The Poet Creek Express - Foamie Hybrid

Canvas covered foamies (Thrifty Alternatives...)

Moderator: eaglesdare

Re: The Poet Creek Express - Foamie Hybrid

Postby KCStudly » Sat Jul 18, 2015 4:31 pm

He started out in Vermont, got a degree in geology, started in oil exploration on the north shore of Alaska, moved to Denver (somewhere in there he met her, also in oil). Then kids, then Europe, now Rio, where she is from.

My mother's sister now lives here and they have just spent a week together in a rental out on Cape Cod, so we will get to have a visit before they head home.

Pretty cool really when you think about it.

I got the chinking done between the walls and front/roof, but we're running off on a date, so that will have to wait 'til later.
KC
My Build: The Poet Creek Express Hybrid Foamie

Poet Creek Or Bust
Engineering the TLAR way - "That Looks About Right"
TnTTT ORIGINAL 200A LANTERN CLUB = "The 200A Gang"
Green Lantern Corpsmen
User avatar
KCStudly
Donating Member
 
Posts: 9640
Images: 8169
Joined: Mon Feb 06, 2012 10:18 pm
Location: Southeastern CT, USA

Re: The Poet Creek Express - Foamie Hybrid

Postby KCStudly » Sun Jul 19, 2015 1:40 am

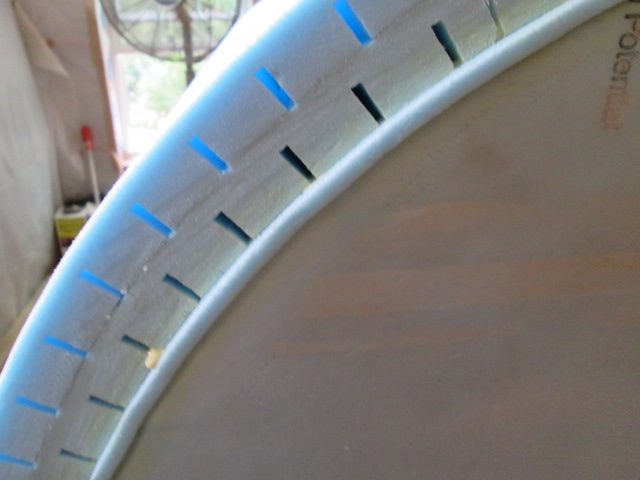
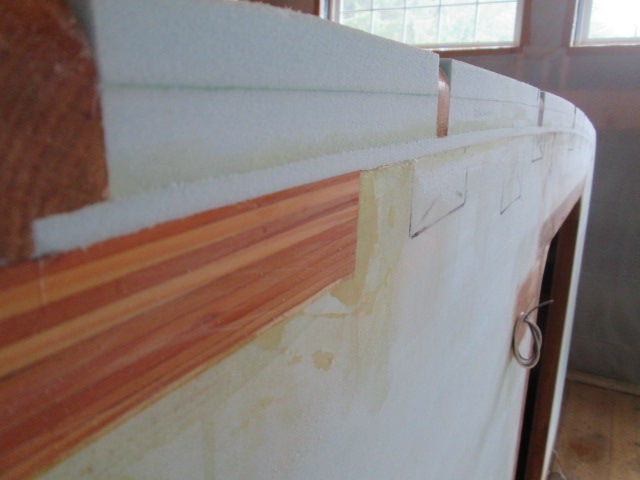
So I spent about 4 hrs today cutting and gluing the chinking into the gap I left between the edge of the roof foam and the top of the wall foam. This is the area where I held the ceiling ply back from the face of the wall intentionally so that the edge of the ply would be buried and less likely to ever be subjected to leaks.

I wanted to have a little extra foam sticking out to be able to sand back flush and a little extra thickness so that the insert would have to compress a little going in for a snug fit. That meant I needed strips of foam that were about 1/2 inch wide x a scant 1/4 inch thick. I ripped the 1/2 inch cut from 3/4 inch foam about 6 ft long. I ended up ripping quite a few more blanks than I needed, but it was a scrap piece anyway, so no big deal.
Image

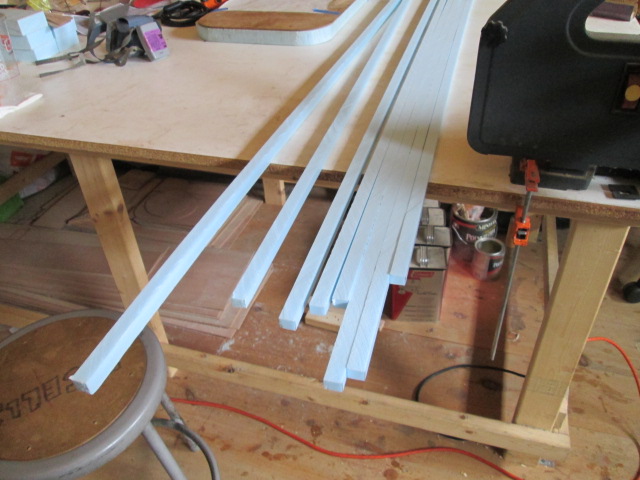
As the foam gets thinner it becomes much less stable in the saw. It’s not like wood with long grain, so it gets floppy pretty quick. Not good for pushing and questionable for feather boards. Also, I never did make a zero clearance insert for the table saw. So it looked like the best tool for the job would be the smaller table top bandsaw with the fine little blade.
Image

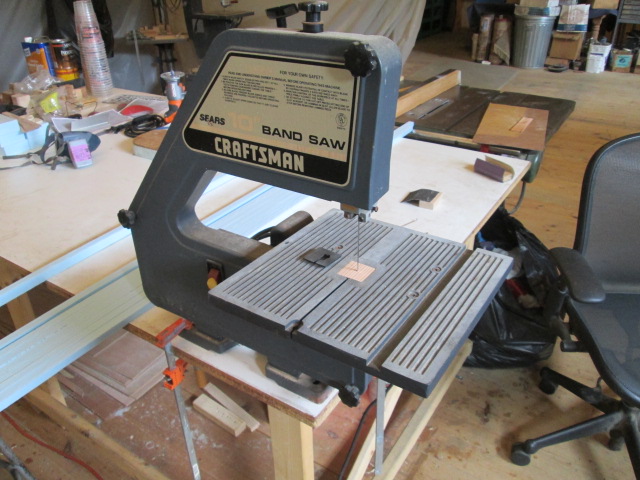
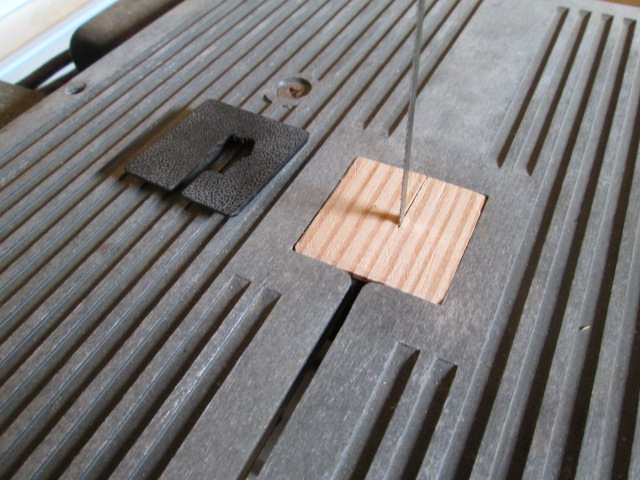
First I had to make a zero clearance insert for it.
Image

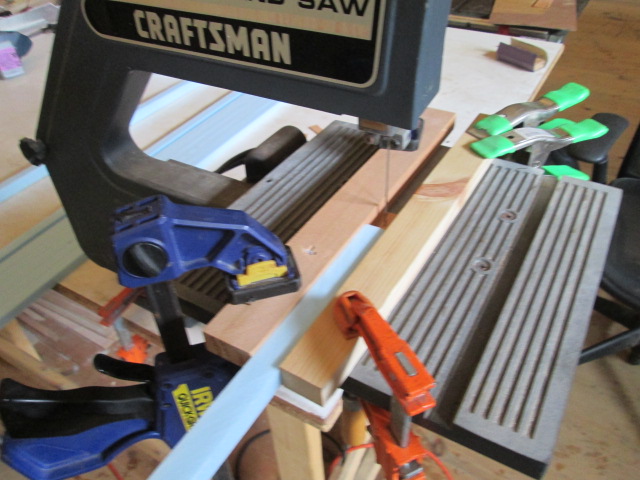
Then I clamped on some scraps to act like a rip fence tunnel. This worked surprisingly well, allowing me to push the foam thru as fast as I could and pull it thru from the far side.
Image

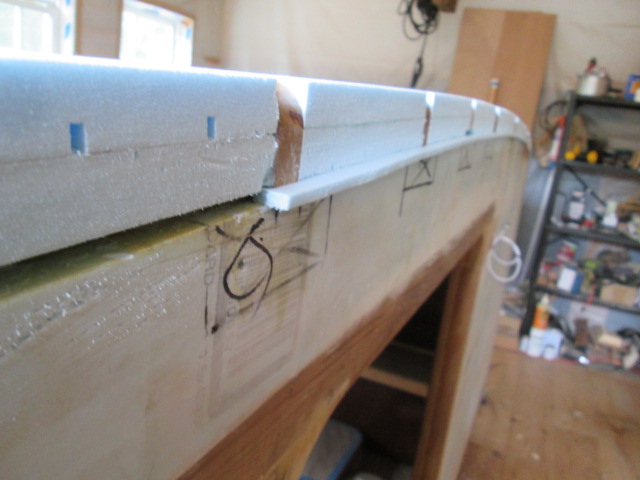
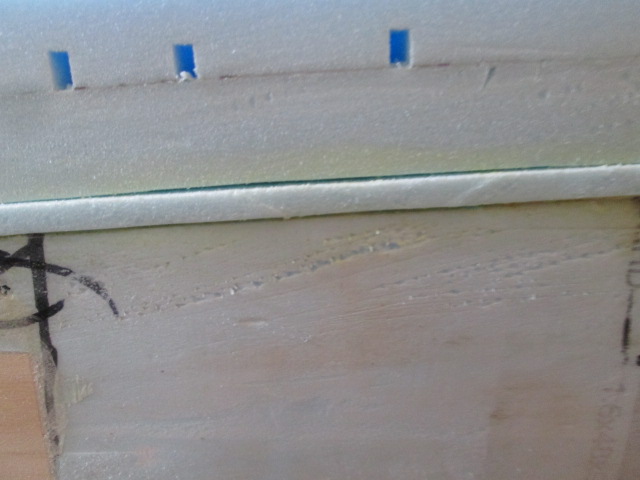
Test fitting the spline I made a small adjustment to the thickness and ripped a few more strips. Here I have only put the spline in part way to judge dry fit.
Image
Image

Despite having sealed the edge of the ply with the mix, I wanted to give it as much protection as I could so I painted a good thick coat of TB2 in the slot using a chip brush. Once I was sure that it was well coated I unloaded the brush and ran it back thru the slot again to make sure that it wasn’t too wet (wanted to make sure it dries in this foam to foam app). Then I stuffed the spline in, mostly just pushing it with my fingers, but in some of the tighter spots I used a piece of wood covered with packing tape and tapped it in with a small mallet.
Image
Image

I did have a couple of areas where it wasn’t as tight as I would have liked, but I wasn’t too worried about it with the steps to come.
Image

For the curb side I made sure to cull the slightly thicker pieces from my initial cuts, after finding that the glue added a lubricating property and made it easier to get the tighter fitting stock to press in. By the time I was done with that, and filling the extra areas where the ceiling butt joint backers were, the street side was just gummy enough to start sanding. I figured that the sanding dust would combine with the still wet glue and act like a filler.

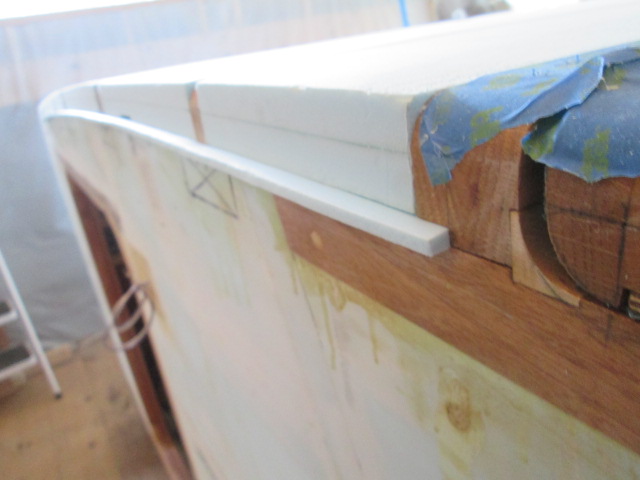
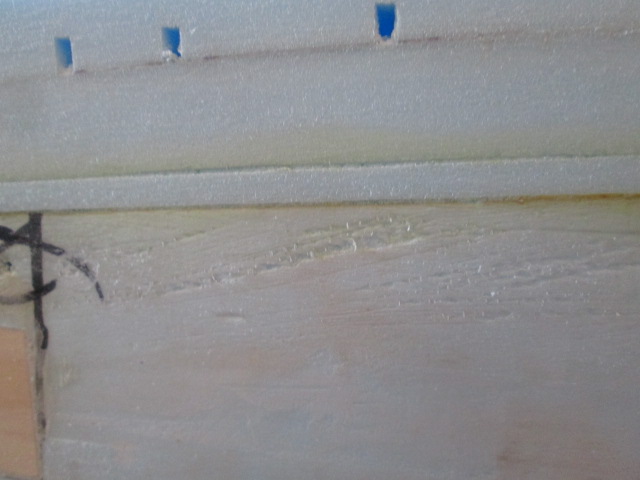
Here is the curb side after sanding.
Image
Image
Image

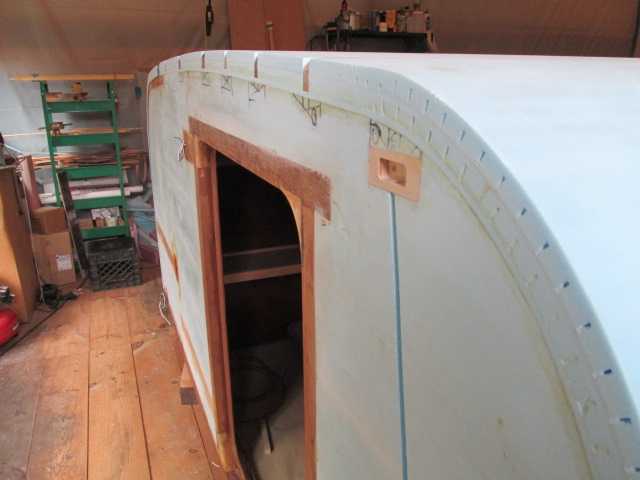
And on the street side the foam dust did a good job of filling.
Image

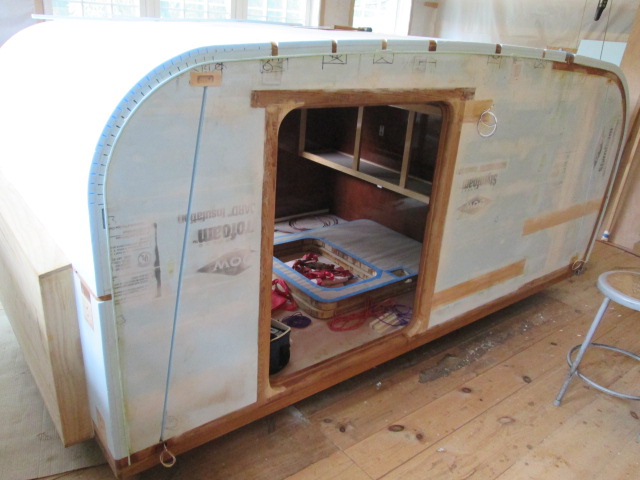
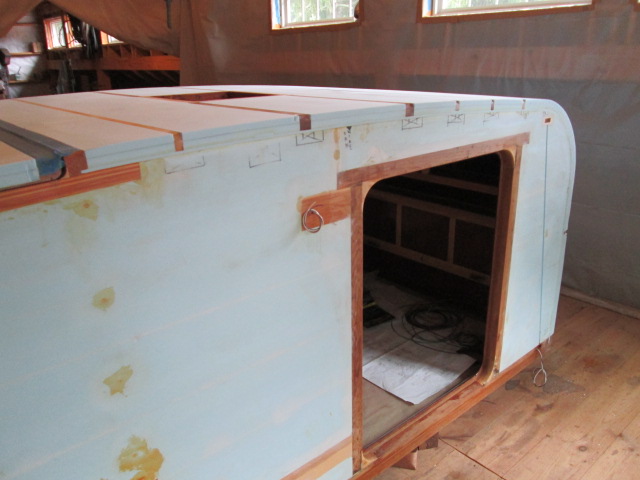
It was just one day of work… a half day, really… but it seems like a big visual milestone to get the gaps filled. I’m happy with how this came out.
KC
My Build: The Poet Creek Express Hybrid Foamie

Poet Creek Or Bust
Engineering the TLAR way - "That Looks About Right"
TnTTT ORIGINAL 200A LANTERN CLUB = "The 200A Gang"
Green Lantern Corpsmen
User avatar
KCStudly
Donating Member
 
Posts: 9640
Images: 8169
Joined: Mon Feb 06, 2012 10:18 pm
Location: Southeastern CT, USA

Re: The Poet Creek Express - Foamie Hybrid

Postby dales133 » Sun Jul 19, 2015 2:33 am

Looks like a productive day.
I did a spot of foam sanding myself...not the nicest job is it!
Looking good as usual mate
User avatar
dales133
4000 Club
4000 Club
 
Posts: 4605
Images: 1
Joined: Mon Oct 13, 2014 5:26 pm
Top

Re: The Poet Creek Express - Foamie Hybrid

Postby Wolffarmer » Sun Jul 19, 2015 7:05 am

I drove out in the desert yesterday to check out things for the 2016 trip. :D

Looking there KC
"these guys must be afraid of the dark"
User avatar
Wolffarmer
Donating Member
 
Posts: 4612
Images: 309
Joined: Wed May 02, 2007 1:32 pm
Location: Idaho Rupert
Top

Re: The Poet Creek Express - Foamie Hybrid

Postby KCStudly » Sun Jul 19, 2015 9:30 am

Thanks guys.

Today I think I might attack that gotcha from the jack incident. I sanded it a little yesterday but it was clear that the shingled nature of the damage will not fill easily and will remain unstable, so I think I need to commit to a dutchman repair (routing out a pocket and gluing a new piece of foam in).
Last edited by KCStudly on Fri Jul 24, 2015 4:04 pm, edited 1 time in total.
KC
My Build: The Poet Creek Express Hybrid Foamie

Poet Creek Or Bust
Engineering the TLAR way - "That Looks About Right"
TnTTT ORIGINAL 200A LANTERN CLUB = "The 200A Gang"
Green Lantern Corpsmen
User avatar
KCStudly
Donating Member
 
Posts: 9640
Images: 8169
Joined: Mon Feb 06, 2012 10:18 pm
Location: Southeastern CT, USA
Top

Re: The Poet Creek Express - Foamie Hybrid

Postby KCStudly » Mon Jul 20, 2015 11:00 pm

Sunday was time to fix that damage on the curb side wall from when the cabin dropped off of, then into the jack. The area to be replaced was about 3 x 3 inches. I went digging thru all of my router templates to find the one I had used for all of the 3-1/2 inch square blocks that got set into the walls, but it was a little bigger than needed and had a couple of donkey tracks in it from being whacked by the cutter (usually when plunging in to start or when lifting the router out before coasting down). So I went ahead and made a fresh 3x3 template. The pencil line extending out to the edge of the template helped me line it up with the bottom of the fender blocking.
Image
Image

Strapped the vacuum hose onto the router with blue tape; really helped keep the dust from flying, but I still wore the respirator.
Image

Made the cut. It is easier to trim the rounded corners square than it is to round the corners of the plug to match. Started in the lower left.
Image

And a closer look at the lower right corner after trimming it square.
Image

I thought I had set the router depth at about 5/8 inch leaving plenty to sand back fair, but when I buttered the plug up with GS and stuffed it in it was nearly flush.
Image

Skipping ahead a little, once it had cured enough I sanded it back even with the wall.
Image

I will need to add a little more to the splintered area of the wood, but it is way better than what it was.

While I had the GS out and flowing, I knocked some more down and spread it around the gaps at the license plate mount. I’ll sand this back next time.
Image

I used the Minwax brand wood filler to fill the screw holes from the router template and went around the wall sills filling various other screw holes from the miscellaneous fixturing that I have done. The yellow finger smudge looking thing has a filled screw hole under it. Stuff dries quick and sands back even quicker (which I did after this reminder pic).
Image

In order to finish fairing the roof foam near the hatch hinge and at the top of the hatch, and to do the initial canvasing on the hatch, I will need to remove the hatch hinge to get it out of the way. The screw holes for the large deck screws I used to hold the hatch side hinge spar in place during hatch construction are still there, but they are under the hinge. So I pulled the masking tape off, extended some of my pencil lines as registration marks, and stuffed the little oak shims back in, all to make sure I can keep the hatch lined up after the hinge comes off.
Image

Before the foam went on I could clamp the two spars together with a shim spacer in between. If I have to draw them back together after removing the hinge I will have to screw some clamp blocks on top of the spars using the hinge screw holes.

And that’s where I got. Today it was hot and I was almost falling asleep during my wind down period after punching out for the day, so I stayed in the AC of my office looking at woodworking videos before heading home.
KC
My Build: The Poet Creek Express Hybrid Foamie

Poet Creek Or Bust
Engineering the TLAR way - "That Looks About Right"
TnTTT ORIGINAL 200A LANTERN CLUB = "The 200A Gang"
Green Lantern Corpsmen
User avatar
KCStudly
Donating Member
 
Posts: 9640
Images: 8169
Joined: Mon Feb 06, 2012 10:18 pm
Location: Southeastern CT, USA
Top

Re: The Poet Creek Express - Foamie Hybrid

Postby dales133 » Tue Jul 21, 2015 6:44 am

Looks great mate that's a lovely looking joint between the hatch and hatch spar.
Re our conversation I took the spotted gum to a stair maker down the road to get thicknesses and decided to get them to mitre it and cut 8x20mm slots in the ends and machine a tennon to fit for extra strength for the but joint.. 40 bucks so I'm happy.
Even better I got home after work and and tracy said I've got a surprise for you. Around the corner walks my mum from NZ!
HAPPY DAYS. Got her for a whole week
User avatar
dales133
4000 Club
4000 Club
 
Posts: 4605
Images: 1
Joined: Mon Oct 13, 2014 5:26 pm
Top

Re: The Poet Creek Express - Foamie Hybrid

Postby KCStudly » Tue Jul 21, 2015 7:34 am

Ooh, mum's bickies! I envy you that. My NZ mum would make simple shortbread biscuits (cookies to us Yanks) fresh almost every day for our after work/school cuppa tea. Like a fresh hot Lorna Doone, except a little bigger, much more tender and with more buttery goodness. I loved those short bread bickies. :D
KC
My Build: The Poet Creek Express Hybrid Foamie

Poet Creek Or Bust
Engineering the TLAR way - "That Looks About Right"
TnTTT ORIGINAL 200A LANTERN CLUB = "The 200A Gang"
Green Lantern Corpsmen
User avatar
KCStudly
Donating Member
 
Posts: 9640
Images: 8169
Joined: Mon Feb 06, 2012 10:18 pm
Location: Southeastern CT, USA
Top

Re: The Poet Creek Express - Foamie Hybrid

Postby dales133 » Tue Jul 21, 2015 10:28 am

Short breads good stuff
User avatar
dales133
4000 Club
4000 Club
 
Posts: 4605
Images: 1
Joined: Mon Oct 13, 2014 5:26 pm
Top

Re: The Poet Creek Express - Foamie Hybrid

Postby GPW » Wed Jul 22, 2015 8:04 am

KC , your post brings up some questions ... Traditionally down south we’re not much cookie or candy eaters ... On my many visits up north , I ate more sweets than ever in my life ... even seeing candy stores along the road ... after every meal , here comes somebody with cookies or candy ... It was amazing ... What a treat .... but I’d always return home several pounds heavier ... :roll:
So , do you think that comes from the British / Germanic countries that settled mostly up there , bringing the sweet tradition from the old world ??? :thinking:

Note: People here are likely the Fattest , but not from sweets .... just from eating a LOT of everything else ... :duh:
There’s no place like Foam !
User avatar
GPW
Gold Donating Member
 
Posts: 14920
Images: 546
Joined: Thu Feb 09, 2006 7:58 pm
Location: New Orleans
Top

Re: The Poet Creek Express - Foamie Hybrid

Postby KCStudly » Wed Jul 22, 2015 8:53 am

Dunno, maybe just good old American marketing and enterprise.

I think the obesity issue in America is at least in part due to the government subsidizing corn products and the subsequent inclusion of corn syrup in just about every commercial thing we consume.

That and the "instant gratification" mentality that seems to be a result of the same business greed (more, faster, raise prices give less), that fills fast food options with empty calories and other dinning options with huge portion sizes (the more food plated the more we can charge each customer, and the less change overs needed to reap the profit... not to mention that the customer wants to perceive good value for the cost).

Not a political statement at all, just observations and speculation.
Last edited by KCStudly on Wed Jul 22, 2015 7:14 pm, edited 1 time in total.
KC
My Build: The Poet Creek Express Hybrid Foamie

Poet Creek Or Bust
Engineering the TLAR way - "That Looks About Right"
TnTTT ORIGINAL 200A LANTERN CLUB = "The 200A Gang"
Green Lantern Corpsmen
User avatar
KCStudly
Donating Member
 
Posts: 9640
Images: 8169
Joined: Mon Feb 06, 2012 10:18 pm
Location: Southeastern CT, USA
Top

Re: The Poet Creek Express - Foamie Hybrid

Postby GPW » Wed Jul 22, 2015 2:55 pm

Well stated !!! :thumbsup:
There’s no place like Foam !
User avatar
GPW
Gold Donating Member
 
Posts: 14920
Images: 546
Joined: Thu Feb 09, 2006 7:58 pm
Location: New Orleans
Top

Re: The Poet Creek Express - Foamie Hybrid

Postby Fred Trout » Wed Jul 22, 2015 4:02 pm

All that plus the boob tube. People are much less active when they become hive dwellers compared to us country bumpkin outdoors types.

Plus we have bugs siphoning our bodily essences :D

Image
User avatar
Fred Trout
The 300 Club
 
Posts: 396
Joined: Fri May 08, 2015 4:30 pm
Location: SW Montana
Top

Re: The Poet Creek Express - Foamie Hybrid

Postby dales133 » Wed Jul 22, 2015 5:57 pm

Eating crap devoid of any nutritional value unfortionatly rampant world wide, well in the west anyway (although Asia's fast catching up)
I agree with KC alot of it comes down to large companies concerned only with profit margins at the expense of nutrition.
I've had a few friends visit America and are absolutely flabbergasted at the portion sizes in restaurants there
User avatar
dales133
4000 Club
4000 Club
 
Posts: 4605
Images: 1
Joined: Mon Oct 13, 2014 5:26 pm
Top

Re: The Poet Creek Express - Foamie Hybrid

Postby KCStudly » Fri Jul 24, 2015 4:22 pm

Let’s get caught up a little. On Wednesday I pulled the hatch hinge off to be able to fair that area of the roof and hatch. Here is the joint after removing the hinge and sinking the large deck screws thru the hatch spar into the wall edge on either side.
Image

You can see that the hatch moved off of its mark about 1/8 of an inch on the curb side and 1/16 on the street side. I think this may just be slumping, as in the hatch may not have been fully supported by the tension in the draw latches. We’ll see later if it gives me a hard time bringing the gap back together when it’s time to put the hinge back on.
Image
Image

The long board (… and respirator) is you friend. Just keep saying that, “the long board is your friend”. The weather was hot and humid, so I just kept saying that. Here’s another shot of the cabin keeled over so that I could reach the center. I tipped it both ways to be sure that I was getting all of it fairly evenly. I’m getting pretty good at this now with no further incidents.
Image

Here is a look along the spar lines after knocking it down. It wasn’t as easy as just running the long board over and using the spars as a guide. No, because I cut the rabbets for the ceiling and hatch inner skins a little deep and the spars wanted to roll toward the skins when screwed and glued down, there is actually a low area to the front and rear, worse at the front. You can just see where the tops of the spars started to get scuffed away near the gap before I had to change tactics and sand up to the spars from either side.
Image

A thin spline helps see it better.
Image

This really won’t matter as there will be a gutter there anyway where the roof slopes down and meets the raised height of the hinge, rubber cover strip and trim. That hinge assembly will also break up the visual line of the profile so this shouldn’t stand out at all. I didn’t want to try and sand the spar flat because the hinge has already been fit to it this way.

I was a little worried that the upper portion of the hatch was looking kind of flat compared to the gentle arc of the roof top. Where the edges of the hatch ply are winged up slightly it gave me a little extra foam to work with and is looking better now. Still looks kind of flat in the pic here, but not so bad in person.
Image

Looking along the profile edge I don’t see anything alarming on the street side.
Image

If you sight down the curb side wall it has a dip into the roof line just ahead of the first spar seen here. You can’t see it in the pic and I'm not sure if it is worth doing anything about either, but at least the profile rolling into the hatch looks fine.
Image

In the middle it’s a different story. You can see the shiny “bald spot” where the curve of the long board never touched off. Not sure if I want to try and fill this whole area or just let it be.
Image

The front has a similar bald spot, but smaller, and the darker (middle) of the front three spars is low in the middle so will need to be filled to bring it up to the foam.
Image

Maybe I’ll do that first and see how it goes, then decide if I want to do the hatch, too.

Last night, Thursday, I spent a couple of hours finessing the GS crack filler around the license plate mount. The masking tape pulled a little chunk out of the edge at the top and along the bottom, and I made a couple of boo-boos over sanding the edge radius in a couple of spots, but it looks better than before. A little spackle and another round of sanding and it should be ready to jamb out with bed sheet material.
Image

Unfortunately I have to go into work tomorrow for at least a half day. On the plus side, I picked up the extra wire I need to run from the side marker lights up to the side clearance lights. Getting that done will allow me to get the wire ways filled back in. Another thing I will need to tackle is filling the ends of the roof foam kerfs and rounding the profile edge over. Then there will be a bunch of spackle work leading up to canvas. So I am making slow but steady progress prepping for the day that I can start laying canvas.
KC
My Build: The Poet Creek Express Hybrid Foamie

Poet Creek Or Bust
Engineering the TLAR way - "That Looks About Right"
TnTTT ORIGINAL 200A LANTERN CLUB = "The 200A Gang"
Green Lantern Corpsmen
User avatar
KCStudly
Donating Member
 
Posts: 9640
Images: 8169
Joined: Mon Feb 06, 2012 10:18 pm
Location: Southeastern CT, USA
Top

PreviousNext

Return to Foamies

Who is online

Users browsing this forum: No registered users and 13 guests