The Poet Creek Express - Foamie Hybrid

Canvas covered foamies (Thrifty Alternatives...)

Moderator: eaglesdare

Re: The Poet Creek Express - Foamie Hybrid

Postby Wobbly Wheels » Sat Jul 07, 2012 12:00 am

Lookin' good KC :thumbsup:

Heads up on the hinges:
Lamp is good stuff, but (as I'm sure you know) 18-8 is normally kitchen-sink grade. Not a problem unless you're near salt water but keep an eye on the pins because that's where they'll 'cheap out' if they're going to: even if the plates are 18-8, the pins might still start to rust. 304 or 316 hinges would give you stainless pins as well. (Lamp makes 'em, so does Perko)

Knowing how you work, I assume you've already checked, making my post irrelevant, lol.
Not posting much but always following....
User avatar
Wobbly Wheels
Donating Member
 
Posts: 1080
Joined: Tue Mar 15, 2011 9:51 am

Re: The Poet Creek Express - Foamie Hybrid

Postby KCStudly » Sat Jul 07, 2012 7:37 am

Here's some more info on the hinges excerpted from McMaster-Carr:

Mortise-Mount Lift-Off Hinges
Non-template Reversible

Mount these hinges into recessed cutouts (mortises) in your door's edge and frame for a neat, flush-mounted appearance. Ideal when there is minimal clearance between the door and the frame. The pin is permanently attached to the frame leaf and mates into the door leaf, allowing you to quickly lift your door off the hinge without removing the pin. The leaves and the pin are made of the same material. Holes are countersunk prior to plating to provide complete coverage for better corrosion resistance. Furnished with mounting screws.

Non-template—The hole pattern differs among manufacturers. From the folded position, the range of motion is 270°. Hinges are reversible for right- and left-hand doors.

Note: Maximum door weight based on three hinges per door, 50-100 daily openings, with a maximum door size of 7 ft Ht.×3 ft. Wd.×1 3/4" Thick., unless noted.

Type 304
Stainless Steel
with Dull Finish
Leaf Ht. Open
Wd. Leaf / Thick / Pin Dia. / Screw Size / No. of Holes / Load Cap., lbs. / Handing
*Load capacity is based on two hinges per door.
2 31/64" 3 35/64" 0.118" 45/64" #6 8 110 Reversible

PN12575A74 $22.66 ea
Load-Rated 304 Stainless Steel Lift-Off Hinge 110# Cap, Reversible, Mortise Mnt, W/Holes, 2-1/2" H


They say the range of motion is 270 deg, however, that is based on their assumption about your door. The hinges swivel 360 deg with no stop or interference.

I plan on surface mounting them to the jamb, or using small hardwood spacers so the combined thickness of the leaf and spacers matches my door gap. If I could figure out a way to stretch my precut door frame xmbrs, I would let the thickness of the hinge set the hinge side door gap and have my planned 1/4 inch gap on the other three sides. Alas, I had preplanned for 1/4 inch gap all the way around (...it's a prototype, #1 of 1 :thinking: :roll: ).

According to the above spec they are 100% 304SS, although I suspect that the ball bearing in the tip of the pin might by 17-4PH (harder SS, but subject to rust). I will keep an eye on that and lube with light 3-1 oil or Kesters if required.

I have had a bunch of rusting with 304SS in contact with saltwater spray/splash on some parts I made for my boat. If I were to do those over it would be in 316SS or at least coat with clear. I'm sure Dave Z. (the guy who helped with the swivel coupling machine work) would be happy to powder coat them clear for me, maybe for a small token.
KC
My Build: The Poet Creek Express Hybrid Foamie

Poet Creek Or Bust
Engineering the TLAR way - "That Looks About Right"
TnTTT ORIGINAL 200A LANTERN CLUB = "The 200A Gang"
Green Lantern Corpsmen
User avatar
KCStudly
Donating Member
 
Posts: 9640
Images: 8169
Joined: Mon Feb 06, 2012 10:18 pm
Location: Southeastern CT, USA

Re: The Poet Creek Express - Foamie Hybrid

Postby KCStudly » Sat Jul 07, 2012 7:59 am

Here's a link to a thread on "Construction Tips" where I asked for info to help pick my door latch hardware.

http://www.tnttt.com/viewtopic.php?f=21&t=51242
KC
My Build: The Poet Creek Express Hybrid Foamie

Poet Creek Or Bust
Engineering the TLAR way - "That Looks About Right"
TnTTT ORIGINAL 200A LANTERN CLUB = "The 200A Gang"
Green Lantern Corpsmen
User avatar
KCStudly
Donating Member
 
Posts: 9640
Images: 8169
Joined: Mon Feb 06, 2012 10:18 pm
Location: Southeastern CT, USA
Top

Re: The Poet Creek Express - Foamie Hybrid

Postby KCStudly » Sat Jul 07, 2012 7:34 pm

Kind of took it easy today; only 5 hrs on the build.

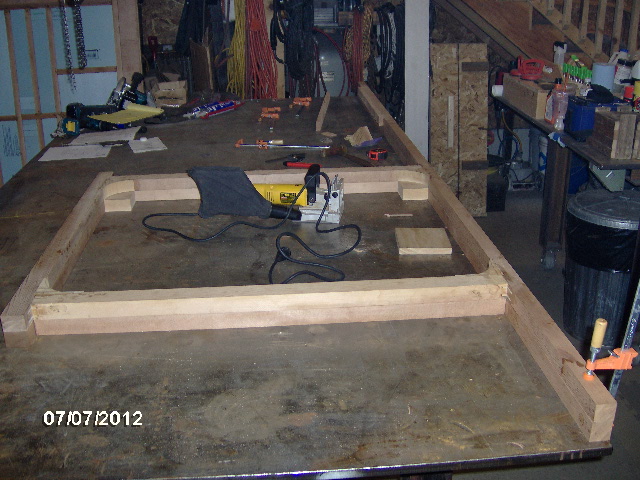
Started by fitting the corner blocks for the door surrounds in the second wall. The blocks didn't come out all exactly the same so I took care to chisel out the dado's just a whisker here and there. I also made sure to take from the inboard side so as not to affect the squareness of the opening.
Image
Image

So here comes another confession. I thought I had made the first door surround nice and square, but later realized that I had measured the diagonals from the top ends of the header, which extend past the actual opening...it was easier by myself to just hook the tape over the top corner to measure. Problem was that I had not checked to see that the header ran past the door opening by the same amount at each end, and it didn't. The opening ended up about 1/8 inch out from bottom to top. I will build the door to fit the surround and no one will ever notice. It will be our little secret.

So on this wall I also trimmed the door header so that the distance from the corner block dado to the end of the header was exactly the same at each end.

After making some fine adjustments to the rabbets in the jambs (so that they all snuggled up to the corner blocks well), and dry fitting the rest of the door surround, I decided to lay the first wall on top to double check that the location of the galley under counter drawer glide blocking (which will also set the location of the bulkhead blocking) was identical. After moving the cardboard from in front of the standing parts (to protect against shop grinder and welding splatter, and incidental bumping), pulling the first wall frame down, flipping it, and locating it on top...
Image
...I found that I had already made a pencil line on the second wall sill when I had laid them out together. Doh! Good photo op, though.

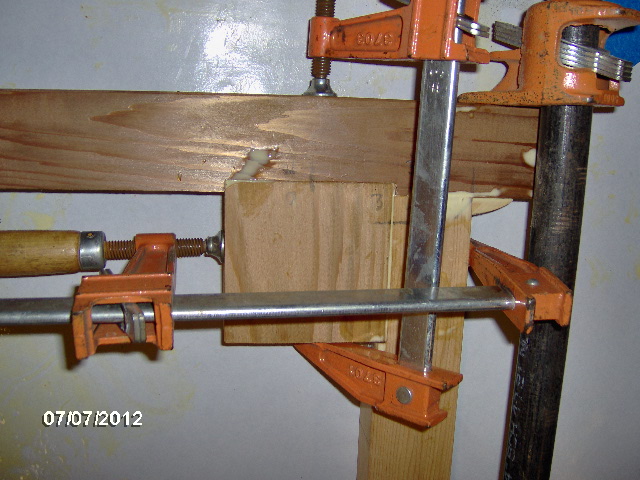
Then I broke out the biscuit slot cutter/jointer and started cutting slots, as before. Cut down the corner block to jamb biscuits, as before.

Then came the glue up. First I glued the corner blocks into the header and sill, then I started to glue the jambs into the lower corner blocks and sill. Uh oh. No slots in the sill for the jambs! Quick, quick, what to do? The biscuit cutter was still sitting right there, but it would no longer fit where it needed to go with the corner block in the way. Pull the corner blocks out quickly before the glue takes? That could create more problems and would be a mess. Glue it together and rely on the biscuits between the blocks and sill, and between the blocks and jambs to tie it all together? Sounds okay, but then the blocks are structural (Damn GPW, I'm doomed).

Do something! Glue it...
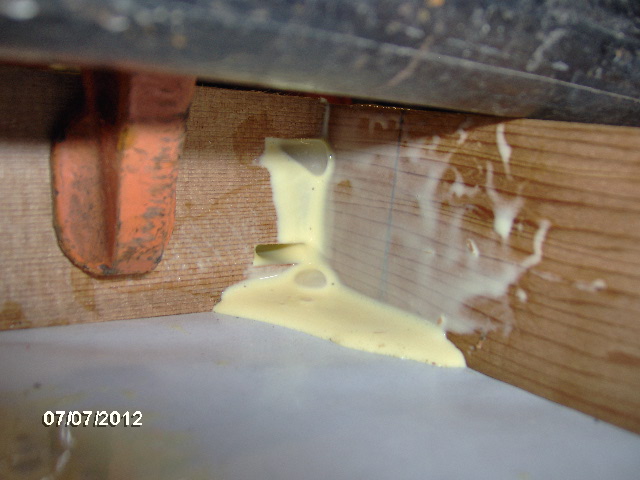
Image
Image

And screw it...
Image
Image
using coated deck screws. The countersinking drill driver was already in the drill, whew.

Followed up with the galley glide blocking and here she is.
Image

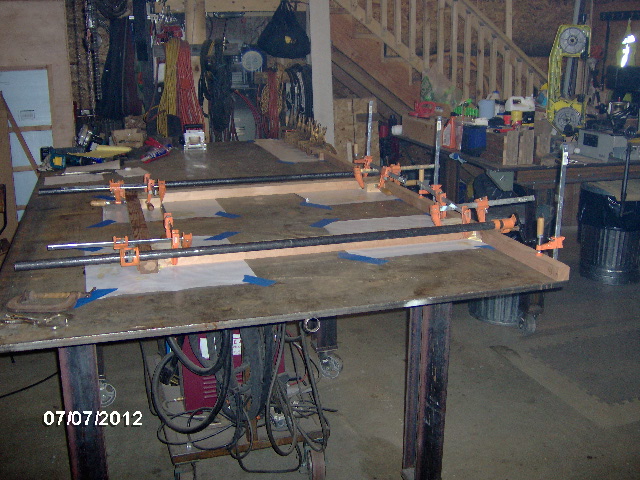
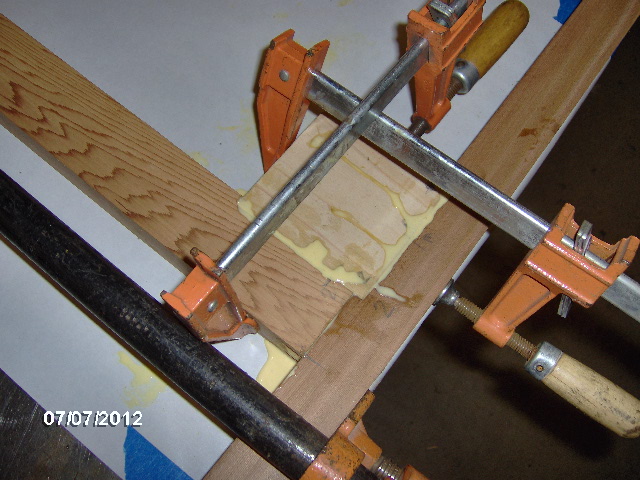
Notice that I used the freezer paper this time and took the time to tape it to the table. That worked out so much better. Didn't have to chase it around, didn't stick to anything and move unexpectedly, and didn't bunch up and pinch into the joint. Win, win. If it solves the discoloration issue with the cedar, then I have got it licked (never know when I might want to use some of that cedar for something that is not getting buried.

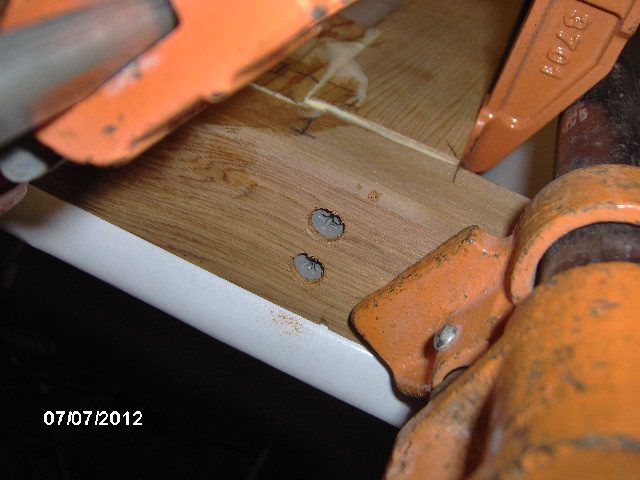
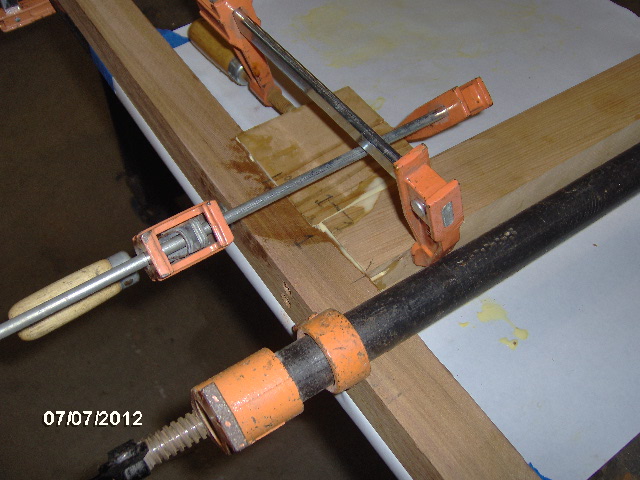
Some more detail shots.
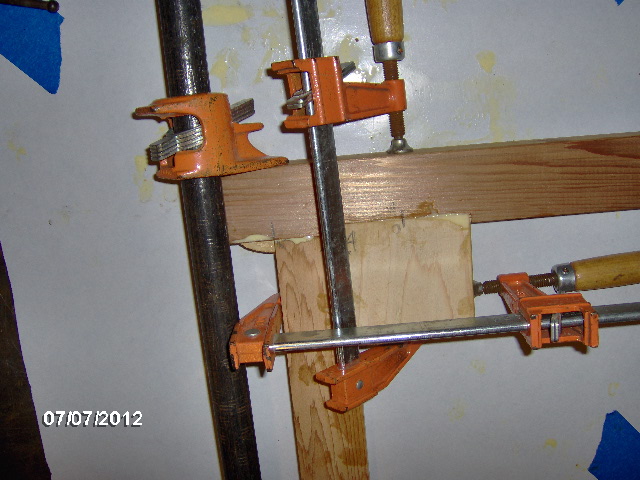
The header to jamb joints.
Image
Image

The jamb to sill joints.
Image
Image

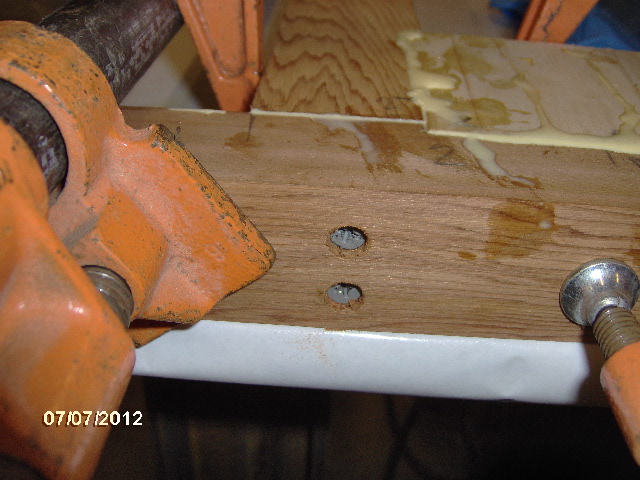
And the under counter glide blocking.
Image
Right now I am only planning to have glides on the curb side where the cooler goes, but it just makes sense to put them in both sides now in case I decide I want to upgrade later.

Before starting the glue up I had thought and Karl had commented that maybe I should work on something else for now and do the glue up later, since it would then be tying up the bench. It was humid, I was in a daze and couldn't really think ahead to well. I knew I wanted to glue up the foam blanks for the walls, and the doors need to be built soon (but need to be fit to the walls so the corner blocks in the wall frames need to be radiused and I'd rather do that with the top bearing bit that I ordered last night). Screw it, just glue it.

Karl and Kris were in the shop welding and grinding on the chip drier project (making noise, dust and smoke), I guess making up for the holiday off, so I had been wearing a dust respirator and hearing protection even after having completed cutting the biscuits slots (...well, almost completed :roll: ).

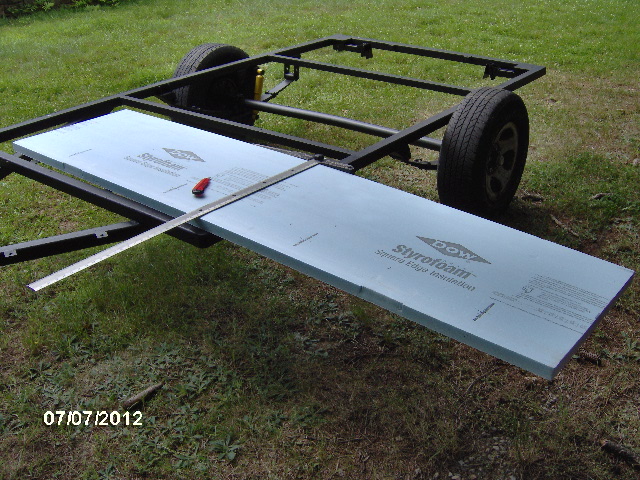
Decided to get some fresh air by using the trailer frame as a bench to cut the piece of 1-1/2 thk x 2x8 ft foam that will extend the larger 4x8 sheets to 4x10.
Image

Then it started to rain a little. When I went back in I was still struggling with what to do next. I know, I know, there are so many things that need doing. The under galley dividers are small and I could prep and glue those on the left over corner of the bench, but I have not dimensioned those yet so I might screw them up (now it occurs to me that the skins would have told me what the dimensions needed to be...).

I ended up clearing off the opposite corner of the bench and finished radiusing the first wall door corner blocks using the multi-step router process using the bottom bearing bit.
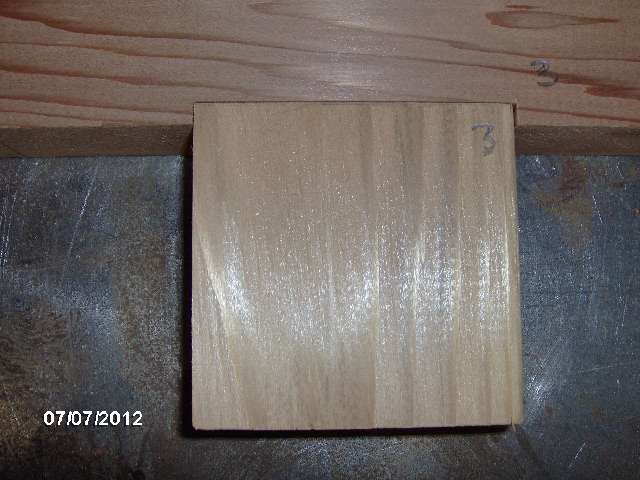
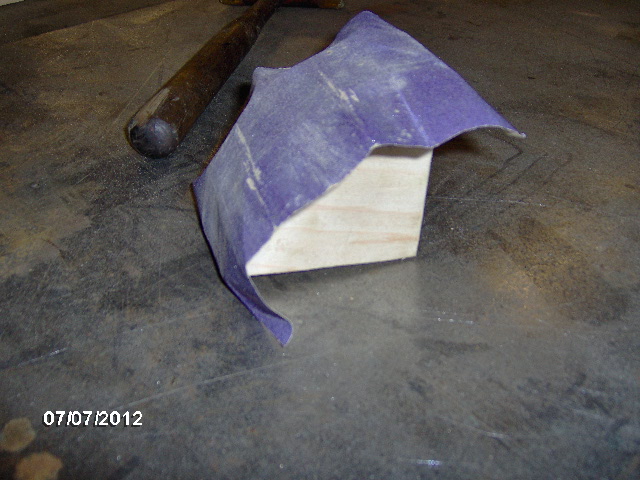
Here are some pics showing the radiused sanding block I mentioned. It was made by stapling sand paper to the drop piece of the corner block that was rough cut off using the jigsaw.
Image
Image
Image

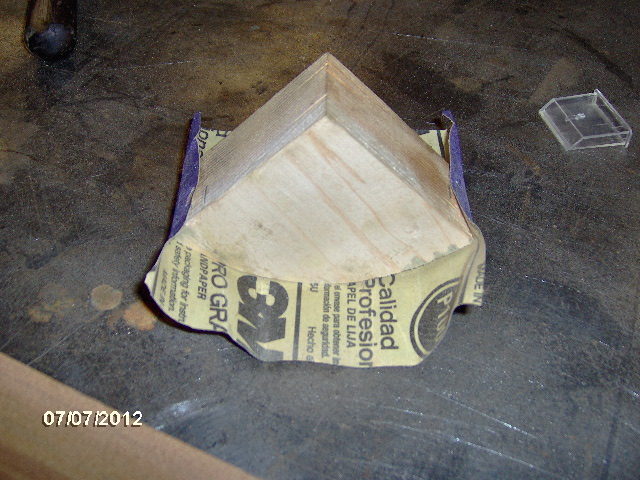
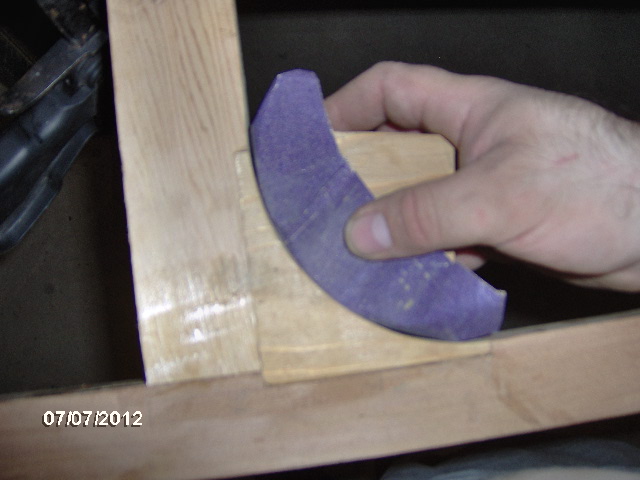
Shortly after those pic's I replaced the sand paper with a narrower strip which made it easier to hold.

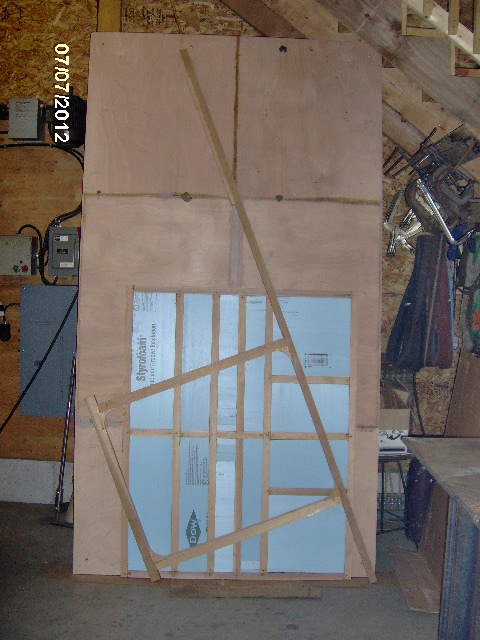
And that pretty much did it for the day. Cleaned up after myself. Here is a parting shot showing the under side of the floor, the unskinned side of the galley bulkhead, and the first wall frame standing against Dave's big band saw at the end of the shop under the stairs.
Image

Tomorrow is another day. On the agenda is unclamping and cleaning up the second wall frame glue up; bonding the wall foam blanks with GG; prepping the door frames for glue up, and maybe even gluing up a door.

Stay tuned.

Oh yeah, Rocky the kitten goes to the vet for his healthy kitten check up and comes home with us on next Saturday. It should be exciting and entertaining all at the same time.
KC
My Build: The Poet Creek Express Hybrid Foamie

Poet Creek Or Bust
Engineering the TLAR way - "That Looks About Right"
TnTTT ORIGINAL 200A LANTERN CLUB = "The 200A Gang"
Green Lantern Corpsmen
User avatar
KCStudly
Donating Member
 
Posts: 9640
Images: 8169
Joined: Mon Feb 06, 2012 10:18 pm
Location: Southeastern CT, USA
Top

Re: The Poet Creek Express - Foamie Hybrid

Postby KCStudly » Mon Jul 09, 2012 12:46 am

Out to Mecca and pulled the second wall frame out of the clamps, scrapped down the glue, hit any uneven edges with the plane, sanded smooth, and flipped up to chisel the biscuits at the door header.
Image
Image
Image

The freezer paper taped to the bench worked much better than the waxed paper. Didn't disintegrate as much, no black staining, didn't pinch into joints and didn't transfer/stick to wood as much.

Rough trimmed the door surround corner blocks.
Image

Put carpet tape on corner template.
Image

Applied the template flush to two sides.
Image
Image

Then ran the router (no pic). Repeat 4x.

Decided to see how well I had done on the door frames, check square.
Image
Image
Image
Front side looks awesome!

Back side...
Image
Image
...out 1/8th inch. Yup, I'm no master carpenter.

This is actually why I decided to use the smaller corner template rather than using the big CNC template for the door openings. The second door surround is also about 1/16th inch shorter than the first, but it has tighter fits between the jambs and blocks in way of the rabbets.

Okay, on to the wall foam. After all, that's what a Foamie is all about, isn't it?

Selected the bottom and front edges based on where any flaws were and optimizing what would get cut off later versus what would stay. Used a piece of slat to set the big and small sheets flush on the bottom then added some tape to hold the joint tight.
Image
Image

Taped the seam to form a hinge. I had seen this technique described here, probably attributed to GPW.
Image

Flipped the piece over and around to the other end of the bench.
Image

Geared up for Gorilla Glue (GG). Pictured are a spritzy water bottle, GG, plastic spatula, and gloved hand.
Image

Ran a bead of GG along the horizontal edge, spread it out evenly using the spatula, spritz water along the whole thing (tried to concentrate on the vertical edge), folded the flap up, slide it back on the table and taped over the seam to secure.
Image
Image
Image

I learned a few things on the first joint. In the previous pic you can kind of see how the 2 ft wide piece of foam was a little thicker than the 4 ft wide. Also the foam is starting to expand and lift the tape. Decided that I needed to add some weight, so I stuck a couple of wood slats onto the tape and piled on a couple of pieces of steel.
Image

The instructions on the bottle of GG said 1-2 hours cure time, but with the heat and humidity we are having I found it to be stable after 1/2 hour. The uneven heights had allowed the GG to expand out under the tape on the top side and the tape didn't peel off very clean. The GG is harder than the blue foam so it is difficult to sand evenly. I started with my coarse hand block but it didn't seem to take much of a bite, so I jumped up to the long board with the 36 grit. Unfortunately the contact adhesive holding the sand paper down had given up some allowing the edges of the sanding belt to curl up, so I ended up with some gouges adjacent to the GG joint before figuring out what had happened. These will see some spackle before we are done. The bottom side of the joint was much more even and had less problems with peeling the tape and glue squeeze out.

While that was setting up I laid the wall frame up on the foam and traced around the outside of the door surround with a sharpie marker. Then I scored the perimeter with the razor knife just inside the line by holding it tight to the wood.
Image
Image
Note the slat in the foreground. Used that to make sure the frame was flush to the front of the foam.

The sharpie didn't really get right into the corner, so it is just a highly visible locator for the score mark.
Image
Image
Image

On the second wall I improved my gluing technique. I sanded the thicker side down to flush using my little sanding block with 100 grit before tapping and put the weights on right away before the expansion had a chance to lift the tape. Had to be careful of the sand paper on the block. The loose edges of the paper wanted to tuck under and tear chunks out of the foam. Be careful to tuck those edges up and keep the loose flap out of play.

Also note how I let the tape run long to keep glue off of the bench.
Image
Image
Image
Image

Half hour later the tape peeled off much better and the joints were much cleaner, requiring less work with just the little sanding block.

Did the wall frame tracing and scoring, including the galley slider block this time, then went back and traced the galley block that I had missed on the first wall.

The pile of parts is getting bigger. Back to front are: the floor, the wall foam blanks, the bulkhead, and the pair of wall frames.
Image

About 6 hours in today and home in time to fall asleep in front of the drags.
Last edited by KCStudly on Sat Apr 13, 2013 3:55 pm, edited 1 time in total.
KC
My Build: The Poet Creek Express Hybrid Foamie

Poet Creek Or Bust
Engineering the TLAR way - "That Looks About Right"
TnTTT ORIGINAL 200A LANTERN CLUB = "The 200A Gang"
Green Lantern Corpsmen
User avatar
KCStudly
Donating Member
 
Posts: 9640
Images: 8169
Joined: Mon Feb 06, 2012 10:18 pm
Location: Southeastern CT, USA
Top

Re: The Poet Creek Express - Foamie Hybrid

Postby RandyG » Mon Jul 09, 2012 2:59 pm

I built a speaker box with GG once, makes a very strong bond on wood. Love that stuff, would buy it in 5 gal. buckets if they sold it that way.
Randy
Aircraft fabricator, novice carpenter, electrical apprentice, audio engineer dropout.
Build thread - http://www.tnttt.com/viewtopic.php?f=50&t=54126
User avatar
RandyG
500 Club
 
Posts: 695
Images: 115
Joined: Thu May 10, 2012 6:52 pm
Top

Re: The Poet Creek Express - Foamie Hybrid

Postby parnold » Mon Jul 09, 2012 3:30 pm

Made me smile to see your door off by 1/8". You are human!!!

Sorry, but your level of attention to detail can be a little bit overwhelming to someone like me. I continue to enjoy following along, especially now that things are taking shape enough to assist in my visualization.

:thumbsup:

Thanks for the quality of your narrative and photos. Your documentation reflects your attention to detail.
User avatar
parnold
Donating Member
 
Posts: 2344
Images: 302
Joined: Mon Feb 08, 2010 4:49 pm
Location: Northwest New Jersey
Top

Re: The Poet Creek Express - Foamie Hybrid

Postby Rosey » Mon Jul 09, 2012 4:44 pm

Glad to see you keep making progress! I aim to only be 1/8th off :D
User avatar
Rosey
Teardrop Master
 
Posts: 116
Images: 66
Joined: Sat Jun 12, 2010 4:48 pm
Location: New Orleans
Top

Re: The Poet Creek Express - Foamie Hybrid

Postby GPW » Mon Jul 09, 2012 5:16 pm

Now we all know that 1/8” off is totally unacceptable for this build , so KC you’re gonna' have to start all over and make it right this time .... :o :lol: :lol: :lol: :lol: :lol: :lol:
There’s no place like Foam !
User avatar
GPW
Gold Donating Member
 
Posts: 14920
Images: 546
Joined: Thu Feb 09, 2006 7:58 pm
Location: New Orleans
Top

Re: The Poet Creek Express - Foamie Hybrid

Postby bonnie » Mon Jul 09, 2012 8:12 pm

GPW wrote:Now we all know that 1/8” off is totally unacceptable for this build , so KC you’re gonna' have to start all over and make it right this time .... :o :lol: :lol: :lol: :lol: :lol: :lol:


You made me laugh out loud
Remember, the turtle won. :)
User avatar
bonnie
Donating Member
 
Posts: 1390
Images: 107
Joined: Sun Jul 24, 2011 4:14 pm
Location: Roxana, IL
Top

Re: The Poet Creek Express - Foamie Hybrid

Postby linuxmanxxx » Mon Jul 09, 2012 8:45 pm

I'm usually about an 1/8" off on my sideburns at any time.
User avatar
linuxmanxxx
500 Club
 
Posts: 802
Images: 10
Joined: Fri Sep 10, 2010 1:50 am
Location: Abilene TX
Top

Re: The Poet Creek Express - Foamie Hybrid

Postby KCStudly » Mon Jul 09, 2012 10:11 pm

In order to achieve perfection one must first try.

I don't really expect to achieve perfection, but I do like to try... and if I can improve and do better the next time so much the better. But if something is close enough, or can be fixed, I won't redo it just to make it "perfect". There isn't an unlimited budget for time and materials, so we have to pick our battles.

What I am finding is that I seem to be breaking new ground, for me at least, in many techniques and materials, and that for each new thing that I try there is a learning curve. Like the panels for the floor. The first attempt at scarfing didn't go well, so I changed how I did that operation. Had to do more work using additional materials and techniques to fix the problem, but I didn't throw it away because it wasn't perfect. Same for the foam in the bulkhead. First couple of panels had a gap here or there, but by the time I was done they were nice and tight; didn't throw the first ones out or go back and redo them (although I might squirt a little Great Stuff spray foam in there before I'm done).

I'm proud when I get it right, and, sure, I share that pride, but I'm also trying to be fair and showing the reality of this build. It is not perfect, and I am not going to hide any of the "oops". That would not be fair to the next guy who thinks he might want to build a camper. We learn from our mistakes and how can I share what I have learned if I don't show the mistakes?

So I am happy to take the ribbing. Heck, you all built me up to be something great, while I warned you that I am just another guy building a camper. Guess that makes me right... again. :rofl: :laughter: :chicken: ;) (That was a joke. You know, I thought I was wrong once...)

Thank you all. It is reassuring that you are all following along. I know I can go overboard with details and info, but so long as a few of you think it is informative, or at least entertaining, then I'm up for it.

I can tell you that my motivation is waning a bit. I've put in so much time and effort, and it doesn't seem as though I am even half way there. I have purposely not tried to estimate how long things will take or whether I will make my deadline... it's not looking good, and I suppose that is a little depressing.

I think part of that relates to having the completed model and that gives me the ability to work on sub assemblies. That in turn gives me the option of not jumping to the "box" stage, keeping the build area open and flexible for Karl's work.

All of the next major operations are new adventures for me and there is at least some trepidation. I'm sort of in no man's land where I am having to start thinking further ahead on the build sequence. And now I'm rambling. :frightened:

Tonight I spent a great deal of time laying out the door frame corner blocks and cutting them out, including the rough outside radii. Karl suggested that I just cut the first one and use it for a template for the rest of them, but tracing with a carpenter's pencil isn't a very good way to make parts the same. I suppose I could have brought the layout home and used the band saw, but ended up using a combination of the jig saw for the curved bits, and the miter saw for the angled bits. Downstairs where it was relatively cooler to clamp to the bench and jig saw, then up stairs where it was hotter to cut the part off and nip the corners in the miter saw. Downstairs, upstairs, downstairs, upstairs for eight parts. No pic's tonight, but I'll catch you up on the next pic dump.

And yes, unlike the door surround, the door frame corner blocks are structural and the grain runs along the diagonal... per the plan. knowing what I know now, I would have done it differently, but it is done, so no reason to do it over.

Thanks for watching! :thumbsup:
Last edited by KCStudly on Tue Jul 10, 2012 9:15 pm, edited 1 time in total.
KC
My Build: The Poet Creek Express Hybrid Foamie

Poet Creek Or Bust
Engineering the TLAR way - "That Looks About Right"
TnTTT ORIGINAL 200A LANTERN CLUB = "The 200A Gang"
Green Lantern Corpsmen
User avatar
KCStudly
Donating Member
 
Posts: 9640
Images: 8169
Joined: Mon Feb 06, 2012 10:18 pm
Location: Southeastern CT, USA
Top

Re: The Poet Creek Express - Foamie Hybrid

Postby RandyG » Tue Jul 10, 2012 8:29 am

~Start the slow clap~
Randy
Aircraft fabricator, novice carpenter, electrical apprentice, audio engineer dropout.
Build thread - http://www.tnttt.com/viewtopic.php?f=50&t=54126
User avatar
RandyG
500 Club
 
Posts: 695
Images: 115
Joined: Thu May 10, 2012 6:52 pm
Top

Re: The Poet Creek Express - Foamie Hybrid

Postby KCStudly » Tue Jul 10, 2012 5:49 pm

RandyG wrote:Start the slow clap


Not sure if that is respect or sarcasm. Either (dare I say both) would be considered appropriate. :R :frightened: :FNP

I have a pretty thick skin (for the most part) and can see the humor in most things, but sometimes the fog of internet communication complicates perception.

My ego wants to say respect. :D Reality is more likely sarcasm meant to be humor :thumbsup: :R ... and then there is the fog. :frightened: :NC :thinking: :roll:

Break it to me gently. I can take it. ;)
KC
My Build: The Poet Creek Express Hybrid Foamie

Poet Creek Or Bust
Engineering the TLAR way - "That Looks About Right"
TnTTT ORIGINAL 200A LANTERN CLUB = "The 200A Gang"
Green Lantern Corpsmen
User avatar
KCStudly
Donating Member
 
Posts: 9640
Images: 8169
Joined: Mon Feb 06, 2012 10:18 pm
Location: Southeastern CT, USA
Top

The Poet Creek Express - Foamie Hybrid

Postby aggie79 » Tue Jul 10, 2012 7:04 pm

KC,

My take is that it is a slow clap as we are beginning to see your teardrop take shape from all the different assemblies with the clapping rising to a crescendo as your teardrop comes together.

Thank you for your documentation and experiences. We all are learning things from your incredible build.

Take care,
Tom
Tom (& Linda)
For build info on our former Silver Beatle teardrop:
Build Thread

93503
User avatar
aggie79
Super Duper Lifetime Member
 
Posts: 5405
Images: 686
Joined: Tue Aug 07, 2007 5:42 pm
Location: Watauga, Texas
Top

PreviousNext

Return to Foamies

Who is online

Users browsing this forum: No registered users and 15 guests