New Foamie Hybrid build * Frame Finally Done! *

Canvas covered foamies (Thrifty Alternatives...)

Moderator: eaglesdare

Postby tinksdad » Mon Jul 25, 2011 12:48 pm

There is a lot to say for the K.I.S.S. method. I would think #1 consideration would be "How does it affect the end user(s)?" If you look at my latest iteration in the Silly Foamie Ideas thread, you will see that I have been thinking about a drop step to increase door height and less ground to floor step height. It may not work for you because your design is being built for different usage. She will probably throttle me if she reads this; but "she who camps with me" is built like the next line in "I'm a little teapot....". I really need to make sure it's convenient for her to use. If those who will be using yours are the long legged model type, then the taller step with a step stool might be all you need. Do what is going to work for you.
User avatar
tinksdad
500 Club
 
Posts: 966
Images: 155
Joined: Mon May 05, 2008 9:20 pm
Location: Olive Branch, MS

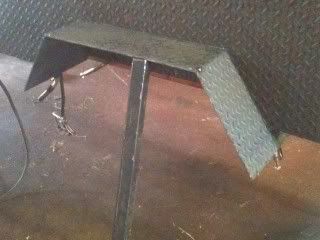
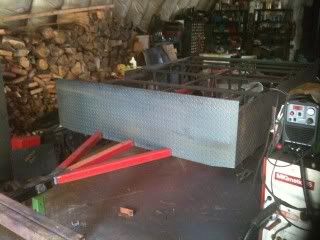
Stairs on my donor popup

Postby aratman » Mon Jul 25, 2011 7:13 pm

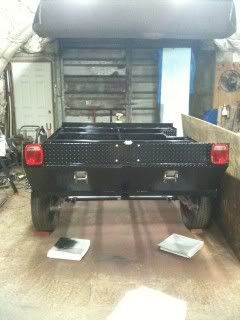
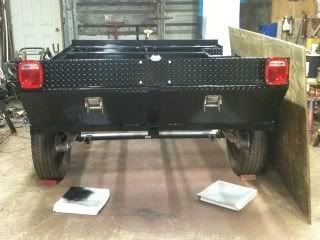
There is a metal ledge welded to the side. The steps hook over the ledge and are removeable for transport. Really simple.
User avatar
aratman
Teardrop Inspector
 
Posts: 24
Images: 8
Joined: Sun Jul 03, 2011 12:49 am
Location: Spokane, WA

Postby DJT » Thu Jul 28, 2011 9:54 pm

Well not much happening with the build this week. Between my son's first birthday party on the weekend, my Jeep kicking out both its rear brakes, having to rescue my buddy when his boat quit out on the lake, and trying to see my parents before they leave for overseas. I think I've only made it to the shop for a few minutes all week.

The replacement axle did arrive today, but it's the wrong size (exactly the same size as the first one...) so it will be late next week before I can even get it out to clean up the shop...

Does anyone else get to the point in a build where they just want to throw up their hands and walk away?

Anyway, hopefully next week will be slightly more productive.
User avatar
DJT
Gold Donating Member
 
Posts: 102
Joined: Wed May 11, 2011 6:46 pm
Location: SW Ontario
Top

Postby GPW » Fri Jul 29, 2011 6:03 am

DJ, sometimes things don't work out as planned .... :o 
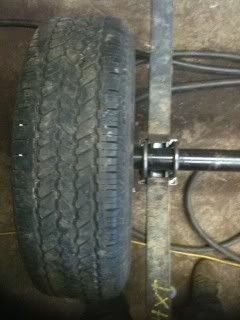
You just have to walk away for a while and take care of everything else in life , as you apparently have been ... The build will always be there, when the time comes (and the right axle ) :roll:
There’s no place like Foam !
User avatar
GPW
Gold Donating Member
 
Posts: 14912
Images: 546
Joined: Thu Feb 09, 2006 7:58 pm
Location: New Orleans
Top

Postby DJT » Sat Aug 06, 2011 4:22 pm

Well it's not too hot today, and the family was busy elsewhere, so I got time to head to the shop for a few hours.

Picked up the new axle on the way, and the fit perfect!

Image

Got the first fender tacked up:

Image

And got the front panel notched, fitted and burned in:

Image

I'm going to take another crack at it again after supper, but I'm pretty happy with the day so far!

The new goal is to have it campable by Sept 12.... :worship:

It's good to have goals right? :shock:
User avatar
DJT
Gold Donating Member
 
Posts: 102
Joined: Wed May 11, 2011 6:46 pm
Location: SW Ontario
Top

Postby eaglesdare » Sat Aug 06, 2011 9:36 pm

yup goals are good. i had a deadline for our first camping trip. although it did have me stressing out at times that i would never be campable by it, but all worked out. and i have never gotten back to finishing that interior!

speaking of that, i just might go take that hour drive to a fabric store and see what i could pick up.
Louella
May the foam be with you.
User avatar
eaglesdare
Donating Member
 
Posts: 3168
Images: 13
Joined: Tue Aug 26, 2008 7:06 pm
Top

Postby GPW » Sun Aug 07, 2011 5:54 pm

DJ, that's going to be so STRONG Dude !!! :thumbsup: 8)
There’s no place like Foam !
User avatar
GPW
Gold Donating Member
 
Posts: 14912
Images: 546
Joined: Thu Feb 09, 2006 7:58 pm
Location: New Orleans
Top

Postby DJT » Sun Sep 04, 2011 11:26 pm

Ok, so it's been a while since I updated this... But I have been working slowly.

So shocks are in:

Image
Image

Tires are here, mounted and installed:

Image

Primer:

Image

And painted:

Image
Image

Going to let the paint cure for a few days, and in the mean time, we're going to start sticking foam together tomorrow after work! :worship:
User avatar
DJT
Gold Donating Member
 
Posts: 102
Joined: Wed May 11, 2011 6:46 pm
Location: SW Ontario
Top

Postby Wobbly Wheels » Mon Sep 05, 2011 5:28 am

Wow, I like it !

There are quite a few roads around here where a rig like that would shine
Be happy to test it out for you.... ;) :lol:

Just curious, but how will you access the upper shock mount bolts ?
User avatar
Wobbly Wheels
Donating Member
 
Posts: 1080
Joined: Tue Mar 15, 2011 9:51 am
Top

Postby pat g » Mon Sep 05, 2011 10:11 am

Really nice work DJ! I'm sure, with your fabrication skills, that you could fab a flip down step as needed. Look forward to seeing the cabin go on.

Pat G
pat g
Teardrop Master
 
Posts: 155
Images: 122
Joined: Thu Feb 17, 2011 8:28 pm
Location: Medina, Oh
Top

Postby DJT » Fri Sep 09, 2011 8:46 am

Didn't get to the shop much this week, but did get a few little additions done:

Image
Image

I realized that I need some new tools as well!
User avatar
DJT
Gold Donating Member
 
Posts: 102
Joined: Wed May 11, 2011 6:46 pm
Location: SW Ontario
Top

Postby GPW » Fri Sep 09, 2011 8:53 am

DJ, That’s so Cool !!! Looks very “militaryâ€
There’s no place like Foam !
User avatar
GPW
Gold Donating Member
 
Posts: 14912
Images: 546
Joined: Thu Feb 09, 2006 7:58 pm
Location: New Orleans
Top

Postby atahoekid » Fri Sep 09, 2011 10:44 am

DJT wrote:
I realized that I need some new tools as well!


One can never have enough tools... :lol: :lol: :lol: That's some great fabricating going on. That's the one skill I really wish I had. I'd have build the frame quite differently than the one I scavenged out from under an old tent trailer. But sometimes you gotta just make do...

Keep up the good work :thumbsup: :thumbsup: :applause: :applause:
Mel

"Believe in your abilities... Remember amateurs built the ark, professionals built the Titanic"

"Indecision may or may not be my problem" Jimmy Buffet

Image

The Road Foamie Build Thread: viewtopic.php?t=45698
User avatar
atahoekid
Platinum Donating Member
 
Posts: 1773
Images: 158
Joined: Sat Jul 24, 2010 2:49 am
Location: Incline Village, NV
Top

Postby DJT » Fri Sep 09, 2011 3:51 pm

Thanks!

I'm hoping that the white top will tone down the military feel, not that I mind, but my wife is less impressed...

I realized that my 4' clamps will only clamp 47"... :shrug: so new clamps. I can't find any blades for the jig saw, or the bearings for the router bits, and all of my painting equipment was loaned out??? so need a handle/rollers/tray etc. Frustrating thing is I'll find them all in about a month or so...

A friend just emailed me with an offer of an aluminum work trailer.... Maybe I'll make the box removable! :grin:
User avatar
DJT
Gold Donating Member
 
Posts: 102
Joined: Wed May 11, 2011 6:46 pm
Location: SW Ontario
Top

Profile!

Postby DJT » Sat Sep 10, 2011 7:25 pm

Last night started on the box:
Image

Started laying out the profile:
Image

I'm hoping to get both sides cut tonight and maybe start gluing some foam together as well since we are going camping for the next week.
User avatar
DJT
Gold Donating Member
 
Posts: 102
Joined: Wed May 11, 2011 6:46 pm
Location: SW Ontario
Top

PreviousNext

Return to Foamies

Who is online

Users browsing this forum: No registered users and 8 guests