Fairy Diddle

Canvas covered foamies (Thrifty Alternatives...)

Moderator: eaglesdare

Postby Anita Rae » Fri Oct 07, 2011 7:29 am

GPW, you are such a little stinker. :lol:

Here we go:

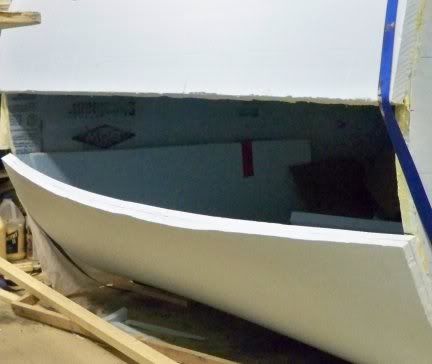
Charlie was at work when I glued this on. It went on pretty smoothly but as you can see it has a nasty warp in it.
Image

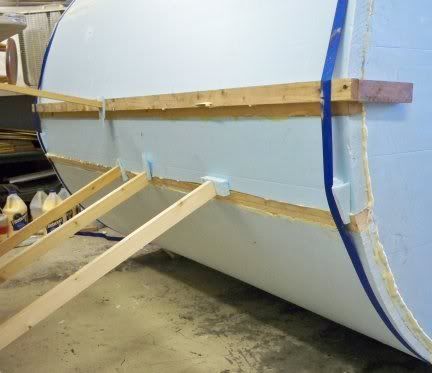
I needed to glue a board on anyway that the bed will attach to from the inside. This, I am hoping will hold that back end down when we are going down the road. So here I have the board glued in place and supported with lots of other boards and clamps and wedges.

Image


When I remove all that, the bow in the styro was stronger than the glue and both ends of the board popped off leaving me with a half glued board and a still bowed back end. Soooooo.....you guessed it. I took the whole thing off and started over with some help from hubby.


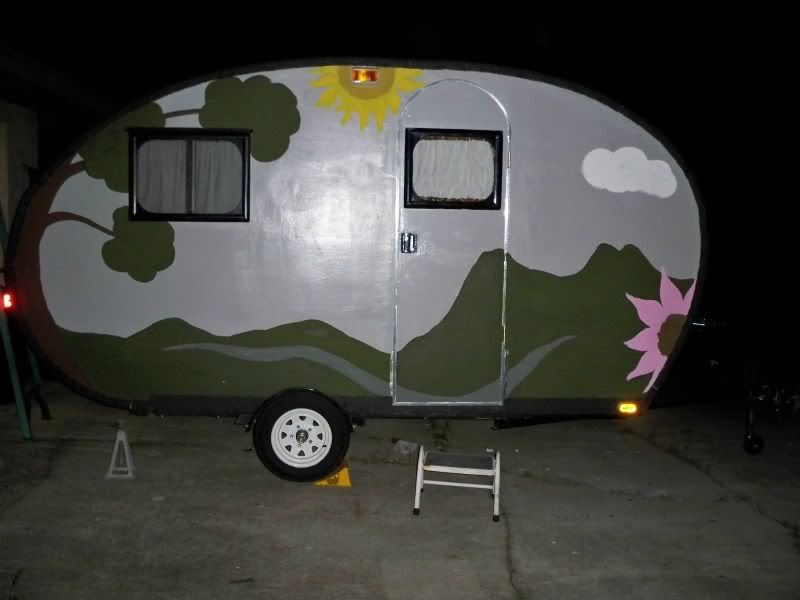
In this picture you can see the finished back end. We glued the board on 1st and reattached it. I don't think I could have done it by myself because of the strength it took to tighten the straps. Even with Charlie doing the straps it still had a tiny bit of bow in it but we quickly cut some boards and wedged it against a nearby table until it was dry.

Image


We had a few friends drop by to supervise.

Image


I thought I took pictures of it after we took the straps off but I guess I didn't. We are headed out of town to a rat convention for the weekend, so I will get some more pics of it when I get back. It really turned out nicely. Now I need to clean up some of those seams and then I can put the skin on.


The other thing is that I am thinking about ordering some marine dock bumper to trim out the edegs. I think that will kind of hide the seems and give it a more finished look.
User avatar
Anita Rae
Donating Member
 
Posts: 104
Joined: Fri Jun 04, 2010 1:48 pm
Location: Mims, Fl

Postby GPW » Fri Oct 07, 2011 9:09 am

AR, That’s looking really Good !!! 8)

We’ve given much thought to this bending “thing" with foam ....and the “spring back problemâ€
There’s no place like Foam !
User avatar
GPW
Gold Donating Member
 
Posts: 14920
Images: 546
Joined: Thu Feb 09, 2006 7:58 pm
Location: New Orleans

Postby ebutler » Sun Jan 29, 2012 12:23 pm

GPW wrote:AR, NICE!!!! A Big one !!! :o Any ideas on how you're going to bend the foam for the roof/etc. ?
We really need to investigate the bending of foam with heat ... I saw on the Dow site a picture of foam with what looks like a propane tank and torch (wide spread tip) :shock: So we must assume :roll: that it's possible ... We've bent Lots of thinner Foam (1/4-1/2" ) with a heat gun ... Thicker material would just need more heat (used cautiously) ... Would be nice to just attach the roof sheet to the front , apply a little heat and bend to the contour .... no messy kerfing , smooth interior (less finish work) , and the foam once heated and bent stays in that shape ... perfect for galley hatches!!! :thinking:


Here is a site with a page on heating foam although it is a different kind called Zotefoam. http://www.recumbents.com/mars/pages/pr ... 3heat.html
Build Stuff Or Perish
User avatar
ebutler
Teardrop Builder
 
Posts: 47
Images: 14
Joined: Sun Aug 16, 2009 8:52 pm
Location: Natchez, MS
Top

Postby atahoekid » Sun Jan 29, 2012 1:02 pm

Looks like his mold is made of pink XPS which was kerf cut. Sounds like he covered his mold with plaster and muslin. Don't know about plaster on a foamie exterior but I think I heard someone mention muslin before on the long thread. Just another thought.... Seems there's more than one way to skin a "Foamie" 8) :lol: 8) :lol:
Mel

"Believe in your abilities... Remember amateurs built the ark, professionals built the Titanic"

"Indecision may or may not be my problem" Jimmy Buffet

Image

The Road Foamie Build Thread: viewtopic.php?t=45698
User avatar
atahoekid
Platinum Donating Member
 
Posts: 1773
Images: 158
Joined: Sat Jul 24, 2010 2:49 am
Location: Incline Village, NV
Top

Postby GPW » Mon Jan 30, 2012 7:32 am

The real beauty of heat bent foam is once cooled , it stays in that shape ... Forever...
That foam looks just like the OC Pink stuff ... ??? 200F sounds about the right temp .... Boiling water eh ?

a test ... place a sheet of foam between two horses (saw horses) ... pour boiling water across the middle till it sags to the shape you want ... let it cool ... test ... easiest , cheapest way I can think of ...
There’s no place like Foam !
User avatar
GPW
Gold Donating Member
 
Posts: 14920
Images: 546
Joined: Thu Feb 09, 2006 7:58 pm
Location: New Orleans
Top

Re: Fairy Diddle...Well...

Postby Anita Rae » Tue Oct 16, 2012 9:27 pm

I know ya'll thought I disappeared but I didn't. I've been working on the trailer but my computer got a nasty virus and I lost most of my pictures. After that I just didn't take any more. Anyway, here she is. I still have some painting to do but she is pretty much finished. 12 ½ ft long and 6 ft tall. We took it out for a trial run a few weeks ago and had a blast. I towed it with the 4 cylinder Mariner.

I will try to get some more pics tomorrow of the inside if you want.


Image
User avatar
Anita Rae
Donating Member
 
Posts: 104
Joined: Fri Jun 04, 2010 1:48 pm
Location: Mims, Fl
Top

Re: Fairy Diddle

Postby jdarkoregon » Tue Oct 16, 2012 10:03 pm

Very nice, Great construction of a beautiful trailer,.. Let us know some of the final specs, Weight, etc??? I'm looking forward to the images, don't forget the insides. PLEASE

How did it do when you were on the road, was it affected much by wind, trucks, ???

John :thumbsup:
Innovation is essential
The world can be better
ImageImage
User avatar
jdarkoregon
Donating Member
 
Posts: 1237
Images: 47
Joined: Mon Aug 22, 2005 7:07 pm
Location: Oregon, Sublimity
Top

Re: Fairy Diddle

Postby S. Heisley » Tue Oct 16, 2012 11:05 pm

Congratulations, Anita! Your trailer looks great! :thumbsup:
Thanks for remembering us and posting a picture. :applause:
I, too, would like to see some pictures of the inside. :D
User avatar
S. Heisley
Super Lifetime Member
 
Posts: 8866
Images: 495
Joined: Mon Sep 17, 2007 10:02 am
Location: No. California
Top

Re: Fairy Diddle

Postby GPW » Wed Oct 17, 2012 4:26 am

Love that Paint job !!! 8) 8) 8)
There’s no place like Foam !
User avatar
GPW
Gold Donating Member
 
Posts: 14920
Images: 546
Joined: Thu Feb 09, 2006 7:58 pm
Location: New Orleans
Top

Re: Fairy Diddle

Postby eaglesdare » Wed Oct 17, 2012 4:45 am

oh i love it!!!!!!!! did you cover it with canvas? did you use tb2? :wine: would also love to see more pics.
Louella
May the foam be with you.
User avatar
eaglesdare
Donating Member
 
Posts: 3168
Images: 13
Joined: Tue Aug 26, 2008 7:06 pm
Top

Re: Fairy Diddle

Postby bonnie » Wed Oct 17, 2012 5:39 am

Love the paint job. I too would like more pictures. Thanks!
Remember, the turtle won. :)
User avatar
bonnie
Donating Member
 
Posts: 1390
Images: 107
Joined: Sun Jul 24, 2011 4:14 pm
Location: Roxana, IL
Top

Re: Fairy Diddle

Postby Anita Rae » Wed Oct 17, 2012 6:34 am

Thanks guys. I will take some more pics when the sun gets up. That one was taken at night.


How did it do when you were on the road, was it affected much by wind, trucks, ???


Actually wind was one of the things that really scared us. We took it over to Ocala which meant I needed to get out on I95 for about an hour. My DH followed in his truck. I white knuckled it every time I saw a Semi but it turned out to be a non issue. I can feel a slight pull when a truck passes me but nothing major.

Honestly, I don't know how much it weighs. I wanted it for my little truck to haul and if it struggled too much, I will start taking thing off the trailer.

My big disappointment is that my mileage dropped from around 25 mpg to around 15 mpg. Maybe some of that is my fault because I was nervous and I took it out of overdrive for the whole trip over. On the way home, I relaxed a little and started slipping it in and out of overdrive when extra power was needed. I even used the speed control when I was at cruising speed. I was able to cruise with the traffic and I even passed a few of the slower vehicles. Yay!


And I got into a race at a stop light with a big 5th wheeler that wasn't about to let this ugly little thing pass him. Hehe, I won. What can I say...he was too heavy. LOL


did you cover it with canvas? did you use tb2?


Yes, it is covered with canvas, TB2 and exterior house paint. I don't recommend the house paint because the dang stuff keeps getting air bubble. I'll bet I've popped and patched a million of them. This has been a real learning experience for me.

The paint job is just the little jars of acrylic paint that you get in the craft department. I will put a clear coat on when it is finished. I just felt like it needed something and I think it's going to work out. I haven't done the other side yet, so I really need to put some thought to it and get busy. This bad boy is pulling out of here Saturday morning headed for Chattanooga. Gonna go up and see the leaves change.
User avatar
Anita Rae
Donating Member
 
Posts: 104
Joined: Fri Jun 04, 2010 1:48 pm
Location: Mims, Fl
Top

Re: Fairy Diddle

Postby GPW » Wed Oct 17, 2012 7:49 am

Bubbles in the paint ... that’s odd huh? ... :o
There’s no place like Foam !
User avatar
GPW
Gold Donating Member
 
Posts: 14920
Images: 546
Joined: Thu Feb 09, 2006 7:58 pm
Location: New Orleans
Top

Re: Fairy Diddle

Postby wagondude » Wed Oct 17, 2012 3:38 pm

Maybe an adhesion problem/incompatability between the paint and the TB2. If I remember correctly, you saturated the canvas with the glue, or am I wrong? Did you sand before painting? Might have worked out better if the glue was used to put the dry canvas on then saturate the canvas with the paint. Or, as we have now found, skip the glue and go with the paint for the whole job. Otherwise, you have one nice looking camper. I will also be looking forward to the new pictures.
Bill

TnTTT ORIGIONAL 200A LANTERN CLUB
101137
User avatar
wagondude
1000 Club
1000 Club
 
Posts: 1535
Images: 35
Joined: Sun Jan 16, 2011 7:41 pm
Location: Land of the Jayhawks
Top

Re: Fairy Diddle

Postby Anita Rae » Thu Oct 18, 2012 2:15 am

I'm not sure what is going on with that paintl. Could be a lot of things. Too late to turn back now.
Here are some photos. It was too cloudy yesterday to do much painting. I will try again today.

This is looking in from the front door. We have a 2x2 shower.
The orange cushions on the right will be replaced but they will get us through. The shower floor seems to be a good place to store stuff I'm not sure where I want to put. That's just some Dollar Tree stuff that I picked up because... well, it was only $1 and I'm sure I can find some reason to have it. On the left is the sink. On the right is a small seating area with storage underneath.


Image

Here is the sink area. The top cabinet has dishes. Underneath is pans, food, plumbing and that is where we store the water heater. The water heater attaches to the outside of the camper and hoses bring the water back inside.

This is also a good picture of the wood print fabric that I used on the inside walls of the trailer. I attached it with TB3 then put a clear coat over it. And you might notice that we used two different woods. Lowes ran out of the birch and I didn't want to wait soooo.

You can barely see the pump switch on the right. I'ts kind of in between the shower and the sink so it is easy to turn on and off. The other outlet is 110.

Image
Last edited by Anita Rae on Thu Oct 18, 2012 2:51 am, edited 1 time in total.
User avatar
Anita Rae
Donating Member
 
Posts: 104
Joined: Fri Jun 04, 2010 1:48 pm
Location: Mims, Fl
Top

PreviousNext

Return to Foamies

Who is online

Users browsing this forum: No registered users and 15 guests