My Foamie Build--Updated --Jul 3 I'm eating an elephant

Canvas covered foamies (Thrifty Alternatives...)

Moderator: eaglesdare

Re: My Foamie Build--Updated 26 April 2012

Postby PcHistorian » Thu Apr 26, 2012 11:42 am

I hate it when I have a bank account screwed up... :-(

you would probably have to have normal hinges on something and these hinges on something right next to each other to see how these work, or would work with your round door. If you wouldn't mind waiting a year or two, I'll be able to show you when I attach these to a hobbit door on the next elf cottage build I do.

here is try #2 at describing these hinges at work.

Image
Elf Cottage
Image

Build Documentary
https://sites.google.com/site/pchistorian/home/hobby/camping/elf-build
Build Forum
http://www.tnttt.com/viewtopic.php?t=48462
Build Album
http://www.tnttt.com/gallery/album.php?album_id=42

progress is progress. (don't look a gift "progress" in the mouth.)
User avatar
PcHistorian
The 300 Club
 
Posts: 354
Images: 198
Joined: Fri Dec 09, 2011 1:06 pm
Location: S.E. Michigan

Re: My Foamie Build--Updated 28 April 2012

Postby bonnie » Sat Apr 28, 2012 1:54 pm

I hit the jackpot today!

Bought two 4" nipple pipes and four end covers to make the pivot for the two pieces of the trailer. Still need to find a nylon sheath of some sort to glue into the wall. I have an idea for that.

Got floating hardwood laminate flooring at the ReStore. It's the type that has the backer board and sound material built in. It's plenty thick to allow me to use 1/4" ply in the cabin. Least I think it will. Tell me please, if I'm crazy. My pretty floor is going to weigh about 80#.

Then I stopped by a local cabinet shop to see if they would sell me a 1/2 sheet or several scraps of laminate for my chuck box project. I now have old school type butcher block -- I'd estimate 3/4 a sheet and :thumbsup: :thumbsup: :thumbsup: :thumbsup: FREE!

Gotta hit the farmers market, so I'm off again. I'll post pics, if anyone wants them.
Remember, the turtle won. :)
User avatar
bonnie
Donating Member
 
Posts: 1390
Images: 107
Joined: Sun Jul 24, 2011 4:14 pm
Location: Roxana, IL

Re: My Foamie Build--Updated 28 April 2012

Postby Wobbly Wheels » Sat Apr 28, 2012 2:18 pm

Pics are always good ! :thumbsup:

What's your idea for a bushing material for the pipe nipples ?
I've used PVC in the past for stuff like that and it works pretty well. If you can't find anything with a snug fit, get it a bit small and cut a lengthwise slit in it so it can expand a little - works great !
Just a thought, but a "floor flange" will thread onto one end (like the caps you bought) and let you fasten it to the wall.

Image

Gotta love ReStore - the one here knows me by name, lol.
User avatar
Wobbly Wheels
Donating Member
 
Posts: 1080
Joined: Tue Mar 15, 2011 9:51 am
Top

Re: My Foamie Build--Updated 28 April 2012

Postby bonnie » Sat Apr 28, 2012 3:30 pm

Wobbly Wheels wrote:Pics are always good ! :thumbsup:

What's your idea for a bushing material for the pipe nipples ?
I've used PVC in the past for stuff like that and it works pretty well. If you can't find anything with a snug fit, get it a bit small and cut a lengthwise slit in it so it can expand a little - works great ! I'll look at PVC too, but I saw nlyon ones somewhere. Those looked to be sturier.

Just a thought, but a "floor flange" will thread onto one end (like the caps you bought) and let you fasten it to the wall. I thought of that and looked at them.
Here's my plan, please commment:

The outter wall cap would be GG into the outer wall foam.
Then, I would glue the PVC or nylon sleeve into the walls where the pivot should fit. (2 pieces)
Then I would mount the other end cap and thread the rod through the PVC/nylon sleeve and screw the entire thing down snug.
The inner head would pivot when the outer shell was lifted while resting within/upon the brace built into the wall structure itself.


Gotta love ReStore - the one here knows me by name, lol.
Remember, the turtle won. :)
User avatar
bonnie
Donating Member
 
Posts: 1390
Images: 107
Joined: Sun Jul 24, 2011 4:14 pm
Location: Roxana, IL
Top

Re: My Foamie Build--Updated 26 April 2012

Postby bonnie » Sat Apr 28, 2012 3:32 pm

PcHistorian wrote:I hate it when I have a bank account screwed up... :-(

you would probably have to have normal hinges on something and these hinges on something right next to each other to see how these work, or would work with your round door. If you wouldn't mind waiting a year or two, I'll be able to show you when I attach these to a hobbit door on the next elf cottage build I do.


I think I found the hinges you're talking about. They look very useable. I haven't made up my mind yet. Gotta get the door fleshed out first. :)
Remember, the turtle won. :)
User avatar
bonnie
Donating Member
 
Posts: 1390
Images: 107
Joined: Sun Jul 24, 2011 4:14 pm
Location: Roxana, IL
Top

Re: My Foamie Build--Updated 28 April 2012

Postby PcHistorian » Sat Apr 28, 2012 7:49 pm

Your thread sounds like you are working on the main pivot hardware too. well, keep coming up with new ideas, until one is clearly superior, then see if you can expand or refine that one. That's what I usually do.
:-)
Elf Cottage
Image

Build Documentary
https://sites.google.com/site/pchistorian/home/hobby/camping/elf-build
Build Forum
http://www.tnttt.com/viewtopic.php?t=48462
Build Album
http://www.tnttt.com/gallery/album.php?album_id=42

progress is progress. (don't look a gift "progress" in the mouth.)
User avatar
PcHistorian
The 300 Club
 
Posts: 354
Images: 198
Joined: Fri Dec 09, 2011 1:06 pm
Location: S.E. Michigan
Top

Re: My Foamie Build--Updated 30 April 2012

Postby bonnie » Mon Apr 30, 2012 9:46 pm

91560

Seems like a small thing, but the door size and shape are set. I'm sure enough to use permanent marker for the outline. In my low res cell phone shot, you can just make out the zillions of lines and erasures. It's almost 38" exactly. It will have a centered knob! It will be a 1/4" ply sandwich with foam. That will be covered with cedar planks like the ones you use for paneling in the home. They are light weight and I will either paint them or protect them somehow. :)

I've put the hardware in position and drew in the hinges, as I haven't got them as of yet. The ones I'm looking at are 2" at the base and come to a rounded point, so they won't be a clunky. I will be ordering 13 1/2 inch shutter hinges with a small offset. This will allow the door to swing out and away from the frame. The deadbolt's face will need shaped to the curve, but I'll wait until I have the cutout ready to mount it and then curve it to fit. To have the galley latch enclosed, I figured out the door will need to be deeper than the 2" foam, so the inside facing of the wall will need to be built up to accommodate the difference.

Next up is clamping the two sides of the door together and cutting them out. Then I will start adding the bracing and foam. I have some 1" beaded foam, I will be using for the door. Might as well use it where it won't be seen.

Looking at the spacings, I may not need the roller catches at all. I haven't bought them, yet.

Pretty stoked about the progress. :D
Remember, the turtle won. :)
User avatar
bonnie
Donating Member
 
Posts: 1390
Images: 107
Joined: Sun Jul 24, 2011 4:14 pm
Location: Roxana, IL
Top

Re: My Foamie Build--Updated 30 April 2012

Postby PcHistorian » Tue May 01, 2012 1:23 pm

sounds like you've got it nailed to me.
are you going to have a semi-hollowed door to put the latching rods from the centered knob to the edge?
Elf Cottage
Image

Build Documentary
https://sites.google.com/site/pchistorian/home/hobby/camping/elf-build
Build Forum
http://www.tnttt.com/viewtopic.php?t=48462
Build Album
http://www.tnttt.com/gallery/album.php?album_id=42

progress is progress. (don't look a gift "progress" in the mouth.)
User avatar
PcHistorian
The 300 Club
 
Posts: 354
Images: 198
Joined: Fri Dec 09, 2011 1:06 pm
Location: S.E. Michigan
Top

Re: My Foamie Build--Updated 30 April 2012

Postby bonnie » Wed May 02, 2012 12:20 pm

I'm planning on fixed channels for the rods. Bead foam might foul their movement after some wear. Hoping to work on it this weekend. I need to get one slab of foam to work on the door jamb. Maybe i'll just buy a piece and cut it to size at the big box store.

Later
Remember, the turtle won. :)
User avatar
bonnie
Donating Member
 
Posts: 1390
Images: 107
Joined: Sun Jul 24, 2011 4:14 pm
Location: Roxana, IL
Top

Re: My Foamie Build--Updated 30 April 2012

Postby PcHistorian » Thu May 03, 2012 10:54 am

some pvc might be what you want. figure the widest diameter of the rods, then get the smallest inner diameter to match. get a 10 foot piece and cut as needed. should give you enough for 4 rods. That should take a few decades to wear through the pvd. you might even oil or grease them before you seal up the door. periodically spray in some litium grease into the tubes... that should protect the foam but let everything else work good.
Elf Cottage
Image

Build Documentary
https://sites.google.com/site/pchistorian/home/hobby/camping/elf-build
Build Forum
http://www.tnttt.com/viewtopic.php?t=48462
Build Album
http://www.tnttt.com/gallery/album.php?album_id=42

progress is progress. (don't look a gift "progress" in the mouth.)
User avatar
PcHistorian
The 300 Club
 
Posts: 354
Images: 198
Joined: Fri Dec 09, 2011 1:06 pm
Location: S.E. Michigan
Top

Re: My Foamie Build--Updated 4 MAY 2012

Postby bonnie » Fri May 04, 2012 6:37 pm

Got an email today. The hinges should be here by next Thursday. I am comencing a timeout from computers. Sawdust and foam fuzz call to me from the garage. Time to get a door made. :twisted:
Remember, the turtle won. :)
User avatar
bonnie
Donating Member
 
Posts: 1390
Images: 107
Joined: Sun Jul 24, 2011 4:14 pm
Location: Roxana, IL
Top

Re: My Foamie Build--Updated 6 MAY 2012--Made saw and foam d

Postby bonnie » Sun May 06, 2012 7:21 pm

I feel productive! Started out Friday night with the first sawdust. I clamped the two 1/4" luan ply Hobbit door skins together. I need more clamps!

91682

Then I agreed to go with my girls and grand daughter to the zoo the next morning and sew most of Saturday. :thinking: Gotta get moving! So I put aside my :frightened: and started cutting.

91683

Kept all the fingers and toes. :thumbsup: If I were rich, I'd get a band saw. As it was, the two halves were pretty good. It looks like a door!

91684


That's Daisy the wonder dog roaming through the picture. My work bench is actually an old computer desk. Don't ask. It's complicated. :roll:
By that time, I was tired. Mistakes happen when you're tired. So I went to bed. Friday was done. I was happy. 8)
Remember, the turtle won. :)
User avatar
bonnie
Donating Member
 
Posts: 1390
Images: 107
Joined: Sun Jul 24, 2011 4:14 pm
Location: Roxana, IL
Top

Re: My Foamie Build--Updated 6 MAY 2012--Made saw and foam d

Postby bonnie » Sun May 06, 2012 7:54 pm

Saturday was wonderful! My daughters and grand daughter and I played at the Zoo. Ate China Quick for lunch and sewed all afternoon. My oldest daughter and the grandchild and the one on the way are headed to Saipan this summer as missionaries. So time as a family is precious!

After all the festivities, my youngest daughter and I went to Lowes and I bought my first piece of foam. :P Just so you know, if you're crazy enough you can borrow a T-square and cut the foam to size right in the store. I didn't get pictures of that, but I'm sure the young sales person had a great story to tell later. :lol: :lol: :lol: So, I ended up with a 5' x 45" piece, a 3" x 8' piece and a 3' x 4' piece. Pretty nifty, if you score both sides of the foam, you can bend it and it will break away cleanly. As an aside, I was standing in the checkout line and a male person came up and thumped on my foam! It's not even a trailer yet, for Pete's sake! :x We managed to stuff the foam into my daughter's CRV. Tight fit. Got home and unloaded everything. Got back to work.

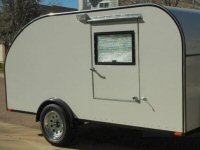
The door panel is sitting in the living room. I'm thinking about door placement. Final decision will have to wait until the hinges arrive.

91689

I also cut and glued the support piece for the galley latch onto the door skin. This is going to be a inside out door build. Anyhoo, that's 3 seven pound pavers being used as weights in the picture.

91690

Finally, I left the following drying overnight, only to discard it and do something else. It's the door piece for the dead bolt. I didn't like how heavy it was. I have come up with a better idea. Hopefully I'll have it done by Thursday:

91691

And so ended Saturday.
Remember, the turtle won. :)
User avatar
bonnie
Donating Member
 
Posts: 1390
Images: 107
Joined: Sun Jul 24, 2011 4:14 pm
Location: Roxana, IL
Top

Re: My Foamie Build--Updated 6 MAY 2012--Made saw and foam d

Postby bonnie » Sun May 06, 2012 8:24 pm

Sunday Finale!

Trailer building is addictive. I came up with an idea for the galley rod supports and spent a few minutes this morning before going to church out in the garage putting the idea to reality. Remember all that free wood I got? Well part of it is old rails of some sort. They happen to glue up to exactly the height of 2" blue foam. So I decided to use them to guide and support the galley rods.

Here's a picture of the glue up process. Have I said I need more clamps? Well I broke out the C clamps to make the whole length tight. Worked.

91692

And a close up shot:

91693

I used my miter box to cut the angles into the end of the glued pieces. One thing nice about 90 degree weather -- glue dries fast! I did drill a hole in the supports while they were clamped together. Goofed that up. Once they were glued onto the door skin, they didn't line up. Have no idea what happened, but it was a guide hole. I need to find a bigger bit, or a tiny hole saw. I will use brad nails on the reverse side when the glue is dried.

91694

And a side shot showing the angle better:

91695

Foam fit test. Success!

91696

Lastly, I measured and cut the 3" foam piece into two 31" pieces and cut and will glue to them 1/4" pieces of wood to encase the galley latch area. The wood will keep foam from filtering into the latch mechanism. I'm pondering about whether I need to build the other door skin, so that I can get to the latch if needed. Do latches need care and feeding? Or frequent replacement? Been a long weekend. I'm very pleased with my progress.
Remember, the turtle won. :)
User avatar
bonnie
Donating Member
 
Posts: 1390
Images: 107
Joined: Sun Jul 24, 2011 4:14 pm
Location: Roxana, IL
Top

Re: My Foamie Build--Updated 6 MAY 2012--Made saw and foam d

Postby eaglesdare » Mon May 07, 2012 6:47 am

wahoo, very nice bonnie! :thumbsup: :wine:
Louella
May the foam be with you.
User avatar
eaglesdare
Donating Member
 
Posts: 3168
Images: 13
Joined: Tue Aug 26, 2008 7:06 pm
Top

PreviousNext

Return to Foamies

Who is online

Users browsing this forum: No registered users and 12 guests