Hot Wire Foam Cutting ....

Canvas covered foamies (Thrifty Alternatives...)

Moderator: eaglesdare

Postby mikeschn » Fri Feb 03, 2012 5:19 pm

Are you melting foam yet? especially the quarter radius?

Mike...
The quality is remembered long after the price is forgotten, so build your teardrop with the best materials...
User avatar
mikeschn
Site Admin
 
Posts: 19202
Images: 479
Joined: Tue Apr 13, 2004 11:01 am
Location: MI

Postby GPW » Sat Feb 04, 2012 8:32 am

Mike , the rounding bit still holding you up ??? I’m sure this will be resolved soon ... with a simple HW round over cutter/burner ... I can’t say as I blame you for not wanting to carve sand the round over in , it is MESSY !!! :o
There’s no place like Foam !
User avatar
GPW
Gold Donating Member
 
Posts: 14912
Images: 546
Joined: Thu Feb 09, 2006 7:58 pm
Location: New Orleans

Postby pete42 » Sat Feb 04, 2012 9:48 am

Allan "no-load" means just that, think flashlight, light off there isn't any "load" on the batteries
turn on the light the bulb becomes the "load"and batteries would be under load.

if you were to measure the batteries voltage under "no-load", light off
they would read say 3 VDC for a two cell flashlight and some what less than 3 VDC with the light on or "under load"

same for your power supply measure the terminals with out any wire between them they would read stated numbers.
add a wire which becomes the load the voltage will be lower remember the longer the wire the bigger the load.
remember also that the wires running to your foam cutter are part of the load, once tried you will figure it out and we will be coming to you for advice on making cuts.

Mike if I can find my spool of safety wire I'll send you some.
when I find it I'll need ur address I may still have a small cutter too.
weather has been nice I should have gotten out to the back garage and looked sooner but It just came to me, I'm old ;)

Pete
User avatar
pete42
Super Lifetime Member
 
Posts: 2203
Images: 13
Joined: Sat Nov 07, 2009 11:52 am
Location: SouthWest Ohio
Top

Postby allan1 » Sun Feb 05, 2012 12:28 am

pete42 wrote:Allan "no-load" means just that, think flashlight, light off there isn't any "load" on the batteries
turn on the light the bulb becomes the "load"and batteries would be under load.

if you were to measure the batteries voltage under "no-load", light off
they would read say 3 VDC for a two cell flashlight and some what less than 3 VDC with the light on or "under load"

same for your power supply measure the terminals with out any wire between them they would read stated numbers.
add a wire which becomes the load the voltage will be lower remember the longer the wire the bigger the load.
remember also that the wires running to your foam cutter are part of the load, once tried you will figure it out and we will be coming to you for advice on making cuts.

Mike if I can find my spool of safety wire I'll send you some.
when I find it I'll need ur address I may still have a small cutter too.
weather has been nice I should have gotten out to the back garage and looked sooner but It just came to me, I'm old ;)

Pete
Thanks Pete.
User avatar
allan1
Donating Member
 
Posts: 60
Images: 19
Joined: Wed Dec 28, 2011 1:51 pm
Location: Canada, British Columbia, Powell River
Top

Postby GPW » Sun Feb 05, 2012 9:22 am

Here’s another interesting video for your edification ... http://www.youtube.com/watch?v=tiitiKyu_Iw
There’s no place like Foam !
User avatar
GPW
Gold Donating Member
 
Posts: 14912
Images: 546
Joined: Thu Feb 09, 2006 7:58 pm
Location: New Orleans
Top

Postby allan1 » Sun Feb 05, 2012 9:56 am

GPW wrote:Here’s another interesting video for your edification ... http://www.youtube.com/watch?v=tiitiKyu_Iw
Hey a TEC 3 transformer even! Thanks
User avatar
allan1
Donating Member
 
Posts: 60
Images: 19
Joined: Wed Dec 28, 2011 1:51 pm
Location: Canada, British Columbia, Powell River
Top

Postby pete42 » Sun Feb 05, 2012 11:09 am

Mike I found the safety wire email or pm me if you want some for a foam cutter.

GPW that is a nice video you found should work maybe a spring loaded gizmo to keep the wire tight or an adjustable bolt.

Im sure allan will have one up and running soon.

pete
User avatar
pete42
Super Lifetime Member
 
Posts: 2203
Images: 13
Joined: Sat Nov 07, 2009 11:52 am
Location: SouthWest Ohio
Top

Postby GPW » Sun Feb 05, 2012 2:50 pm

Pete , yeah, although elegantly Simple , it could have used a better way of keeping the wire taught ... The wire (as you know) tends to stretch when heated anyway ...
There’s no place like Foam !
User avatar
GPW
Gold Donating Member
 
Posts: 14912
Images: 546
Joined: Thu Feb 09, 2006 7:58 pm
Location: New Orleans
Top

Postby allan1 » Mon Feb 06, 2012 12:23 pm

mikeschn wrote:Are you melting foam yet? especially the quarter radius?

Mike...
After the firewood is brought in I'll have some time to build and play! Been researching the various types of cutter tools and tables and trying to come up with a multipurpose variation and learn about types of wires, wire bending for accuracy, etc. I've got some different wires ranging from .016 to .035 to play with (guitar strings, stainless fishing leaders, etc - locally available stuff) I don't want to end up with dozen different tools if one or two can be adapted to multi-use. Maybe I'll end up with a product?
I am assuming that you'll do the radius after assembly. Let me know if you want something specific or just generalities. I'd be happy to do the research and prototype and post info and pictures of the results.
User avatar
allan1
Donating Member
 
Posts: 60
Images: 19
Joined: Wed Dec 28, 2011 1:51 pm
Location: Canada, British Columbia, Powell River
Top

Postby allan1 » Wed Feb 08, 2012 10:33 pm

Mike, goofed with the radius cutter today. Haven't figured out the transformer stuff (I think electricians are wizards) yet so I played with the soldering gun.
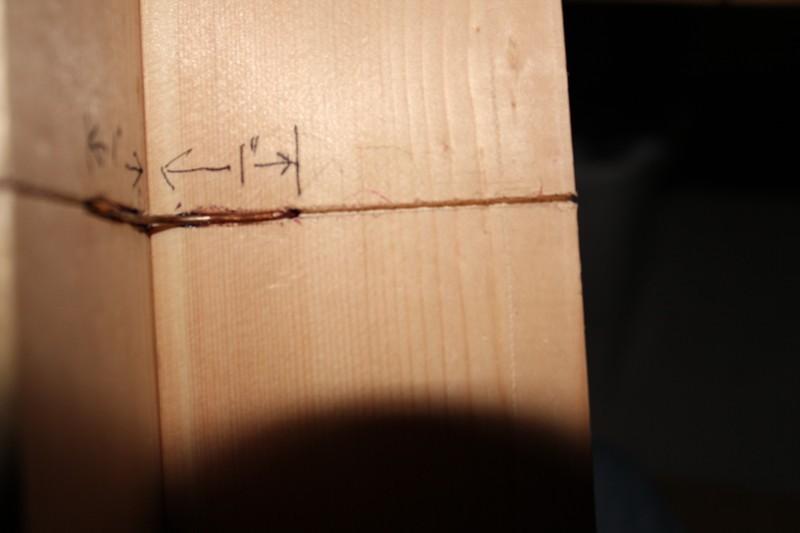
Took some 1x3, - measured down 4" and cut a kerf (1/16" about 4 light passes)) with a hand saw which just happens to be a touch smaller than the #12 ground wire I used for the cutter.
Screwed boards on edge, on the inside measured out 1" along kerf on each side and drilled a 5/64" hole (the size of the ground wire).
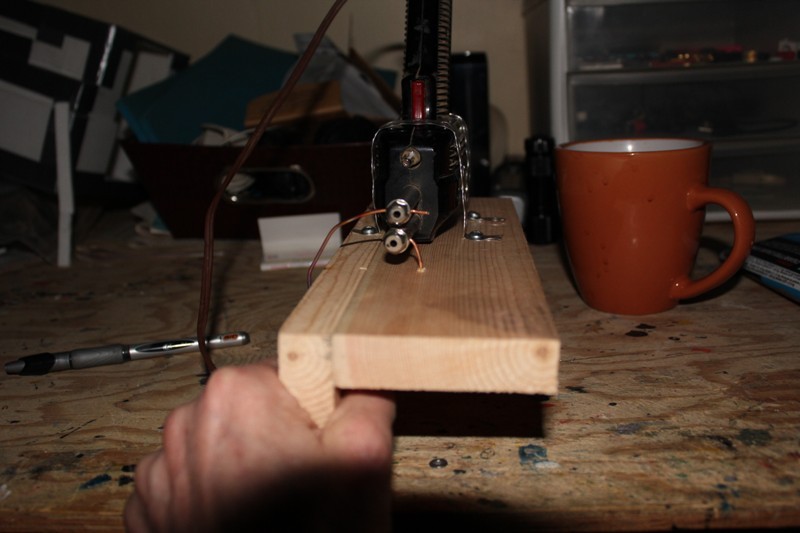
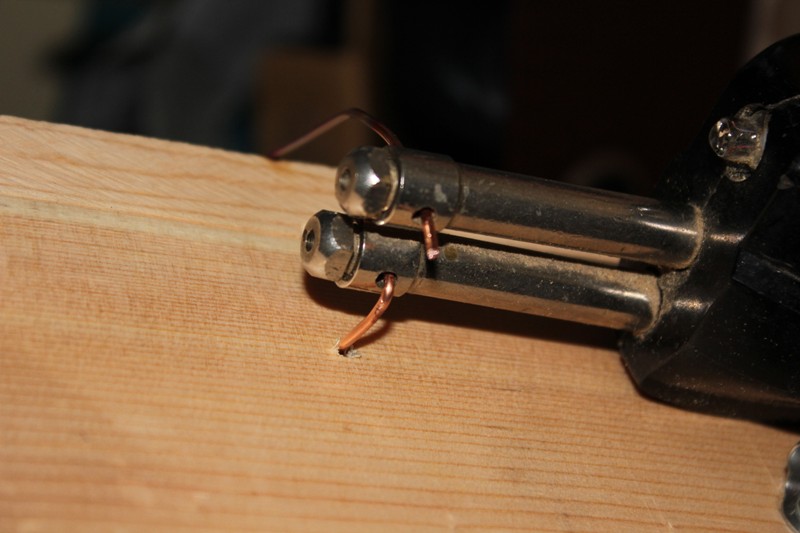
Turned plate over and centered soldering gun holes over the drilled holes and clamped solder gun down solid with screws and plumbers tape.
Strung the wire through the two holes out the sides and loosely fit into soldering gun. Got myself a 1" piece of dowel and used it to shape my radius (whacked it with a hammer). Centered wire in the kerf and tapped it in so nothing was sticking up above the cutting plane (goofed up here by not paying attention and a corner of the wire did not get tapped in - left a 1/64th depression about 1/4" below bottom of radius).
Tightened up the wire in the gun, plugged it in and .... had to do it twice, I found that the cut had smoother results when pulled rather than pushed.
The pics are in the album but I'll post them here for a week or so and then remove them (I'll leave them in the album) so they don't take up so much space.
Image
Image
Image
Image
Image
Image
Image
Image


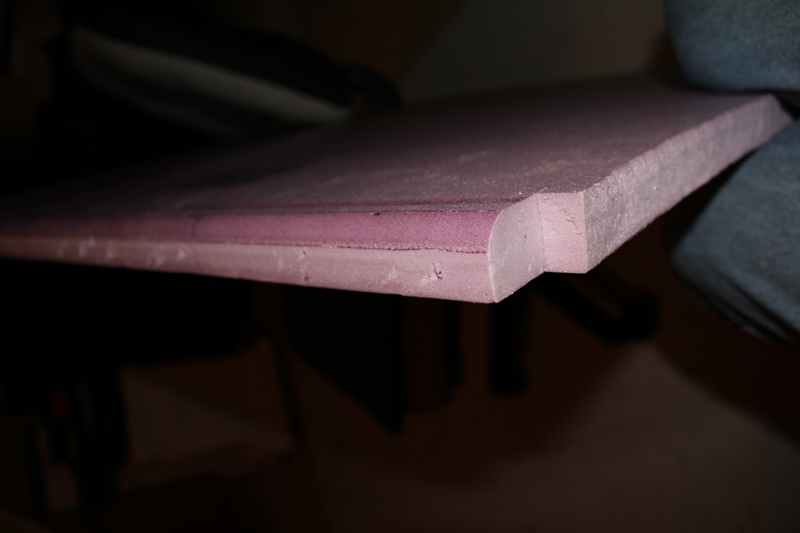
My experience was that the unit pulled along the surface well and stayed flush in both planes and the feed rate seemed like 1-1/2" per second. There were no dips, grooves, etc during the cut. I'm not sure if the 'blemish' (from not having 1 cutter wire seated properly) would show up after taping the edges or covering the faces. The radi can easily be shaped to whatever is wanted - the ground wire is soft yet will hold the shape and is easily tooled to whatever increase in radi is wanted.
User avatar
allan1
Donating Member
 
Posts: 60
Images: 19
Joined: Wed Dec 28, 2011 1:51 pm
Location: Canada, British Columbia, Powell River
Top

Postby wagondude » Wed Feb 08, 2012 10:50 pm

That looks really good! A little tune up with the sandpaper after and all is good.

Bill
Bill

TnTTT ORIGIONAL 200A LANTERN CLUB
101137
User avatar
wagondude
1000 Club
1000 Club
 
Posts: 1535
Images: 35
Joined: Sun Jan 16, 2011 7:41 pm
Location: Land of the Jayhawks
Top

Postby Treeview » Wed Feb 08, 2012 11:02 pm

Alln,

Nicely done and well documented! thanks :D

What are the specs on the soldering gun? I'm going to have to buy a new one so I might as well get one that will cut foam too.

tom
User avatar
Treeview
The 300 Club
 
Posts: 498
Images: 30
Joined: Sun Nov 27, 2011 9:22 am
Location: Land of 10,000 Lakes
Top

Postby KCStudly » Wed Feb 08, 2012 11:43 pm

NICE!!! :thumbsup: :thumbsup: :ok:
KC
My Build: The Poet Creek Express Hybrid Foamie

Poet Creek Or Bust
Engineering the TLAR way - "That Looks About Right"
TnTTT ORIGINAL 200A LANTERN CLUB = "The 200A Gang"
Green Lantern Corpsmen
User avatar
KCStudly
Donating Member
 
Posts: 9613
Images: 8169
Joined: Mon Feb 06, 2012 10:18 pm
Location: Southeastern CT, USA
Top

Postby atahoekid » Thu Feb 09, 2012 1:11 am

Very nicely done. So what are you doing with the power supply you just got??? With results like that, I'd be half tempted to send it back!!
Mel

"Believe in your abilities... Remember amateurs built the ark, professionals built the Titanic"

"Indecision may or may not be my problem" Jimmy Buffet

Image

The Road Foamie Build Thread: viewtopic.php?t=45698
User avatar
atahoekid
Platinum Donating Member
 
Posts: 1773
Images: 158
Joined: Sat Jul 24, 2010 2:49 am
Location: Incline Village, NV
Top

Postby eaglesdare » Thu Feb 09, 2012 7:00 am

nice :thumbsup:
Louella
May the foam be with you.
User avatar
eaglesdare
Donating Member
 
Posts: 3168
Images: 13
Joined: Tue Aug 26, 2008 7:06 pm
Top

PreviousNext

Return to Foamies

Who is online

Users browsing this forum: No registered users and 20 guests