Turkeys Tear (all finished and tested)

...ask your questions in the appropriate forums BUT document your build here...preferably in a single thread...dates for updates, are appreciated....

Re: Turkey's Tear (pic heavy)

Postby KCStudly » Fri Mar 22, 2013 3:16 pm

I like the window shape and placement. That's showing some style! :thumbsup:
KC
My Build: The Poet Creek Express Hybrid Foamie

Poet Creek Or Bust
Engineering the TLAR way - "That Looks About Right"
TnTTT ORIGINAL 200A LANTERN CLUB = "The 200A Gang"
Green Lantern Corpsmen
User avatar
KCStudly
Donating Member
 
Posts: 9640
Images: 8169
Joined: Mon Feb 06, 2012 10:18 pm
Location: Southeastern CT, USA

Re: Turkey's Tear (pic heavy)

Postby Wild Turkey NZ » Wed Mar 27, 2013 12:57 am

well may part time job is hacking into teardrop time but there is lots of time waiting for glue to dry at the moment so here is what ive done in the last couple of days:

i glued the glass to the door metal. if the glass ever breaks it will be a major to fix but oh well, its water tight.
103687

while the glue was drying above i used fiberglass resin to reinforce the MDF vents i made. it made them stronger than plastic ones.
103686
here they are all painted up. just like a bought one
103688
here are the doors held up in position.
103681
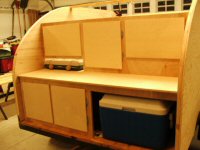
then it was time to start framing the inside of the doors. the cavities will be insulated and covered with MDF
103682
more time on my hands waiting for glue.. lets go get this thing legal,
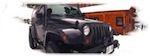
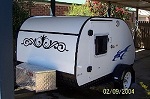
got the warrant of fitness booked right away so i pulled the tear out into the sunshine for the first time:
103685
103684
after an long and interesting inspection with the local mechanic i got the WOF! on one condition... i show him what it looks like when its finished. haha
103680
what a relief! one step closer to camping now that i can legally drive on the roads!
User avatar
Wild Turkey NZ
Teardrop Inspector
 
Posts: 24
Images: 202
Joined: Fri Mar 01, 2013 4:20 pm

Re: Turkey's Tear (pic heavy)

Postby AlgoDan » Wed Mar 27, 2013 4:40 am

Nice progress WildTurkey, your moving right along . I like your vents and a cool idea. :beer:
Here now but Camping later.............Dan

Build Journal
http://www.tnttt.com/viewtopic.php?f=50&t=54681
102535 103199 105576
From .................Paper...........................To.......................... Pavement............................
User avatar
AlgoDan
The 300 Club
 
Posts: 449
Images: 238
Joined: Mon Feb 25, 2013 4:08 am
Location: Ontario, Canada
Top

Re: Turkey's Tear (pic heavy)

Postby KCStudly » Wed Mar 27, 2013 2:51 pm

Great work you are doing making lots from scratch. :thumbsup:

Gud-on-ya’ for the WOF!

A question: Will your door windows be able to open, or is it just the vents that will add make up air to the cabin? Might get a little stuffy in there, but then again there aren't many (any?) predatory animals in N-Zed either, so I guess you can sleep with the doors open if extra ventilation is needed on those hot January nights.

Keep up the good work. :thumbsup:
KC
My Build: The Poet Creek Express Hybrid Foamie

Poet Creek Or Bust
Engineering the TLAR way - "That Looks About Right"
TnTTT ORIGINAL 200A LANTERN CLUB = "The 200A Gang"
Green Lantern Corpsmen
User avatar
KCStudly
Donating Member
 
Posts: 9640
Images: 8169
Joined: Mon Feb 06, 2012 10:18 pm
Location: Southeastern CT, USA
Top

Re: Turkey's Tear (pic heavy)

Postby Wild Turkey NZ » Thu Mar 28, 2013 12:43 am

Thanks guys
Re KCStudly: no the windows are fixed shut, it was too hard to have them open as the glass is on an angle. The vents will allow air to pass through between the galley and the sleeping area. the galley door will be able to be locked in a slight open position. ventilation wont be a problem. there aren't many critters that will harm you here, but the sand-flies and mosquitoes can be annoying in some places. all the vents will have fly screen behind them to try to keep out the big ones. im just gluing an old fly screen to the mdf:
103764
103765
im mainly building this so i can camp in winter where nights can be anywhere between -10 to 20 degrees, wet or dry. so instead of laeving the galley door open slightly i will bring air in through a vent in the floor in the back of the galley. i know its hard to keep it warm and have fresh air but i have a good sleeping bag.
this box will fit over a vent in the floor:
103766
it will allow me to recirculate the air when i am heating up the tear but also allows me to bring in fresh air from outside when sleeping. the box will also hold the heat exchanger and two computer fans to force the air to circulate.
103683


well i had a productive day.
i got the doors hung. all went to plan. all the spaces are perfect.
103770
put the handles on the doors
103768
what a pig of a job to get all those holes lining up. got there in the end. i recessed the bolt heads so they will be hidden under the MDF that covers the door. which is being cut out here:
103767
and the finished product ready to be fitted once the cladding is on:
103769
its at this point that i realize its not all about getting it water tight and road legal as these have been the goals i have been working so hard to reach. now i have to think hard about the interior, drawers and such.
User avatar
Wild Turkey NZ
Teardrop Inspector
 
Posts: 24
Images: 202
Joined: Fri Mar 01, 2013 4:20 pm
Top

Re: Turkey's Tear (pic heavy)

Postby Wild Turkey NZ » Fri Apr 05, 2013 9:06 pm

I glued a sheet of ali to the side of the tear and needed something to do while the glue was drying
so I started making my fireplace/ burner/ cooker/ heater. its more of an experiment than anything.

im using a old fire extinguisher and a sheet of stainless:
104243
still needs a wetbak and air vents.

I cut the top off and cut a hole on the edge of the door where the hinges would be. then i welded the hinges on before i cut the rest of the door.
104244
then when the door was cut out it swings and lines up perfectly:
104245
the plasma cutter makes short work of all the other components i needed to cut out:
104246
all welded up and ready to be set on fire:
104247
i had a quick fire to burn the paint off and hit it with the sand blaster:
104248.

glue dry. time to cut.
i hit it with the router. what a mistake.i was hoping it would cut somewhat similarly to the ply. but no overheating and disastrous vibrations forced me to try something else to i started cutting it with a hacksaw:
104249
the hack aw worked well but it would take weeks to make all my cuts so i borrowed a power hacksaw/ body saw:
104250
it ripped right through like a dream
104251
after a bit of cleaning up i got the door on for hopefully the last time
104252
woop woop one side done. hopefully the other side will be just as easy.

oh yea, i bought some foam for the bed.
104253
User avatar
Wild Turkey NZ
Teardrop Inspector
 
Posts: 24
Images: 202
Joined: Fri Mar 01, 2013 4:20 pm
Top

Re: Turkey's Tear (pic heavy)

Postby Wild Turkey NZ » Fri Apr 12, 2013 3:34 am

i got more metal on the front, top and back. yay
i put a aluminium corner molding on the edges to help water proof the corners. i didnt want a heap of screws showing so i am trying to use just glue at the moment with one screw at either end.
i used duct tape to hold the corner molding on while the glue set.
104591
104592
104593

i started working on the back door hinge seal. i hope it works out all good:
104594
104595
and in the open position:
104596

i didnt like my old mud guards. they were flimsy and did not sit straight so im going to make new ones.
im still going to use plastic but this time im going to use a buoy instead of a barrel. this is half a buoy from a mussel farm:
104597
i used the table saw to cut a ring off of it:
104598
then cut it in half again and had my two guards. the plastic was a bit rough from being in the surf and getting hit by boats and such so i tried sand blasting sanding and heating it to get it to smooth out but no luck. i decided to put a layer of aluminium over it.
here it is about to be glued with contact adhesive:
104600
104601
the new guards are a different radius to the old ones so i needed to modify the mounts. as welding to the fram is now a bit of a fire risk im just going to use wooden packers to make up for the larger arc.
104599
ill paint them up and they will look fine...i hope

so waiting for glue, paint and sealant to dry/cure/set. so i started doing some more small jobs.
one thing i wanted was a sliding tray that would support my water barrel and make it possible to have the barrel tap hanging out of the tear ( to prevent spillage) when pouring water. so i found some 'invisible door' slides that had come of an old tv cabinet some time. they were too long and designed to fit to the side of a cabinet, so with some modification with the trusty air powered body saw i had a solution.
104602
104603
104604
sweet.

the cold has hit. had our first fire for the year this week. so i had to mount the heater in preparation for the cold nights to come:
104605
104606

i bought the fabric for the mattress covers and curtains but no photo of it yet.
User avatar
Wild Turkey NZ
Teardrop Inspector
 
Posts: 24
Images: 202
Joined: Fri Mar 01, 2013 4:20 pm
Top

Re: Turkey's Tear (pic heavy)

Postby AlgoDan » Fri Apr 12, 2013 5:19 am

Wow wildturkey, your teatrdrop is moving right along.Looking good and wont be long before 1st camp. :beer: Mate
Here now but Camping later.............Dan

Build Journal
http://www.tnttt.com/viewtopic.php?f=50&t=54681
102535 103199 105576
From .................Paper...........................To.......................... Pavement............................
User avatar
AlgoDan
The 300 Club
 
Posts: 449
Images: 238
Joined: Mon Feb 25, 2013 4:08 am
Location: Ontario, Canada
Top

Re: Turkey's Tear (pic heavy)

Postby KCStudly » Fri Apr 12, 2013 4:47 pm

Yes, quite a bit of progress there and it is looking great! :thumbsup:

I love the shot of your gum boots, too. So stereotypically NZ that it made me think of Footrot Flats.
Last edited by KCStudly on Mon Apr 22, 2013 8:05 pm, edited 1 time in total.
KC
My Build: The Poet Creek Express Hybrid Foamie

Poet Creek Or Bust
Engineering the TLAR way - "That Looks About Right"
TnTTT ORIGINAL 200A LANTERN CLUB = "The 200A Gang"
Green Lantern Corpsmen
User avatar
KCStudly
Donating Member
 
Posts: 9640
Images: 8169
Joined: Mon Feb 06, 2012 10:18 pm
Location: Southeastern CT, USA
Top

Re: Turkey's Tear (pic heavy)

Postby Wild Turkey NZ » Mon Apr 22, 2013 3:35 am

Im back and i have been busy. so here goes.

started putting the weather seals on the doors. i got this stuff for free and i think it will do the job (it was free so it HAS to do the job):
105266
i screwed the seals on then siliconed the gap:
105267
i thought that looked a bit ugly so i made up some Rimu strips to cover it all up. i also painted the floor:
105268 105275
i will have a matching skirting board around the inside:
105276

mudguards are on and lights and #plate are fitted:
105269
i finished painting the interior walls and doors:
105270
i also mad a adjustable support for the galley door. sorry you will just have to rotate your head as i i forgot to do it to the image. suffer
105271

i wanted to make a deck to keep mud outside when hopping in and out of the caravan so i made one out of pine, again using the old orchard timber:
105272
it fits under the caravan when driving around. keeps the dirt outside:
105273

looking good. mudguards turned out very nice if i do say so myself.
105274

now out of the workshop ind into the house. sewing time!!
here is the material and my new work bench. ready to make the mattress covers
105277105279
i started by sewing in the zipper on to two strips then onto the material that surrounds the edges.
105278
wack on the top and bottom and...
105280
several hours later...
105281
glad to get that out of the way. still have to make up the curtains but i need to find some metal to playwith for now...

so the plan is and has always been to tow my tear with my little car known as 'Suzi'
105287
one small issue...Suzi is sick. shes been burning oil making mysterious knock sounds and gushing oil out from various seals and gaskets.
its not long before my planned departure so i need to get her fixed up. Im going to rebuild a engine so i can do i quick swap when the time comes.
now i know this isnt directly tear related but please hold your fire because that teardrop aint going anywhere until Suzi has a few more healthy ponies under the hood. so im including a bit of engine rebuild into this thread. so here is the block and the freshly stripped head.
105282105283
head is in good shape. no cracks or anything serious. i will send it in to have the valves re-seated anyway.
the bore is a different story. all cylinders have pitting. i guess it will need honing and new pistons.
105284
it also looks like the rod that the rockers pivots on is quite worn (at least through the case hardening). i dont know if it needs replacing.
105285
one of the pistons has pitting and corrosponding marks on the head so it looks like something dropped down into it while it was running.
105286
so i dont know enough about motors to say what needs to be done and how long it will take but ill keep you posted.

one more just because i can
105274

nice
User avatar
Wild Turkey NZ
Teardrop Inspector
 
Posts: 24
Images: 202
Joined: Fri Mar 01, 2013 4:20 pm
Top

Re: Turkey's Tear (pic heavy)

Postby AlgoDan » Mon Apr 22, 2013 4:31 am

Nice job Turkey looking sweet, you might be smelling the campfire soon. Sorry to hear about the Suzi, hope you get her repaired. :thumbsup:
Here now but Camping later.............Dan

Build Journal
http://www.tnttt.com/viewtopic.php?f=50&t=54681
102535 103199 105576
From .................Paper...........................To.......................... Pavement............................
User avatar
AlgoDan
The 300 Club
 
Posts: 449
Images: 238
Joined: Mon Feb 25, 2013 4:08 am
Location: Ontario, Canada
Top

Re: Turkey's Tear (pic heavy)

Postby Wild Turkey NZ » Mon May 06, 2013 12:19 am

Ive been needing to make some sort of retaining clip to hold the internal door handles onto the shaft or else the door will fly open when i drive.
i decide to make them with a machined bit of rod and a grub screw:
105913105912105914105915

I also finished of the firebox by putting a latching handle and a wet back water heater in it:
105916105917
its a little rough around the edges but i consider it a prototype. next time it needs a bigger chimney flu.

finally got the last bit of aluminium on the outside! the gutter above the door. its now water proof:
105918

curtains on and mattresses in:
105919

so i took it on the road for the first time behind my car and it pulls like a dream:
105920

so now its water proof im leaving home on the great adventure.
i drove down to wellington and got straight on the ferry to cross the cook straight. the crossing was a little rough and both my car and the tear got covered in salt spray .the aluminium didn't seem to get damaged from it.waiting on the ferry:
105921
it was early the next day the time i got to the south island so i stopped on the side of the road and had my first night in the tear. i left a little fan running for ventilation and it was still really warm. i woke up and there was frost outside. i was a really comfortable night, except for the trucks rolling past shaking the ground. next time i will go down a side road...after a bit of a sleep in i hit the road. Kaikoura ranges:
105922

so now im in Dunedin and have a place to keep working on my tear while the weather is bad.
i fitted the box to the draw bar:
105923
There is about 6kg of rabbit meat on top of it from the hunt the night before.

while im in Dunedin i still have the sink to make, gas struts to fit, and a cheap 12v pump to find.
living the dream
User avatar
Wild Turkey NZ
Teardrop Inspector
 
Posts: 24
Images: 202
Joined: Fri Mar 01, 2013 4:20 pm
Top

Re: Turkey's Tear (pic heavy)

Postby AlgoDan » Mon May 06, 2013 5:05 am

Looking good, must be a great feeling getting it out for a trip....Good luck on your travels. :thumbsup:
Here now but Camping later.............Dan

Build Journal
http://www.tnttt.com/viewtopic.php?f=50&t=54681
102535 103199 105576
From .................Paper...........................To.......................... Pavement............................
User avatar
AlgoDan
The 300 Club
 
Posts: 449
Images: 238
Joined: Mon Feb 25, 2013 4:08 am
Location: Ontario, Canada
Top

Re: Turkey's Tear (pic heavy)

Postby Shadow Catcher » Mon May 06, 2013 5:53 am

Your heater idea.
There has been a bit of speculation on how to do a heater similar to what you are actually doing, but so far I do not know of anyone who has actually done it. The answer for the pump is to use one made for a solar hot water system i.e. http://www.amazon.com/2-2-GPM-8-5-LPM-T ... B0075J5GEY (probably more than you need) or http://compare.ebay.com/like/2810689377 ... &var=sbar#
My thinking was to use quick disconnects and Polypropylene glycol antifreeze (nonpoisonous), you will also need to include a steam safety valve.
Do a write up once you have it working.
User avatar
Shadow Catcher
Donating Member
 
Posts: 6008
Images: 234
Joined: Sat Apr 11, 2009 8:26 pm
Location: Metamora, OH
Top

Re: Turkey's Tear (pic heavy)

Postby Roo Dog » Mon May 06, 2013 6:05 am

Turkey,

Just finished reading your thread.
Interesting read and a top job as well.
I'm on the other side of Oz. had our Tear for over a year now, they really are good value.
Enjoy.

Take it easy.

RD
Lets do a three sixty and get out of here !
User avatar
Roo Dog
Silver Donating Member
 
Posts: 461
Images: 0
Joined: Fri Mar 22, 2013 3:12 pm
Location: Esperance Western Australia
Top

PreviousNext

Return to Build Journals

Who is online

Users browsing this forum: No registered users and 10 guests