Teardrop4vets is building - slowly

Anything to do with mechanical, construction etc

Teardrop4vets is building - slowly

Postby Guy » Sun Apr 02, 2006 3:53 pm

Well, it was too beautiful outside to do anything but finally put my router table together and then finish the design. Tomorrow I am off to the water jet cutters to get a bid and proceed. One short trip to Dc later this week but everything else will be building. I will post a pic later, however here is the "final" design.

Image
Regards,

Guy
Keep on living, laughing, learning and loving.
Image
User avatar
Guy
1000 Club
1000 Club
 
Posts: 1521
Images: 44
Joined: Thu Nov 25, 2004 5:53 pm

Postby Darren » Sun Apr 02, 2006 4:26 pm

Wow that's nice Guy. :thumbsup: :applause: I know you'll keep us updated on the progress.
Image
User avatar
Darren
the camper formerly known as Victor Star
 
Posts: 1356
Images: 161
Joined: Sat Dec 03, 2005 12:09 am
Location: Shawnee, Kansas (KC)

Postby Miriam C. » Sun Apr 02, 2006 8:30 pm

:P :beautiful:
Looking good. Am I seeing it right, hot water that is usable outside and in?

Great idea.


Miriam
“Forgiveness means giving up all hope for a better past.â€
User avatar
Miriam C.
our Aunti M
 
Posts: 19675
Images: 148
Joined: Wed Feb 15, 2006 3:14 pm
Location: Southwest MO
Top

Postby 48Rob » Mon Apr 03, 2006 1:12 pm

Guy,

It looks well planned. :thumbsup:

A microwave is a very practical appliance for a "full timer".

Don't forget about the inside of the hatch for "storage".
Thin profile items can be arranged on the surface, and held in place with elastic, etc.
As you know, drawer and cabinet space is limited, but with a bit of thought and planning, many items will "just fit" here or there.
The "everything in it's place" theory...
Your design also lends itself to "under floor" storage, that can be accessed by a small hatch in the floor.
An area say, 2' x 2' x 3-5" inces deep will hold a lot of things.

Rob
Waiting for "someday" will leave you on your deathbed wondering why you didn't just rearrange your priorities and enjoy the time you had, instead of waiting for a "better" time to come along...
User avatar
48Rob
Super Lifetime Member
 
Posts: 3882
Images: 4
Joined: Thu Nov 17, 2005 6:47 pm
Location: Central Illinois
Top

Postby Chip » Mon Apr 03, 2006 8:02 pm

well since the cats out of the bag I guess this thread is on life support,,,,
Living large,,,travling small !!!
54"x9'4" tear
4'x8' tear
Serro Scotty rebuild(in progress)
User avatar
Chip
2000 Club
2000 Club
 
Posts: 2534
Images: 49
Joined: Sat Apr 17, 2004 7:33 pm
Location: Greenville, S.C.
Top

Postby mikeschn » Mon Apr 03, 2006 8:11 pm

You got that right Chip... :lol: :lol: :lol:

Mike...
The quality is remembered long after the price is forgotten, so build your teardrop with the best materials...
User avatar
mikeschn
Site Admin
 
Posts: 19202
Images: 475
Joined: Tue Apr 13, 2004 11:01 am
Location: MI
Top

Yup

Postby Guy » Mon Apr 03, 2006 8:19 pm

YUP!
Regards,

Guy
Keep on living, laughing, learning and loving.
Image
User avatar
Guy
1000 Club
1000 Club
 
Posts: 1521
Images: 44
Joined: Thu Nov 25, 2004 5:53 pm
Top

Postby 48Rob » Fri Apr 07, 2006 7:16 pm

Guy,

My apologies, I just found your message from Monday :oops:

Here are the photos you requested.

Image

Image

Image

As you know, the design is quite simple, yet works and looks great.

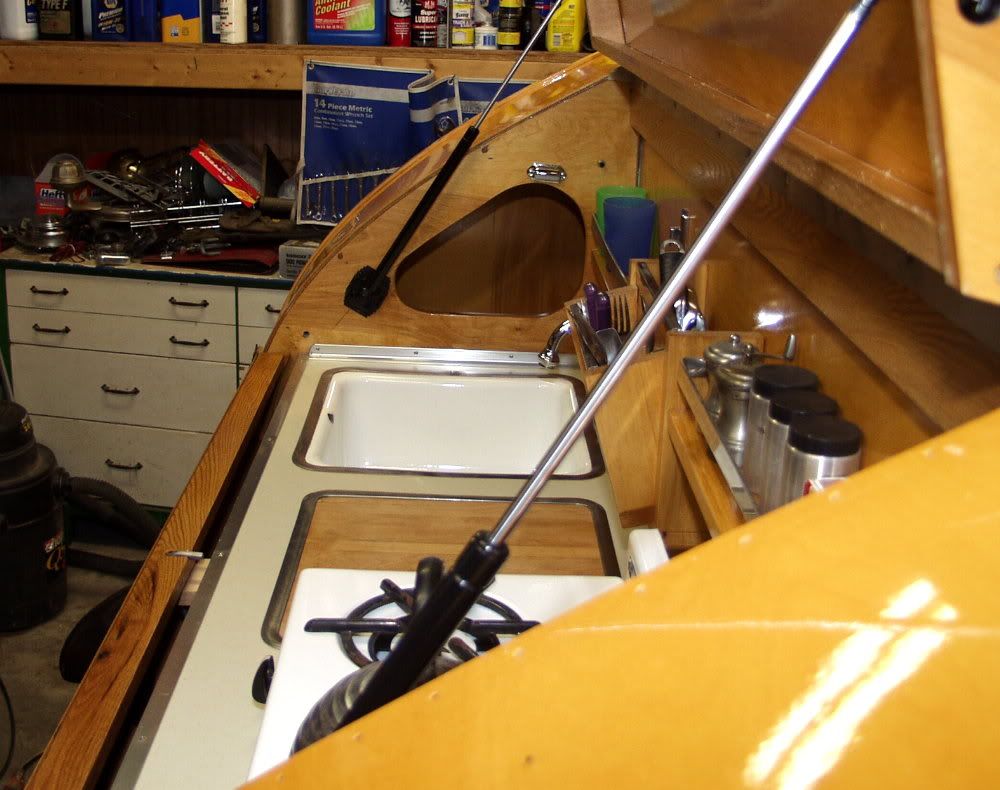
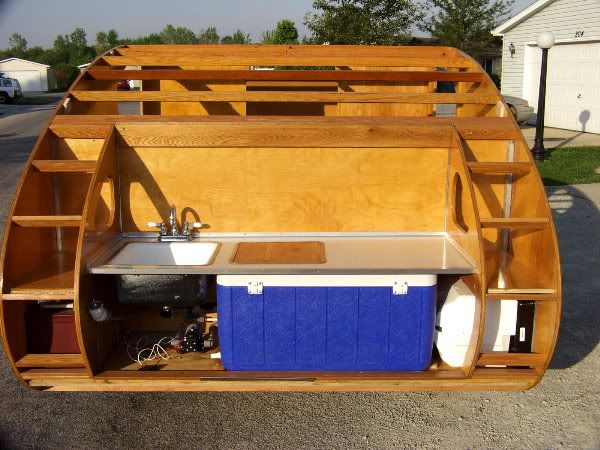
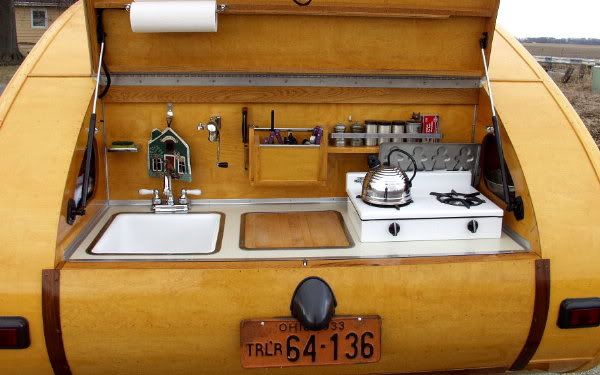
The concept (not mine) is to have the cooler, either home made, or store bought, under the work counter in the galley/kitchen area.

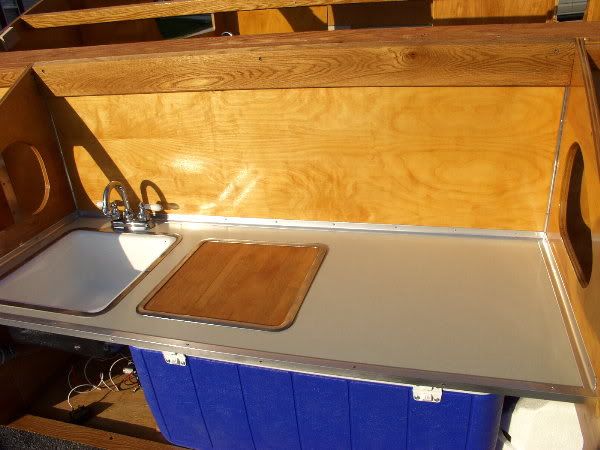
To access the contents, one removes or folds back the bread board "lid" that is set into the countertop.
There is of course a corresponding hole in the cooler top.
Appropriate trim is used to keep the cool air in, and debris out.

By using this design, the counter space is still available, and the cooler does not have to be pulled out and opened.
If the galley hatch is so designed, only the upper half of the hatch needs to be opened for everyday operations.
It gives a "neater" look, and reduces the weight of the upper door.

Though not shown in the photos, I have installed several "extras" to enhance the cooler.
There is a full width sliding drawer/tray at the top of the cooler, and a wire basket shelf attached to the side of the cooler.
Both allow for storage of items that would be ruined by contact with the water.
I added a second drain (I glued the original shut) with a shut off valve and tube that drains below the floor, to allow the melt water out.

And finally, I installed a motion controlled battery powered lamp in the upper area of the cooler.
It turns on and "lights the way" as soon as the lid is opened (turns off by itself after 15 seconds)
Great for retrieving an item in the dark.

Rob
Waiting for "someday" will leave you on your deathbed wondering why you didn't just rearrange your priorities and enjoy the time you had, instead of waiting for a "better" time to come along...
User avatar
48Rob
Super Lifetime Member
 
Posts: 3882
Images: 4
Joined: Thu Nov 17, 2005 6:47 pm
Location: Central Illinois
Top

Postby Laredo » Thu Apr 13, 2006 8:40 pm

48Rob, do those triangular pockets in the inner sides support / aid the hatch struts' operations?
Mopar's what my busted knuckles bleed, working on my 318s...
User avatar
Laredo
Donating Member
 
Posts: 2017
Images: 0
Joined: Mon Jul 05, 2004 10:42 pm
Location: West Texas
Top

Postby 48Rob » Fri Apr 14, 2006 6:14 am

Laredo,

They aid in that they provide a mounting surface for the struts...if that is what you meant?

The panels with the cutouts are structural, a part of the framing.


The triangular (teardrop shaped) holes, are the access to the cabinets.
The area at each side holds food stocks and pots and pans.

Rob
Waiting for "someday" will leave you on your deathbed wondering why you didn't just rearrange your priorities and enjoy the time you had, instead of waiting for a "better" time to come along...
User avatar
48Rob
Super Lifetime Member
 
Posts: 3882
Images: 4
Joined: Thu Nov 17, 2005 6:47 pm
Location: Central Illinois
Top

Postby Laredo » Fri Apr 14, 2006 10:16 am

Sweet.

From the angle of the picture I wasn't sure if the supports "traveled" along the bottom of the cutouts or not. (I'm thinking of Roly Nelson's wooden support arms, I expect.)

The cabinets are, what, about 8'' deep either side of the galley in the dimension between the galley side and the outside of the trailer side?
And from the "top off" pics it looks like they extend the width of the
cabinet top and drop down about 3'' below the galley cabinet deck?
Mopar's what my busted knuckles bleed, working on my 318s...
User avatar
Laredo
Donating Member
 
Posts: 2017
Images: 0
Joined: Mon Jul 05, 2004 10:42 pm
Location: West Texas
Top

Postby 48Rob » Fri Apr 14, 2006 12:06 pm

Laredo,

Thanks!

The cabinets are 12" wide, and 24" or so deep.
They run from 2" tall at the rear, to almost 24" at the front.
Very useable storage space!

The counter area is just under 5" wide, the trailer is just under 7' wide...kind of like a teardrop on steroids...

The cabinet bottoms are deeper than the counter.

Rob

Image
Waiting for "someday" will leave you on your deathbed wondering why you didn't just rearrange your priorities and enjoy the time you had, instead of waiting for a "better" time to come along...
User avatar
48Rob
Super Lifetime Member
 
Posts: 3882
Images: 4
Joined: Thu Nov 17, 2005 6:47 pm
Location: Central Illinois
Top

Postby Laredo » Fri Apr 14, 2006 8:59 pm

That is sooooo beautiful.
Mopar's what my busted knuckles bleed, working on my 318s...
User avatar
Laredo
Donating Member
 
Posts: 2017
Images: 0
Joined: Mon Jul 05, 2004 10:42 pm
Location: West Texas
Top


Return to Teardrop Construction Tips & Techniques

Who is online

Users browsing this forum: Google [Bot] and 4 guests