BUILDING DOWN UNDER, MY NEW TD

...ask your questions in the appropriate forums BUT document your build here...preferably in a single thread...dates for updates, are appreciated....

Re: BUILDING DOWN UNDER, MY NEW TD

Postby Kody » Wed Dec 19, 2012 7:47 am

Hi Roo Dog
I estimate the total weight to be about 550 to 600 kg. I'm good for 750kg but need to add brakes after 750kg. My boat weighs in a 730kg and I was checked over by the MRD mob one day and got the green flag. There were some other cars/boats that had been pulled up and even blind Freddy could see these boats were well over the 750 kg limit and had no brakes so they weren't going anywhere. My axle has been fitted with brake mounting plates so if I need to add brakes later, it will not be a biggie to do. I will probably add them after a few trial runs anyway.

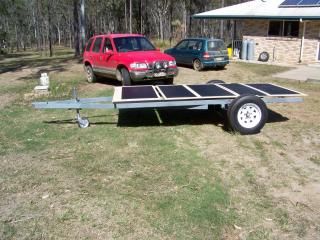
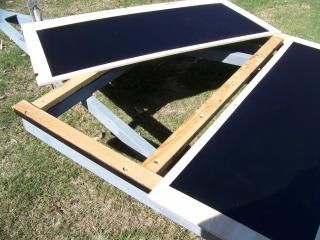
I have the frame mounted up on a stand at each end now and have the springs and axle fitted. I only have 15 minutes more of welding to do and the frame is all finished. Photos will follow soon. I would like to fit the hubs and wheels first as it's then easy to move around for the photos. The wood chips will fly when I get the plywood, hopefully next week after Christmas and the Sydney to Hobart (Boxing Day) which is something we never miss.

Kody
Never be afraid to ask questions here, Prov. 11:14
User avatar
Kody
The 300 Club
 
Posts: 341
Images: 22
Joined: Fri Aug 24, 2012 5:14 am

Re: BUILDING DOWN UNDER, MY NEW TD

Postby Kody » Thu Dec 20, 2012 3:58 am

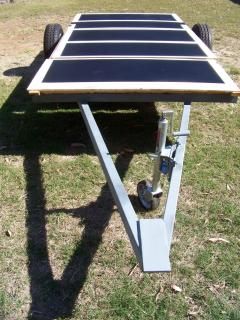
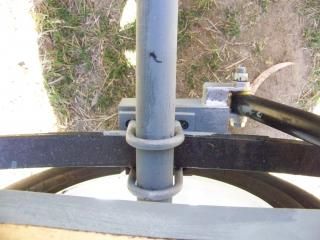
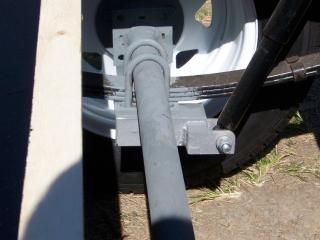
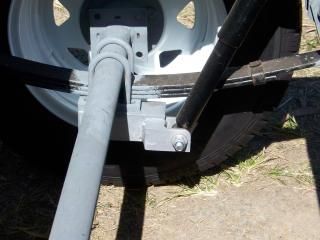
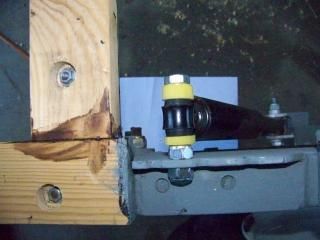
I burned the last welding rod this afternoon and the welding of the frame is now completed. :thumbsup: :applause:
The axle is welded on the small location blocks and is now bolted onto the springs. I can now fit the hubs and bearings tomorrow, paint the last of the frame and start the woodwork. As soon as I get the wheels and tires on I can pull the frame outside for photos. My first job tomorrow is to search out the plant nurseries around here and get two Macrozamier plants for my wife for Christmas. The nurseries are about 40 klms away so time will be scarce for working on the axle and hubs. However, at long last, all the welding is completed. I also have to choose what style of wheels and tires to use and I hope to get these fitted for the weekend.
Where does the time go when you're having fun?

Kody
Never be afraid to ask questions here, Prov. 11:14
User avatar
Kody
The 300 Club
 
Posts: 341
Images: 22
Joined: Fri Aug 24, 2012 5:14 am

Re: BUILDING DOWN UNDER, MY NEW TD

Postby nevadatear » Sat Dec 22, 2012 9:07 am

With your backgrounds sounds like you and my husband have a lot in common. He is a custom machinist for the local farmers in Nevada, with his own two man shop (he and his semi retired dad who still comes to work every day) but hails from ohio, the Akron area, Hartville to be specific. I will be sure and show him this thread.
Debbie (with Randy looking over my shoulder)
Our build thread: http://www.tnttt.com/viewtopic.php?t=41295&highlight=monstero
2009 Homebuilt woody, Kenskill inspired 5 wide
ImageImage
User avatar
nevadatear
Silver Donating Member
 
Posts: 2381
Images: 171
Joined: Mon Nov 10, 2008 2:37 pm
Location: No. Nevada
Top

Re: BUILDING DOWN UNDER, MY NEW TD

Postby Kody » Sun Dec 23, 2012 11:11 pm

At long last I have the wheels and tires fitted to the TD frame. I went down to town this morning and had new tires fitted to the wheels. They look super and after I mounted them they each ran perfectly true. I can now move the frame outside when the rain stops and take some proper photos. Rain? Yes, it's raining at last, not heavy but it is rain. :worship: :applause:
I have to find a new engine for the ride-on mower as the original one has seized up. I have no idea why this happened but it did. There was plenty of oil and the air cleaner was in perfect condition. Now that we have had some rain, the grass will need cutting in about 3 weeks. During a break in the rain, I found lots of dead frogs. They had all died by drowning. Seems it's been so many long years since the last rain, the frogs had forgotten how to swim.
Now that the wheels are fitted, I can check the drawings for conformity and plan out the start of the woodwork. First job now will be the floor. Good exciting stuff.

Kody
Never be afraid to ask questions here, Prov. 11:14
User avatar
Kody
The 300 Club
 
Posts: 341
Images: 22
Joined: Fri Aug 24, 2012 5:14 am
Top

Re: BUILDING DOWN UNDER, MY NEW TD

Postby Kody » Thu Dec 27, 2012 7:41 am

Here are the photos you have all been waiting for. They were only made possible by the demise of the starving hyenas that made everyone's life here in Central Queensland a total misery. We have just had some more rain, 9mm, and we all hope that the March Flies (the savage hyenas) don't come back. It will be a disaster if they do.
I can now look around for a trailer hitch to fasten onto the front of the frame and also a good quality jockey wheel. I have seen some trailers with such poor quality jockey wheels that I would be ashamed to be seen with it. A good quality jockey wheel certainly adds to the value and appearance of a TD.
There will be a clearance of 2 1/2 inches from the side of the tire to the side of the cabin. This is a little wide but it alows me to fit a fender of the shape and form that I want so I am very pleased with it. The little extra width also adds to the stability of the TD when it's being towed. The total width across the tires is 6'- 8". I am working on some ideas how I might utilize the extra few inches of width.
I'm still working on how to include photos, however, if you click on a photo it will display as a larger size.

100764
After all the hard work, here is the final result. I am very pleased with it and I can now complete the last of the painting with the Cold Gal paint
It is now too heavy to pick up by myself but with the wallaby, it's a piece of cake.

100767
You can see that I have enclosed all the ends of the RHS. It makes a huge difference for longevity of the frame.

100768
This is one of my new wheels. They are very nicely finished off and painted all over. I like the yellow and green stripes.
The tires are 14-185-75, they are 8 ply and called a Light truck tire. I was very pleased with the cost, $60.00 each
fitted and balanced
I made a tool from aluminium to set the hub caps into the hubs. The caps were driven in after filling them with grease. I made two washers to pack out the castellated nuts. These have works perfectly but holding a washer only .060" thick in a worn set of chuck jaws was not a pleasure. I discovered a major fault with the axle on one side. There were two holes to fit the split pin drilled in the outer end of the axle at 90 degrees. The split pin would only fit in one hole. When I tried to fit the pin into the other hole, I discovered that the pin didn't line up with the opposite slot/s in the nut. "Not happy, Jan!"
Everything is still the same, if I want something done right, I have to do it myself! At least it's all done now and ready for the wood chips to start flying.
I'm very pleased with the result, can't wait to get the plywood.

Kody
Never be afraid to ask questions here, Prov. 11:14
User avatar
Kody
The 300 Club
 
Posts: 341
Images: 22
Joined: Fri Aug 24, 2012 5:14 am
Top

Re: BUILDING DOWN UNDER, MY NEW TD

Postby lukeyslide » Fri Jan 04, 2013 10:10 am

Hey Mate,

Good to see another Aussie on here. Your build seems to be coming along nicely.Once you see the frame and then axle bolted on its worth all the effort. You picked up a bargin for the wheels I was charged $100 each and they ran out of white ones so now they are silver,for now. Looking forward to your progress.
lukeyslide
Teardrop Builder
 
Posts: 29
Joined: Wed May 11, 2011 5:35 am
Location: Brisbane, Australia
Top

Re: BUILDING DOWN UNDER, MY NEW TD

Postby Kody » Sun Jan 06, 2013 6:36 am

Great to have you on board Lukey, I now have the frame all painted with Cold Gal paint. This stuff is the best invention since sliced bread. I also have two new shockies to fit to the axle/frame. It took hours of work on the Cad Drawing program to get everything exactly how I wanted it but now the design is finished. I can start work on fitting them tomorrow. There is very little welding to be done but I have to make a small technical adjustment to the floor to achieve a perfect job. The photos will be posted as soon as I have the shockies mounted. I think you fellas will like the method I will be using. Some of the welding will be on the nicely painted frame but a splash more of Cold Gal and it will look fabulous. I can't wait to get them mounted. It is so much easier to build and assemble when the design has been worked out with precision. I then know that the finished job will be exactly as it should be.
I also bought a jockey wheel ($44.00) for the front. They were having a sale at Repco with 60% off everything. The jockey wheel is all galvanized and it can also be welded on this week.

Kody :)
Never be afraid to ask questions here, Prov. 11:14
User avatar
Kody
The 300 Club
 
Posts: 341
Images: 22
Joined: Fri Aug 24, 2012 5:14 am
Top

Re: BUILDING DOWN UNDER, MY NEW TD

Postby Kody » Mon Aug 26, 2013 7:10 am

After a disastrous 3 months of fighting off the back pain I am now well on the way with the work. I have the wooden bearers (70mm x 35mm ) all bolted down onto the frame. I decided to make all the bolts to hold the wood down on the frame. These bolts are UNF 1/4 - 28 and vary from 4" long to 1 3/4" long. I threaded both ends, one nut is loctited on and this nut/bolt head is sunk into the bearer to just clear the nut. The 1/4" round bright steel bar that I made the bolts (studs?) from cost me $7-00. The nuts and washers cost another $8-00 for 100 of them. For less than $20-00, I made over 75 bolts. To buy the same bolts over the counter would have cost $276-00. It has been quite a saving to make them.
I decided to make a technical adjustment to the shockie mounting points on the frame by lowering the position of the bolts that holds the shockie's. I am very pleased with the result. It's very hard to design and build properly when a crook back is tearing you apart. I have re positioned the mounts for the jockey wheel. I made four lugs and welded them to the "A" frame so the jockey wheel is mounted between the bars of the "A". The jockey wheel is bolted on instead of being welded. I preferred this method of mounting as I can remove the wheel assembly if I want to. The welded lugs look really cool and give it that professional touch.
I have cut out all the 12mm ply for the floor and it will be painted tomorrow with the tar stuff and then the sheets will be turned over and screwed and glued onto the bearers. I masked out where the bearers are so I can glue the ply, wood to wood onto the bearer. While the tar stuff is drying, I will spray paint the chassis a blue colour using a rust resistant paint. When the tar stuff is dry, I only need to flip the sheets over, glue and screw them down and paint the tar stuff along the sides of the bearers and into the corners. This will save heaps of messing around under the trailer and collecting all the tar drips all over me.
I posted some photos of how I mounted the shockies on another section of the forum. I will take some more photos and include them in here. If I get the urge, I may rebuild the lower mount that bolts onto the spring plate. Everything is now in the go ahead with the woodwork. It's a huge help to have the dry weather here now and all the march flies have gone. What a blessing this is. I only have to combat the mozzies now but the smoker coils do a fabulous job of keeping (killing) them away. It's all looking great. Will post more photos tomorrow.

Kody
Never be afraid to ask questions here, Prov. 11:14
User avatar
Kody
The 300 Club
 
Posts: 341
Images: 22
Joined: Fri Aug 24, 2012 5:14 am
Top

Re: BUILDING DOWN UNDER, MY NEW TD

Postby Roo Dog » Mon Aug 26, 2013 5:31 pm

Kody,

Good to hear you are getting on with your build.
Our Teardrop is in Limbo waiting for some decent weather, it is ready to roll, we keep it in a 'Ready for Off' status.
There is always some jobs/modifications to be done but nothing that stops us from going.
Take it easy and take care of yourself.

RD :)
Lets do a three sixty and get out of here !
User avatar
Roo Dog
Silver Donating Member
 
Posts: 461
Images: 0
Joined: Fri Mar 22, 2013 3:12 pm
Location: Esperance Western Australia
Top

Re: BUILDING DOWN UNDER, MY NEW TD

Postby Kody » Tue Aug 27, 2013 9:37 am

I now have the floor panels painted with the tar stuff. Using the masking tape was a great success. I applied two heavy coats of the stuff and now I can flip the panels over and glue and screw them down. Before they are screwed down, I will spray paint the trailer frame first. The photo shows the layout of what I have done so far.
Image

This shows the front end panel and some of the bolts/studs that fasten the wooden bearers to the frame.
Image

Front view, it will look quite different tomorrow. The frame will be painted (blue) and if the paint dries before it gets dark, I will glue and screw the rear floor panel down.
Image

This is an above view of the shockie mounts I made. The mount consists of a 5" length of 2"x2"x1/4" steel angle drilled out to fit the shanks of one of the "U" bolts that hold the axle to the spring. The mount is a bit of an overkill and I will change it later (?) to a cantilevered bolt similar to the top mount. I much preferred this method of mounting rather than simply weld a bolt to the spring plate. It didn't take very long to make the mounts and I am pleased with them but the lower mount will be changed. (Maybe next year or the next, you know how it is.) If it's not broke, don't fix it!
Image

This is how the mount is bolted to the spring plate. It was very easy to make, it just took some time to figure out how to do it in as simple a way as possible.
Image

Image

One more shot of the upper shockie mount. Perhaps this will inspire someone to install some shockies the same way as this. It really was easy to do, I hope the design/idea can can help someone.
Image
Never be afraid to ask questions here, Prov. 11:14
User avatar
Kody
The 300 Club
 
Posts: 341
Images: 22
Joined: Fri Aug 24, 2012 5:14 am
Top

Re: BUILDING DOWN UNDER, MY NEW TD

Postby Roo Dog » Tue Aug 27, 2013 6:46 pm

Joe,

We decided to go without shockers and fit them later if needed.
So far all is good, nothing moves around, that said we are not off roaders. We do amble up dirt tracks and I mean amble.
There appears to be enough friction in the slipper springs to control any rebound.
Tyre press is set at 20psi after much experimentation.
Take it easy.

SD
Attachments
100_1737 (800x533) (500x333).jpg
100_1737 (800x533) (500x333).jpg (126.34 KiB) Viewed 1869 times
Lets do a three sixty and get out of here !
User avatar
Roo Dog
Silver Donating Member
 
Posts: 461
Images: 0
Joined: Fri Mar 22, 2013 3:12 pm
Location: Esperance Western Australia
Top

Re: BUILDING DOWN UNDER, MY NEW TD

Postby Kody » Fri Sep 13, 2013 7:51 am

Things are now starting to take shape. I have glued and screwed the plywood for the floor down onto the 35 x 70 mm wooden bearers and it looks great. The glue has now set so it was time to get the router out this afternoon and do some trimming around the edges. There was a small variation in the integrity of the straightness of the wooden bearers, (about 1/16") and this had to be machined as perfectly as I could to make the edges straight. I needed a "straight edge" to clamp onto the floor and guide the router. The only thing I had that came anywhere near straight was the left over 2" x 2' x 1/8" steel angle. I clamped this down at the ends and then ran a nylon string line along the face of the angle. The string line was offset with a nail at each end. The line now being pulled tight revealed a concave bend in the angle. This was trued up by fitting a 3 x 2 across the center of the trailer and clamping the end down on the opposite side of the floor. The concavity was removed with a Knockometer to make the necessary adjustment. I was then able to slide the router along and trim the edges and also trim the 30 x 70 (mm) bearers. Trimming the edge of the bearers has meant that the RHS frame is now protruding 1 mm or slightly more, past the edge of the wood. I was going to locate the walls on the side of the RHS but will now fit them to the sides of the bearers. They are plenty strong enough and deep enough to fasten the walls to with no problems.
I have found that I have more "weld warp" than what I at first thought on the RHS frame. The frame sides are 10' long and the welding has bowed the frame upwards to the extent of 5/16" to a possible (probable) 3/8". This is no biggie problem. I will simply trim/shape the walls to fit the curve. This will be far better than simply fitting them on with a straight edge on the bottom of the wall.
I would post some photos of how I set up the angle steel but it's now all done. The steel left some rust marks (don't ask why this happened!) and I have now sanded them all off. To take photos means getting the rust stains on the wood again. The floor and the edges look fabulous and I can't wait to start on the walls. I am very pleased with the way the project has taken shape.
One thing I did discover was that when machining (?) steel, (the shockie mounts), the router slows down and makes sparks. The cutter is ok but will need sharpening with the diamond hone. The last time I machined some steel, the 1/2" cutter exploded which was quite exciting (but not nice!)

It's all going great :thumbsup: :thumbsup: :applause:
Kody
Never be afraid to ask questions here, Prov. 11:14
User avatar
Kody
The 300 Club
 
Posts: 341
Images: 22
Joined: Fri Aug 24, 2012 5:14 am
Top

Re: BUILDING DOWN UNDER, MY NEW TD

Postby Kody » Sun Oct 06, 2013 7:21 am

Everything is now going really well. The back pain is beginning to ease off and I can now work so much easier. I cleaned off the dust and dirt from the garage floor using the air compressor and a long hose fitted with an air blower (or duster). This made short work of the floor and a big sheet of black visqueen was then laid down. I dropped a sheet of 1/8" ply on the floor and proceeded to lay out and glue the parts I cut out for the inner frame work. I bought a 12" De-Walt Radial drop saw about a year ago and now it's getting a thorough work out. I love the accuracy of the cuts and the angles. I can cut a piece ot 2 1/2" x 3/4" to an exact length and then repeat it for a second piece. I can even cut 0.010" and less off the end to perfect the fit.
The glues you guys suggested that I could use don't appear to be available here in Aust. I will keep looking but I'm not holding my breath to do it. Kody comes into the work area when no power tools are running and "helps" me with the build. I was kneeling down on the ply this morning to check the gluing of the pieces I fitted yesterday. She jumped all over the ply with wet and dirty feet, dropping dirt and stains everywhere. Oh well, at least I can blow it all off the ply with the air hose and the surface of the ply is the unseen side in the wall. It's very hard to rouse her as she only wants to be near me. She also has been so wonderful protecting Cindy from the dingos.
Its been a major effort to find wood that is straight and square and without it being twisted. I have had to examine every stick of wood in the store and after much searching, I found 11 pieces for the struts to go across the top of the walls and all the wood for the framework. It only took me two days to find it!!
I will be cutting out the main base for the frame tomorrow and gluing it down. It is so exciting to see it all coming together at last. Once the base section is down, the rest of the frame will be very quick to assemble. If I ever do this again, I will endeavour to make all the angled pieces of the frame designed to cut at very specific angles. That is, made to a whole angle, not to an angle measured in decimals of a degree. It's rather tricky to set the saw to cut an angle of 19.3 or 21.8 degrees. So far, I have been able to keep everything to the accuracy that I want. You have probably gathered by now that I'm somewhat of a perfectionist but it's so much easier if things fit well, especially the joins. Now that the wood work has started, I can take lots more photos for you all.
It's time to hit the hay, Kody won't leave me to do the same so it's time for a glass of iced coffee and we're outer here.

Joe n' Kody :thumbsup: :thumbsup: :thumbsup:
Never be afraid to ask questions here, Prov. 11:14
User avatar
Kody
The 300 Club
 
Posts: 341
Images: 22
Joined: Fri Aug 24, 2012 5:14 am
Top

Re: BUILDING DOWN UNDER, MY NEW TD

Postby KCStudly » Sun Oct 06, 2013 6:49 pm

Glad to hear that your back is better and that you are able to continue with the build! :thumbsup:

We are of similar minds on the details.

Don't forget to take lots of pics!
KC
My Build: The Poet Creek Express Hybrid Foamie

Poet Creek Or Bust
Engineering the TLAR way - "That Looks About Right"
TnTTT ORIGINAL 200A LANTERN CLUB = "The 200A Gang"
Green Lantern Corpsmen
User avatar
KCStudly
Donating Member
 
Posts: 9640
Images: 8169
Joined: Mon Feb 06, 2012 10:18 pm
Location: Southeastern CT, USA
Top

Re: BUILDING DOWN UNDER, MY NEW TD

Postby Kody » Thu Oct 10, 2013 6:27 am

The building is now progressing the way it should be. The 1/8" ply is laying on a sheet of heavy visqueen and the outer shape of the side is beginning to show.
The wooden beam is tucked under the trailer and a short length of timber is transferring the weight of the beam (plus the steel weights at the end) onto the frame parts to hold them down while the glue dries. There is another 3 1/2 feet of ply to be added to complete the side in length. The red hose is the air hose from my air compressor. It's being used to keep all the timber, parts and floor clean of sawdust and dirt. It works better than a broom or vacuum cleaner.
113265

This photo shows the shape of it all a little better, You can see the frame that has been shaped to form a scarf join to increase the length of the wood that spans the length of the trailer. I have use a staple gun to hold the parts from sliding out of position while I place the weights on them. This has been a great asset.
113258

Will start uploading some more photos to show.

Kody
Never be afraid to ask questions here, Prov. 11:14
User avatar
Kody
The 300 Club
 
Posts: 341
Images: 22
Joined: Fri Aug 24, 2012 5:14 am
Top

PreviousNext

Return to Build Journals

Who is online

Users browsing this forum: No registered users and 1 guest