Where to run Fantastic Fan wiring?

Anything to do with mechanical, construction etc

Where to run Fantastic Fan wiring?

Postby tony.latham » Sun Sep 08, 2013 6:58 pm

Okay, I THINK I've got it. Take a peak at the photo. Right now I've got the wiring running into the fan hole at A, but I can move it over to B. Which one is closer to where the fan's wires are? (The unfoamed area is where my fan wire is coming from. you can see it running left to right into the cutout and taped in place.)
Image

Thanks!

TL
User avatar
tony.latham
Gold Donating Member
 
Posts: 7074
Images: 17
Joined: Mon Jul 08, 2013 4:03 pm
Location: Middle of Idaho on the edge of nowhere

Re: Where to run Fantastic Fan wiring?

Postby Nobody » Mon Sep 09, 2013 9:39 am

Mine is an older model (2006) 3-speed, exhaust only FV. Controls are in left (driver side) rear corner so I ran the wires there...

Image
Image

This interior shot shows FV location with speed control (& fuse) at 'right' rear (driver side) corner
Image
Harvey -

- - - - - - - - - - - - - - - -

Doing the right thing ain't always easy but, . . . it's always right!
User avatar
Nobody
1000 Club
1000 Club
 
Posts: 1196
Images: 342
Joined: Wed Jan 25, 2006 1:09 pm
Location: Benton, Arkansas

Re: Where to run Fantastic Fan wiring?

Postby tony.latham » Mon Sep 09, 2013 5:26 pm

Harvey:

Thanks for the photos. That's a fine looking tear!

TL
User avatar
tony.latham
Gold Donating Member
 
Posts: 7074
Images: 17
Joined: Mon Jul 08, 2013 4:03 pm
Location: Middle of Idaho on the edge of nowhere
Top

Re: Where to run Fantastic Fan wiring?

Postby Loader » Mon Sep 09, 2013 6:43 pm

Tony,

Mine is wired to what would be point "A" on your build.

Image
Earl & Kerry

"Loader"

Blue Yonder Build Thread - viewtopic.php?f=50&t=42611

ImageImage
User avatar
Loader
Platinum Donating Member
 
Posts: 1584
Images: 245
Joined: Tue Apr 26, 2005 2:33 pm
Location: Fort Worth, Texas
Top

Re: Where to run Fantastic Fan wiring?

Postby Chuckles » Mon Sep 09, 2013 10:36 pm

Not sure which model I recently purchased (12v, three speed, reverse, thermostatically controlled) but mine is wired where you have hole "A"

Chuck
User avatar
Chuckles
Teardrop Master
 
Posts: 141
Images: 48
Joined: Thu Jan 26, 2012 10:42 pm
Location: NE Wisconsin
Top

Re: Where to run Fantastic Fan wiring?

Postby MontanaTeardrops » Mon Sep 16, 2013 10:15 pm

Hey Harvey. I was just wondering what kind of saw you used to cut your spar pockets into the wall tops. Also, do you have a build pic of the Galley Spar and hinge install?
Image
User avatar
MontanaTeardrops
Donating Member
 
Posts: 58
Joined: Sat Aug 17, 2013 11:12 am
Location: Montana
Top

Re: Where to run Fantastic Fan wiring?

Postby Nobody » Tue Sep 17, 2013 11:46 am

MontanaTeardrops wrote:Hey Harvey. I was just wondering what kind of saw you used to cut your spar pockets into the wall tops. Also, do you have a build pic of the Galley Spar and hinge install?


I think :oops: I used my jig (saber) saw to cut the notches, or possibly after cutting the first saw kerfs at each end of the notch I may have used a skilsaw set to correct depth & just cleaned out the notch that way. Either will work, just use a good sharp 'crosscut' type blade for the jigsaw.

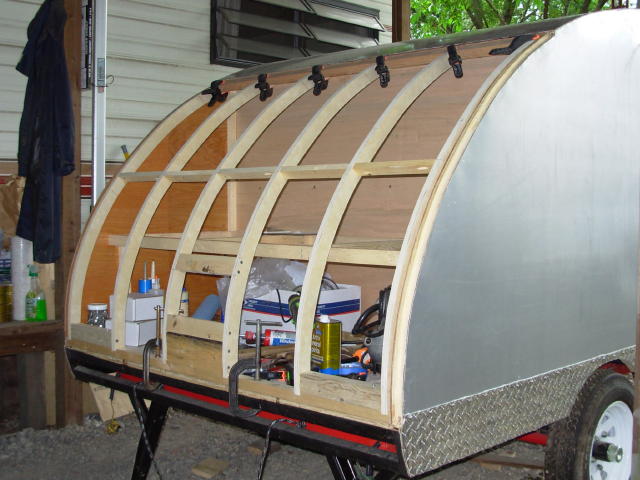
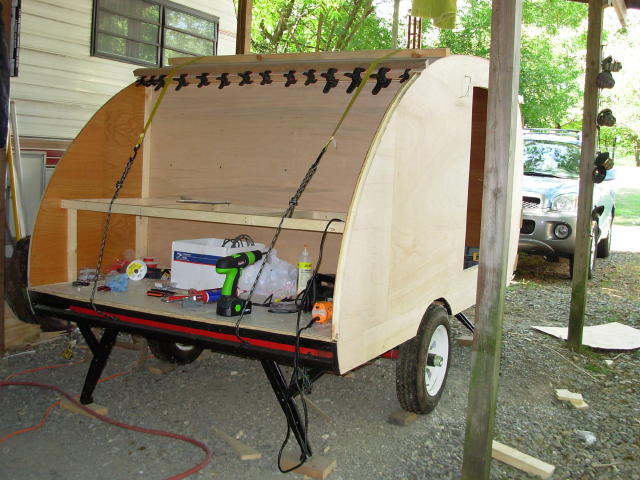
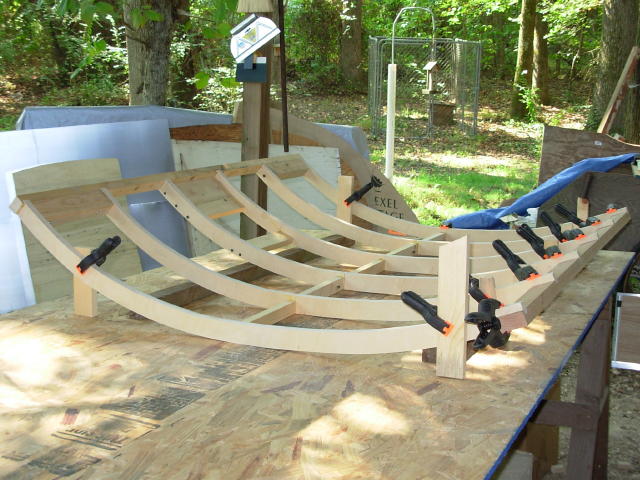
Somewhere in my old files (I've re-formatted the hard drive of my old computer a number of times) I probably have pix of the galley spar better than what's in the gallery here but it'll take days to locate them. For the galley spar I simply used a piece of full 1" x 2" oak that I cut from rough lumber & planed to dimension with my little jointer. Also used the same type lumber for the top cross piece of the hatch frame. the 'hurricane hinge' went on after the aluminum skin was in place, using stainless screws & sealant (butyl tape under the hinge & PL adhesive in the screw holes). My aluminum skin is 'floated' generally except I used a few 'beads' of PL adhesive to help hold it in place until doors, trim, etc., were screwed in place. As can be seen in at least one pic in my gallery I used several beads of adhesive for the roof skin at the galley spar, held in place by a 'bunch' of clamps 'til the adhesive had cured. The screws in the hinge of course negated any need for adhesive after installation. Here's a few pix from my gallery you may find interesting...

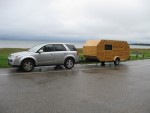
Oh yeah, I used 5x10'x0.40" mill finish aluminum for my skin. For the top I cut the sheets in half (5x5' pieces) & overlapped them 2" with joints over a roof spar. Overlaps were toward the rear on top & toward the ground at the front radius (except for the diamond tread trim pieces which have several beads of 'sikaflex' & PL adhesive at the joints).

Luan 'under skin' clamped in place before adding aluminum
Image

pretty god shot of the oak galley spar
Image

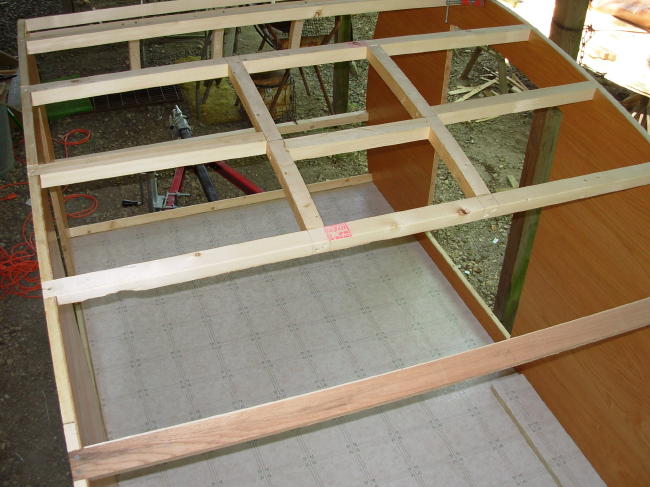
detail of the hatch frame with the oak hinge base at right
Image

pic showing how the oak hinge base 'mates' with the oak galley spar
Image
Harvey -

- - - - - - - - - - - - - - - -

Doing the right thing ain't always easy but, . . . it's always right!
User avatar
Nobody
1000 Club
1000 Club
 
Posts: 1196
Images: 342
Joined: Wed Jan 25, 2006 1:09 pm
Location: Benton, Arkansas
Top


Return to Teardrop Construction Tips & Techniques

Who is online

Users browsing this forum: No registered users and 2 guests