Utility Trailer Score - The Charcoal Briquette

Ask questions about Harbor Freight trailers, or questions about building your own...

Utility Trailer Score - The Charcoal Briquette

Postby KCStudly » Wed Oct 09, 2013 10:16 pm

Strike while the iron is hot. Take the bull by the horns. Like a phoenix rising from the ashes.

My employer has a separate facility a few blocks away from the main factory that is mainly only used as warehousing. Old brick and timber mill building. I like to call it, “the abandoned building that we still use”. It is poorly maintained and in a poor neighborhood. The parking lot is occasionally used as a dumping ground by people that don’t want to pay dump fees.

Well, one day a pair of 5x8 utility trailers, loaded to the gills with wood, scrap, some tools, etc. showed up. The catch is that they have no license plates and someone attempted to burn them to the ground. When that didn’t work, they apparently decided to dump them in the parking lot.

They appear to have been work trailers for a handyman business. The facilities guy contacted the local police and they filed a report declaring them as abandoned. They gave us a CAD number and said to reference that at DMV. He claimed the one with the flip down tailgate ramp (even though the second xmbr had been bent down by the tongue, and the tongue was bent from a jackknife), and offered the other one up to me.

I swung by there after work to have a look.
Image
Image
Image

The fire seems to have been mostly confined to the pile of wood on top, including the 2x4 rack, although the skirt boards and tailgate are charred, as well. The taillights and wiring at the tongue are melted, and the street side tire has some heat checks (needs to be replaced). However, the only place where the paint on the chassis got hot enough to burn off was the street side fender (rust area). The rest of the steel does not look bad and does not seem to have been adversely affected by the fire.

The truck bed box on the tongue was brittle and had been busted open, but could not be opened properly due to the boards sticking out the front. This mess would need to be cut off before towing.

I took those pics and talked to my friend Karl, and he said we should go for it. We grabbed his cordless recip-saw, impact driver, cargo straps and picked up a set of those prewired magnetic mount taillights at Wally world.

After cutting the overhanging boards, removing a bunch of junk from the tongue box (including a hard bag of sakrete and most of a flat of tar shingles… about 160 lbs), so that I could remove a handful of lag screws that were holding the box on, we were able to remove it… and the whole trailer tottered back onto the rear xmbr!

Closer inspection found that it has a tilting bed (there is a latch pin holding the box to the tongue under the front). The axle appears to be slightly ahead of the middle of the bed, which makes sense to aid in tilting the bed, but plays hell on tongue weight.

I had to stand on the coupler with both feet to get the tongue down on the ball, then we threw the sakrete and shingles onto the pile in the front of the bed, barely achieving a neutral tongue weight. Strapped everything down and rigged up the lights.

It towed evil; wagged severely all the way back to the shop doing 25 mph and under.

Ever since switching from a small P/U to an SUV I have wanted to get a small UT. I’m going to call this one “The Charcoal Briquette”, and if I ever build a TD on it, it will be named the same.

Saturday I will use Karl’s UT to haul all of the crap to the dump and will be able to get a closer look at her condition.
Last edited by KCStudly on Tue Oct 15, 2013 7:57 pm, edited 2 times in total.
KC
My Build: The Poet Creek Express Hybrid Foamie

Poet Creek Or Bust
Engineering the TLAR way - "That Looks About Right"
TnTTT ORIGINAL 200A LANTERN CLUB = "The 200A Gang"
Green Lantern Corpsmen
User avatar
KCStudly
Donating Member
 
Posts: 9640
Images: 8169
Joined: Mon Feb 06, 2012 10:18 pm
Location: Southeastern CT, USA

Re: Utility Trailer Score - The Briquette

Postby bobhenry » Thu Oct 10, 2013 7:25 am

Negative tongue weight and axle to far forward makes an evil towing monster. I had a similar problem with "Chubby"
(62 MPH was max) until I extended the tongue almost 2 feet.

When I built "the barn" I actually cantilevered the body 2 foot forward of the front of the frame and again reinforced and extended the tongue. ( I know for a fact it will tow well at 85 MPH )

Get some weight on the tongue and extend the tongue length you will be amazed the difference it makes.

By the way a great find. I always like free ! :thumbsup:
Growing older but not up !
User avatar
bobhenry
Ten Grand Club
Ten Grand Club
 
Posts: 10368
Images: 2623
Joined: Fri Feb 09, 2007 7:49 am
Location: INDIANA, LINDEN

Re: Utility Trailer Score - The Briquette

Postby KCStudly » Thu Oct 10, 2013 8:00 am

Thanks Bob!

I have also been told to look for the possibility that it has a quick adjustment mechanism for axle location, similar to a boat trailer. Seems that these tilting trailers sometimes have that.

I'll take a closer look at that when I have some more daylight (it had gotten dark by the time we yanked it).

I'm not going to go crazy with it right now; don't want to take too much time away from TPCE, and it is punkin tossing season (!!!), but I will break down the crap, wire up the permanent light kit that I already picked up ($25 for 4-flat wire loom, tail and side marker lights), get that tire changed out, maybe replace some of the wood on the deck and side skirts (as required), and get the paper work going.
KC
My Build: The Poet Creek Express Hybrid Foamie

Poet Creek Or Bust
Engineering the TLAR way - "That Looks About Right"
TnTTT ORIGINAL 200A LANTERN CLUB = "The 200A Gang"
Green Lantern Corpsmen
User avatar
KCStudly
Donating Member
 
Posts: 9640
Images: 8169
Joined: Mon Feb 06, 2012 10:18 pm
Location: Southeastern CT, USA
Top

Re: Utility Trailer Score - The Briquette

Postby KCStudly » Thu Oct 10, 2013 1:26 pm

Got some info from CT DMV.

Got the Comptroller here to sign a DMV affidavit of ownership form (claiming that the trailer was left on private property for a period of time and documenting the police report) and a DMV gift form so I will not have to pay sales tax (hopefully).

In CT you can not claim vehicles that have title history, but under 3k lbs trailers do not require title in CT, so I hope this works.
KC
My Build: The Poet Creek Express Hybrid Foamie

Poet Creek Or Bust
Engineering the TLAR way - "That Looks About Right"
TnTTT ORIGINAL 200A LANTERN CLUB = "The 200A Gang"
Green Lantern Corpsmen
User avatar
KCStudly
Donating Member
 
Posts: 9640
Images: 8169
Joined: Mon Feb 06, 2012 10:18 pm
Location: Southeastern CT, USA
Top

Re: Utility Trailer Score - The Briquette

Postby KCStudly » Fri Oct 11, 2013 9:37 pm

Karl was a big help moving the pile of burnt crap out of the Briquette and on to his UT so that I can haul it to the dump tomorrow.

After we moved most of the schtuff, cut the charred wooden rack off, and removed the 2x10 top skirt board that had been added above the sides and front rails, we found that someone had added a layer of T&G OSB in two pieces over the original plank deck. It was charred and heavy with moisture so we pried it up. There were only a few small nails holding each piece down at the edges, but they were wedged in there pretty good. Here it is after removing the rear piece of OSB.
Image

The middle board is broken thru a large knot, but the planks are otherwise in good condition. In the above pic, and this next one you can also see the 3/8 ply that lined the side rails, and the thin 1/4 inch panels set into the front “wall”. That blob of black is actually a small shop vac melted onto the front portion of the floor. The ply sides and extra layer on the floor contained the fire like a tub and sent most of the heat upward, insulating the steel from any serious heat damage.
Image

Here is the shop vac after we pried it up off of the floor. It was a pancake with only the mesh from the filter and a small chunk of the hose underneath to identify it.
Image

There was also two paint spray guns, a powered spray rig, small air compressor, small gas powered generator, an electric jigsaw, a recip saw, a 6 ft FG step ladder… all toast… Dali-esque melting… and about 5 lbs. of nails that had been bonded together by the remains of a HoDePo orange bucket.

And here is the Briquette after stripping most all of the charred junk and wood off.
Image
Image
Image
Image

And the load on Karl’s UT.
Image
Image

The taillights.
Image
Image

The tilt mechanism works great, and I can confirm that the axle placement suits that function very well. The bed tips up by itself when the pin is released and would tip back down soon after the rear wheels on something like a lawn tractor or motorcycle roll up on, but just sitting there unloaded the tongue has very little weight on it, and the axle is at about 60/ct forward of the rear, so an evenly distributed load would be tail heavy.

I guess that is the tradeoff with the tilt feature.

The trailer was originally red with two fine lines of white pin stripping showing on the tongue where I peeled up some duct tape that was holding the melted wiring harness on. I'm assuming that this is a Carry-On or equal.
Last edited by KCStudly on Sat Oct 19, 2013 8:21 pm, edited 1 time in total.
KC
My Build: The Poet Creek Express Hybrid Foamie

Poet Creek Or Bust
Engineering the TLAR way - "That Looks About Right"
TnTTT ORIGINAL 200A LANTERN CLUB = "The 200A Gang"
Green Lantern Corpsmen
User avatar
KCStudly
Donating Member
 
Posts: 9640
Images: 8169
Joined: Mon Feb 06, 2012 10:18 pm
Location: Southeastern CT, USA
Top

Re: Utility Trailer Score - The Briquette

Postby Corwin C » Fri Oct 11, 2013 10:15 pm

Just a heads up ... make sure the grease and seal for the bearings aren't damaged by the fire before towing it. I made that mistake before when reclaiming a burned trailer.
Corwin
Image Image Image
If I am unwilling to stand up straight before the world and admit what I have accomplished during the day, without excuses, in complete and honest detail, then I can do better ...
and no one should be expected to accept anything less.
-- myself
User avatar
Corwin C
500 Club
 
Posts: 916
Images: 78
Joined: Mon Oct 19, 2009 10:27 am
Location: Junction, Piute County, UT
Top

Re: Utility Trailer Score - The Briquette

Postby KCStudly » Fri Oct 11, 2013 10:33 pm

Thanks for the advice. I had thought about that.

We did drag it about 10 miles with the load on it, but at only 20-25 mph pulling over several times to let cars by. From what I am seeing I would not be surprised if the seals are ruined, but would be quite surprised if the bearings and grease were so far gone to have failed in that short distance. (On the other hand, I would not be surprised to find that they have been poorly maintained.)

I do intend to pull the hubs for inspection, and I'm probably going to replace both tires, just cuz the one is checkered from the heat and it's just not worth the risk.

I hope that we didn't do any damage to the spindles, but I wanted to take advantage while I could. I'm fairly confident that the heat didn't get that bad at the hub. The back sides of the 3/8 ply lining the sides was not charred, and the paint on the inside of the inner fender skirts was not blistered.

The damage to the street side tire appears to be from something on fire falling down on top of the fender and coming into direct, or near direct contact.
KC
My Build: The Poet Creek Express Hybrid Foamie

Poet Creek Or Bust
Engineering the TLAR way - "That Looks About Right"
TnTTT ORIGINAL 200A LANTERN CLUB = "The 200A Gang"
Green Lantern Corpsmen
User avatar
KCStudly
Donating Member
 
Posts: 9640
Images: 8169
Joined: Mon Feb 06, 2012 10:18 pm
Location: Southeastern CT, USA
Top

Re: Utility Trailer Score - The Charcoal Briquette

Postby KCStudly » Sat Oct 12, 2013 9:27 pm

I'm renaming the utility trailer 'The Charcoal Briquette', or 'The Briq' for short.

After loading up the junk from The Briq last night and hauling the stuff to "the tip" this morning, I gave Karl a hand mounting an 18 hp leaf vac onto the tongue of a customer's 14000 lb dump bed trailer.
Image
Image

Seemed like a fair trade of labor for the help that Karl gave me handling nasty charred wood and burnt plastic.
KC
My Build: The Poet Creek Express Hybrid Foamie

Poet Creek Or Bust
Engineering the TLAR way - "That Looks About Right"
TnTTT ORIGINAL 200A LANTERN CLUB = "The 200A Gang"
Green Lantern Corpsmen
User avatar
KCStudly
Donating Member
 
Posts: 9640
Images: 8169
Joined: Mon Feb 06, 2012 10:18 pm
Location: Southeastern CT, USA
Top

Re: Utility Trailer Score - The Charcoal Briquette

Postby KCStudly » Sat Oct 12, 2013 9:32 pm

Forgot to mention that I looked under The Briq again today and was happy to see that the axle has brake mounting flanges already installed. :thumbsup:
KC
My Build: The Poet Creek Express Hybrid Foamie

Poet Creek Or Bust
Engineering the TLAR way - "That Looks About Right"
TnTTT ORIGINAL 200A LANTERN CLUB = "The 200A Gang"
Green Lantern Corpsmen
User avatar
KCStudly
Donating Member
 
Posts: 9640
Images: 8169
Joined: Mon Feb 06, 2012 10:18 pm
Location: Southeastern CT, USA
Top

Re: Utility Trailer Score - The Charcoal Briquette

Postby KCStudly » Mon Oct 14, 2013 10:22 pm

On Sunday, before moving The Briq into the barn to work on replacing the lights and wiring Karl and I wanted to get all of the loose charcoal dust and small debris off that did not get scooped up with the square bladed shovel. So we wrapped a sling around the tongue behind the jack and tipped it up with the fork truck so that we could sweep the bed off more efficiently.
Image
Image
(Mostly I think Karl wanted to give it a good shaking, but the fork truck did not go high enough for that.)

While there I took a couple pics of the suspension.
Curb side.
Image

Street side showing brake flange on axle.
Image

I was happy to see no signs of melted axle seals or grease coming out, and there was no play or crunchiness in the bearings. They spin over nicely.

One of the leaf springs was installed backwards, with the band at the rear, but that doesn’t really matter too much w/o brakes installed.

Next we moved her into the barn and hung her from the front top rail for easy access to the underside.
Image
Image
If you look closely at the above pic you can see the new wiring running down the middle and out to the rear taillights. There weren’t any front marker lights on it, so I added them, and you can just see the new wires prior to being anchored down.

In this pic you can see the small piece of 2x2 under the back of the deck that I screwed in to splice the broken center plank back together. It had split at a large knot.
Image

The wiring kit came with small wire nuts for connecting the lights and splice connectors for tapping in the runs to the front markers. I soldered the connections and used shrink tubing at the lights, but did use the splice connectors to tap in for the front markers; wrapped well with tape.

The ground lead (white wire) on the 4-flat was painfully short, so I extended that enough to get back behind the coupler by soldering some white wire that I had from TPCE. I used a flap wheel in the 4-1/2 inch grinder to clean paint off the ring terminal mounting location (crimped and soldered the ring terminal before adding shrink tubing). If I had been thinking I would have extended the ground wire thru the tongue with the rest of the wires; read on.

I bundled the wire pairs together (right turn/brake = green with right running lights = green with brown stripe, and left turn/brake = yellow with left running lights = yellow with brown stripe), drilled a 3/8 inch hole in the top of the tongue behind the jack mounting bolts. I deburred the hole well and wrapped the bundle of wires several times in tape to prevent chaffing, before feeding the wires through the tongue tube and sealing around the hole with some black Henry’s caulk. By feeding the wires through the tongue they would come out on the chassis at the back of the tilt pivot point, avoiding the pinch points at the tilt latching pin and side bolsters.

There were existing holes down the centerline in each xmbr that had been made with a smoke wrench (oxy/acetylene torch); I assume they were OEM. Surprisingly, these holes were pretty smooth around the edges, but one of them needed drilling out larger. I tripled up on electrical tape wrapping a generous portion of the harness at each of these xmbrs.

The kit only came with a few metal clips for securing the wires, so I used these ‘P’ clips that I had left over from a previous project with some small wood screws and flat washers.
Image

Here you can see the shrink tubing over the solder joints for the right rear taillight. I reused the old nuts to mount the taillights because they were serrated washer faced, whereas the new hardware was a small lock washer and nut that would not work well with the generous sized holes. Later I came back and cleaned off the backs of the mounting brackets with the flap disk and cleaned the nuts with a wire brush and scuff pad; read on.
Image

I positioned the single hole for the front side marker lights carefully so that they were above the deck on the inside (so that I could get the nut and washer on) and close enough to the front corner vertical angle iron so that the light housing could not turn on the stud.
Image

The taillights are specifically labeled “TOP” with the license plate “light” (really just a clear lens in the housing) on the bottom of the left light. I wish the license plate light was on top so that the plate would be up and out of harm’s way, but there is no way to flip it over because the rear side marker is integral and the plate needs to be on the left if not mounted on the back (which is not practical on a UT). The plate will hang low and probably get damaged from dips or when tilting the bed.
Image

Next I started cutting off the old rusty bolts that had held the side and front wood panels on; working until the cordless grinder ran out of juice.

I was running out of steam myself, so was quite disappointed when I hooked the Ford up to test my work and nothing lit up. Bummer. I immediately suspected a bad ground, since none of the lights were lit. Tired and dejected, I decided to tow the trailer around back for the night rather than wheel it by hand. On the ride around the barn I could see that the lights had started working, reinforcing my suspicion about the grounding. Once parked I checked the lights again (turn your running lights and flashers on to do this by yourself) and found everything working except the left turn/brake. Hmm.

It occurred to me that the way I had connected the ground from the 4-flat connector to the tongue might not be making a good enough connection through the pivot joint at the tilt hinge bolt and where the front xmbr rests on the tongue could be intermittent due to clearances and bouncing, but that didn’t really account for the running lights working and the signal/brake light not.

Ditto the fact that I had not done anything special to clean off the backs of the mounting brackets where the taillight mounting studs make their ground connection.

So tonight, Monday, I decided to go back and add a dedicated ground jumper wire between the tongue and main chassis.
Shown here with cleaned contact points with the bed down.
Image

And with the bed tilted up.
Image

Removed the taillights and cleaned off the backs of the mounting brackets, but still no left turn/brake light. Hmm.

A little troubleshooting later and I had determined that the problem was with the TV, and not the trailer. BTW, a handy tip I picked up is that you can flip the 4-flat connector around and just connect the odd pins; the ground pins. This allowed me to jumper across the other pins with a test lead. By cross connecting the right turn/brake (green) from the TV to the left turn/brake on the trailer (yellow) I was able to confirm that the trailer wiring was good. Also, by cross connecting the yellow on the TV to the green on the trailer, I was able to confirm that the problem stayed with the connector on the TV.

I had just installed the relay kit on the Ford last year about this time and only used it to tow the support trailer to the punkin’ chunk, so I was a little surprised to be having a problem. I pulled the left taillight lens off of the Ford and did a hand-over-hand inspection of the wires up from the hitch; no obvious breeches. The connection between the vehicle harness and the splitter in the relay kit was good because the TV taillight was still working; which left the potted relay box itself as the main suspect.

So I snipped the yellow leads on either side of it and connected them together. Viola!!! Everything worked fine again (shown here in flasher mode).
Image
Image

<rant> Makes me wonder why the hell I spent 50 bucks on the POS kit in the first place. <end rant>

Good thing I found this problem now and had a chance to fix it, rather than at the end of the month in Framingham when I pick up the chunker UT again!

Went around and cut off the rest of the errant bolts, and snugged up the loose tie down eye bolts (one had to be removed because it had busted thru the edge of the angle iron… hole was too close to the edge).

I ordered the replacement tire today. When that comes in I will pull the wheels, patch up the small issues with the fenders (one has a skill saw cut in the top, and the other has a small rust hole), and service the bearings.

Until then it is back to The Poet Creek Express build!
Last edited by KCStudly on Fri Nov 22, 2013 12:58 am, edited 1 time in total.
KC
My Build: The Poet Creek Express Hybrid Foamie

Poet Creek Or Bust
Engineering the TLAR way - "That Looks About Right"
TnTTT ORIGINAL 200A LANTERN CLUB = "The 200A Gang"
Green Lantern Corpsmen
User avatar
KCStudly
Donating Member
 
Posts: 9640
Images: 8169
Joined: Mon Feb 06, 2012 10:18 pm
Location: Southeastern CT, USA
Top

Re: Utility Trailer Score - The Charcoal Briquette

Postby KCStudly » Fri Oct 18, 2013 9:26 pm

Okay, I think I’m ready to attempt DMV.

Got the new tire mounted on the rim and bolted back up on the trailer. I had “worked like the Egyptians” using a couple of scraps of wood to lever the trailer frame up onto a third board; all scraps that were laying right there behind the barn from the storm damage repair work that Karl had done.
Image
Image

Note that I did this on relatively soft level ground and the jack has a sand foot (not a wheel), so there was not much risk of the trailer moving on its own; I only lifted the trailer about an inch; I never had any body part under any pinch point; and I certainly did not work under the trailer using this method. Use your common sense, and if you don’t have any, don’t blame me.

The safety chain was a single length of chain with ‘S’-hooks on each end. It was held on to the bottom of the tongue tube with a single 7/16 bolt, a couple of flat washers, and nylon insert self-locking nut. The washer between the nut and chain was already folded over from trying to pull thru the chain link. The tongue tube is maybe a strong 1/8” thk, but I had visions of the bolt pulling straight thru in the event of a serious event. So I unbolted it, cut the center link out of the chain and (since Karl had the MIG welder out fixing a hoe bucket for his paver customer) had Karl weld on a pair of his 3/8 round bar tie down loops, same as on TPCE. This pic was taken while the metal was still glowing cherry red… good weld penetration!
Image

While I was there I trimmed the excess portion off of the universal jack mount backing bars. They stuck down under the tongue, and the leading one was bent and ground down to a sharp edge on the bottom where it had dragged. Also cut the extra inch of thread sticking out of each of the jack mounting nuts (skin grabbers) and used the flap wheel to remove sharp edges.
Image
You can also see the corrugated plastic wire loom that I put over the wiring pigtail, and how I routed the wiring into the top of the tongue Just behind the jack bolts (helping to protect it from pinching between the coupler and end of the tongue tube while hooking up). It’s kind of hard to see here because the pigtail is flipped back on itself down the curb side just behind where it drops into the tube.

I touched this all up with black spray bomb rattle can paint.
Image

Last thing I did was to disassemble the coupler latch and turn it around to the normal orientation; it had been turned around backwards. While this made it easy to push back on the front rail to seat the ball in the front of the coupler will using your foot to close the latch, it just did not sit well with me, so I fixed it.

I haven’t fixed the two small “holes” in the fenders, but I want to see if DMV is going to be a pain before I go too far. Gonna try them tomorrow.
KC
My Build: The Poet Creek Express Hybrid Foamie

Poet Creek Or Bust
Engineering the TLAR way - "That Looks About Right"
TnTTT ORIGINAL 200A LANTERN CLUB = "The 200A Gang"
Green Lantern Corpsmen
User avatar
KCStudly
Donating Member
 
Posts: 9640
Images: 8169
Joined: Mon Feb 06, 2012 10:18 pm
Location: Southeastern CT, USA
Top

Re: Utility Trailer Score - The Charcoal Briquette

Postby KCStudly » Sat Oct 19, 2013 4:38 pm

On the way home the other night I stopped and got a new draw bar with 2 inch drop, and I sprang for the matching hex base 1-7/8 ball to match. My other draw bar is a 3-1/2 inch drop with 2 inch ball and the other 1-7/8 ball I have only has a standard round base on it. I like the design of the Reese hex base ball system and I didn't want to have to switch balls back and forth. The 2 inch drop is spot on putting the deck level when hitched up.

The temp. lic. plate has been issued. Now I need to go to Wethersfield for a VIN inspection.

She towed up to 60 mph empty just fine. After a little steering input I can see just a minimum of wiggle in the mirror, but nothing felt in the TV or steering wheel. So it looks like the problem before was the imbalanced load, or maybe the damaged tire. I didn't have an opportunity to go faster.

I need to shorten the safety chains; wish I had done that when I mounted them. Oh well, a little more work to remove the 'S'-hooks and take a few links out.
Last edited by KCStudly on Wed Oct 23, 2013 6:53 pm, edited 1 time in total.
KC
My Build: The Poet Creek Express Hybrid Foamie

Poet Creek Or Bust
Engineering the TLAR way - "That Looks About Right"
TnTTT ORIGINAL 200A LANTERN CLUB = "The 200A Gang"
Green Lantern Corpsmen
User avatar
KCStudly
Donating Member
 
Posts: 9640
Images: 8169
Joined: Mon Feb 06, 2012 10:18 pm
Location: Southeastern CT, USA
Top

Re: Utility Trailer Score - The Charcoal Briquette

Postby Mary C » Sun Oct 20, 2013 4:34 pm

KC looks like you got a pretty nice trailer out of it I just wish I had a friend like Karl with all the wonderful tools. You are one lucky man. the trailer looks like it will work for a new TD.!!!

Mary C. :)
User avatar
Mary C
1000 Club
1000 Club
 
Posts: 1776
Images: 473
Joined: Mon Oct 15, 2012 6:29 pm
Location: Waco, Georgia
Top

Re: Utility Trailer Score - The Charcoal Briquette

Postby KCStudly » Sun Oct 20, 2013 6:31 pm

Mary, you are so right. Karl and I have the best kind of friendship. We both help each other out willingly and neither of us wants to be "that kind of friend" that only takes advantage. He thinks that the give and take is nice and even, but we all know that I am getting the better end of the deal. I won't ever take that for granted and am always there if he needs me, no questions asked; I will help him gladly.

The other thing is that we usually keep business and personal projects separate. If he needs me to do some design work for a paying job, or to help out in the shop on a larger job, he will figure that into his quote and insist on paying me for my time; and I don't hit him too hard on my rate. Karl is a networker; he has symbiotic relationships with several of his customers/providers and their shops, so the way he sees it is that it is not costing him anything by helping me out, and it is a way for him to show that he is grateful for my help in the past.

I was going to say, "and he knows I will make it up to him by helping him in the future", but I honestly don't think that he sees it that way. He's just a good friend being a good friend.

The best kind of friend.
KC
My Build: The Poet Creek Express Hybrid Foamie

Poet Creek Or Bust
Engineering the TLAR way - "That Looks About Right"
TnTTT ORIGINAL 200A LANTERN CLUB = "The 200A Gang"
Green Lantern Corpsmen
User avatar
KCStudly
Donating Member
 
Posts: 9640
Images: 8169
Joined: Mon Feb 06, 2012 10:18 pm
Location: Southeastern CT, USA
Top

Re: Utility Trailer Score - The Charcoal Briquette

Postby KCStudly » Wed Oct 23, 2013 10:39 pm

Okay, where was I? Oh yeah, Monday night I shortened the safety chains and worked on the fenders some.

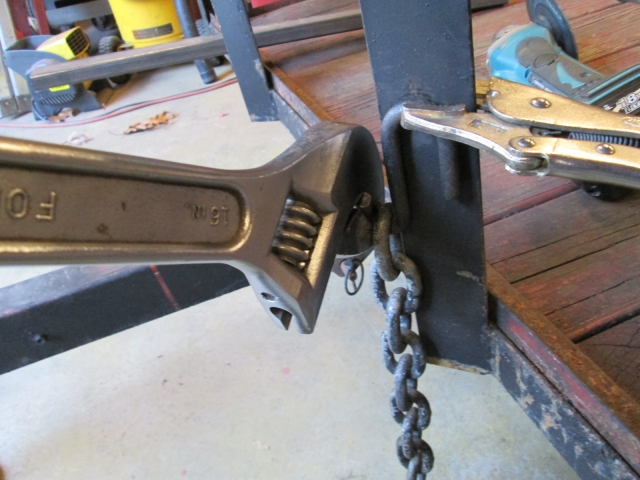
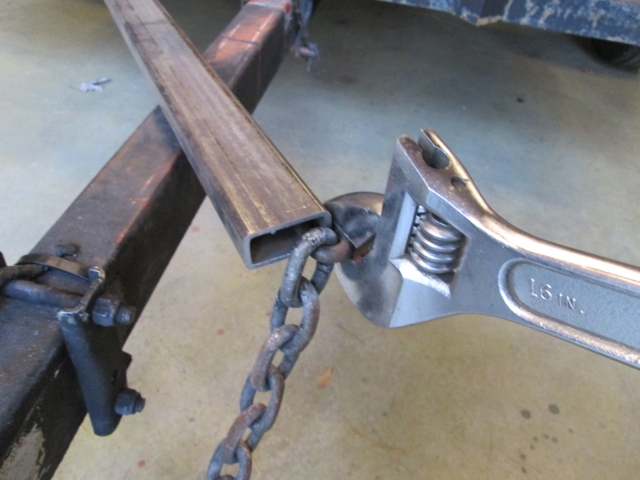
Karl had thought that I should be able to use a couple of large adjustable wrenches to twist the S-hooks apart and remove them, but due to the angle of the closure, the wrenches could not be held parallel and wanted to twist out. After smashing my hand pretty hard, once, I found a better way.

I clamped the S-hook to one of the front rail verticals to hold it securely then used the big wrench to lever the pinched end sideways.
Image
Image

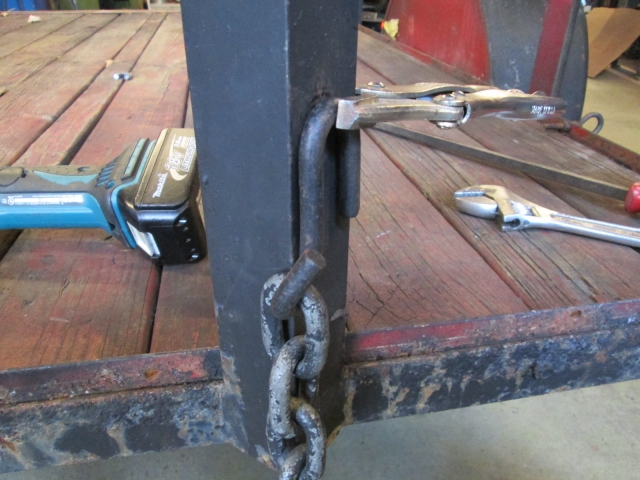
A little tweak with a big pry bar and that was just enough to get the chain link out, no more.
Image

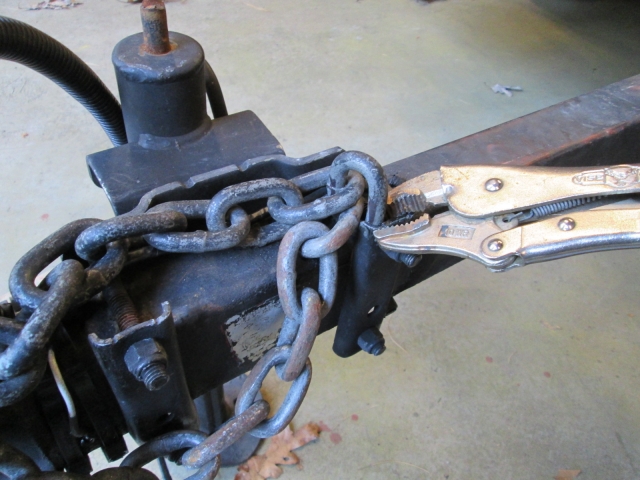
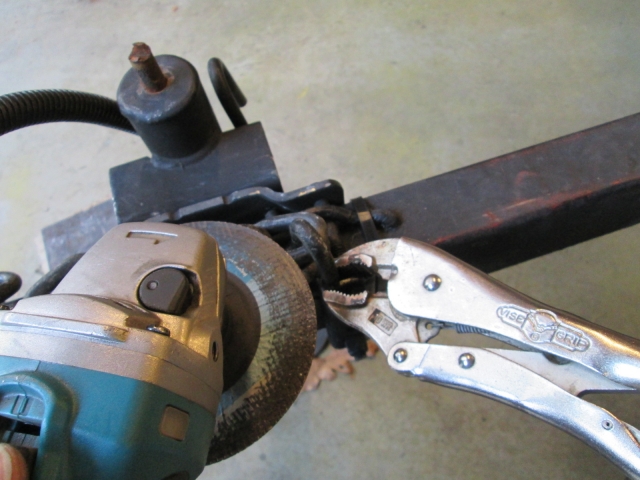
The chains needed to be about 10 links shorter, which left few places to clamp it securely while cutting, but I managed to nestle the link to be cut in behind the jack mounting clip in a way that I could cut both sides of the link w/o having to reposition.
Image
Image

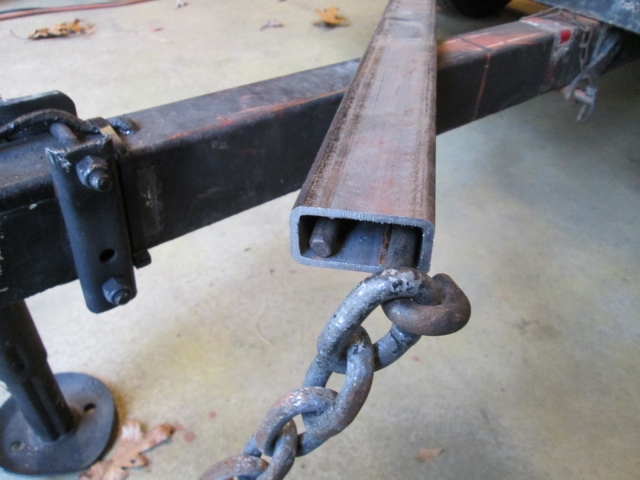
The chains would no longer reach back to the front rail so I used a length of 1x3 rectangular steel tube strategically placed under one of the front rail vertical supports and over the tongue to where I could slip the S-hook into the end and pry downward.
Image
Image
Image

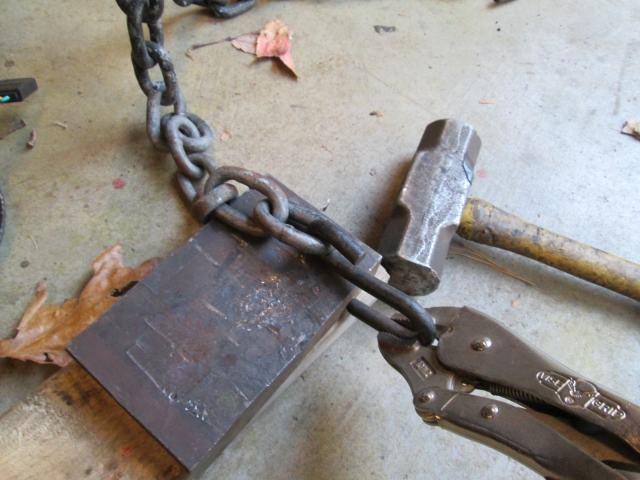
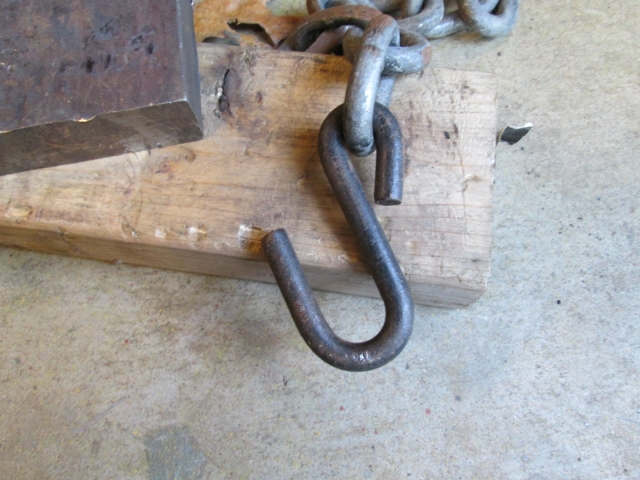
To get the tag end of the hook to close that last little bit I placed a piece of 2x4 on the concrete floor with a chunk of steel on top to use as an anvil. Mini sledge and a vice grip took care of the rest.
Image
Image

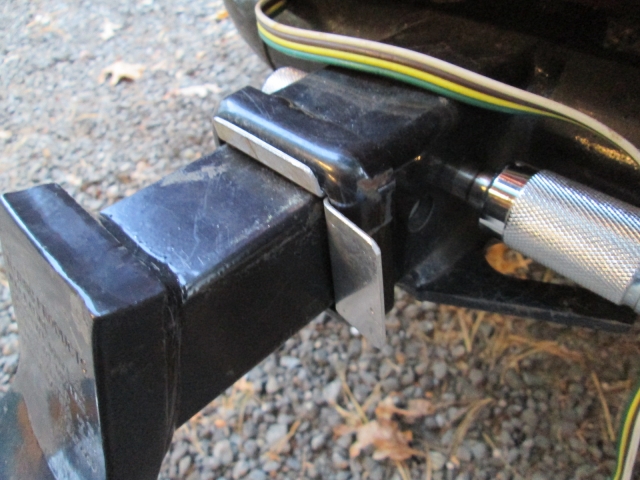
With the tongue being so light, especially when empty, I was getting a lot of clunking at the hitch, so I made a couple of 1/16 thk aluminum shims and stuffed them in tight.
Image
I brought the trailer home with me (since my next move was to go for inspection after work on Wednesday) and they didn’t seem to do a whole lot. In fact I heard one spit out and go tinkling along the road as I turned into the entrance ramp for the highway. I did get out and look for it using my Fenix PD20 single CR123 flashlight (a fantastic performing little LED unit), but to no avail. Lost the other one about 1/2-way home. :(

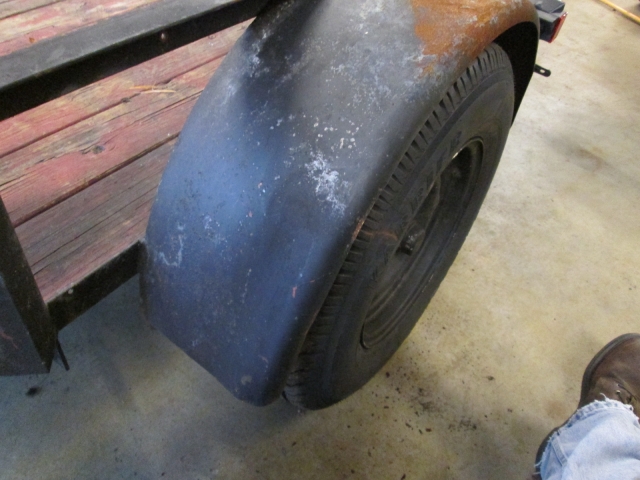
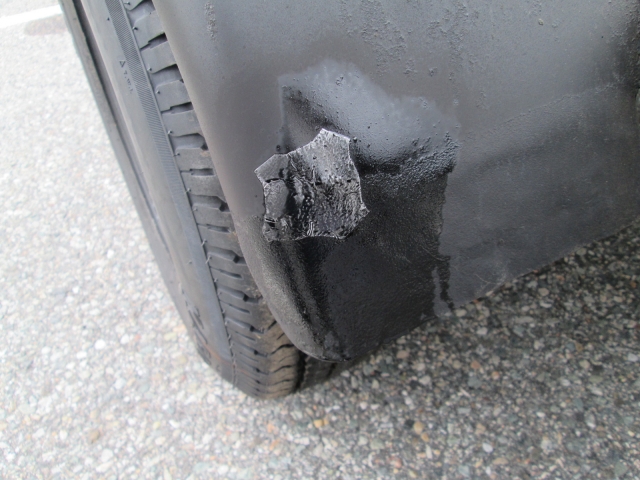
Anyway, before that I spent a few minutes using the mini sledge as a dolly with a body hammer to remove that little kink that was in the street side fender lip. Here is a pic from before where you can see the kink.
Image

And here it is after (the kink was right in the middle of the pic where the little rust spot is on the lip).
Image

As I mentioned previously, there are a couple of small quarter sized rust holes in the lower portion of the street side fender (one in front and one in rear), and a saw cut in the top of the curb side fender. I, being anxious about not putting too much effort in before I know that I will be able to get legally registered, wanted to slap some foil tape and paint over these and skate by for now. Karl scoffed (mockingly) and was willing to weld the relatively clean, yet highly visible saw cut. The rust holes are thin on the edges (hard to weld w/o cutting in a patch) and less blatant visually, so will get the butch tape treatment for now.

Here is that saw cut in the top of the curb side fender (steel fenders don’t make very good sawhorses!). I have shaped a piece of 1/8 thk aluminum strip to fit the underside, backing up the weld to prevent burn through.
Image

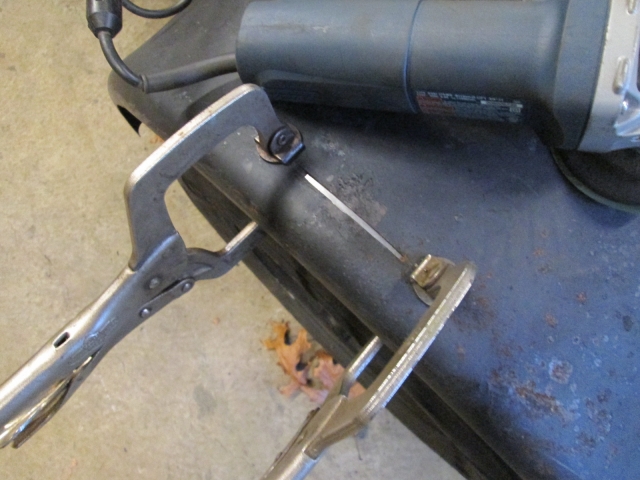
Then I pulled it back off, sanded away the paint with the flap wheel, and put it back into place.
Image

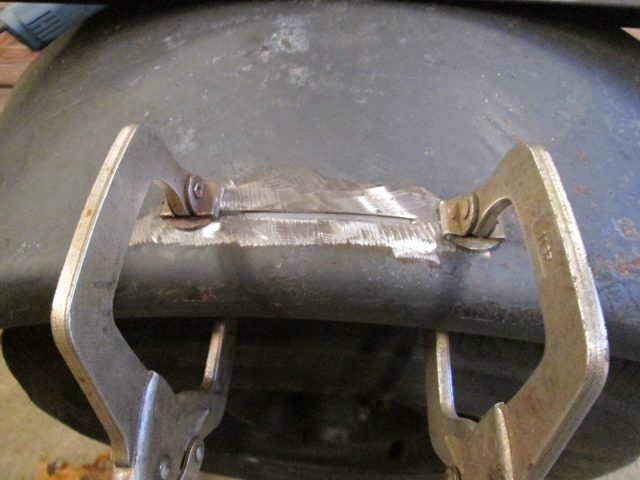
Here’s the first part of the weld that closed up the slot.
Image
Then the part of the cut that didn’t go all the way thru was welded, the whole thing was sanded “good enough” with the flap wheel, and I shot it with some rattle can black paint.

Today, Wednesday, I took a half day off from work so that I could get to Wethersfield in plenty of time to get into the inspection bay before the cutoff at 2pm.

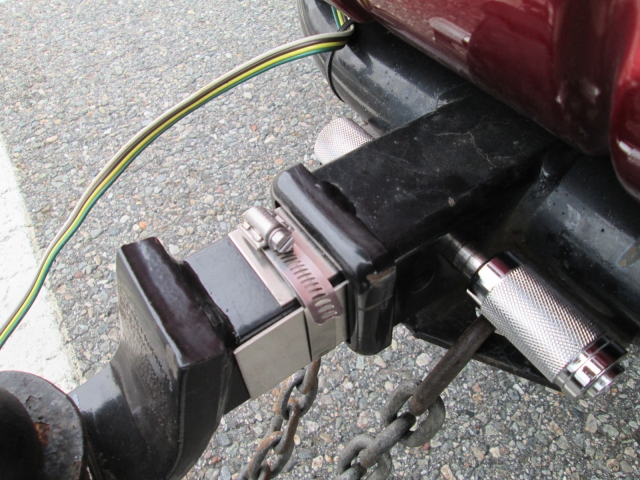
I left work and pulled into a parking lot to install these new and improved stainless steel receiver shims, now held in place by a worm drive clamp (even though they are now longer and can’t slip by the weld on the tang of the ball mount).
Image

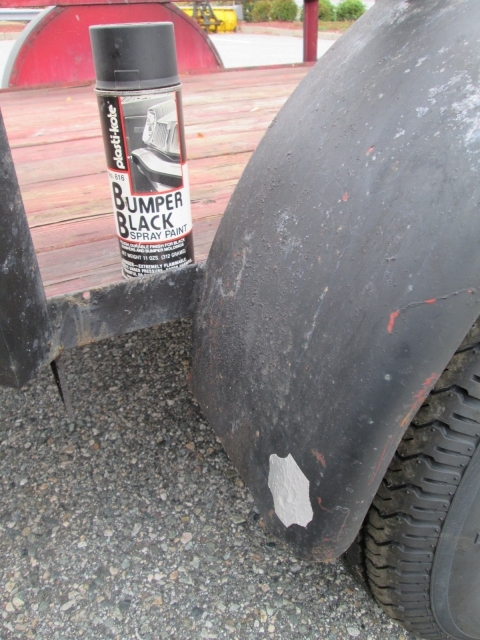
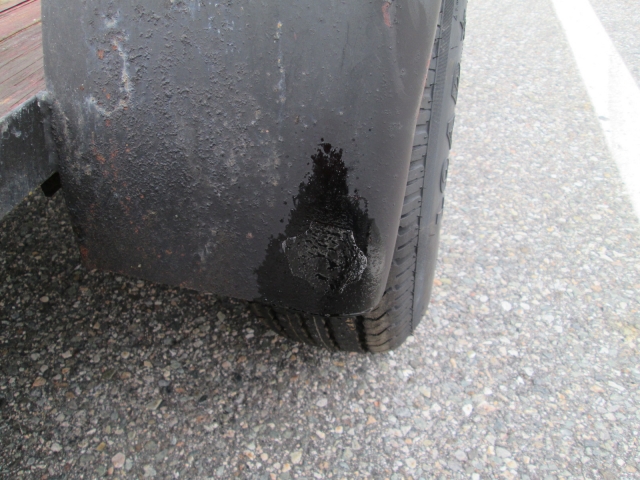
Next I slapped some foil tape on both sides of the rust holes in the fender and blasted them with some black paint… butch, I know. I tore the foil irregularly hoping it would camouflage, but the tape didn’t take paint too well, so it was kind of moot.
Front before paint.
Image
Front after paint.
Image
Rear after paint.
Image

On the way up the left hand blinker was acting funny; sometimes flashing rapidly as if a bulb was out; then slowly; and then normally. Dagnabbit. Jumped out and checked all of the light functions again. All of the lamps where lighting, so I put it down to the TV flasher not liking the extra load from bypassing the faulty trailer relay light kit on that side. Oh well, try to stay off of the left signal as much as possible and hope it acts right during inspection.

Never having been to the big DMV offices at Wethersfield, when I arrived I pulled into the main lot (trailers to the rear) and went inside down a long hall all the way to the other end to the info desk, only to find that I needed to pull into the inspection lane on the other side of the property. Fortunately there was no line and I made it into the shed with plenty of time to spare.

Now the width across the fenders is only 79 inches. If you sight to the bulge in the tire sidewalls you can stretch it out to 79-3/4 inches. So I was pretty confident that the OEM did this so as to fall under the "80 inch and over" requirement to add the 3-light rear center marker lights. So when the inspector wrote down 80 inches wide I had to question him. Said I wouldn’t have minded and would have added the 3-light if I had thought I needed it, but since it was technically less than 80 inches I didn’t think it was required. He countered with the ole, “yeah but I’m just trying to save you from having trouble with the cops down the road. They won’t know the difference.” I kept my cool. :x

And now the most inane part. He asked me where I got the 2000 lb. gross weight rating that I had put on the forms. I said that it was pretty standard for these 5x8 angle iron frames and that the axle diameter supported this assumption. He said that they usually go by the tires, but because mine are 205/75-14’s (load range C at 1760 lbs. each) he couldn’t use that. He asked what I intended to haul with the trailer. (What?) I explained, in not so many words, that it was a utility trailer (duh) :? and that I might haul all manner of things up to and perhaps including the gross weight rating.

He said that to establish the weight rating I needed to load the trailer in the manner that I intend to use it, take it to a certified scale, then whatever the scale ticket said would be the weight limit. What? No engineering, no safety limit; I could essentially overload the thing to whatever it would bear and the state was going to let me use that as a “safe” load limit? I apologized first, told him that I wasn’t trying to be disrespectful, but that this was an absolutely asinine policy. Not to mention that I would have to make another 3 hour round trip, and take more time off work. I was polite about it. :x

So next I back tracked and made a quick stop at Karl’s to borrow some big ratchet straps; a stop at Wally World to get one of these and a pair of these for myself (…and some jerky beef for my belly).

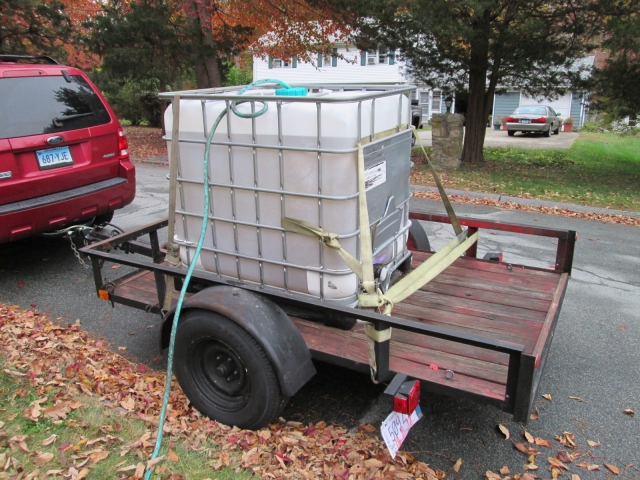
Then back to work to borrow a pallet tank tote for some ballast. This was the best way I could think of to: (1) make it easy to put a lot of weight on, and take it back off again; and (2) put on an amount of weight that I could calculate closely enough to be sure that I did not under load and set my GVWR too low. Here it is with the tote strapped down with its center just ahead of the axle and the garden hose going in (city water at work costs the company money, so I did this part at home).
Image

From comparable trailer spec.’s I had been figuring that the light (empty) weight on the trailer should be about 575 lbs. The empty tote is light enough that I can shove it around quite easily, even lift one side up from the trailer to the loading dock, then slide it up and off, so it can’t weigh any more than 80 lbs… maybe less. I figured this would be margin of error and ignored it. So to be sure that I was over 2000 lbs I figured I needed to add at least 180 gallons of water (8.3 lbs/gal x 180 gal = 1494 lbs. and 575 + 1494 = 2069 lbs, so a little more margin). Since the graduated marks on the tank are somewhat crude/approximate, and the trailer was not standing level, I ran it up to about 220 gallons just to be sure (meanwhile I tucked into the house and checked out the forum while that was filling up).
Image

Twenty three more miles one way to the nearest truck stop and certified scales (my dump is only open on Wed and Sat).
Image

The scales are actually broken into several sections so that the truckers can get readings on each axle set, allowing them to shift their loads around and make sure that none of their axles are over the limits. I pulled the Ford up to the front section of the scales with the trailer on the second platform. Then I uncoupled the trailer so that I would get a true weight including tongue. No easy feat because the jack screw is locked up hard and won't extend or retract (although it swings into the stowed and locked down positions just fine); I had to straddle the tongue and lift with my legs to get the coupler up and the jack to swing down and lock (my back will probably remind me of this tomorrow or the next day). I forgot to take a pic on the scales. Funny thing was that the "call" button to let the attendant know you are ready to have them print out your weight is about 9 or 10 ft up on a pole; perfect for a trucker sitting in his cab, but I had to jump up to hit the button.

Trailer weight was 2680 lbs and the SUV was 3740 (more or less empty with nearly a full tank of gas). I hope they don’t give me a hassle for having two numbers on the ticket.

Since I didn't want to haul all that water all the way home, I pulled across the street from the truck stop into a commuter lot, backed up to a storm drain, opened the foot valve and let it run out before heading home.

Tomorrow I will install the 3-light bar and figure out when I will be able to take time off (we are a man down at work and the boss is a little twitchy right now).
KC
My Build: The Poet Creek Express Hybrid Foamie

Poet Creek Or Bust
Engineering the TLAR way - "That Looks About Right"
TnTTT ORIGINAL 200A LANTERN CLUB = "The 200A Gang"
Green Lantern Corpsmen
User avatar
KCStudly
Donating Member
 
Posts: 9640
Images: 8169
Joined: Mon Feb 06, 2012 10:18 pm
Location: Southeastern CT, USA
Top

Next

Return to Trailer and Chassis Secrets

Who is online

Users browsing this forum: No registered users and 1 guest