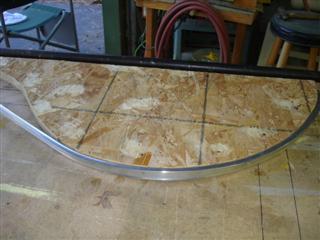
Here's how I did the wheel well trim pieces to form the S type curve needed. I'm sure there are all sorts of methods but this one seems to work well for my needs. I'm using the 1" by 1/2" L shaped trim that is pre-drilled.
First, I took a large piece of paper and taped it to the side of the trailer with the bottom even with the edge of the side. Then I took a lumber crayon and did a rubbing of the wheel well profile. Cut it out.
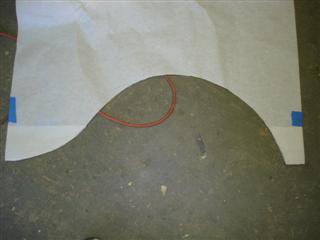
I transferred the template to 2 pieces of MDF that were stacked and screwed together so that they were taller than the 1" of the trim piece. Cut out the 2 pieces and screwed the female portion down to the table.
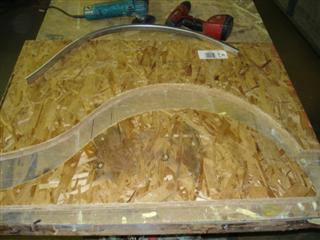
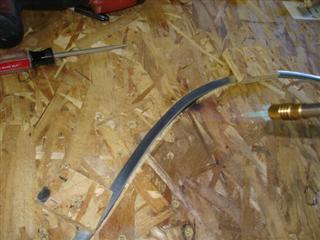
Attach the male portion so that you can swing the material around the curve and not have any interference. Clamp the end to the jig and then slowly bend the material around the curve. No heat is needed to do this as you are stretching the flange and it should bend/stretch easily. Shoot some screws into the jig edge to hold it in place and "massage" it with a rubber faced mallet and block of wood if needed.
Once I got it this far along, I cut the inside end portion on the male side of the jig so that it would give me some room to work the tighter inside curve. I used some pipe clamps to suck the 2 pieces of the jig together with the newly bent material sandwiched between the 2. Then some sacrificial blocks screwed into the top of the female portion to hold the material down tight on the flange. Once it was all in place...then I shot some screws into the male portion into the table to hold it all tight. I gave it a quick shot with a propane torch so that it would relieve any of the stress on the curved piece.
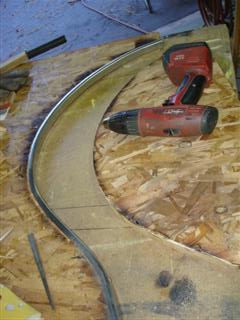
For the tighter inside portion, I shot a screw in every pre-drilled hole, applied a bit of heat and whenever it tried to pucker on the flange, massaged it down and jammed a putty knife under the flange to act like an anvil and worked it with a small tack hammer to minimize puckering. A file, some sandpaper and steel wool should take care of your tooling marks.
After the S curved piece was shaped I heat treated the whole thing with a blast from a propane torch by running it back and forth. You can hear it make some pops and noises as it eases the stress. Don't hit it with a real hot spot as aluminum this thin is unforgiving when applying heat and will suddenly collapse and puddle. Once heat treated it holds it's shape with no spring back.
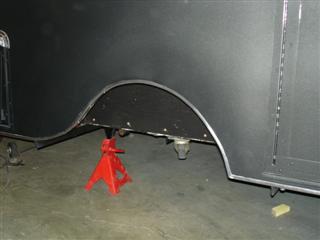
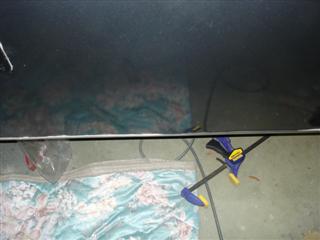
I installed it using a butyl tape as this really seals the seams. I, however have a real problem with that as the tape is a very light gray and the lower portion of this trailer is charcoal. It really shows! I used a credit card for a trim tool as it won't mark the paint and dragged it along the trim piece as a knife, then balled up the excess butyl tape. Use the excess tape as a ball and just mop the other tape and it will lift it and give you a clean edge. To hide the white...I took a tube of graphite lube and "dusted" the butyl...then wiped it down with a rag. It may not really show in the pic, but in real life, it hides a lot and makes the trim piece look nice and clean.
I still have a lot of excess butyl to remove on this trailer. It took 6 rolls of tape to do. You can see the difference on the far right side, just past the handle on the clamp. If your tape is nice and even and cleaned up well, I'd imagine that a felt pen would work as well to match your paint color. Over time...all the road grime will darken it up, I did this in the interim. I wonder if some yellow chalk for a string line would hide it up on the yellow portion?
Butyl tape will squish out over time and will want to "flow" in hot weather. I ran the shop up to about 85F with the wood stove today to maximize the squish out now. I'll go back on a early morning when it's really cool to cut out the excess and clean up the trim. It still needs a bit if TLC to be where I want it, but this technique has worked for a couple of trailers for me so far.
Things to remember: this is for 1 side of the trailer. When you do the opposite side, don't forget to flop your jigs over to get the opposing profile. Run the ends long and trim to fit prior to final install, don't bother asking me why...damn. Doug