Father-Daughter Build 2013-14

...ask your questions in the appropriate forums BUT document your build here...preferably in a single thread...dates for updates, are appreciated....

Re: Father-Daughter Build 2013-14

Postby Shadow Catcher » Tue Feb 04, 2014 6:02 pm

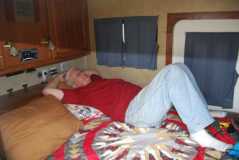
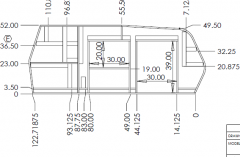
One of the deciding factors in the width of the door is the head of the bed in the rear or in the front. Bed is the reverse of most so that once you sit on the edge of the bed you schooch backward and the legs follow. The revers is more difficult and you need enough room to turn. Ours are 30" and not too large.
10038010037961605
User avatar
Shadow Catcher
Donating Member
 
Posts: 6008
Images: 234
Joined: Sat Apr 11, 2009 8:26 pm
Location: Metamora, OH

Re: Father-Daughter Build 2013-14

Postby lfrazer98 » Tue Feb 04, 2014 9:13 pm

Tom- Excellent drawing and your words made sense! I see what you mean. When I look at KC's build I think the offset for the door was created by layering an 1/8" border around the door, from what I can tell from his pics. KC can correct me if I am wrong.

Jon- I have already spoken to Grant and am going to go with one of the two you mentioned in your post. I may just need him to talk me through how much of everything I will need based on my dimensions.

I know all the planning will pay off and the help you are all giving is amazing! Drawings and pictures are SUPER! Hopefully tomorrow will be a snow day and I can do more planning and research! (6-15 inches expected folks) :D
User avatar
lfrazer98
Teardrop Master
 
Posts: 204
Images: 217
Joined: Tue Sep 17, 2013 6:25 pm
Location: New York

Re: Father-Daughter Build 2013-14

Postby KCStudly » Tue Feb 04, 2014 10:12 pm

The shim is actually 5 mm (3/16 thk), the same as my inner wall skins and door seal flange, but you get the idea. The seal has a 3/8 bulb and they recommend that you only squeeze the bulb 1/4 to 1/2 of its nominal size. If you squeeze it tighter it may take a set and then it won't seal as tight over its lifespan. Also, if you don't allow some space you might have trouble getting the door to close well.

I went into some more detail (surprised?) a little further down when I did the second wall and installed the flange.

p.s. You nailed it on Tom's sketch and description! His build is an invaluable resource that I have referred to and cited many times.
KC
My Build: The Poet Creek Express Hybrid Foamie

Poet Creek Or Bust
Engineering the TLAR way - "That Looks About Right"
TnTTT ORIGINAL 200A LANTERN CLUB = "The 200A Gang"
Green Lantern Corpsmen
User avatar
KCStudly
Donating Member
 
Posts: 9640
Images: 8169
Joined: Mon Feb 06, 2012 10:18 pm
Location: Southeastern CT, USA
Top

Re: Father-Daughter Build 2013-14

Postby danlott » Tue Feb 04, 2014 11:12 pm

Image

I like this design best for the door, seems nicer.

Dan
Hoplite Traveler Build thread
Image Image
Life is what happens to you while you're busy making other plans.
User avatar
danlott
Donating Member
 
Posts: 874
Images: 264
Joined: Fri Mar 06, 2009 2:18 pm
Location: Winnemucca, Nevada
Top

Re: Father-Daughter Build 2013-14

Postby lfrazer98 » Sat Feb 15, 2014 11:45 pm

Dad got home 2 days ago and we spent the day together planning and figuring things out. We bought another type of wood and stained it to consider it for our cabinets and I think we have a winner. Maple. It was beautiful with all 4 stains we tried and I think we are going to be using it for all my interior and galley cabinets. Tomorrow we are meeting for breakfast then going to buy the wood and start staining and preparing the wood for the cabinets. If we get all of it completed this week, we will start on the side walls. Got negative temps tomorrow, but then we should be above freezing the rest of the week. Yay!
User avatar
lfrazer98
Teardrop Master
 
Posts: 204
Images: 217
Joined: Tue Sep 17, 2013 6:25 pm
Location: New York
Top

Re: Father-Daughter Build 2013-14

Postby The Teardrop Nanny » Sun Feb 16, 2014 2:43 am

Yeah," Dads ".... :D two heads with a vision, and two pair of hands, and lots of snow. Way to Go! :thumbsup:

I was just going through a list of different woods and their best uses yesterday. Maple is right up there as a good, solid wood, especially for homemade heirloom pieces.....which is what you probably would like your Teardrop to be. My TD has a detailed trim done in an Arts & Crafts style with wood panels that are a mixture of birch and maple, with the trim executed in mahogany.
I think it was fantastic that you tried out the stains and found what you liked. Here's to a productive week ! :eyebrows2:
Joanie
TDN

:goodmorning:
Life's uncertain...eat dessert first. Check out our cooking channel for cast iron:
www.youtube.com/outdoorcastironcook Dean & Joanie, your hosts
User avatar
The Teardrop Nanny
Teardrop Muse
 
Posts: 1869
Images: 4
Joined: Wed Aug 03, 2005 11:52 am
Location: Northwestern Coast of California
Top

Re: Father-Daughter Build 2013-14

Postby lfrazer98 » Mon Feb 17, 2014 7:10 pm

Thanks, Joanie! I took a lot of pictures today, too! Very productive day.

116867
At least there was sun!

116869
All bundled up! It was about 15 degrees at this point.

116870
Bought a few maple boards and you can see the laminate counter top I bought right behind it.

116871
Took a while, but we sanded all the ripped boards

116872
Mostly done. Using 3/4" x 1" for face frames of my cabinetry. For the horizontal pieces anyway. Will have 1 1/2" face frames for the vertical face frames. Went narrower to get as much height as possible for my drawers and cabinets under the counter top.

116873
Gunstock stain on my 1/4" maple ply that I will be using for the panels of all my drawer and cabinet faces.

116875
Back galley wall and counter top. We used fiberboard to make sure it was straight, because it was cheaper, and we will cover the parts that show with a maple veneer (which won't be much).

Dinner break now and then more to come tomorrow!
User avatar
lfrazer98
Teardrop Master
 
Posts: 204
Images: 217
Joined: Tue Sep 17, 2013 6:25 pm
Location: New York
Top

Re: Father-Daughter Build 2013-14

Postby The Teardrop Nanny » Tue Feb 18, 2014 12:01 pm

:thumbsup: Love dem photos! :pictures:
TDN
Life's uncertain...eat dessert first. Check out our cooking channel for cast iron:
www.youtube.com/outdoorcastironcook Dean & Joanie, your hosts
User avatar
The Teardrop Nanny
Teardrop Muse
 
Posts: 1869
Images: 4
Joined: Wed Aug 03, 2005 11:52 am
Location: Northwestern Coast of California
Top

Re: Father-Daughter Build 2013-14

Postby lfrazer98 » Tue Feb 25, 2014 10:14 pm

117149
Dry fitting the face frame for the lower drawers.

117150
Upper cabinet face frames ready to assemble for the top of the counter in the galley. (Note- the galley is on the wrong side of the trailer. It is not attached, nor is it going there.)

117151
Assembling a panels for the side of my upper cabinet in the galley.

117152
Glued and pin nailed.

117153
Dry fitting the upper cabinets. 2 cabinet doors will enclose this cabinet.

117154
Left lower drawer faces waiting to be sanded, stained and polyurethaned. Panel insert is already ready.

117155
Center lower drawer faces ready as well. I decided to go with three drawers in the center rather than one drawer and one cabinet. The right is still open for a cooler slide. (All the drawer slides should have arrived today from McMaster Carr- great company!)

117156
Upper cabinet drawer faces run through the router. 4 total for the uppers.

117157
Dry fitting the upper cabinet doors. Also bought the hardware and ended up with brushed nickel self closing door hinges.

117158
Dad cleaning his new miter saw after a long work day. The old one broke and this one worked well as a replacement!

We had a long work week, a few set backs, plan changes, lots of good progress and a galley that just needs to be assembled. Next step (a few months away) will be cutting out the walls and attaching them and to the galley.

Thanks for those of you who are following along. We aren't perfect, have made mistakes, but are learning as we go, and are enjoying the finished products. I will be finishing all my staining and finishing work on my cabinets and will post those pictures soon. However, there will be quite a bit of time after that until Dad returns to work with me again.

Let's hope for warmer weather soon! :wine:
User avatar
lfrazer98
Teardrop Master
 
Posts: 204
Images: 217
Joined: Tue Sep 17, 2013 6:25 pm
Location: New York
Top

Re: Father-Daughter Build 2013-14

Postby wagondude » Wed Feb 26, 2014 9:20 pm

That is a whole lot of progress in a short time. Nice work. :thumbsup:
Bill

TnTTT ORIGIONAL 200A LANTERN CLUB
101137
User avatar
wagondude
1000 Club
1000 Club
 
Posts: 1535
Images: 35
Joined: Sun Jan 16, 2011 7:41 pm
Location: Land of the Jayhawks
Top

Re: Father-Daughter Build 2013-14

Postby The Teardrop Nanny » Sat Mar 01, 2014 11:42 am

You've got an "A+" average so far........ :D Great going, Jim and Lauren!
Life's uncertain...eat dessert first. Check out our cooking channel for cast iron:
www.youtube.com/outdoorcastironcook Dean & Joanie, your hosts
User avatar
The Teardrop Nanny
Teardrop Muse
 
Posts: 1869
Images: 4
Joined: Wed Aug 03, 2005 11:52 am
Location: Northwestern Coast of California
Top

Re: Father-Daughter Build 2013-14

Postby be_a_jayhawk » Sat Mar 01, 2014 2:28 pm

I think you will be done before I even get my walls up! Lol
User avatar
be_a_jayhawk
Teardrop Master
 
Posts: 214
Images: 2
Joined: Wed Jun 19, 2013 6:32 pm
Top

Re: Father-Daughter Build 2013-14

Postby lfrazer98 » Sun Mar 02, 2014 8:28 pm

Well, we would be moving fast if my father didn't have to go back to Florida! :thumbdown: 
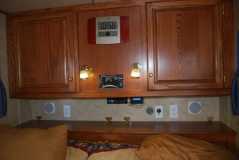
But, we did work every day from about 9am until dinner. I was astonished how long everything took to measure, cut, sand, stain and poly! We also went shopping every day, because we never seemed to have exactly what we needed. I was uncertain about the wood and stain after making the face frames, but I am happy to report that my drawer fronts and cabinet fronts stained well! There was also a piece of maple with beautiful ripple marks on it. I wasn't certain how it was going to stain, but it made almost a zebra like pattern. I like it! Here are the photos from yesterday. Got the staining done and just need to poly.

117308 117310 117309 and the floor for the galley 117311

Have a great week, everyone!
User avatar
lfrazer98
Teardrop Master
 
Posts: 204
Images: 217
Joined: Tue Sep 17, 2013 6:25 pm
Location: New York
Top

Re: Father-Daughter Build 2013-14

Postby KCStudly » Mon Mar 03, 2014 8:20 am

Make sure to use vinyl adhesive, in addition to the peel-n-stick tile backing. The peel-n-stick will not stay adhered in temperature changes.

I did a work bench top in my garage using stick on tiles and the first summer heat they were all buckling up. Lifted them off, applied adhesive with a notched trowel, glued them down, and I have not had a problem since.

Stain looks good! :thumbsup:

Maybe dad could set you up with some tasks that you are comfortable doing by yourself while he is gone? I am sure that the more you work on the project, the more knowledgeable and comfortable you will be in the shop.
KC
My Build: The Poet Creek Express Hybrid Foamie

Poet Creek Or Bust
Engineering the TLAR way - "That Looks About Right"
TnTTT ORIGINAL 200A LANTERN CLUB = "The 200A Gang"
Green Lantern Corpsmen
User avatar
KCStudly
Donating Member
 
Posts: 9640
Images: 8169
Joined: Mon Feb 06, 2012 10:18 pm
Location: Southeastern CT, USA
Top

Re: Father-Daughter Build 2013-14

Postby lfrazer98 » Mon Mar 03, 2014 8:21 pm

Yep! Got an adhesive for the peel and stick. We were thinking ahead about the temperature.

I am doing all the staining and poly while he is gone. I may get on the saw and cut out my panels for my drawers and cabinets. I am feeling pretty good about using the router and the miter. Haven't used the table saw yet. I can do pockets screws and used the pin/staple gun if needed. I tried all the tools as we were working, but he did most of the cutting,etc. and I did all the finishing wood work. I am meeting with an electrician (a fellow physics teacher) to plan out my circuits (more for my peace of mind than anything). I am also ordering my windows and door handles and latches. However, I can't do too much in the way of side walls until he comes home. We aren't assembling any of the cabinetry until the side walls are up. I may try to build my interior cabinets, but it might be nice to have two sets of hands.

May is going to be a big month! I will try to get some things done in the mean time. Thanks for the advice about the vinyl adhesive! I will double check to see what kind we got.
User avatar
lfrazer98
Teardrop Master
 
Posts: 204
Images: 217
Joined: Tue Sep 17, 2013 6:25 pm
Location: New York
Top

PreviousNext

Return to Build Journals

Who is online

Users browsing this forum: No registered users and 9 guests