The "Minibago" benroy continued.....

...ask your questions in the appropriate forums BUT document your build here...preferably in a single thread...dates for updates, are appreciated....

The "Minibago" benroy continued.....

Postby twinight » Sun Mar 09, 2014 1:55 am

On valentine's day, The minibago found it's new home in Southern California.

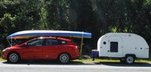
You can see the sale thread here. http://www.tnttt.com/viewtopic.php?f=18&t=57710
At 5.5x13', it barely fits California's criteria for a camp trailer. But the size is great for a family with 2 toddlers.
I sent my wife the link and she was sold on it. 3 days later we picked it up in Utah.
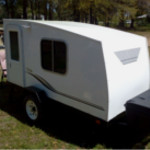
We plan on camping for our summer vacation this summer, so I'm tasked to finish it by July.
The trailer is campable, but needs power, gas, water, and finishes.

The priorities are to skin the exterior to make it waterproof, and build the galley.

Sourcing sheets of aluminum larger than 48x144 seems to be an impossible task, IMS, Thyssenkrupt, both don't stock it.
Wood shiplap siding looks good, but would have to custom cut, it's heavier and makes sealing the transition from wall to roof more difficult. Wood paneling is not appealing with the trim required to cover the seams..
I have resolved instead to canvas the exterior, and paint, perhaps a simple 2-3 color pattern mural to make it more interesting. Paneling can be added later if so desired, but waterproofing is the 1st priority.

The galley will use the included SMEV cooktop and sink with drainboard. Unfortunately the galley is only 22" deep and a cooler would take up a lot of space. To maximize the space, we will be using a swing out counter for the sink. Since the swingout slides underneath the main counter, there is no space for a traditional faucet. The faucet will be a pot filler mounted on the sidewall with a 17" reach. The lower cabinet is a birch closet chest from Ikea which the drawers will be skinned in aluminum. The countertop is a birch finished butcherblock. Under the counter will be a trash can with a countertop drop through, and a grey water catch tank. The cooler will be on a slide out drawer that can be accessed with the swingout closed.

Image
Image
Image
twinight
Teardrop Advisor
 
Posts: 51
Images: 68
Joined: Wed Feb 19, 2014 6:01 am

Re: The "Minibago" benroy continued.....

Postby rowerwet » Sun Mar 09, 2014 5:38 am

in hot weather the ice in the cooler lasts longer in the TV, with the air conditioning keeping cool on the outside.
User avatar
rowerwet
Gold Donating Member
 
Posts: 2075
Images: 521
Joined: Mon Apr 20, 2009 12:52 am
Location: Merrimack River Valley

Re: The "Minibago" benroy continued.....

Postby Woodbutcher » Sun Mar 09, 2014 9:48 am

My wife sewed me a cooler cover that helps alot. Even in very hot weather. Just made of fabric sewed around foil backed bubble wrap. Looks like this....

Image

Image
User avatar
Woodbutcher
Platinum Donating Member
 
Posts: 4191
Images: 45
Joined: Fri Mar 10, 2006 10:01 pm
Location: Chicago Suburbs
Top

Re: The "Minibago" benroy continued.....

Postby kayakdlk » Sun Mar 09, 2014 1:04 pm

Congratulations on the Minbago purchaser. When I saw this a while back I really liked the design and shape. I think covering in canvas as you mentioned would work great and be durable and waterproof. Any good two tone paint scheme would make it look nice. I liked the original owners red/white scheme, but any colors would work. I also like what you are planning for the galley. Hope it all works out for you

Dan
User avatar
kayakdlk
Platinum Donating Member
 
Posts: 310
Images: 392
Joined: Wed Jun 27, 2012 9:02 pm
Location: Foothills of Colorado
Top

Re: The "Minibago" benroy continued.....

Postby Greg M » Sun Mar 09, 2014 1:45 pm

It's great to see that GregB's project went to a good home. Have you tried the RV shops for wide aluminum? They usually have 104" wide coil stock.
Give a person a fish and you feed them for a day; teach a person to use the Internet and they won't bother you for weeks.
User avatar
Greg M
*Geek Extraordinaire
 
Posts: 1167
Images: 85
Joined: Mon Sep 12, 2005 12:40 am
Location: Victoria, BC, Canada
Top

Re: The "Minibago" benroy continued.....

Postby KCStudly » Sun Mar 09, 2014 9:17 pm

Truck repair shops usually have the big aluminum on a roll. Any length you want, usually white.
KC
My Build: The Poet Creek Express Hybrid Foamie

Poet Creek Or Bust
Engineering the TLAR way - "That Looks About Right"
TnTTT ORIGINAL 200A LANTERN CLUB = "The 200A Gang"
Green Lantern Corpsmen
User avatar
KCStudly
Donating Member
 
Posts: 9640
Images: 8169
Joined: Mon Feb 06, 2012 10:18 pm
Location: Southeastern CT, USA
Top

Re: The "Minibago" benroy continued.....

Postby twinight » Mon Mar 10, 2014 12:56 am

I spent most of the weekend sanding down the exterior. Greg waterproofed every staple and joint with some hard sealant. Unfortunately it didn't leave a smooth finish. It took some effort even with a belt sander to knock it down. I ended up using joint compound to fill any low spots. While the left side required quite a bit of work, the right side was surprisingly smooth. A little more sanding and it will be ready for some canvas.
Image

Here's the galley with the cabinet placed and the cooler fitted front-back. I removed the handle and the wheels to save space. The only question is whether the drain pipe will clear the edge of the cooler when the counter is swinging open and closed.
Image

The only 50 qt cooler that had a <22" width was the coleman xtreme. While it advertised that it keeps ice for 5 days, the walmart reviews say otherwise because the lid is not insulated. I'm not sure if the black one sold at $60 is insulated or not, but I figured I can insulate the $30 walmart one myself. Hopefully it works as well as my igloo maxcold.

I guess in order to support an advertised 250lb sitting on the lid, they needed to gusset top to the bottom.
Image

Some spray foam goes in first around the edges, wait for it to expand, the the first layer of XPS goes in.
Image
Image

Some more expanding foam and the second layer of XPS. I just need to find some thin plastic to finish it.
Image
Image
Last edited by twinight on Mon Mar 10, 2014 12:09 pm, edited 1 time in total.
twinight
Teardrop Advisor
 
Posts: 51
Images: 68
Joined: Wed Feb 19, 2014 6:01 am
Top

Re: The "Minibago" benroy continued.....

Postby mezmo » Mon Mar 10, 2014 1:22 am

Good to see that this build has gone to a new owner who appreciates
it and is finishing it out. There are some threads in the Foamie section
on covering with canvas and paint if you need any info.

Cheers,
Norm/mezmo
If you have a house - you have a hobby.
User avatar
mezmo
1000 Club
1000 Club
 
Posts: 1817
Images: 194
Joined: Fri Jan 01, 2010 4:11 am
Location: Columbia, SC
Top

Re: The "Minibago" benroy continued.....

Postby twinight » Tue Mar 18, 2014 3:04 am

My wife is still unconvinced on the painted canvas finish so I spent the weekend working on the galley.

It's 80% done. I still need to fur out the back wall behind the sink to install power and a pot-filler faucet. It still needs backsplash, upper cabinets and shelves. The gravity tank filler needs to be installed and hose runt to the tank.

Here is the galley closed.
Image
And open for business.
Image
Last edited by twinight on Tue Mar 18, 2014 2:08 pm, edited 1 time in total.
twinight
Teardrop Advisor
 
Posts: 51
Images: 68
Joined: Wed Feb 19, 2014 6:01 am
Top

Re: The "Minibago" benroy continued.....

Postby rowerwet » Tue Mar 18, 2014 4:56 am

canvas and porch paint work great mine has three years on it and still looks great
User avatar
rowerwet
Gold Donating Member
 
Posts: 2075
Images: 521
Joined: Mon Apr 20, 2009 12:52 am
Location: Merrimack River Valley
Top

Re: The "Minibago" benroy continued.....

Postby jbyrd » Tue Mar 18, 2014 8:26 am

I really love the look of this trailer! I cant wait to see it finished after seeing how impressive your work on the galley turned out. :applause:
Til later, See ya
Jeremy

My build journal #1 "SOLD" : viewtopic.php?t=45945
my build journal #2 "SOLD": viewtopic.php?f=50&t=59216
User avatar
jbyrd
Teardrop Master
 
Posts: 146
Images: 172
Joined: Sun Aug 28, 2011 8:24 pm
Location: marianna, Florida
Top

Re: The "Minibago" benroy continued.....

Postby twinight » Tue Mar 18, 2014 3:18 pm

My wife is worried about the finish looking rough and bumpy. The overlapping seams at the edges would have to be covered with aluminum trim. I think its easier to ensure waterproofing than aluminum. Not to mention it's easier to trim to size and work around the corners.

I wanted to do a simple mural along the lines of this:
Image
or this:
Image

Or a pattern that transitions from one color to another.
Image

Maybe a simplified version of a scene like this:
Image
She likes the imagery from the Secret of the Kells.
twinight
Teardrop Advisor
 
Posts: 51
Images: 68
Joined: Wed Feb 19, 2014 6:01 am
Top

Re: The "Minibago" benroy continued.....

Postby KCStudly » Tue Mar 18, 2014 3:43 pm

I like the first image of the trees, but would use the purple tones from the second image of the mountains instead of the greens.

I think that would make a super paint job for a camper, and not too difficult to pull off, even for a novice. Great ideas! :thumbsup:

Adding trim to canvas, with all of those fasteners penetrating thru, kind of defeats the idea of using the canvas in the first place, unless you can find vinyl trim and glue it on. Besides, what's the difference between a line of trim and a crisp canvas seam?

From what those who have done it have said, a couple of coats of paint on some nice #12 cotton duck cloth is all you need to get a nice surface; perhaps a little textured, but that helps hide imperfections and dirt. If you want it glass smooth, use block filler primer first, and block it out with an extra top coat or two.

Have you looked at Desert Moose's build? With a little extra attention to the application of the canvas you can achieve some very excellent results w/o trim.

$.02
KC
My Build: The Poet Creek Express Hybrid Foamie

Poet Creek Or Bust
Engineering the TLAR way - "That Looks About Right"
TnTTT ORIGINAL 200A LANTERN CLUB = "The 200A Gang"
Green Lantern Corpsmen
User avatar
KCStudly
Donating Member
 
Posts: 9640
Images: 8169
Joined: Mon Feb 06, 2012 10:18 pm
Location: Southeastern CT, USA
Top

Re: The "Minibago" benroy continued.....

Postby danlott » Tue Mar 18, 2014 3:44 pm

If you are willing to do the work to apply canvas, then you should spend just a little extra money by going with epoxy and fiberglass. You should be able to get a really fine exterior finish, which could have a really nice painted design.

There are lots of videos on youtube about fiberglassing boats. It takes the same amount of work as the canvas does, should be more waterproof than canvas, will be a nicer finish and should have a higher resale value. I know a lot of people say they are not building to resale, but if you are going to put all the time and money into it you might as well build something that you can sale down the road.

Dan
Hoplite Traveler Build thread
Image Image
Life is what happens to you while you're busy making other plans.
User avatar
danlott
Donating Member
 
Posts: 874
Images: 264
Joined: Fri Mar 06, 2009 2:18 pm
Location: Winnemucca, Nevada
Top

Re: The "Minibago" benroy continued.....

Postby rowerwet » Tue Mar 18, 2014 4:34 pm

compared to canvas, the glass adds much more weight. I've fiberglassed the whole bottom of boats before and found the weight gain amazing.
think of it this way, canvas is cotton, light weight, Fiberglass started life as sand, glass and sand are heavy. you could epoxy the canvas, or a much lighter weight fabric (bed sheet cotton). Personally the toxic nature, work time of epoxy, compared to paint, and the fact it needs a top coat for UV protection, not to mention the cost, are all negatives.
But the great part is, there are no wrong answers, if it works for you than it's all good.
User avatar
rowerwet
Gold Donating Member
 
Posts: 2075
Images: 521
Joined: Mon Apr 20, 2009 12:52 am
Location: Merrimack River Valley
Top

Next

Return to Build Journals

Who is online

Users browsing this forum: jdeleon and 1 guest