I was not able to work on my build much because of work, issue with kids, allergy season and tooth pain, but I think I have all of those under control and am back.

One thing I was concentrating most was to waterproof the underside of my floor. I know I should have done it while I had the floor upside down. But my walls bypass the floor and extend a few inches below trailer frame, I wanted to apply waterproofing after floor and walls are attached so I can make the joints water tight. Another thing was that this winter was so cold, attaching anything with glue meant look for a warm days. One thing led to another, and worked on the things I was able to work. So when I got ready to work on under carriage, the body was heavy enough to needing to think about a way to lift it and hold it up.
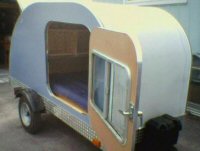
Since I will be crawling under the camper to apply under carriage coating, I wanted to lift the camper 30" or so. The first thing I did was to create 4 sawhorses.

To lift the camper, I used combination of ratchet strap and floor jack. Off course the jack is one of those you turn the thread to raise or lower, so the speed of action is very limited.

Actually, slow speed help manage the lift better. I sure did not want to drop the camper.


Camper is sitting on 2x4 cross member.
Once I have the camper supported, I pulled the trailer from below to make some space.

Before I can apply coatings, I needed to attached under floor storage box.


I debated what to use for the waterproofing, but settled on the Fence-Post paint from Tractor Supply. I was a little worried about this when I read the review there, but once I started, I knew this would work. This is inexpensive, fast drying, and really not that messy. I also caulked corners and joints with asphalt caulk.


Above photos are after one coat. I ended up doing three coats and still have about 1/3 of can left.
I also put window flashing tape on top side of trailer frame.

Since I have more left and this thing is so good, I put this tape at the outside corners of under floor storage box.
After waited for the paint to dry over night, I managed to lower the camper back onto the trailer. They are bolted together.
Although I really don't want to, but I have this designed so that camper can be removed from the trailer when I have to. I may decided to change, repair, or need the trailer for something.

The last thing I did was to apply last plywood on the exterior wall. These will be the last before aluminum sheets.

Oh, I almost forgot, I worked a little on the under galley storage tube. This is 4" PVC tube that span full width of the trailer. I will add twist off hatch on both side. I will use this to store something long and skinny, like fishing rods or canopy.


 absolutsnwbrdr wrote:I noticed the profile template was printed and pieced together, so I'm assuming you've put in some computer time prior to building?
)


 )
)


