CNC Build: The Bed and Breakfast at 4 years and 40,000 miles

...ask your questions in the appropriate forums BUT document your build here...preferably in a single thread...dates for updates, are appreciated....

Re: CNC Build -- Hatch 4.0

Postby GuyllFyre » Thu Mar 13, 2014 7:16 pm

capnTelescope wrote:
GuyllFyre wrote:Would make it easier to manufacture perfect side profiles.

and hatch spars, cabinetry, ... It's a really versatile tool, for general woodworking as well as for teardrop building. In the meantime, learn CAD, if you haven't already. CAD skills and your imagination are the only real limits with CNC. It's a blast. Get one! :thumbsup:


The plan is to have one at some point.
I grew up in a household/family that used power tools on nearly a daily basis. My dad was a mechanic, had high voltage certifications for hydroelectric electrical repairs, basic computer programming, general contractor who regularly did electrical, framing, plumbing, automotive, and many types of industrial maintenance. I learned all of this from him plus my own inclinations to experiment and build. I rebuilt my own first car, I've rebuilt small engines and automobile engines, built or modified many of my own tools, do all of my own auto and home repairs, and regularly build, rebuild, or diagnose dozens of computers in a month.
It's also genetic. My dad's father was a machinist for GE, my mom's father was a mechanic and ran his own businesses for many years.
All through high school and college I did studio art, industrial illustration, architectural drawing, engineering drawing, worked with CADKey, AutoCAD, and whatever vector CAD program the old PrimeOS system had on it. I attained an AAS in MEC and ELT (Mechanical Engineering and Electrical Engineering Technology), which means 20+ years ago I used at least three different CAD programs, a CAD to CAM program, drew parts on paper, structures on paper, "art" in many forms (clay, paper, wood, metal, etc), actually machined parts on real manual milling, grinding, turning, etc, tools. Nowadays I use that to sketch rough "to scale" drawings and use all of the tools I have.
I'm a computer technician, can do many electronics repairs, can do pretty much any mechanical automotive work, can do boilers, forced air, water, natural gas, plumbing, electrical, low and high voltage, structure, etc.
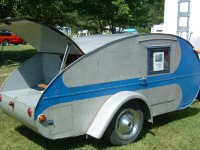
I really picked up on the Teardrops because I love smaller (sporty) cars and I really don't like tenting it.

My designs are more basic. I don't like the hatch, so this revision I've eliminated it. Reason being, I really don't need the external "galley" or storage and sealing a hatch is a real PITA, along with those hinges and needed supports...

My new build thread will start soon but right now it's in the single digits with winds up to 35mph. My garage is full of a parts car I'm stripping, I just put up a 10x20 garage canopy with tarps on the sides but the wind is beating that to death right now.
I do focus on lightweight, due to the small cars. Funny thing is that if you built too light, it just kinda floats behind your car, jerking it around awkwardly instead of planting itself and following.
Next post will have some specific questions on your work and setup.
Things I have for sale on craigslist:
http://albany.craigslist.org/search/?ar ... catAbb=sss

Things I have for sale on eBay:
http://www.ebay.com/sch/merchant/seansmith
User avatar
GuyllFyre
Donating Member
 
Posts: 209
Joined: Fri May 21, 2010 9:35 pm
Location: Scotia, NY

Re: CNC Build -- Mechanicals questions

Postby GuyllFyre » Thu Mar 13, 2014 7:28 pm

I've happily read through all of your thread so far and have some questions.

You have a dust collection system but why not a hood on the CNC?
I've seen you following the router with a shop vac multiple times now. I would think rigging a dust collection setup would be pretty important.

I see you using clamps on your table to hold materials but have a vacuum bag for final assembly.
Is there a reason you don't have a vacuum table set up for the CNC?

The router motor looks a LOT like my basic Porter Cable motor I have for my fixed and plunge base.
Is yours the standard 120V motor or the 3hp 240V one?

I noticed you are holding the router in place with gear clamps. These tend to slip and break horribly.
My experiences with these on high-pressure turbos means joints that pop apart with no warning as the gear assembly stresses, loosens, and strips.
I've gone to t-bolt clamps but in the instance of the router motor, I would wonder why you haven't use steel strap formed to make a clamp of the right size with a nice grade 10 bolt and locking nut to secure it.
It would definitely cut down on any deflection due to the "springyness" of the gear clamp.

Loving this thread as it's put together all of the misc info I've seen from other places as it actually shows you using it to build a teardrop.
Waiting for updates!
:beer:
Things I have for sale on craigslist:
http://albany.craigslist.org/search/?ar ... catAbb=sss

Things I have for sale on eBay:
http://www.ebay.com/sch/merchant/seansmith
User avatar
GuyllFyre
Donating Member
 
Posts: 209
Joined: Fri May 21, 2010 9:35 pm
Location: Scotia, NY

Re: CNC Build -- Hatch 4.0

Postby capnTelescope » Thu Mar 13, 2014 8:23 pm

GuyllFyre wrote:Ethernet connection to an old Windows box is a BAD idea.

Not as bad an idea as running the CNC thru the parallel port, apparently. :) 32 bit Windows and Mach3 are what you get unless you want to spend some major big bucks on the control software. My Smooth Stepper apparently has some buffering in it, so all is wonderful. For now. Maybe. :NC Mach3 only wants a 32-bit version of Windows 2000, XP or Vista, or Windows 7, a 1Ghz CPU and 512MB RAM. I got that covered. This ain't professional-grade stuff. Mach support has about 3 printed pages of instructions for Windows tweaks for XP, many of which you mentioned.

Things with the CNC are all better now. Everything works good, and no sneakernet. :thumbsup:

Enjoy the rest of the thread! :beer:
I'll burn that bridge when I come to it.

Brad
ImageImageImage

Building the Bed & Breakfast
User avatar
capnTelescope
Lifetime member
 
Posts: 1218
Images: 368
Joined: Sun Jun 27, 2004 3:44 pm
Location: Round Rock, TX
Top

Re: CNC Build -- Computer Lesson Quickie

Postby GuyllFyre » Thu Mar 13, 2014 8:30 pm

For those who are not so computer savvy, here's a quick guide to computer needs/terms.
I'm going to post a computer term and then equate it with a PHYSICAL equivalent to help with the perception.

RAM = Desk
Your desk is your workspace. If you have a bigger desk, you can spread more things out on it and see them without shuffling things around.
If you have a smaller desk, you have to move things back and forth more often into other places, like your file cabinet, or a temporary pile in another place under other things.
Works the same for the computer, the less RAM it has, the fewer things it can see at once.
It can pull all of the information into RAM if it has enough and show it all to you at once rather than having to keep going back to the hard drive and showing you a bit at a time.

Hard Drive = File Cabinet (plus secretary)
Your file cabinet is where you store all of your stuff, various information about specifications, past build information, etc, etc.
The bigger your file cabinet, the more things you can store in it.
Same with a computer, the larger the hard drive is, the more things you can put on it.
The issue becomes more with the secretary.
The older and slower hard drives are like the old and reliable secretary. They do their job but sometimes things just don't get things to you as fast but it's a lot of stuff and they know where it is and can get it to you.
New SSD hard drives are like young cyborg secretaries. They can find things super fast and give them to you. Problem is, they are only good for things inside their "building." Once they have to get something from the outside archives, they have to rely on the old reliables.

Now, there's advantages to both. If you have a LOT of things to store, then the older and slower but much LARGER and reliable hard drives are handy. It's your archives.
I equal this to a file server or "NAS" (Network Attached Storage). I have my own "slower" server attached via network to store all my bulk files. I use "NAS4Free" with a couple of drives in a RAID1 configuration on a micro PC on a shelf. This holds all the information, is reliable, but is limited in speed in various ways.

For the hard drive in your computer though, you want the super fast, young, and agile cyborg.
It coordinates getting the brain (CPU) everything it needs (if the desk is big enough) and then runs off and waits.

This is where the CPU comes in.
The CPU is the brain/boss.
It has the fast secretary coordinate everything it needs for the job and waits for it to be put on it's desk (RAM).
It doesn't care who puts the information on it's desk as long as it's available when it's requested.
If you have a slow CPU (brain), it can only look at it just so fast but it also does not have to request more, it can just keep going.
If you have a fast CPU and a small desk (RAM), then having the secretary get more things and remove more things takes more time, plus, if all of your stuff is on an old drive, it takes much more time to move the stuff off the small desk to the archives and then retrieve other things from the archives and put it on the desk.

Now, we also have maintenance and operations.
CPU (brain) has to manage these guys as well to make sure all the pipes and wiring keep moving along like they should.
The more plumbing and wiring they have to attend to, the slower some things get done.
This is where disabling any un-needed hardware comes in handy.
The fewer items you have to keep track of, the less maintenance an time is required to keep everything up to snuff.

When it comes down to it, maximizing your RAM (desk) and minimizing your plumbing and electrical needs, boosts the most performance for a single use type environment, like a CNC, where typically we would use a dedicated micro-controller but are now using a general purpose PC to produce similar results.
Things I have for sale on craigslist:
http://albany.craigslist.org/search/?ar ... catAbb=sss

Things I have for sale on eBay:
http://www.ebay.com/sch/merchant/seansmith
User avatar
GuyllFyre
Donating Member
 
Posts: 209
Joined: Fri May 21, 2010 9:35 pm
Location: Scotia, NY
Top

Re: CNC Build -- Hatch 4.0

Postby GuyllFyre » Thu Mar 13, 2014 8:41 pm

capnTelescope wrote:Not as bad an idea as running the CNC thru the parallel port, apparently.


Well, I would disagree. Being from the old school DOS days and using serial, parallel, and Ethernet connections to transfer data, I can say for sure that a good direct access parallel port will result in more accuracy.
I used to build audio DACs (mostly a bunch of resistors) that plugged into the printer (parallel) port to make decent quality music when an audio card for a PC cost thousands.

It was built for a purpose, to control an X and Y axis, with accuracy, to reproduce a page or image, with nothing but a TTY or Dot Matrix.

Look for old school ASCII art fanfold pinups.

Nothing like running out full height playboy girls on the wide fanfold on the line printer to hang up in the server room. :angel:
Things I have for sale on craigslist:
http://albany.craigslist.org/search/?ar ... catAbb=sss

Things I have for sale on eBay:
http://www.ebay.com/sch/merchant/seansmith
User avatar
GuyllFyre
Donating Member
 
Posts: 209
Joined: Fri May 21, 2010 9:35 pm
Location: Scotia, NY
Top

Re: CNC Build -- Hatch 4.0

Postby capnTelescope » Thu Mar 13, 2014 9:25 pm

GuyllFyre wrote:You have a dust collection system but why not a hood on the CNC?

Priorities. Before I built the Thien baffle, the DC system didn't suck hard enough (or sucked too much) to worry about any elaborate dust collection. And building the Tear was higher priority. Somewhere along the way, I'm going to rig some suction at the router motor.

GuyllFyre wrote:Is there a reason you don't have a vacuum table set up for the CNC?

What little research I've done on vac tables, they need way more vacuum horsepower than my little HF unit. Plus sealing around the workpiece, etc. Clamping is easy & cheap.

GuyllFyre wrote:The router motor looks a LOT like my basic Porter Cable motor

Could be because it's a Porter Cable 890 motor. :) That's the 120V variable speed not-3-hp model. The fixed and plunge bases are under the bench the Radial Arm Saw is on.

GuyllFyre wrote:I noticed you are holding the router in place with gear clamps...

There I was, just finished putting the CNC kit together, and it's ready to go, and I need to fix the router motor to it, because I WANNA MAKE SOME ROUTER DUST! Well, I could rout something fancy with the new CNC, but I can't hold the router to do that. :fb The wooden V-block holder you see was done on the table saw, and the hose clamps were in stock. Turns out it's pretty rigid. The hose clamps aren't stretchy at the machining forces we're dealing with. The router mount to the Z axis is steady as a rock. Any deflection I get comes from machining forces having to go from Z to Y to gantry to X to base thru all the axis mountings, carriages, drive belts, etc., and there's very little of that.

To quote,
capnTelescope wrote:This ain't professional-grade stuff.
:EXP
I'll burn that bridge when I come to it.

Brad
ImageImageImage

Building the Bed & Breakfast
User avatar
capnTelescope
Lifetime member
 
Posts: 1218
Images: 368
Joined: Sun Jun 27, 2004 3:44 pm
Location: Round Rock, TX
Top

Re: CNC Build -- Hatch 4.0

Postby capnTelescope » Thu Mar 13, 2014 9:31 pm

GuyllFyre wrote:Nothing like running out full height playboy girls on the wide fanfold on the line printer to hang up in the server room. :angel:


Aren't you a little bit young to be doing stuff like that? :angel:
I'll burn that bridge when I come to it.

Brad
ImageImageImage

Building the Bed & Breakfast
User avatar
capnTelescope
Lifetime member
 
Posts: 1218
Images: 368
Joined: Sun Jun 27, 2004 3:44 pm
Location: Round Rock, TX
Top

Re: CNC Build -- Hatch 4.0

Postby GuyllFyre » Fri Mar 14, 2014 6:27 am

capnTelescope wrote:Aren't you a little bit young to be doing stuff like that?


I'm 42. Old enough to know line printers pretty well.

Thanks for answering the questions. I have curiosity. I do not mean to offend. I just like to know.
:)
Things I have for sale on craigslist:
http://albany.craigslist.org/search/?ar ... catAbb=sss

Things I have for sale on eBay:
http://www.ebay.com/sch/merchant/seansmith
User avatar
GuyllFyre
Donating Member
 
Posts: 209
Joined: Fri May 21, 2010 9:35 pm
Location: Scotia, NY
Top

Re: CNC Build -- Hatch 4.0

Postby KCStudly » Fri Mar 14, 2014 7:30 am

The "heavy duty" (5/8 inch wide) worm drive clamps are much more robust than the std. variety.

Vibration Resistant SAE J1508 Select 5/8 wide and stick with the normal worm clamp (I can't vouch for the quick release style, nor the constant tension ones).
KC
My Build: The Poet Creek Express Hybrid Foamie

Poet Creek Or Bust
Engineering the TLAR way - "That Looks About Right"
TnTTT ORIGINAL 200A LANTERN CLUB = "The 200A Gang"
Green Lantern Corpsmen
User avatar
KCStudly
Donating Member
 
Posts: 9610
Images: 8169
Joined: Mon Feb 06, 2012 10:18 pm
Location: Southeastern CT, USA
Top

CNC Build -- Hatch 4.1

Postby capnTelescope » Sun Mar 16, 2014 7:14 pm

OK! I think I have this thing figured out. Went to HD and got me some shiny new door hinges. They look like stainless, but don't say that anywhere, so maybe brushed nickel. But nice and heavy and solid. With something to take measurements from, I headed back to the drawing board, and came up with Hatch Hinge 4.1. Hatch 4.1 is a refinement of 4.0, which was a "proof of concept." I will build the 4.1 version. :P

The 4.1 design consists of four parts: Clockwise from the top, the galley spar, hinge, hatch frame end panel and hatch spar, shown here.
Image

One of the major problems with 4.0 was that I couldn't accurately locate the parts in the space-time continuum. :roll: I've got that problem licked now, as this picture tries to show:
Image
The galley spar will fit into pockets on the Tear walls, the hinge fits into pockets in the galley spar and the hatch frame end panel, and the hatch spar fits into a pocket in the hatch frame end panel. All those pockets to be CNC machined. The head bone's connected to the neck bone... :M

All these pieces and all these versions make for an interesting piece of plywood Swiss cheese:
Image

Side view:
Image

Closer look:
Image

This shot tries to show how well the "skin" follows the curve of the side:
Image

Nice squish on the weatherstripping:
Image

A look at the weatherstrip from the outside:
Image
The gap from hatch to wall won't be nearly this wide. Probably about 3/8" when built.

The next step is back to the drawing board to design the entire hatch. Then build! :twisted: The hard part is done! :chicken:

Thanks for looking, stay tuned! :beer:
I'll burn that bridge when I come to it.

Brad
ImageImageImage

Building the Bed & Breakfast
User avatar
capnTelescope
Lifetime member
 
Posts: 1218
Images: 368
Joined: Sun Jun 27, 2004 3:44 pm
Location: Round Rock, TX
Top

Re: CNC Build -- Hatch 4.1

Postby KCStudly » Sun Mar 16, 2014 11:06 pm

Looking very cool. :thumbsup:

It looks like you will end up with about 70-75 deg of opening. I assume you got it to where you are happy with the height of the open hatch(?).

That is a very original seal arrangement. The trim seal seems like a very nice product, IMO. What are your impressions with it so far?

You've got my attention and I'm full of questions. What do you plan on doing at the top and bottom transitions where the seal needs to transition to horizontal?
KC
My Build: The Poet Creek Express Hybrid Foamie

Poet Creek Or Bust
Engineering the TLAR way - "That Looks About Right"
TnTTT ORIGINAL 200A LANTERN CLUB = "The 200A Gang"
Green Lantern Corpsmen
User avatar
KCStudly
Donating Member
 
Posts: 9610
Images: 8169
Joined: Mon Feb 06, 2012 10:18 pm
Location: Southeastern CT, USA
Top

Re: CNC Build -- Hatch 4.1

Postby capnTelescope » Mon Mar 17, 2014 1:03 am

(soapbox) First of all, I want to encourage anyone with questions or concerns about this design to SPEAK UP! If you don't understand how this is going to work, maybe I don't either. The dumb questions are the ones you didn't ask that could have kept me from looking stupid(er). (/soapbox)

KCStudly wrote:It looks like you will end up with about 70-75 deg of opening.

72 deg, according to the dwg. :ok:

KCStudly wrote:I assume you got it to where you are happy with the height of the open hatch(?).

I'm glad you asked that question. :frightened: I ass-u-med it would be so. Thanks to your question, I checked it. According to the drawing and my estimate of the trailer bed height, the bottom edge of the hatch will be 75" (6'3") above ground level. I'm only 5'7" (or at least I once was), so if I don't start wearing Lady Gaga shoes or ten-gallon hats, I'll be OK. :ok:

Which makes me want to ask a question of my Dear Readers. How high is the bottom edge of your hatch when it's open? More? Less?

KCStudly wrote: The trim seal seems like a very nice product, IMO. What are your impressions with it so far?

It's McMaster-Carr 1120A592, 1/4" edge, 3/4" "A" dimension, upper left corner of the page. It looks like choice quality good stuff to me. :thumbsup:

KCStudly wrote: What do you plan on doing at the top and bottom transitions where the seal needs to transition to horizontal?

I'm thinking mitered weatherstrip corners held together with some super-dooper weatherstrip adhesive TBD. I'm still fumbling around trying to draw in a rain gutter along the top. I thought I'd mount the bottom weatherstrip piece a little bit proud of the trailer end, so it could ease the banging of my shins on the trailer. I'd really like to radius the corners so I don't have to miter, but I haven't fingered that one out yet. I'm also thinking about how to use aluminum bar/channel/angle/whatever. I could probably cut Al on the CNC. On teardrop.net's facebook page, Grant shows using aluminum sheet/plate on the hatch spars to fight springback. I'll probably do that. Fiberglass is another possibility for rain gutters. :thinking:

I can see why there haven't been many builders trying this approach. :?
I'll burn that bridge when I come to it.

Brad
ImageImageImage

Building the Bed & Breakfast
User avatar
capnTelescope
Lifetime member
 
Posts: 1218
Images: 368
Joined: Sun Jun 27, 2004 3:44 pm
Location: Round Rock, TX
Top

CNC Build -- Hatch 4.x Fatal Flaw

Postby capnTelescope » Mon Mar 17, 2014 10:17 am

Now that I'm working in the third dimension, to put a rain gutter along the top of the galley opening, I've uncovered a fatal flaw in the design of Hatch 4.x. Let's look at the mockup in the open position:
Image

The parts that I called the Galley Spar and the Hatch Frame End Panel come face-to-face in the full open position. This means that any rain gutter along the top edge cannot extend below the plane of the bottom of the Galley Spar. If I can't do that, there's not enough room for the weatherstrip, so there's no seal. Checkmate. :cry:

Hatch 3.x shows some promise in getting around this, so I'm back to that.

Thanks for looking! :beer:
I'll burn that bridge when I come to it.

Brad
ImageImageImage

Building the Bed & Breakfast
User avatar
capnTelescope
Lifetime member
 
Posts: 1218
Images: 368
Joined: Sun Jun 27, 2004 3:44 pm
Location: Round Rock, TX
Top

Re: CNC Build -- Hatch 4.x Fatal Flaw

Postby GuyllFyre » Mon Mar 17, 2014 6:19 pm

I decided to not have a hatch of any sort.
With issues of fitment, sealing, etc, I've been finding my camping experiences have no need for a hatch.
GuyllFyre Alpha II, coming soon, no hatch 5 wide.
Things I have for sale on craigslist:
http://albany.craigslist.org/search/?ar ... catAbb=sss

Things I have for sale on eBay:
http://www.ebay.com/sch/merchant/seansmith
User avatar
GuyllFyre
Donating Member
 
Posts: 209
Joined: Fri May 21, 2010 9:35 pm
Location: Scotia, NY
Top

Re: CNC Build -- Hatch 4.x Fatal Flaw

Postby capnTelescope » Mon Mar 17, 2014 7:23 pm

GuyllFyre wrote:I decided to not have a hatch of any sort.
With issues of fitment, sealing, etc, I've been finding my camping experiences have no need for a hatch.


I think we all tend to build what we want/need. I've been wanting to give this design a try for a long time. :D
I'll burn that bridge when I come to it.

Brad
ImageImageImage

Building the Bed & Breakfast
User avatar
capnTelescope
Lifetime member
 
Posts: 1218
Images: 368
Joined: Sun Jun 27, 2004 3:44 pm
Location: Round Rock, TX
Top

PreviousNext

Return to Build Journals

Who is online

Users browsing this forum: No registered users and 18 guests