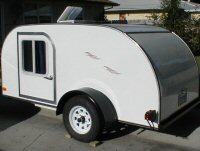
The "Minibago" benroy continued.....

...ask your questions in the appropriate forums BUT document your build here...preferably in a single thread...dates for updates, are appreciated....

Re: The "Minibago" benroy continued.....

Postby twinight » Tue Mar 18, 2014 4:43 pm

I've done small stuff with fiberglass, but working with epoxy and creating a smooth surface is a pain. The epoxy always comes out bumpy, I always get glass fibers sticking up and the whole thing gets rock hard and is difficult to sand. Then I'm resorted to use body filler to get it smooth which is not much easier. Then it's even more important to get it perfectly smooth without waves because an automotive finish will show every slightest imperfection. In socal, the TB2 and exterior paint will provide enough weatherproofing and the trailer will be covered when stored. The edges are up in the air, depending how clean I can get the overlaps and whether my wife wants the "framed" look rather than a "monolithic" look.
twinight
Teardrop Advisor
 
Posts: 51
Images: 68
Joined: Wed Feb 19, 2014 6:01 am

Re: The "Minibago" benroy continued.....

Postby KCStudly » Tue Mar 18, 2014 6:54 pm

If it is just the look you are after, paint a border on it, or do like Mel (atahoekid) did and add a raised foam trim board, also covered. (He used glass and epoxy, but it could be done in canvas/glue/paint just as... no check that, I meant to say... more easily.)

Like Rower said, tho, none of the proven techniques are wrong. It just depends on what you are after, the skills and tools you prefer to use, and, in some cases the budget you have allotted. I suppose the space you have to build in could be a factor, too. I recall one builder who's garage was attached to his house and his wife had sensitivities to chemical smells. He would never consider skinning with epoxy.

We can tell you why we have made many of our build choices, but only you and your wife can decide which way you will go.

Build on.
KC
My Build: The Poet Creek Express Hybrid Foamie

Poet Creek Or Bust
Engineering the TLAR way - "That Looks About Right"
TnTTT ORIGINAL 200A LANTERN CLUB = "The 200A Gang"
Green Lantern Corpsmen
User avatar
KCStudly
Donating Member
 
Posts: 9640
Images: 8169
Joined: Mon Feb 06, 2012 10:18 pm
Location: Southeastern CT, USA

Re: The "Minibago" benroy continued.....

Postby twinight » Tue Mar 25, 2014 1:01 am

The galley is almost finished. The gas is hooked up with copper line to the tank up front. The plumbing is installed with a pressure switched pump.
The upper cabinets are mounted temporarily while my wife hunts down the terrazo FRP backsplash she likes and the grey FRP to skin the inside of the hatch. I found some bright 12v LED puck lights at ikea that are going in the ceiling. The hatch struts were spare parts left over from an old integra I had. They hold the hatch horizontal at full extension. When the hatch is closed, they do hold the hatch open just a bit when it cams over center, giving the draw latches a workout.
I ordered some 7 oz canvas from rosebrand. Since I need it for waterproofing and not strength, 7 oz will work fine and use less TB2.

I'm looking forward to visit the Perris teardrop gathering this weekend for more ideas.

Image
Image
Image
Image
twinight
Teardrop Advisor
 
Posts: 51
Images: 68
Joined: Wed Feb 19, 2014 6:01 am
Top

Re: The "Minibago" benroy continued.....

Postby KCStudly » Tue Mar 25, 2014 6:39 am

Looks really nice! :thumbsup:
KC
My Build: The Poet Creek Express Hybrid Foamie

Poet Creek Or Bust
Engineering the TLAR way - "That Looks About Right"
TnTTT ORIGINAL 200A LANTERN CLUB = "The 200A Gang"
Green Lantern Corpsmen
User avatar
KCStudly
Donating Member
 
Posts: 9640
Images: 8169
Joined: Mon Feb 06, 2012 10:18 pm
Location: Southeastern CT, USA
Top

Re: The "Minibago" benroy continued.....

Postby S. Heisley » Tue Mar 25, 2014 8:07 pm

That galley is very nice and also well thought out! :thumbsup:
User avatar
S. Heisley
Super Lifetime Member
 
Posts: 8869
Images: 495
Joined: Mon Sep 17, 2007 10:02 am
Location: No. California
Top

Re: The "Minibago" benroy continued.....

Postby jimun » Tue Mar 25, 2014 10:24 pm

That is a nice looking galley.Image
Benroy Style 5x10 Build - http://www.tnttt.com/viewtopic.php?f=50&t=57462

Now to Him who is able to do far more
abundantly beyond all that we ask or think,
according to the power that works within us,
Eph 3:20 (NASB)
User avatar
jimun
Teardrop Advisor
 
Posts: 57
Images: 10
Joined: Sun Sep 08, 2013 11:49 am
Location: Banning, CA
Top

Re: The "Minibago" benroy continued.....

Postby twinight » Wed Mar 26, 2014 11:49 am

Thanks all. I think my wife is taking this like a mini home remodeling project and being particular about things. I have to keep reminding her it's only a camping trailer.

The large 250ah AGM battery was 1.5" too tall to fit in the compartment under the bed.
Now I have to decide whether to fur the entire bed platform up 1.5" or cut on opening through the insulated layer of the floor, or just fur up around the battery and use open cell foam to make up the thickness everywhere else. Since it's in the corner under the cabinets, you won't notice the difference.
There is a floor section up front of the axle that Greg had cut out through the insulated layer for a hot water heater and I could enlarge it to fit the battery. But when I moved the battery up there and measured the tongue weight and it was 240lbs! That's with an empty propane tank. Way too much.
So back in front of the galley the bulkhead it goes.

I have a few things to do before I start canvassing. My wife wants a 2" band at the top edge to continue the line of the hatch opening. I'll have to cut this out of foam. The openings for some of the windows are too large around the corners preventing the flange to seal completely. I'll have to fill these in to match the window contours. Most likely using foam as well since I will wrap the canvas in till it meets the interior plywood anyway.
twinight
Teardrop Advisor
 
Posts: 51
Images: 68
Joined: Wed Feb 19, 2014 6:01 am
Top

Re: The "Minibago" benroy continued.....

Postby twinight » Thu Apr 03, 2014 2:08 am

I got the inside cabinet done. I used some perforated metal racks that happen to be the perfect width when joined. I used these on the top and bottom. The center is a recess for a 19" TV and a DVD player shelf. Behind the TV is a compartment for the converter and solar charger. The perforated metal panels allow for venting and also light to pass through. I plan on mounting some cove lighting that will wash the ceiling and light the cabinets at the same time. The inverter will be mounted next to the battery on the floor to keep the 2awg cable short.. All the wiring will run down a chase in the corner.

Image
Image
Image
twinight
Teardrop Advisor
 
Posts: 51
Images: 68
Joined: Wed Feb 19, 2014 6:01 am
Top

Re: The "Minibago" benroy continued.....

Postby jbyrd » Thu Apr 03, 2014 7:37 am

Great job on those cabinets! I'm really liking the perforated metal :thumbsup:
Til later, See ya
Jeremy

My build journal #1 "SOLD" : viewtopic.php?t=45945
my build journal #2 "SOLD": viewtopic.php?f=50&t=59216
User avatar
jbyrd
Teardrop Master
 
Posts: 146
Images: 172
Joined: Sun Aug 28, 2011 8:24 pm
Location: marianna, Florida
Top

Re: The "Minibago" benroy continued.....

Postby twinight » Thu Apr 03, 2014 2:09 pm

The metal was used because I ran out of the birch plywood, but it became a design element.
I love the as-is section at IKEA. Lots of building material for dirt cheap.
My wife said no flush doors like the galley cabinet, and this way I didn't have to build a cabinet face either. The doors are also held off the face of the metal and requires no door pull to open for a cleaner look. The perforated metal will creates some cool lighting effects. I might use an acrylic shelf or clear coroplast to save weight and allow light to shine through.
twinight
Teardrop Advisor
 
Posts: 51
Images: 68
Joined: Wed Feb 19, 2014 6:01 am
Top

Re: The "Minibago" benroy continued.....

Postby twinight » Tue Apr 08, 2014 4:52 am

I just got done skinning one side in canvas and it came out looking pretty good.
The 8oz canvas from Rose Brand was not-preshrunk and not-ironed.
I cut the canvas a foot longer than the length and secured it over the side with some weight plates on the roof.
then I folded it all on top while I rolled on undiluted TB2 on half the 5x13 side. Then I dropped the canvas down and started smoothing it out by hand to stretch out the folds and prevent bunching up and wrinkles. I followed up with a carper roller and a spray bottle to get the glue to soak into the canvas and spread evenly. The wheel wells I ended up using a staple gun to secure the edge and followed up with an overlapping strip to cover all the exposed wood. The window openings, I overlapped the thickness of the walls.
After all the canvas was on, I rolled on a layer of 50/50 diluted TB2 to make sure the canvas was soaked through.
After all was said and done, I only used 1/2 gallon of glue.

Here are the pics.
Image
Image
Image
Image
Image
Image
twinight
Teardrop Advisor
 
Posts: 51
Images: 68
Joined: Wed Feb 19, 2014 6:01 am
Top

Re: The "Minibago" benroy continued.....

Postby KCStudly » Tue Apr 08, 2014 10:30 pm

Looking good!

Any idea how much thickness was added to the jambs by your two layers?
KC
My Build: The Poet Creek Express Hybrid Foamie

Poet Creek Or Bust
Engineering the TLAR way - "That Looks About Right"
TnTTT ORIGINAL 200A LANTERN CLUB = "The 200A Gang"
Green Lantern Corpsmen
User avatar
KCStudly
Donating Member
 
Posts: 9640
Images: 8169
Joined: Mon Feb 06, 2012 10:18 pm
Location: Southeastern CT, USA
Top

Re: The "Minibago" benroy continued.....

Postby twinight » Wed Apr 09, 2014 12:43 am

I only used one layer in the window jambs, since it will be covered up by the window and trim and not visible. It's a tight fit, but I placed the window in the opening as the canvas was drying to make sure the opening didn't shrink. I only used 2 layers over the wood fender extensions. I'm working on the other side tonight. The door and hatch jambs will be covered over with butyl tape and aluminum angles to act as flashing and water stops. After the other side is done, I will trim the canvas flush at the top edge. I will be cutting 2" wide trim pieces out of 1/2" foam to create a raised band along the edges. Then the roof canvas will wrap over the side and terminate on the inside edge of the raised foam trim.
twinight
Teardrop Advisor
 
Posts: 51
Images: 68
Joined: Wed Feb 19, 2014 6:01 am
Top

Re: The "Minibago" benroy continued.....

Postby twinight » Wed May 28, 2014 3:19 am

Long overdue update.
The canvas with 2 coats of gripper.
120691
Edges:
120694
Polyurethane concrete crack sealant on the edges of the hatch hinge will completely seal it.
120693
The three colors for the trailer. I may add a 4th between the baby blue and the teal.
120696
I did use 1/2" foam to add a raised trim around the top edge of the trailer.
The canvas wrapped nicely and didn't have to do any cutting around the bends.
At the hatch I used 1/2" plywood instead of foam, to strengthen the hatch and since the latch will be mounted to it.
120692
Lightest base color of porch paint and the treeline penciled in. I'm thinking I need to go down lower since I have 13' of canvas and the trees will look a bit small.
120695
And the paint scheme from the 1st page.
120725
Last edited by twinight on Wed May 28, 2014 2:52 pm, edited 1 time in total.
twinight
Teardrop Advisor
 
Posts: 51
Images: 68
Joined: Wed Feb 19, 2014 6:01 am
Top

Re: The "Minibago" benroy continued.....

Postby KCStudly » Wed May 28, 2014 7:05 am

Your canvas job is looking really nice! :thumbsup:

Is there more info and pics about how you imbedded your hatch hinge? Is there a piano hinge under the rubber or just the rubber flap?

I plan on doing the hinge and rubber cover on top of the canvas, but I would be interested to hear your reasoning for burying the hinge.
KC
My Build: The Poet Creek Express Hybrid Foamie

Poet Creek Or Bust
Engineering the TLAR way - "That Looks About Right"
TnTTT ORIGINAL 200A LANTERN CLUB = "The 200A Gang"
Green Lantern Corpsmen
User avatar
KCStudly
Donating Member
 
Posts: 9640
Images: 8169
Joined: Mon Feb 06, 2012 10:18 pm
Location: Southeastern CT, USA
Top

PreviousNext

Return to Build Journals

Who is online

Users browsing this forum: jdeleon and 5 guests