Father-Daughter Build 2013-14

...ask your questions in the appropriate forums BUT document your build here...preferably in a single thread...dates for updates, are appreciated....

Re: Father-Daughter Build 2013-14

Postby lfrazer98 » Thu May 01, 2014 10:15 pm

I knew I could count on tnttt for quick replies and good advice/links!

I realize now that I don't need a roll pan as I am not extending my floor over the dimensions of my frame. Floor is perfectly flush and the front and rear wall attach to the frame at the floor.

I have heard that about putty tape from Grant before, but when I ask rv places, or read other articles online, they say butyl is better because it doesn't dry out and crack. However, I do trust the expertise of a 25 year teardrop builder and will most likely use putty tape. So, nothing goes in the screw holes before the final screws are placed? Just the putty tape?

Agree about the spars and figured we would have to do so for vent installation (upright 1x 2's) anyway. Yep, KC, I planned on having a double spar or a thicker board for the vent installation and the hatch hinge.

Almost all of my materials arrived this week, so I am excited to break them open and get started. Many pictures to come! (and probably more questions, too)

:D
User avatar
lfrazer98
Teardrop Master
 
Posts: 204
Images: 217
Joined: Tue Sep 17, 2013 6:25 pm
Location: New York

Re: Father-Daughter Build 2013-14

Postby KCStudly » Fri May 02, 2014 12:20 am

Just to clarify, it is a good idea to use hardwood (oak or maple) for the hatch hinge because it hold screws better. The hinge spars are subject to a lot of leverage trying to pry the hinge away from the camper so the screws can be ripped out of softer woods.

Another trick that works pretty good, if hardwood is not an option, is to run the screws in, pull them out, then squirt a little fast CA glue in the hole. The CA soaks in good without clogging the hole. You can also use regular wood glue, put the screw back in and pull it right back out. This basically forms a threaded hole. The screw pushes the excess glue out of the way and the glue hardens the fibers around the screw and makes them much stronger. You would do this during initial fit up then rely on the tape to seal on final assembly.

It's a lot easier to just use hardwood.
KC
My Build: The Poet Creek Express Hybrid Foamie

Poet Creek Or Bust
Engineering the TLAR way - "That Looks About Right"
TnTTT ORIGINAL 200A LANTERN CLUB = "The 200A Gang"
Green Lantern Corpsmen
User avatar
KCStudly
Donating Member
 
Posts: 9640
Images: 8169
Joined: Mon Feb 06, 2012 10:18 pm
Location: Southeastern CT, USA

Re: Father-Daughter Build 2013-14

Postby aggie79 » Fri May 02, 2014 6:15 am

Poplar is another poplar option (pun intended) option to use on your hatch spar.

If you use butyl or RV tape for your trim, you don't want to use it under your hurricane hinge. It is too thick to compress and will affect the fit of your hatch.

For the trim held by screws, I pre-bent the trim, drilled pilot holes for the screws, removed the trim, and applied sealant. Then I reinstalled the trim. After a day or so, I removed the screws a second time, used a syringe to inject sealant into the screw holes and refastened the screws.

Be careful using too much torque installing the screws. It is easy to strip out the threads in wood. If you do, don't panic. Just push the screw into the hole and the sealant will hold the screw and the trim in place.
Tom (& Linda)
For build info on our former Silver Beatle teardrop:
Build Thread

93503
User avatar
aggie79
Super Duper Lifetime Member
 
Posts: 5405
Images: 686
Joined: Tue Aug 07, 2007 5:42 pm
Location: Watauga, Texas
Top

Re: Father-Daughter Build 2013-14

Postby jonw » Fri May 02, 2014 8:33 am

lfrazer98 wrote:Agree about the spars and figured we would have to do so for vent installation (upright 1x 2's) anyway. Yep, KC, I planned on having a double spar or a thicker board for the vent installation and the hatch hinge.

Exactly what I did with poplar 1x2s - worked great! Poplar is a good wood to use for these TDs as it is stronger and lighter than pine, but lighter and less expensive than oak or maple.

Another trick if you overtighten/strip a screw in wood is to insert several pieces of wooden toothpicks into the hole, cut to the length of the depth of the hole, and then just re-screw in the screw into the middle of the cutoff toothpicks.
User avatar
jonw
Titanium Donating Member
 
Posts: 525
Images: 163
Joined: Thu Oct 22, 2009 6:22 pm
Location: Marlboro, Mass.
Top

Re: Father-Daughter Build 2013-14

Postby RandyG » Fri May 02, 2014 9:30 am

Toothpicks, that's a great tip. Thanks for that one!
Randy
Aircraft fabricator, novice carpenter, electrical apprentice, audio engineer dropout.
Build thread - http://www.tnttt.com/viewtopic.php?f=50&t=54126
User avatar
RandyG
500 Club
 
Posts: 695
Images: 115
Joined: Thu May 10, 2012 6:52 pm
Top

Re: Father-Daughter Build 2013-14

Postby KCStudly » Fri May 02, 2014 10:30 am

Wooden match sticks work, too. Another option is to drill out to a stock dowel rod size and glue a chunk in. I used the later technique to relocate a screw hole half a hole off.
KC
My Build: The Poet Creek Express Hybrid Foamie

Poet Creek Or Bust
Engineering the TLAR way - "That Looks About Right"
TnTTT ORIGINAL 200A LANTERN CLUB = "The 200A Gang"
Green Lantern Corpsmen
User avatar
KCStudly
Donating Member
 
Posts: 9640
Images: 8169
Joined: Mon Feb 06, 2012 10:18 pm
Location: Southeastern CT, USA
Top

Re: Father-Daughter Build 2013-14

Postby lfrazer98 » Tue May 06, 2014 8:09 pm

While I was at work today, Dad cut the panels for my drawer fronts, and cabinet doors and they will be assembled tomorrow. I am picking up my ply tomorrow or Thursday and then the real fun begins. I will post pictures as soon as I take some. Windows should be arriving by the week's end.

I am still trying to figure out how to get the wires that I need that may be running under the trailer to the galley hatch area.... That is where my current brake and marker light wires are, but I want to put brake lights on the galley hatch. I am thinking I will have to go up the side wall (sandwich style) before the outer skin is on then to the galley hatch by the hinge. However, is there something special I need to do where the hole is that the wire will enter the side wall through? A flanged hole that can be caulked? I should have run the wires in the floor before I was sealed up, but I didn't think that far ahead. My dilemma is about where the wires enter the wall. There has got to be something to buy that allows the wires entrance, but keeps out water. I know Tom posted something about running wires through conduit under his trailer, but I am not sure if he shared how the wires entered the trailer.

Thanks, everyone and can't wait to post progress this weekend!
User avatar
lfrazer98
Teardrop Master
 
Posts: 204
Images: 217
Joined: Tue Sep 17, 2013 6:25 pm
Location: New York
Top

Re: Father-Daughter Build 2013-14

Postby lfrazer98 » Tue May 06, 2014 8:16 pm

Forgot to mention we are using 1x2 poplar spars. We will be placing them upright for a 1 1/2" thick roof. Thanks for all the advice about screws and tape. My father did have a question about the tape under the rv roof edge molding. If you use putty tape under the trim, do you put it around the corner to better seal the joint? My trim will have a 1" roof coverage and 5/8" side wall coverage. I figure I want whatever I am using as a sealant to be pressed evenly underneath the whole roof edge molding trim and not just the top.
User avatar
lfrazer98
Teardrop Master
 
Posts: 204
Images: 217
Joined: Tue Sep 17, 2013 6:25 pm
Location: New York
Top

Re: Father-Daughter Build 2013-14

Postby RandyG » Wed May 07, 2014 8:00 am

Alot of people will drill holes through the spars and run the wiring in the roof. You will probably need some wires up there anyway, for the dome and reading lights. When running the lights up and down to the frame, just have a wire channel in the front and rear cabinets, that way there's no need for channeling through the walls.
Randy
Aircraft fabricator, novice carpenter, electrical apprentice, audio engineer dropout.
Build thread - http://www.tnttt.com/viewtopic.php?f=50&t=54126
User avatar
RandyG
500 Club
 
Posts: 695
Images: 115
Joined: Thu May 10, 2012 6:52 pm
Top

Re: Father-Daughter Build 2013-14

Postby aggie79 » Wed May 07, 2014 10:35 am

lfrazer98 wrote:I am still trying to figure out how to get the wires that I need that may be running under the trailer to the galley hatch area.... That is where my current brake and marker light wires are, but I want to put brake lights on the galley hatch. I am thinking I will have to go up the side wall (sandwich style) before the outer skin is on then to the galley hatch by the hinge. However, is there something special I need to do where the hole is that the wire will enter the side wall through? A flanged hole that can be caulked? I should have run the wires in the floor before I was sealed up, but I didn't think that far ahead. My dilemma is about where the wires enter the wall. There has got to be something to buy that allows the wires entrance, but keeps out water. I know Tom posted something about running wires through conduit under his trailer, but I am not sure if he shared how the wires entered the trailer.


Hi Lauren,

I did use two runs conduit for wiring from the front of the teardrop to the galley. One conduit was for 12v DC trailer fixtures. The other conduit was for primarily for 120v AC wiring. The main trailer lighting wiring is not within conduit. I used a sheathed 4-wire cable and ran it exposed on the bottom side of my teardrop from the trailer connector at the front back to the galley area. It is held in place by a combination of zip ties around the frame rail and cable clamps screwed into the bottom of my floor.

All of my wiring entered the galley area through the floor in the lower left galley cabinet. I drilled slightly over size holes for the two conduits and the one trailer wire and filled the voids with sealant. The picture below shows where the wiring entered the galley area next to the galley bulkhead.

Image

The terminal strips in the picture are for the trailer lighting. Each wire of the four wire trailer wire goes to a separate strip. The individual trailer lights are wired to the strips. The terminal strips are necessary but for me it made things easier. (You may notice some wiring from the terminal strips feeding into the conduit. These go back up toward the front of the teardrop to the front side marker lights.) While I did have some 12v and 120v wiring inside my walls and in the roof framing, none of my trailer lighting was run inside. For the side marker lights, I just drilled through the sidewalls. I used some sealant around the side marker lights to seal them.

For my hatch mounted trailer lighting, I did not run the wiring through the sidewalls. On the hatch, I ran wiring from the lights through the outer skin and then through the hatch framing. The wiring exits the hatch framing near the hatch spar where the hurricane hinge is mounted.

Image

The wiring ended in a four-pin trailer wire connector. (Note: there are two 4-pin connectors is because I had "extra" wiring in the hatch for speakers and light.) The reason I used connectors was for the possibility of having to remove the hatch (which I never have done.)

The wiring for the rear side marker lights and the galley-mounted rear tailights was surface mounted to the galley bulkhead. The tailight wiring was run up from the terminal strips through the galley counter and into my upper galley cabinet. It's a little hard to see from my messy temporary wiring below, but you can see the general path of the wiring in the lower galley cabinet. (This particular cabinet is for battery storage, battery disconnect, wiring chase, and 12v distribution panel.)

Image

The tailight wiring (and speaker and light wiring) were run exposed along the back of the upper cabinets and end in a matching 4-pin connectors so they can connect to the hatch wiring. I used split loom cable wrap around the exposed wiring to make it look more attractive then just the wiring alone.
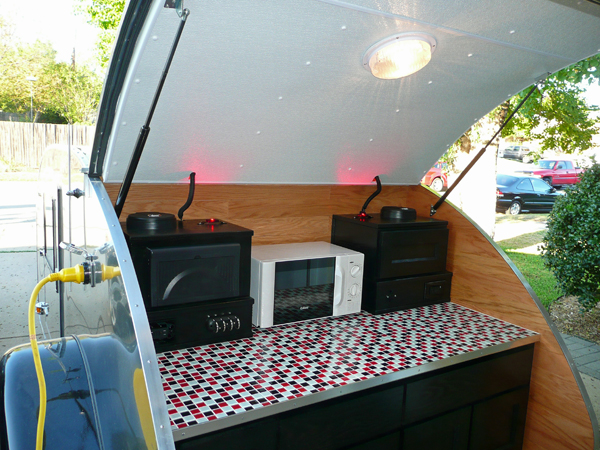
Image

I didn't intend to hijack your build thread. Hopefully this information is beneficial.

Take care,
Tom
Last edited by aggie79 on Wed May 07, 2014 3:18 pm, edited 1 time in total.
Tom (& Linda)
For build info on our former Silver Beatle teardrop:
Build Thread

93503
User avatar
aggie79
Super Duper Lifetime Member
 
Posts: 5405
Images: 686
Joined: Tue Aug 07, 2007 5:42 pm
Location: Watauga, Texas
Top

Re: Father-Daughter Build 2013-14

Postby Esteban » Wed May 07, 2014 1:11 pm

Lauren, I am using a delcity.net/Stud-Type-Plastic-Junction-Box junction box under the trailer. Partly to make the initial set up and future maintenance or repairs easier. Local auto parts stores may sell similar junction boxes.

I chose to use a 7 wire Conntek ROJ Black 7 Way Plug Inline Trailer Cord from the tongue coupler to the under the trailer junction box (above) and from it I'll use more of the 7 wire cord under the trailer then through the galley floor up to the electrical compartment. To have enough (extra) cord to reach the electrical compartment I bought the 25' long version.

I'm using 7 wire plugs so the Tow Vehicle's alternator can help recharge the teardrop's battery when moving it from place to place. I have electric brakes which is another reason to use a 7 wire plug and cord.

I am using Trailer-Connectors between the hatch and my electrical compartment. Like Tom wrote they are good if there ever is a need to remove the hatch. I chose to use two separate connectors for my wiring convenience. One with five connector wires for the stop/tail/turn lights and a TecNiq-Red-HI-Mount-Center-Brake-Turn-ID-Bar-11-LED-Light light (and possible future backup lights). The second with two connector wires is just for the galley light(s).
Steve - SLO, CA
Esteban
Donating Member
 
Posts: 1684
Images: 15
Joined: Fri Jul 28, 2006 4:39 pm
Location: California, San Luis Obispo
Top

Re: Father-Daughter Build 2013-14

Postby lfrazer98 » Wed May 07, 2014 8:56 pm

I am very happy that you "hijacked" the thread! (which you didn't) Valuable info from the both of you, Steve and Tom. So, basically, I can run a conduit through the floor or wall or edge, if need be, but seal it up well. What type of sealant did you use, Tom? A roofing or window sealant? Yes, Steve, I saw the LED brake/turn signal light, but went for two separate left and right oval ones to add to the hatch for greater breaking visibility. We will be using a 7 pin connector as well.

As for an update, my fenders are primed, my cabinet and drawer fronts are put together, and pics have been taken. I should get them uploaded tomorrow. I definitely have to say that I am very hard on myself and notice every imperfection in my wood working. However, overall, it does look quite pretty. And this is my first time, so I guess I should let the little things go. Never knew working with wood was so hard. Got lots of respect for you carpenters out there! :thumbsup:
User avatar
lfrazer98
Teardrop Master
 
Posts: 204
Images: 217
Joined: Tue Sep 17, 2013 6:25 pm
Location: New York
Top

Re: Father-Daughter Build 2013-14

Postby lfrazer98 » Wed May 07, 2014 9:42 pm

Here are a few pictures. All cabinets and drawers are the same color stain. Cabinet pictures were taken inside and look darker than the ones outside with more sunlight. Drawer pulls are not attached yet.

119954 119955 119956 119957 119958

:)
User avatar
lfrazer98
Teardrop Master
 
Posts: 204
Images: 217
Joined: Tue Sep 17, 2013 6:25 pm
Location: New York
Top

Re: Father-Daughter Build 2013-14

Postby lfrazer98 » Wed May 07, 2014 9:50 pm

RandyG wrote:Alot of people will drill holes through the spars and run the wiring in the roof. You will probably need some wires up there anyway, for the dome and reading lights. When running the lights up and down to the frame, just have a wire channel in the front and rear cabinets, that way there's no need for channeling through the walls.


I guess I should have said that I am putting my battery in my tongue box, so I am trying to figure out how to get the wires into the roof as I will need to enter that area from somewhere in the front. I do understand what you are saying though. I plan on running the wires through the roof and coming down behind the cabinets inside the camper and then using a connector so I can get the wires to the galley hatch. I will also run wires from the roof down to each side wall for exterior porch lights and side markers. Thanks for your input!
:)
User avatar
lfrazer98
Teardrop Master
 
Posts: 204
Images: 217
Joined: Tue Sep 17, 2013 6:25 pm
Location: New York
Top

Re: Father-Daughter Build 2013-14

Postby Esteban » Wed May 07, 2014 10:07 pm

Lauren, I will run the 7 wire cable underneath the floor. Then will route it up into the galley area through a hole in the floor. Not sure what sealant I'll use around the wire to seal up the hole in the floor. Will want it to be waterproof and have some flex to it.

:thumbsup: The TecNiq light I linked to up above is a "third brake light" and much more all in one. It is also an ID light and a left or right turn signal. It will be mounted somewhat high in the center of my hatch. I plan to use it In Addition To two oval LED tail lights on the rear of the hatch like these Sealed, 6-1/2" Oval LED Trailer Stop, Turn and Tail Light, Flange Mount, 10 Super Diode. It's sort of a belt and suspenders way to make the trailer highly visible to following vehicles to improve safety.

There are Chrome Accent Ring for STL78 and BUL78 LED Series Trailer Lights and Snap-on Reflector Ring for STL78RB Series LED Lights - Red available for the tail lights. I bought the chrome rings. I may buy the red ones too to see which ones I prefer...I'm now leaning toward using the red ones for greater visibility and safety.

:thumbsup: :applause: Halfdome Danny shows a very good, easy to do, way to mount the "third brake light" to the curve of the hatch.

Edit: Your cabinet and drawer fronts look great. :applause:
Steve - SLO, CA
Esteban
Donating Member
 
Posts: 1684
Images: 15
Joined: Fri Jul 28, 2006 4:39 pm
Location: California, San Luis Obispo
Top

PreviousNext

Return to Build Journals

Who is online

Users browsing this forum: No registered users and 9 guests