I have found through personal experience and watching others. It is very easy to hit a snake with a rifle or pistol when the Hollywood cameras are running. Without them to help your marksmanship it is pert near impossible to shoot a snake with a rifle/pistol.
Shotgun if you must make noise. Shovel is by far my snake disposal tool of choice.
Teardrops n Tiny Travel Trailersor t n ttt for short (tnttt.com) |
The Poet Creek Express - Foamie Hybrid
Moderator: eaglesdare
Re: The Poet Creek Express - Foamie Hybrid
![]() by Wolffarmer » Wed May 14, 2014 10:10 pm
by Wolffarmer » Wed May 14, 2014 10:10 pm
"these guys must be afraid of the dark"
-

Wolffarmer - Donating Member
- Posts: 4612
- Images: 309
- Joined: Wed May 02, 2007 1:32 pm
- Location: Idaho Rupert
Re: The Poet Creek Express - Foamie Hybrid
![]() by KCStudly » Wed May 14, 2014 11:39 pm
by KCStudly » Wed May 14, 2014 11:39 pm
Good point Randy, and you're probably right, but on a good day I can hit a tack at 50 feet with the Marlin. The Mk III has grouped within 2 inches at 25 ft.
In the pin shoot events one table has just the tops of bowling pins sawed off at the neck and we shoot those with .22 at 25 ft. On a good round it's 5 shots, 5 pins in just a few seconds free hand. I don't get them all every time, and sometimes it takes a couple of shots per pin, but a large copper head's head isn't much, if any smaller than that.
But that's all a little off topic. Let's get caught up on this evenings build progress.
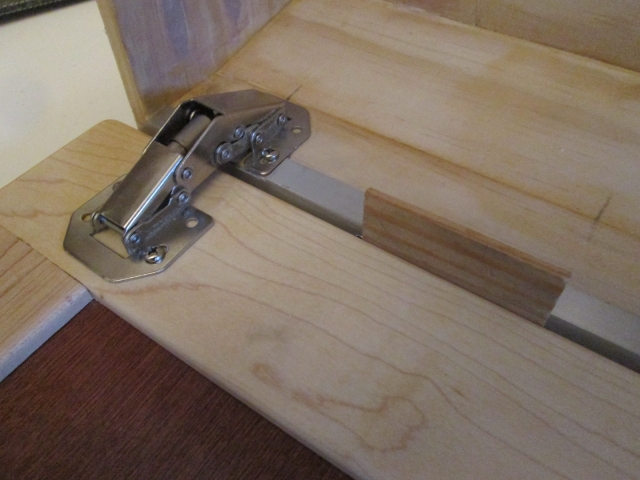
Before I put the polyurethane on the locker door and before I glue the vinyl liner in, I want to complete fitting the door prop strut/lid support. A couple of things have to happen first. I needed to check and see that the hinge alignment is okay or can be adjusted to accommodate the aluminum angle trim. So I miter cut the upper piece of trim to fit the locker opening, marked the hinge locations and milled away the short leg of the angle in these areas. (The top is shown with the locker upside down in these pics.)
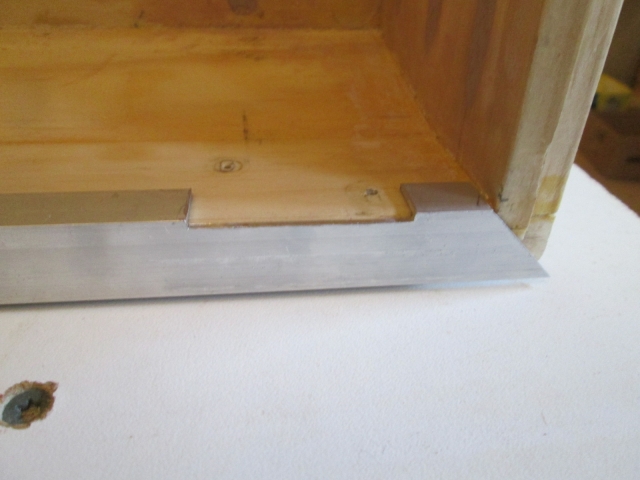
I will likely have to trim the miters back a little to accommodate the thickness of the vinyl, and will do that once the vinyl is in place, but I needed to be able to locate the angle now for these operations, so be it.
Here is one side with the hinge in position.
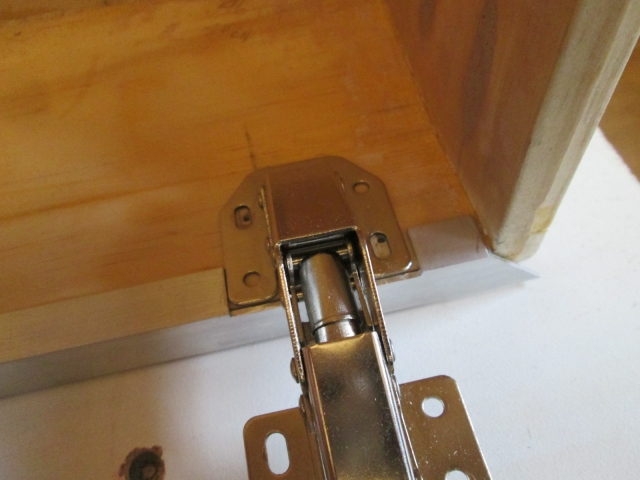
In order to hold the trim in place to check the fit of the door, I had to at least put a few of the countersunk screw holes in, but why stop there? Might as well drill and sink them all even if I’m just going to use a couple of screws for now.
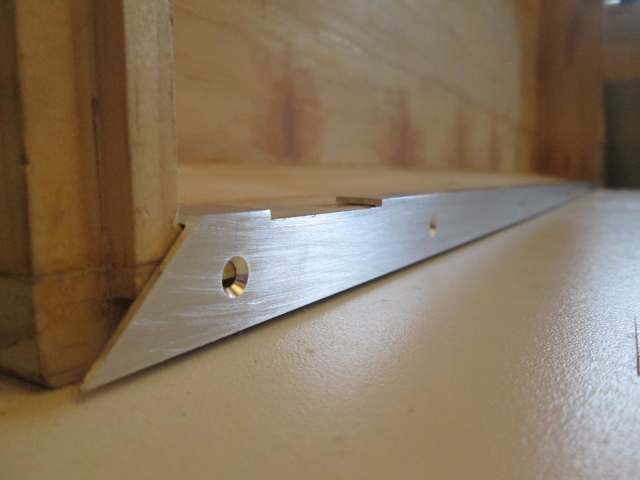
Here the door is shimmed away from the trim the proper amount. There was enough play in the slots in the hinges to accommodate the trim, so everything is good there.
Next thing I wanted to check was to see if the hinged lid support I bought to use as a prop for the door would articulate properly with the hinges. Unlike standard hinges that rotate around a single hinge pin, these hinges have a toggle link that allows the door to swing out, then rotate back inward at the heel providing clearance for the thickness of the door. The instructions for installing the support reference all of the dimensions for attachment off of the hinge centerline. My hinge centerline swings thru an arc and I was concerned that this might cause the support to bind in the closed position, or might keep the door from opening fully to 90 degrees. So rather than using trial and error and putting a bunch of holes in my nice door, I decided that the logical choice would be to make a mock-up.
Here I have cut up a scrap (was the router jig that I used to cut the galley wing table blocking recesses) into three pieces and screwed two of them together. The single piece on the right represents the door, and the two pieces screwed together on the left represent the locker case; again upside down. The brass plate strut is just sitting there for now.
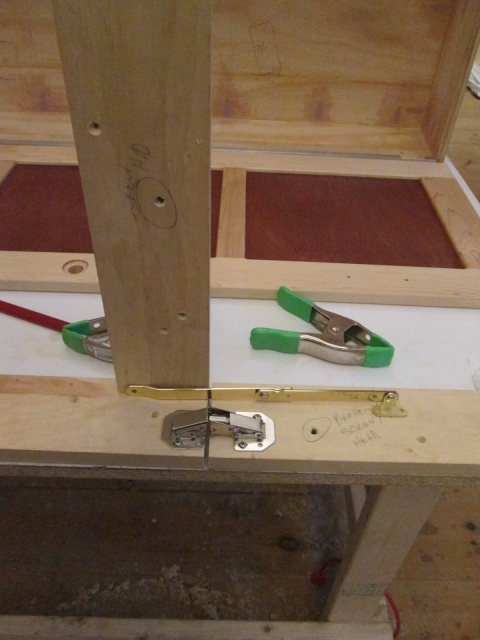
Before I can determine how far in from the side of the case to mount the pivot bracket, I need to make the bearing modification to the case side pivot. I’ll do that after work tomorrow using the lathe with the collet chuck. It will be easier to explain with pic’s as it happens.
Night.
In the pin shoot events one table has just the tops of bowling pins sawed off at the neck and we shoot those with .22 at 25 ft. On a good round it's 5 shots, 5 pins in just a few seconds free hand. I don't get them all every time, and sometimes it takes a couple of shots per pin, but a large copper head's head isn't much, if any smaller than that.
But that's all a little off topic. Let's get caught up on this evenings build progress.
Before I put the polyurethane on the locker door and before I glue the vinyl liner in, I want to complete fitting the door prop strut/lid support. A couple of things have to happen first. I needed to check and see that the hinge alignment is okay or can be adjusted to accommodate the aluminum angle trim. So I miter cut the upper piece of trim to fit the locker opening, marked the hinge locations and milled away the short leg of the angle in these areas. (The top is shown with the locker upside down in these pics.)
I will likely have to trim the miters back a little to accommodate the thickness of the vinyl, and will do that once the vinyl is in place, but I needed to be able to locate the angle now for these operations, so be it.
Here is one side with the hinge in position.
In order to hold the trim in place to check the fit of the door, I had to at least put a few of the countersunk screw holes in, but why stop there? Might as well drill and sink them all even if I’m just going to use a couple of screws for now.
Here the door is shimmed away from the trim the proper amount. There was enough play in the slots in the hinges to accommodate the trim, so everything is good there.
Next thing I wanted to check was to see if the hinged lid support I bought to use as a prop for the door would articulate properly with the hinges. Unlike standard hinges that rotate around a single hinge pin, these hinges have a toggle link that allows the door to swing out, then rotate back inward at the heel providing clearance for the thickness of the door. The instructions for installing the support reference all of the dimensions for attachment off of the hinge centerline. My hinge centerline swings thru an arc and I was concerned that this might cause the support to bind in the closed position, or might keep the door from opening fully to 90 degrees. So rather than using trial and error and putting a bunch of holes in my nice door, I decided that the logical choice would be to make a mock-up.
Here I have cut up a scrap (was the router jig that I used to cut the galley wing table blocking recesses) into three pieces and screwed two of them together. The single piece on the right represents the door, and the two pieces screwed together on the left represent the locker case; again upside down. The brass plate strut is just sitting there for now.
Before I can determine how far in from the side of the case to mount the pivot bracket, I need to make the bearing modification to the case side pivot. I’ll do that after work tomorrow using the lathe with the collet chuck. It will be easier to explain with pic’s as it happens.
Night.
KC
My Build: The Poet Creek Express Hybrid Foamie
Poet Creek Or Bust
Engineering the TLAR way - "That Looks About Right"
TnTTT ORIGINAL 200A LANTERN CLUB = "The 200A Gang"
Green Lantern Corpsmen
My Build: The Poet Creek Express Hybrid Foamie
Poet Creek Or Bust
Engineering the TLAR way - "That Looks About Right"
TnTTT ORIGINAL 200A LANTERN CLUB = "The 200A Gang"
Green Lantern Corpsmen
-

KCStudly - Donating Member
- Posts: 9640
- Images: 8169
- Joined: Mon Feb 06, 2012 10:18 pm
- Location: Southeastern CT, USA
 ... We’ve already seen more snakes in a couple weeks that we did all last year ...


 I’d bet it would be a Huge success... maybe even a PBS show of his own ... You never know eh ?