5x10 renovation and build

...ask your questions in the appropriate forums BUT document your build here...preferably in a single thread...dates for updates, are appreciated....

5x10 renovation and build

Postby inthewoods » Wed May 28, 2014 8:55 am

About 9 months ago I bought a partially complete 5x10 teardrop with the aim of finishing it for my family to camp in. Fall and winter work on the trailer was not in the cards so now that spring is finally here and the weather in Saskatchewan, Canada has warmed up I can finally get to working on the trailer. I pulled it into the garage at the beginning of April and got started. Before I start with the modifications and build info here's some photos and info about the current state of the build. The outer shell and interior was mostly done for what the previous owner wanted in a trailer.

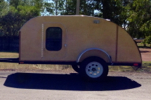
Profile behind my tow vehicle (2011 honda odyssey)
112000
Trailer is a 5x10 frame from a Royal Cargo trailer (pervious owner worked at a trailer shop and picked up the frame only rather than complete cargo trailer). Its a beefy commercial frame with 3500lb axle and trailer tires and rims. Dry weight of the trailer at time of purchase was about 1060lbs and had a tongue weight of around 146lbs.
Side Walls are 3/4" 13ply Baltic Birch with some maple trim.

Galley:
112002
Here's the roughed in galley that was in the trailer... with the floor of the trailer at about 21" from the ground the counter in this galley was simply too high for my liking and there was a whole bunch of space between the back of the floor and the cabinets that I couldn't let go to waste. So that galley is actually gutted and completely removed... more photos to come soon.

Another exterior photo:
112001
The front of the tear was skinned with aluminum diamond plate. The top and galley hatch is luan over maple spars and skinned with White RV/ Cargo trailer aluminum from a roll. there is one door on the driver's side and a large 32"x32" window on the passenger / curb side.

Build plans:
- My wife and I love the bunk concept in the Camp-inn Raindrop so we're going to be adding bunks / couch from that design into the front of this teardrop. It will sleep four comfortably but we may squish in more on occasion when kids are little :). As soon as kids are older they will get the tent next to the trailer.
- Galley... to make room for the bunks and keep the queen sized bed area in the cabin we've gutted the galley that was in the trailer and we need to figure out a new galley design and build all the cabinets and storage.
- Electrical. aside from the required trailer lights for towing there was no electrical installed in this original owner's build. So we have LED lights to install, wiring, roof vent fan (likely), etc. We're doing 120V for occasional shore power and just because we can, small charger for 12V to charge batteries and run minimal 12V when hooked up to shore power. Gotta find a good AGM battery that will likely end up in the galley. Most needs and uses will be LED lighting, charging cellphones and tablet, fan etc. No big power uses like fridge or anything.
- Skinning & sealing... I think we will re-skin the roof and also do the sidewalls in mill finish aluminum. We will store this outside all year under a cover and i'm not sure how well the plywood will hold up long term. There's also a lot of trimming and sealing to do. Door needs trim, seals and drip rail, Galley hatch needs lots of work and has no seals at all right now. Probably need to do a hurricane hinge but not 100% sure on that one. Need to seal the underside of the floor and probably a few other things that I haven't thought of yet.
- Lowering the trailer... the original owner built it to tow behind a big 4x4 truck and had the axle set higher. We're lowering it as much as possible to make it more comfortable to get into and to have it line up a bit better with my tow vehicle. Once done we will also move the fenders down to a more normal height for better curb appeal.

I think that covers the basics of the current trailer and what we're hoping to do. I'll get some interior photos up soon. Some of the work is already underway so I'll post a few updates with photos to catch up to where the build status is at now. Looking forward to getting this thing ready to use even if not complete. Advance thanks to everyone on this forum for all the knowledge and experience represented here. I've loved reading all the build threads and getting great ideas.

Matt
User avatar
inthewoods
Teardrop Master
 
Posts: 112
Images: 25
Joined: Mon Aug 26, 2013 3:19 pm
Location: Saskatchewan, Canada

Re: 5x10 renovation and build

Postby inthewoods » Wed May 28, 2014 11:11 pm

Here's some interior photos of the teardrop when we got it from the original owner.

120798
120799
120800

The interior cabinets are 1/2" birch plywood, luan, maple and some cedar hidden in the cabinets. Walls were finished with a clear varnish some of the maple was stained and varnished and there is light carpeting on floor that wraps up into the area where foot of bed would be.
User avatar
inthewoods
Teardrop Master
 
Posts: 112
Images: 25
Joined: Mon Aug 26, 2013 3:19 pm
Location: Saskatchewan, Canada

Re: 5x10 renovation and build

Postby inthewoods » Wed May 28, 2014 11:21 pm

The first project for me was to remove the cabinets and counter from the galley so we could see how much space we have to work with when we design the new galley and counter.

Before:
112002

Now:
120808

It looks really empty now. In addition to removing the cabinets and cleaning up some small framing I cut out part of the wall separating the galley from the cabin. Since we wanted to install bunks in the front of the trailer (at head of bed) then we needed to move the foot of the bed area further into the galley area. The hole in the wall is 16" high and though picture doesn't show it is full width of the trailer so we can keep the mattress standard sized.

We're now experimenting with cardboard and other scraps trying to figure out the best new galley layout. While we work on that, we continue to collect electrical parts, we also built the bunk bed for the front.
User avatar
inthewoods
Teardrop Master
 
Posts: 112
Images: 25
Joined: Mon Aug 26, 2013 3:19 pm
Location: Saskatchewan, Canada
Top

Re: 5x10 renovation and build

Postby inthewoods » Wed May 28, 2014 11:37 pm

Bunk Bed build...

I started with some 1/2" birch ply and determined the bunk area would be 22" wide (seemed reasonable for kids and fit between door / window and front wall of cabin) and 60" long (width of my interior).

The bed platform is a simple sheet of plywood and the front trim has the same plywood. Edges on the front trim were rounded over on with a router. The trim and bed base were glued and screwed with Kreg pocket screws. here's some photos.

120806 120805 120804

I haven't figured out everything about how the bunk will be supported but I started on the front wall and took out some of the trim and luan the previous owner had put into to expose the contents of the wall so I could see what was in the build. To my surprise I found some insulation and 3/4" plywood.
120802

Next I used some more of the nice birch ply and created a new panel for the front wall and on the panel I glued and screwed a small 1/2"x 1.5" rail the entire width of the wall. This rail will support one edge of the bed platform. here's the panel in place:
120803

And here is a photo of the bunk in place. Note the front is just setting on some scraps of wood to prop it up. I'm not sure if I'll do some legs out of EMT conduit or wood. maybe I'll find some nice metal brackets... not sure still thinking on this one.
120807

In the end the bunk will be removable so that it could transform into a couch similar to the camp-inn raindrop. I'll have to figure out some supports to hold the bed platform in the lower couch position but at our stage in family life the couch probably won't be needed right now. Young kids are great and will play and sleep almost anywhere. They already love the prospect of the bunk bed and can't wait to try it out. hmm I have some work to do before that happens.
User avatar
inthewoods
Teardrop Master
 
Posts: 112
Images: 25
Joined: Mon Aug 26, 2013 3:19 pm
Location: Saskatchewan, Canada
Top

5x10 renovation and build

Postby inthewoods » Mon Jun 09, 2014 11:30 pm

Some more progress has been made. I have laid the vinyl flooring on the floor and added an aluminum trim strip at the back edge. I've also figured out where the wall between the cabin foot well and the galley's lower cabinets would be. This wall with the other framing on the walls and the cabinets will support the counter top.

ImageUploadedByTapatalk1402374593.863083.jpg
ImageUploadedByTapatalk1402374593.863083.jpg (200.17 KiB) Viewed 3618 times
Last edited by inthewoods on Mon Jun 09, 2014 11:42 pm, edited 1 time in total.
User avatar
inthewoods
Teardrop Master
 
Posts: 112
Images: 25
Joined: Mon Aug 26, 2013 3:19 pm
Location: Saskatchewan, Canada
Top

5x10 renovation and build

Postby inthewoods » Mon Jun 09, 2014 11:32 pm

Here's a quick photo of what the counter area will look like. This is before the laminate was added to the counter.

Image
User avatar
inthewoods
Teardrop Master
 
Posts: 112
Images: 25
Joined: Mon Aug 26, 2013 3:19 pm
Location: Saskatchewan, Canada
Top

5x10 renovation and build

Postby inthewoods » Mon Jun 09, 2014 11:39 pm

My wife and I know a cabinet maker in town and I had a look at his leftovers and I found a great piece of laminate for the countertop. I've never done laminate counters so he laid it down on the plywood for me. Here is a photo of the counter. It hasn't been installed yet as I have a few things still to do before I can put it in permanently.


ImageUploadedByTapatalk1402375189.127683.jpg
ImageUploadedByTapatalk1402375189.127683.jpg (205.34 KiB) Viewed 3613 times
User avatar
inthewoods
Teardrop Master
 
Posts: 112
Images: 25
Joined: Mon Aug 26, 2013 3:19 pm
Location: Saskatchewan, Canada
Top

Re: 5x10 renovation and build

Postby Bantam » Tue Jun 10, 2014 1:24 am

Hi there,

Love this thread, really like the position of the bunk. Great idea. Keep up the good work.

My family has a bit of a connection with Saskatchewan, my sister lived there for a few years, and my Dads uncle Archie, is now the resident ghost at Moose Head inn at Kenosse Lake!! Say hello if your camping there for me.

Cheers

Jeff
Bantam
Teardrop Advisor
 
Posts: 51
Images: 6
Joined: Tue Feb 11, 2014 6:42 pm
Location: Auckland, New Zealand
Top

Re: 5x10 renovation and build

Postby inthewoods » Thu Jun 12, 2014 9:18 pm

Thanks Jeff. I'm glad you are enjoying the build. My wife and I are enjoying planning it out and we really look forward to getting it into a campsite this season.
User avatar
inthewoods
Teardrop Master
 
Posts: 112
Images: 25
Joined: Mon Aug 26, 2013 3:19 pm
Location: Saskatchewan, Canada
Top

Re: 5x10 renovation and build

Postby inthewoods » Thu Jun 12, 2014 9:25 pm

The last couple days have been focused on giving the galley interior several really good coats of clear varathane. I want to get the walls countertop bottom and sides, and board that separates the footwell of cabin from the gallery well sealed before continuing with any build in the back end. While I was sealing those I also got the bunk sanded and sealed. a few more coats tomorrow and these pieces will all have a nice shine. They are looking good!
User avatar
inthewoods
Teardrop Master
 
Posts: 112
Images: 25
Joined: Mon Aug 26, 2013 3:19 pm
Location: Saskatchewan, Canada
Top

Re: 5x10 renovation and build

Postby inthewoods » Thu Jun 12, 2014 9:34 pm

Also been collecting a few more parts for electrical and also some kitchen necessities for camping. We've been looking at the Steel Belted Coleman coolers for a long time but couldn't justify the $170-200 they normally sell for in our area. Well Costco in Canada put them on sale for $109.00 including shipping and 5 days later we now have the exact one we hoped for. We were a little worried that it wouldn't fit in the space we were planning to put it because it was hard to find reliable dimensions online. Thankfully it will fit perfectly.
Attachments
ImageUploadedByTapatalk1402626680.964422.jpg
ImageUploadedByTapatalk1402626680.964422.jpg (16.57 KiB) Viewed 3467 times
User avatar
inthewoods
Teardrop Master
 
Posts: 112
Images: 25
Joined: Mon Aug 26, 2013 3:19 pm
Location: Saskatchewan, Canada
Top

Re: 5x10 renovation and build

Postby rebapuck » Thu Jun 12, 2014 11:06 pm

You're almost ready to go camping!

Can the bunks just rest on horizontal pieces screwed into the wall? Use a pin of some kind to keep them from moving. Edging on both sides of the plywood base should be strong enough for the weight of kids.
Judy
1966 VW camper
1967 VW singlecab
Image
User avatar
rebapuck
.
 
Posts: 2243
Images: 1
Joined: Thu May 14, 2009 1:55 pm
Location: Chapel Hill NC
Top

Re: 5x10 renovation and build

Postby inthewoods » Fri Jun 13, 2014 8:30 am

Kids slept in this morning so I got my last coat of Varathane on the bunk, counter and galley walls.
Attachments
ImageUploadedByTapatalk1402666227.246611.jpg
ImageUploadedByTapatalk1402666227.246611.jpg (204.19 KiB) Viewed 3413 times
ImageUploadedByTapatalk1402666197.730946.jpg
ImageUploadedByTapatalk1402666197.730946.jpg (216.2 KiB) Viewed 3413 times
User avatar
inthewoods
Teardrop Master
 
Posts: 112
Images: 25
Joined: Mon Aug 26, 2013 3:19 pm
Location: Saskatchewan, Canada
Top

5x10 renovation and build

Postby inthewoods » Fri Jun 13, 2014 9:44 pm

This evening my wife and I got the counter set in place and fastened in nice and solid. We are really happy with the results so far and it's turning out better than we expected.
Attachments
ImageUploadedByTapatalk1402713741.098123.jpg
ImageUploadedByTapatalk1402713741.098123.jpg (198.57 KiB) Viewed 3367 times
User avatar
inthewoods
Teardrop Master
 
Posts: 112
Images: 25
Joined: Mon Aug 26, 2013 3:19 pm
Location: Saskatchewan, Canada
Top

Re: 5x10 renovation and build

Postby inthewoods » Fri Jun 13, 2014 10:00 pm

The other day while waiting for Varathane to dry I tinkered around with some electrical and got the shorepower inlet set in place and made up the extension that would run from it to the 120 campsite power. My inlet is located right under the galley on the driver's side at the back. It's within easy reach of the back or side and it keeps fewer holes in the sidewalls of the trailer.

You'll notice in the photos I went completely non standard on my choice of power inlet. I don't want the typical 30a RV style connectors and don't need that quantity of power so I decided on basic 20A. So all the wiring breakers and GFCI will all be 20a rated. For my power inlet I went with specialty power connector products from Neutrik. It's tiny, rated for 20a and is both water tight and fully locking so it can't fall out or pop out when someone trips on the cable. Here's a link to the product:

http://www.neutrik.com/en/video/powerco ... con-true1/

And there's a couple photos attached. In the end because I'm in canada it cost me about the same as a generic Marinco 15a inlet like I see is very popular on teardrop builds.
Attachments
ImageUploadedByTapatalk1402714796.929938.jpg
ImageUploadedByTapatalk1402714796.929938.jpg (246.91 KiB) Viewed 3360 times
ImageUploadedByTapatalk1402714781.863405.jpg
ImageUploadedByTapatalk1402714781.863405.jpg (161.32 KiB) Viewed 3360 times
User avatar
inthewoods
Teardrop Master
 
Posts: 112
Images: 25
Joined: Mon Aug 26, 2013 3:19 pm
Location: Saskatchewan, Canada
Top

Next

Return to Build Journals

Who is online

Users browsing this forum: No registered users and 3 guests