4-Day Weekender - Toddler bed!

...ask your questions in the appropriate forums BUT document your build here...preferably in a single thread...dates for updates, are appreciated....

Re: 4-Day Weekender - Galley shelf

Postby Breytie » Sat Jul 19, 2014 4:07 pm

Kharn wrote:I've never used epoxies for anything similar to this before, so I'm learning as I go. Here's my first attempt with body filler, at least I didn't lose too much when I found out my pot life is significantly decreased vs the manufacturer's 30-minute claim.

That often happens due to hot ambient temp and/or to much "bulk" to the activated epoxy. If you activate the filler and then spread it out on your mixing surface, it will keep much longer than when it is kept in a single lump. That is because heat speeds up setting and setting produces heat. Spreading allows the heat to escape and not build up inside the lump. I have seen activated fast setting epoxy start to smoke and char when kept in a pot for too long!

Keep up the good work!
Andre
Experience is learning from your own mistakes
Here I make mine in public: My build
Breytie
Teardrop Master
 
Posts: 209
Images: 36
Joined: Sun Sep 04, 2011 4:21 pm

Re: 4-Day Weekender - Galley shelf

Postby Kharn » Sat Jul 19, 2014 4:12 pm

Thanks for the tip, I've been using a ~6x18" piece of plywood as my mixing/working tray and the spoiled batch was a golfball sized lump I was slowing taking bits off as I worked my way around the trailer. For the coat I put on this afternoon, I only mixed up batches smaller than a quarter since I was just filling in any shrinkage.

The neighbors gave me some strange looks when I was using the sander, full-face gas mask, nitrile gloves and ear protection to smooth out the first coat this morning. :lol:
User avatar
Kharn
500 Club
 
Posts: 655
Images: 1
Joined: Sun Jul 17, 2011 1:54 pm

Re: 4-Day Weekender - Galley shelf

Postby Kharn » Sun Jul 20, 2014 5:29 pm

Third coat of body filler on, I think I'm done after this one since mostly I was fixing very tiny amounts of shrinkage or holes I'd missed on the second coat. Only ~20 holes will not be covered by fiberglass, the other ~70 will be close enough to an edge that they'll be coated. I also started priming the galley pieces.

I ordered a bunch of stuff today, curtain track, table rail, table leg, a few more epoxy tools and colloidal silica (to stiffen it up enough to use on the vertical walls).
I'm planning to have curtain track above each door and also on the two open headboard compartments, both to block lights and noises from charging devices and because my wife would otherwise insist on hiding things (I don't think anyone cares about her trashy romance novels :lol: ) before allowing any showings of the teardrop. I'm thinking about putting snaps on the lower corners of the shelf curtains so we can use them to hold our stuff in place while towing, but I expect small stuff would fall out onto the bed due to the omitted lip at the edge.

Only after I ordered the curtain track did I realize that I could also put a piece across the top of the camper to divide off the bunk from the rest of the camper, but the math works out that I would be ~5" short of material. :roll: Oh well, I'm not putting the plates on the wall for the bunk track either, so that'll just get added on at a later date.
User avatar
Kharn
500 Club
 
Posts: 655
Images: 1
Joined: Sun Jul 17, 2011 1:54 pm
Top

Re: 4-Day Weekender - The hatch fits!

Postby Kharn » Fri Jul 25, 2014 7:06 pm

So my dad came up to help out with a few things this week, mainly fixing my truck's brakes (losing both forward brakes while driving is a fun experience :shock: ), but we had some time for a few Weekender projects.

First we added the inputs to the side of the tongue box, we had to router the back of the panel because the 120v power inlet only has enough threads for a 3/8" panel when my tongue box is 3/4". There's also a 12v outlet and a space for a duplex 120v outlet. I wanted to have 120v and 12v power externally so we could have access to them without needing to leave the galley or a door open.
20140725 tongue box inputs small.jpg
20140725 tongue box inputs small.jpg (164.14 KiB) Viewed 2256 times


Then, we played with the hatch a bit. You can see the lower hatch hanging down in this picture, I have to buy the barrel bolts to hold it in place. It will also need bumpers on the trailer frame because the stabilizer jacks each have a corner that sticks out that dents the panel whenever it swings free.
20140725 hatch closed small.jpg
20140725 hatch closed small.jpg (117.98 KiB) Viewed 2256 times


20140725 hatch open small.jpg
20140725 hatch open small.jpg (125.26 KiB) Viewed 2256 times


We had to cut the center galley divider a bit due to the size of the rib we put at the hinge, but now it opens pretty easily. It is at about my comfort level for height, so my wife (who is 6" shorter) may not have as easy of a time opening it. I need to figure out how I want to prop the hatch open, I'm thinking a single prop rod from the center divider up to the larger panel, with the relative sizes and positions, I'll have to have the rod on the oven side of the divider and hinged there instead of on the hatch. But I have to get the galley completely done and installed to make sure nothing interferes with it.
Last edited by Kharn on Fri Jul 25, 2014 7:43 pm, edited 1 time in total.
User avatar
Kharn
500 Club
 
Posts: 655
Images: 1
Joined: Sun Jul 17, 2011 1:54 pm
Top

Re: 4-Day Weekender - The hatch fits!

Postby Kharn » Fri Jul 25, 2014 7:08 pm

Oh, we also built the drawers for the galley.
20140725 drawers small.jpg
20140725 drawers small.jpg (74.22 KiB) Viewed 2255 times

The photo's not the best, all of the joints are flush. I have to decide if I want a small pull or drill a finger hole in them like the rest of the doors/panels will have.
User avatar
Kharn
500 Club
 
Posts: 655
Images: 1
Joined: Sun Jul 17, 2011 1:54 pm
Top

Re: 4-Day Weekender - The hatch fits!

Postby Kharn » Sun Jul 27, 2014 4:40 pm

I made a little progress on several different areas over the last few days, I filled all the voids in the sidewalls on the bottom edges, filled any gaps between the walls and the subfloor, etc. I also filled in the hatch's exterior holes:
20140727 hatch filling small.jpg
20140727 hatch filling small.jpg (93 KiB) Viewed 2196 times


And I installed the divider for the foot cabinets. I originally wanted a smaller divider, but making it 6.5" wide let me get away with only three sets of sliding door track for the entire trailer instead of four. I also decided the interior divider did not need to go all the way to the ceiling, I hope we never pack enough stuff in there that it becomes an issue. (does Hoarders do episodes about RVs? :oops: )
20140727 shelf divider small.jpg
20140727 shelf divider small.jpg (90.26 KiB) Viewed 2196 times

The two brown marks on the right are screws holding the galley divider in place.

I installed cleats in the galley for the shelf over the countertop, but figured that wasn't worth a picture. Now I really need to get moving on my painting. I have a ton of pieces that need attention, and between work and more family obligations, my August is really booked up. :o
User avatar
Kharn
500 Club
 
Posts: 655
Images: 1
Joined: Sun Jul 17, 2011 1:54 pm
Top

Re: 4-Day Weekender - The hatch fits!

Postby Kharn » Fri Aug 08, 2014 1:57 pm

This week I've been painting everything in the basement, just one coat left on the two galley shelves and I'll be done painting the removed pieces.
I also put the first coat of paint in the under-floor storage box, I can't wait for that to be done so I can put the lids in and be more comfortable when I'm sliding around inside the trailer.

Here are the two galley dividers and the galley drawers:
20140808 basement painting small.jpg
20140808 basement painting small.jpg (113.79 KiB) Viewed 2085 times


I also put a third coat of filler on the hatch today, I'm debating not fiberglassing the hatch panel joint since it would take two layers of fiberglass if I wanted to cover all of the screw holes and then bridge the fiberglass joints, since screws are at 2, 4 and 8" from the joint, when I have 6" fiberglass tape. I'd still epoxy the edges.

I really need to get moving on ordering electrical fixtures, figuring out what I'm going to do for switch boxes and a few hardware choices I have to make. October is coming...
User avatar
Kharn
500 Club
 
Posts: 655
Images: 1
Joined: Sun Jul 17, 2011 1:54 pm
Top

Re: 4-Day Weekender - The hatch fits!

Postby rdraider » Sat Aug 09, 2014 9:02 am

I've been watching this thread closely. It looks great! I'm planning on using the MDO myself on a NANO weekender shape. How well does the MDO work with glue?
User avatar
rdraider
Teardrop Advisor
 
Posts: 71
Joined: Sun Jul 18, 2010 10:51 am
Location: Sheffield, Texas
Top

Re: 4-Day Weekender - The hatch fits!

Postby Kharn » Sat Aug 09, 2014 9:09 am

I've been using Titebond 2, I've been happy with it on the unprimed faces (I would rough any primed face with sandpaper before using Titebond) but I used subfloor adhesive for any MDO-to-2x4 joints to make sure it would bridge gaps and get contact along the entire joint. I've found MDO is extremely nice to work with, my shipment was true 1/2" and 3/4" thicknesses so all the math became very easy and screw selection wasn't a problem.
User avatar
Kharn
500 Club
 
Posts: 655
Images: 1
Joined: Sun Jul 17, 2011 1:54 pm
Top

Re: 4-Day Weekender - The hatch fits!

Postby Kharn » Sat Aug 09, 2014 6:38 pm

I got a bunch of little stuff done today:
-Cut a space for the wires going from the trailer to the hatch, I'd drilled them through the crossmember too high and they would have interfered with the hatch closing.
-Sanded and filled the hatch again
-Sanded the walls at the wheel well curves and the door frames
-Made the two door cut-outs into side tables, including sanding, round-over'ing the edges and fitting the table rails to them. I had two 36x26" cut outs to work with, so one has the rail on the long edge and one on the short edge. I had hoped to prime them and the galley interior this evening, but the router revealed a 1"-long void in the plywood that I wanted to fill before priming. The long edge railed table will go low on the driver's side and get two folding legs underneath it (adjustable in 1/2" increments) for our cooler or other items that do not fit nicely in the galley.

The short edge table will go on the passenger side and I'm a little conflicted about it, the one leg I bought for testing only goes to about 32" high, I would need ~37" to make it equal to my countertop. I could always bring along a base of some sort for it, or I could put it at 30" and have it the same height as a normal kitchen table (vs 36" for countertop height). I set up one of our camping chairs at the kitchen table and tried to eat from it, our chairs end up way too low to the ground to be comfortable/natural. :thinking: At what height do most people put their side tables?

I had to give a neighbor a tour of the tear, he caught me outside working on it and said his family had been taking guesses at what it was for the last few months. They'd never suspected it was a camper. :lol:

The wiring notch, a Multimax made it super easy, but not as square as I wanted.
20140809 wiring notch small.jpg
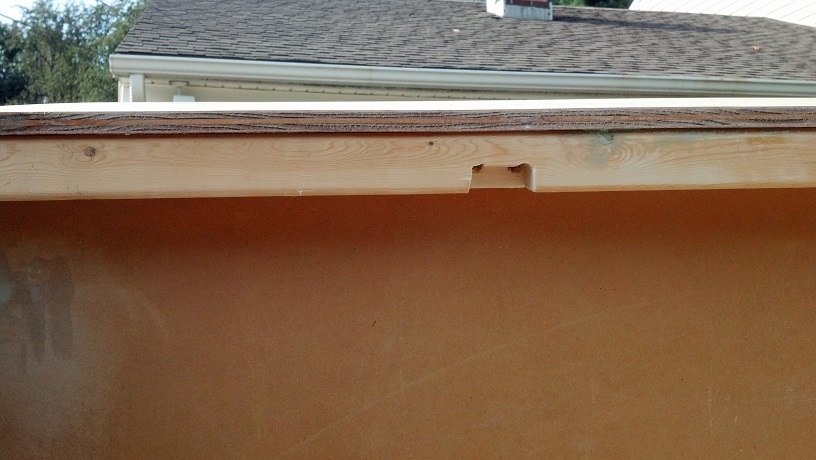
20140809 wiring notch small.jpg (125.93 KiB) Viewed 2005 times

One of the side tables after routing:
20140809 side table small.jpg
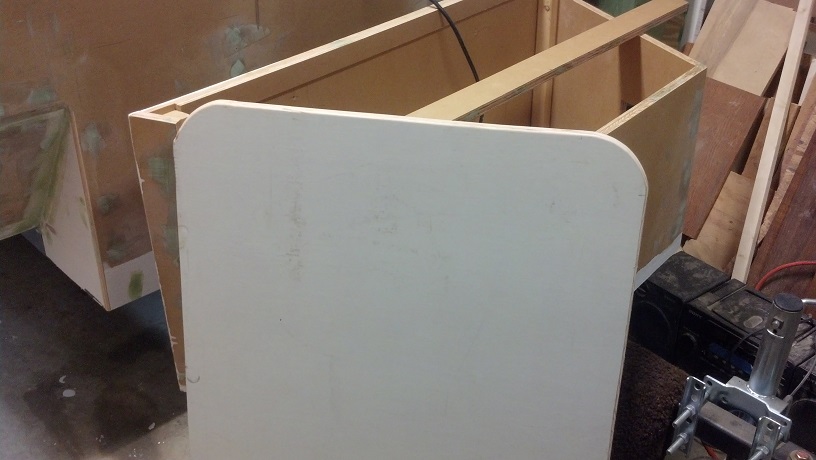
20140809 side table small.jpg (95.85 KiB) Viewed 2005 times
User avatar
Kharn
500 Club
 
Posts: 655
Images: 1
Joined: Sun Jul 17, 2011 1:54 pm
Top

Re: 4-Day Weekender - Epoxy fun

Postby Kharn » Sat Aug 16, 2014 2:14 pm

So today was my first experience with fiberglass and epoxy. I used West's 105 resin, 206 slow hardener (wasn't sure how hot it would be, and I figured I'd need a little extra working time since it was my first time) and West's 9oz, 6" tape, using West's 7" roller covers (cut down to 4" to fit my roller and 3" tipping brushes) and disposable paint tray liners. The left and right upper corners of the front face did not go nearly as smoothly as I would have liked, for one the tape slipped about 1/4" and made a mess of it, the other wasn't nearly as bad. There's also an air bubble I have to fix at the center of the rear-most roof seam that I couldn't get to lay down when wet so I'll fix it when it's dry.

20140816 epoxy layup front small.jpg
20140816 epoxy layup front small.jpg (153.71 KiB) Viewed 1966 times


For the lay-up, I used the machinist's square to mark 3" in on each panel as a rough guide to where the tape should end up, I used a sharpie to put a mark every 12" in the center of the tape for the pieces where I couldn't easily use the square on the joint to be covered. That worked out really well, and made alignment easy even with sun and sweat in my eyes, but I'm going to paint my trailer so the tip wouldn't work for those building a woody.

I did a continuous strip of the tape on the roof from the galley all the way to the bottom front, then folded it over the side and cut the corners using a pair of heavy duty office scissors. I probably should have just made a single cut for each corner and dealt with two layers of fiberglass at each location, since the tape moved a bit while the epoxy was being rolled on. The rolling bunched the fiberglass at the forward corners and left a gap at the top roof joint which I'll have to fair with thickened epoxy, when if I'd left extra fiberglass at each joint, I could have just adjusted it. The tape was held in place with painter's tape, I folded over ~1/4" of the trailer side of each piece so I could easily remove it while wearing nitrile gloves after I'd wet the fiberglass in that area.

So, two coats of epoxy later:
20140816 2 epoxy front small.jpg
20140816 2 epoxy front small.jpg (149.82 KiB) Viewed 1966 times


20140816 2 epoxy side small.jpg
20140816 2 epoxy side small.jpg (137.14 KiB) Viewed 1966 times


I also rolled epoxy onto the screw heads that aren't covered with fiberglass, not a big deal since I bought the 1 gallon kit of epoxy, enough to do 3 complete coats on the 50yds of tape I have, so you could say I have a bit to spare. :lol:
Last edited by Kharn on Sat Aug 16, 2014 7:56 pm, edited 1 time in total.
User avatar
Kharn
500 Club
 
Posts: 655
Images: 1
Joined: Sun Jul 17, 2011 1:54 pm
Top

Re: 4-Day Weekender - Epoxy fun

Postby Kharn » Sat Aug 16, 2014 2:27 pm

Here's the worst corner, the individual fiberglass strands are lifted up pretty far from the wood.
20140816 lifted fiberglass 1 zoom.jpg
20140816 lifted fiberglass 1 zoom.jpg (207.86 KiB) Viewed 1964 times


20140816 lifted fiberglass 2 zoom.jpg
20140816 lifted fiberglass 2 zoom.jpg (157.65 KiB) Viewed 1964 times

You can also see 3 little air bubbles at that corner, when the epoxy is dry, I'll drill those and use an epoxy syringe to fill them.
User avatar
Kharn
500 Club
 
Posts: 655
Images: 1
Joined: Sun Jul 17, 2011 1:54 pm
Top

Re: 4-Day Weekender - Epoxy fun

Postby noseoil » Sat Aug 16, 2014 3:41 pm

The nice thing about working with glass cloth is that you can just grind it down and add another layer or two for a filler. Since it will be painted anyway, just knock the corner down, then cut some small pieces to lay-up a bit more thickness and you're good to go. The epoxy will make a good bond and the problem is solved.
Build log: viewtopic.php?f=50&t=60248
The time you spend planning is more important than the time you spend building.........

137905
User avatar
noseoil
1000 Club
1000 Club
 
Posts: 1822
Images: 670
Joined: Sun Apr 27, 2014 8:46 am
Location: Raton, New Mexico, living the good life!
Top

Re: 4-Day Weekender - Epoxy fun

Postby Kharn » Thu Aug 21, 2014 9:06 am

I ended up mixing a batch of epoxy with silica to rebuild that corner after I trimmed away the raised fibers with an Xacto, another layer of fiberglass would have been a huge effort to feather out.

For sanding the epoxy, West says to take the gloss off, do they mean sand it until it has a flat white appearance or is there a level before that which is sufficient for more epoxy or paint to stick? Even with 100 grit paper and an orbital sander, it was taking forever since I'd have to use the edge of the disc to make sure I hit every little area. I didn't scrub/wash the epoxy prior to sanding, but I didn't notice an amine blush. :thinking: (I have to get a pack of 80 grit, after I sanded half the trailer I found it is required to use 80 if recoating with epoxy when 100-220 is fine for paint)
User avatar
Kharn
500 Club
 
Posts: 655
Images: 1
Joined: Sun Jul 17, 2011 1:54 pm
Top

Re: 4-Day Weekender - Epoxy fun

Postby Kharn » Sat Aug 23, 2014 8:28 pm

So today was a bit of a bust, it was raining off and on most of the day so I couldn't take the trailer outside to work on it.

I moved the hatch and the tongue box down to the basement and drilled the holes for the hatch's taillights and reverse lights (I touched the leads to the contacts on a deep cycle battery and dang they're bright :? :lol: ), I want to get a center brake light as well, but I haven't gotten around to ordering it.

20140823 hatch lights small.jpg
20140823 hatch lights small.jpg (143.83 KiB) Viewed 1825 times


I also drilled the holes for the side lights and porch light on the side of the trailer I can access, but I couldn't get a suitable picture. The forward marker light was the most stressful, as I only had a small margin to put it in to get it both inside the forward storage compartment and also have the light far enough back to be completely on the trailer.

Next up is two more coats of epoxy on the trailer, plus two or three coats on the hatch and tongue box.
User avatar
Kharn
500 Club
 
Posts: 655
Images: 1
Joined: Sun Jul 17, 2011 1:54 pm
Top

PreviousNext

Return to Build Journals

Who is online

Users browsing this forum: No registered users and 2 guests