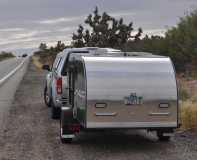
CNC Build: The Bed and Breakfast at 4 years and 40,000 miles
Re: CNC Build -- Teaser -- new clue
Tambor door tracks, but serving what purpose and for what application?
Build log: viewtopic.php?f=50&t=60248
The time you spend planning is more important than the time you spend building.........

The time you spend planning is more important than the time you spend building.........
-

noseoil - 1000 Club

- Posts: 1822
- Images: 670
- Joined: Sun Apr 27, 2014 8:46 am
- Location: Raton, New Mexico, living the good life!
Re: CNC Build -- Teaser -- Winner!

noseoil wrote:Tambor door tracks...
We have a winner! Here, Noseoil, have a beer on me!
 I'd give you two, but you mis-speled "tambour." Those of you unfamiliar with the term, think "roll top desk."
...but serving what purpose and for what application?
Galley and cabin cabinet doors.
I did a lot of pondering on the question of cabinet doors. Normal swing-open doors need a positive latch to stay shut while towing. They, and swing-up and fold-down doors need room in front of the cabinet to open. I could only think how many times I was going to bump my head
 on any of those. Sliders just didn't fit into my mental picture. Then I picked up the October '13 issue of Fine Woodworking mag, (not that I'm a Fine Woodworker, I'm just curious what Fine Woodworking looks like) and there was an article on making tambour doors. Problem solved. Gravity keeps them shut. Nothing to bump my head on
  , and no need to clear the deck in the galley to get to the S'mores ingredients. Plus, I always wanted to make a roll-top desk. Except, I didn't really want a roll-top desk.
I really, really hate bumping my head.
 I've done that enough times, already.
 I know what you're thinking. Just keep it to yourself.
Thank you all for playing. Stay tuned for the next contest, which could happen at any time.

-

capnTelescope - Lifetime member
- Posts: 1222
- Images: 368
- Joined: Sun Jun 27, 2004 3:44 pm
- Location: Round Rock, TX


 I reached a decision on what super-sealer to use on my hatch rain gutters -- sheet aluminum. What could be more super-er than that? Each side has three parts: the bottom, the inboard side(weatherstrip carrier) and the outboard side. You've already seen the weatherstrip carriers. The bottom is a simple flat strip, 3/4" wide. I cut the outboard sides on the CNC, and they matched up to the wood parts without drama.

 That's going to be a tricky operation.

 I've heard there's a nice little bistro on the Galapagos.
 What else would you expect from a bunch of short furriners wearing blankets and funny hats? Sheesh. And then there's that weird portrait of Ecuadorian Gray. Don't get me started on that.


 computer crashed, gotta reconstruct the post from here. I'm starting to think "new computer."


 You won't find any food porn in this thread. Unless you post it for me.
  Everything arrived in good condition, and I was ready to go to work.


