Got a little more done this morning (still too hot outside, 102 this PM!). Worked on the deck framing. Used a doweling jig (Harbor Freight type, clamp) and 3/8" dowels with Titebond II glue, just one peg per end. Didn't have any clamps that were big enough, so we used some nylon string & the "Spanish Windlass" type of clamping system. It worked well enough, but the glue was drying pretty quickly, so we had to hustle to keep things moving. Checked it for square & clamped to the frame, so it can't move at this point. Should be fine and it feels good to be working on the actual build finally. Realized afterward that I made the deck the finished size of the Benroy, so I'm going to dado the sides down into the deck 1/2" (instead of milling the sides with a dado slot for the deck) to make it work, no worries here.
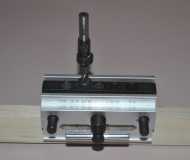
For those not familiar with a doweling jig, here's how it looks. Basically, it is 2 outer cheek pieces with a screw in the center. There are holes drilled along the top to take inserts for different sized drill bits in the center piece. It's self-centering, but the cheap POS index marks (made where?) were off 1/16", so I had to use my knife to scribe a new mark for a reference line. You mark the rails & styles with a center line & drill the holes. Then, pegs go into the ends first with glue, and finally the rails go in place with glue. This is more of a traditional face frame build, just a bigger face frame than a kitchen would typically use.

The framing is 4/4 poplar with most members being 1 1/2" wide, the two ends (fore & aft) are 2 1/4" wide. I'll be using 1/8" Baltic Birch for the bottom & 1/8" for the top, with 3/4" foam sandwiched in the center. The top will get a urethane coating, the underside will get a coat of urethane, followed by a white rubberized roof coating like we use here in the southwest for rain & sun. I ran out of dowels (fortunately, counted before glue started) on Labor day, and had to stop to make some.

Easy way is to rip some 3/8" square stock, cut to length, drill a 3/8" hole in a hunk of steel, then hammer the pins through to size them. Sand one side with a flat to let excess glue out, or you will split the wood with hydraulic pressure, taper the ends on the sander. Then go back to work and do the assembly. PITA but it works OK. Here's how it looks now.
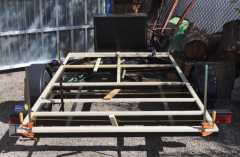
Deck frame assembled on the trailer frame.

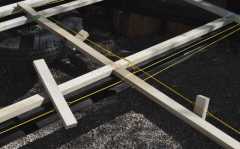
The improvised clamps, this works just fine in a pinch.

Edit - added 15# for the deck frame.


 Easy way is to rip some 3/8" square stock, cut to length, drill a 3/8" hole in a hunk of steel, then hammer the pins through to size them. Sand one side with a flat to let excess glue out, or you will split the wood with hydraulic pressure, taper the ends on the sander. Then go back to work and do the assembly. PITA but it works OK. Here's how it looks now.