Got the power inlet put on last night. Starting to work on exhaust for the heater now and finishing wiring. Got an opportunity to go to a plant outside of Boston for work next week so progress will slow to a halt.
I will try to upload some pics again soon.
Teardrops n Tiny Travel Trailersor t n ttt for short (tnttt.com) |
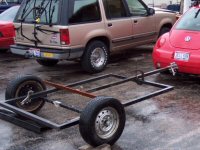
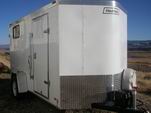
Red Dragon 7x16 conversion
32 posts
• Page 2 of 3 • 1, 2, 3
Re: Red Dragon 7x16 conversion
![]() by Mud Farm » Fri Sep 26, 2014 9:47 am
by Mud Farm » Fri Sep 26, 2014 9:47 am
- Mud Farm
- Teardrop Builder
- Posts: 28
- Images: 3
- Joined: Wed Jan 22, 2014 6:15 pm
- Location: Snow bank
Re: Red Dragon 7x16 conversion
![]() by Mud Farm » Sun Oct 12, 2014 6:30 pm
by Mud Farm » Sun Oct 12, 2014 6:30 pm


Wiring mess

12V and 120V outlets

We have light!!!

Porch lights

- Mud Farm
- Teardrop Builder
- Posts: 28
- Images: 3
- Joined: Wed Jan 22, 2014 6:15 pm
- Location: Snow bank


 ) It still works okay though.

