Compact family camper Build - Always something...

...ask your questions in the appropriate forums BUT document your build here...preferably in a single thread...dates for updates, are appreciated....

Re: Compact family camper Build - More aluminum

Postby ryuandwings » Mon Nov 03, 2014 12:32 pm

KCStudly wrote:I might try tapping gently with a dowel and see if you can hear where they are (assuming you have a pretty good general idea). If you get close you might be able to pierce thru with a sharp prick punch and get the resulting hole in the aluminum to self align, as it is being formed, with the hole in the wood below. Maybe do a test on some scrap before attempting on the real deal.

... but Tony's idea is probably a safer method if you have totally lost track of them.

I though about it a little but did not try since holes are small I though I would not be able to tell the difference. I guess it would not hurt to try.
I do know generally where they are and I can narrow it even more when I align with the trailer mounted hinges.

There are 4 hinges, and each has 3 holes. It will be a precise task to get all 12 located within profile of the hinge.
I guess if I miss any of them, I can make a small spacer plate between hinge and door to cover any screwups. :thinking:
User avatar
ryuandwings
Teardrop Master
 
Posts: 187
Images: 61
Joined: Wed Feb 13, 2013 5:22 am
Location: West Tennessee

Re: Compact family camper Build - More aluminum

Postby tony.latham » Mon Nov 03, 2014 7:15 pm

KCStudly wrote:I might try tapping gently with a dowel and see if you can hear where they are (assuming you have a pretty good general idea). If you get close you might be able to pierce thru with a sharp prick punch and get the resulting hole in the aluminum to self align, as it is being formed, with the hole in the wood below. Maybe do a test on some scrap before attempting on the real deal.

... but Tony's idea is probably a safer method if you have totally lost track of them.


Good gawd... I'm started to wonder about you easterners. :thinking:

Just cut a forked willow stick and witch the damn thing. That willow will flip down like a brick dropped on your big toe and it'll point exactly at the spot you need to drill. We douse all the time here in the west. Generally it's for water or oil, but if'n ya wanna know which cooler's hidin' the beer? Douse it. The willow has to be fresh cut.

Let's get with the program, fellas. :frightened:

T
User avatar
tony.latham
Gold Donating Member
 
Posts: 7073
Images: 17
Joined: Mon Jul 08, 2013 4:03 pm
Location: Middle of Idaho on the edge of nowhere

Re: Compact family camper Build - More aluminum

Postby KCStudly » Mon Nov 03, 2014 9:03 pm

I did say "might" and "try". I didn't say that it would work. :D

Speaking of sapplings, have I told you my switch joke? :lol: :lol: :lol: :R

But really, when it was first stated that there were screw holes predrilled for hinges I had it in my mind that they might be relatively large bolt holes, like 1/4 inch, which I would think you might be able to find with a little gentle probing... if the alum. was thin enough.

Not sure why my mind went there, but figured it "might" be a possible solution to try.

Tony you must be loosing it more than I, if you can't find your beer! :lol: :lol: :lol:
KC
My Build: The Poet Creek Express Hybrid Foamie

Poet Creek Or Bust
Engineering the TLAR way - "That Looks About Right"
TnTTT ORIGINAL 200A LANTERN CLUB = "The 200A Gang"
Green Lantern Corpsmen
User avatar
KCStudly
Donating Member
 
Posts: 9640
Images: 8169
Joined: Mon Feb 06, 2012 10:18 pm
Location: Southeastern CT, USA
Top

Re: Compact family camper Build - More aluminum

Postby tony.latham » Mon Nov 03, 2014 11:02 pm

"Tony you must be loosing it more than I, if you can't find your beer!" :lol: :lol: :lol:

That's a good point. Just between you and me (don't tell anybody else on the forum) but I'd try tapping for those holes too.

Ya gotta realize it's cold and dark up here at 45º north now. That turning the clock back drives me nuts. 'Didn't help to put the cover on the 'drop yesterday. I'm might try witching my fridge to see if'n it's got a frosty beer in it.

T
User avatar
tony.latham
Gold Donating Member
 
Posts: 7073
Images: 17
Joined: Mon Jul 08, 2013 4:03 pm
Location: Middle of Idaho on the edge of nowhere
Top

Re: Compact family camper Build - More aluminum

Postby ryuandwings » Tue Nov 04, 2014 12:37 am

Tapping or willow thing, if it may work I will try. :lol:

I may have found a way to find the holes. Since I have T-nuts imbedded, magnet will stick to it. I tried with a magnet I had around and it kinda sticks. I will get some stronger and perhaps smaller magnets to pinpoint hole locations. :twisted:
User avatar
ryuandwings
Teardrop Master
 
Posts: 187
Images: 61
Joined: Wed Feb 13, 2013 5:22 am
Location: West Tennessee
Top

Re: Compact family camper Build - More aluminum

Postby KCStudly » Tue Nov 04, 2014 7:12 am

Witchcraft!!! :lol: :lol: :lol:
KC
My Build: The Poet Creek Express Hybrid Foamie

Poet Creek Or Bust
Engineering the TLAR way - "That Looks About Right"
TnTTT ORIGINAL 200A LANTERN CLUB = "The 200A Gang"
Green Lantern Corpsmen
User avatar
KCStudly
Donating Member
 
Posts: 9640
Images: 8169
Joined: Mon Feb 06, 2012 10:18 pm
Location: Southeastern CT, USA
Top

Re: Compact family camper Build - More aluminum

Postby noseoil » Tue Nov 04, 2014 7:23 am

Try using the small magnets from an old computer hard drive. They are the "rare earth" type and will be much more powerful than a regular magnet, and are very small as well. This might work well enough to start a small pilot hole (3/32") just to see where you are.
Build log: viewtopic.php?f=50&t=60248
The time you spend planning is more important than the time you spend building.........

137905
User avatar
noseoil
1000 Club
1000 Club
 
Posts: 1822
Images: 670
Joined: Sun Apr 27, 2014 8:46 am
Location: Raton, New Mexico, living the good life!
Top

Re: Compact family camper Build - More aluminum

Postby ryuandwings » Tue Nov 04, 2014 9:49 am

noseoil wrote:Try using the small magnets from an old computer hard drive. They are the "rare earth" type and will be much more powerful than a regular magnet, and are very small as well. This might work well enough to start a small pilot hole (3/32") just to see where you are.


Yup, rare earth magnets are what I was thinking. :thumbsup:
User avatar
ryuandwings
Teardrop Master
 
Posts: 187
Images: 61
Joined: Wed Feb 13, 2013 5:22 am
Location: West Tennessee
Top

Re: Compact family camper Build - Aluminum Skin

Postby chriskoebb » Wed Nov 05, 2014 10:56 am

ryuandwings wrote:
chriskoebb wrote:Great looking work! Super craftmanship

Did you leave the axel on top of the leaf springs as in the early photo's?


Thank you. :)
Yes, my axle is still on top of the leaf springs. I wanted to keep the trailer as low as possible.


I was just curious about how you measure the axle travel.I"m going to put a new axle on my trailer I am building and want to keep it low also but was not sure about measuring the travel distance. I'm having a great time following your post. :applause:
"If you don't make mistakes your not doing anything"

Chris
chriskoebb
Teardrop Builder
 
Posts: 25
Images: 3
Joined: Thu Oct 09, 2014 6:53 pm
Top

Re: Compact family camper Build - Aluminum Skin

Postby ryuandwings » Wed Nov 05, 2014 12:37 pm

chriskoebb wrote:I was just curious about how you measure the axle travel.I"m going to put a new axle on my trailer I am building and want to keep it low also but was not sure about measuring the travel distance. I'm having a great time following your post. :applause:

I looked up all I needed when I was working on the trailer framed, but I slept since then so I'm not remembering all the terminologies. :?
What are you referring when you say axle travel distance? Are you talking about how much axle moves vertically when leaf spring flex? Can you help me refresh my memory? :R
User avatar
ryuandwings
Teardrop Master
 
Posts: 187
Images: 61
Joined: Wed Feb 13, 2013 5:22 am
Location: West Tennessee
Top

Re: Compact family camper Build - Aluminum Skin

Postby ryuandwings » Thu Nov 06, 2014 9:16 am

chriskoebb wrote:I was just curious about how you measure the axle travel.I"m going to put a new axle on my trailer I am building and want to keep it low also but was not sure about measuring the travel distance. I'm having a great time following your post. :applause:

OK, here is what I did.
First, my trailer is not designed as an offroad, so I'm not anticipating much movement. My axle kit is the from Norther Tool. I think it was this.http://www.northerntool.com/shop/tools/product_200593636_200593636

So my goal was to have this as low as possible, the first thing I did was to put the axle on top of leaf spring. I think that lowered 3-4 inches.
Another thing I did drilled new holes on the front hanger. That lowered another 1 to 1-1/2". I'm using the holes that are closer to the frame in the picture.
Image

Rear hangers were located so that shackles is in a angle where the rear of leaf spring is extended beyond rear hanger. I located mine so that holes of shackles are 1" apart.
Here is link to eTrailer.com that describes a lot better than I can. http://www.etrailer.com/question-29891.html

As far as the location of axle in the trailer, that will be based on trailer weight, tongue weight, length, etc... :o

I hope this was what you are asking about. I know that's not a complete how-to, but hope this will get you started. :beer:
User avatar
ryuandwings
Teardrop Master
 
Posts: 187
Images: 61
Joined: Wed Feb 13, 2013 5:22 am
Location: West Tennessee
Top

Re: Compact family camper Build - More aluminum

Postby ryuandwings » Thu Nov 06, 2014 9:25 am

I bought some rare earth magnets and tested them last night. I did not spend too much time, but I this could work. :thinking:
Image
As you can see, this photo was taken from the under side of door as it sits on the sawhorses. There are 3 magnets stuck to the door. Those are stuck to the flanges of t-nuts. I still need to play around to locate the centers of t-nuts and then, transfer the locations to the aluminum side. I was not able to feel the magnets sticking to t-nuts from the aluminum side.

At least I have a plan now. :thumbsup:
User avatar
ryuandwings
Teardrop Master
 
Posts: 187
Images: 61
Joined: Wed Feb 13, 2013 5:22 am
Location: West Tennessee
Top

Re: Compact family camper Build - More aluminum

Postby tony.latham » Thu Nov 06, 2014 9:38 am

ryuandwings wrote:I bought some rare earth magnets and tested them last night. I did not spend too much time, but I this could work. :thinking:
Image
As you can see, this photo was taken from the under side of door as it sits on the sawhorses. There are 3 magnets stuck to the door. Those are stuck to the flanges of t-nuts. I still need to play around to locate the centers of t-nuts and then, transfer the locations to the aluminum side. I was not able to feel the magnets sticking to t-nuts from the aluminum side.

At least I have a plan now. :thumbsup:


Perhaps if you stack the magnets there is enough strength to mark the holes on the outside with some steel filings?

T
User avatar
tony.latham
Gold Donating Member
 
Posts: 7073
Images: 17
Joined: Mon Jul 08, 2013 4:03 pm
Location: Middle of Idaho on the edge of nowhere
Top

Re: Compact family camper Build - More aluminum

Postby ryuandwings » Thu Nov 06, 2014 12:00 pm

tony.latham wrote:Perhaps if you stack the magnets there is enough strength to mark the holes on the outside with some steel filings?

T


I need to try that. :thinking:
User avatar
ryuandwings
Teardrop Master
 
Posts: 187
Images: 61
Joined: Wed Feb 13, 2013 5:22 am
Location: West Tennessee
Top

Re: Compact family camper Build - Aluminum Diamond Plate

Postby ryuandwings » Mon Nov 10, 2014 6:16 pm

A small updates.

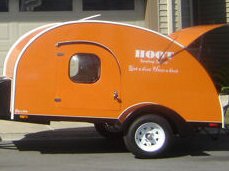
I received aluminum diamond plates last week and started to work with them a little. These diamond plate became a design feature after finding out 5' aluminum anodize is going to be very thick, heavy and expensive. :shock: I did not think about the material sizes when designed my trailer. IF I were to start over, I will strongly consider keeping things within 4 feet material size. Less waste, less cost, more availability. :R

Since my trailer walls are bout 4'-10", I decided to add strips of diamond plate for accent and protection.
I will be using J-cap molding at the transition from aluminum to diamond plate. I found slanted top J-cap molding that is designed for 1/16" material. My diamond plates are 0.045, so I thought the gap may be too wide, but the patterns on the diamond plates make the fit nicely tight. :thumbsup:
Image

Before I start doing anything with diamond plate or J-cap molding, I need to finalize the locations of my fenders. Off course, the fenders are aluminum diamond plate, too. :D
Image

Here you can see I monted J-cap moldings.
Image
I left a gap where the fender will go. There are 2 reasons. First is I wanted fender to be as flush to the wall as possible. I will be able to get the fit tighter without the molding being there. Second is I did not want to spend extra fright fee for the materials longer than 8'. J-cap molding is 12' long, but I will be spending a lot of money to have only 3 of them shipped. :(

I first cut roll of 2x10 diamond plate in half, into 1x10. made a little cutout for the axle.
Image
Slid the plate into the J-cap molding. I think it fit there nicely. :)

Crawled under the trailer and marked the profile of trailer onto the plate. Cut the diamond plate over size and fit it back on the trailer.
Image
I will trim the excess with my router and flush bit.

Other works are front of tongue box.
Image

Tongue box hatch.
Image

I don't have any of the diamond plates glued up yet. Like I did wall and roof aluminum, I will try to do many of them at same time.

Getting closer!
:beer:
User avatar
ryuandwings
Teardrop Master
 
Posts: 187
Images: 61
Joined: Wed Feb 13, 2013 5:22 am
Location: West Tennessee
Top

PreviousNext

Return to Build Journals

Who is online

Users browsing this forum: No registered users and 11 guests