Progress Pics

Anything to do with mechanical, construction etc

Progress Pics

Postby sunny16 » Fri May 19, 2006 9:42 am

It's been a while since I posted any progress pics. I have been working on the tear slowly the past weks and have gotten the roof insulated, wired and skined. Finished the last section last night. Put the rear hatch on using regular dooe hinges and I will build a seal over the top when the time comes. I also cut out the interior cabinet fronts and attached the doors and set it in place to see what it will look like. I think I will build cabinet fronts our of solid 1 x 2's instead. It just looks better and will work better. Boy this nickle and dime stuff to "get er done" is a killer!

Image
Interior cabinets for now.

Image
Rear hatch closed showing the rear profile.

Image
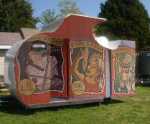
Rear hatch opened. Like my "gas shock"? (Temporary)

Image
Regular door hinges. They work great and I can take the hatch off very quickly by removing the pins.
I cut it three times and it's still too short!!
Perfection is all I ask.......
User avatar
sunny16
The 300 Club
 
Posts: 412
Images: 70
Joined: Fri Oct 14, 2005 10:04 am
Location: Utah, a pretty great state! (West Jordan)

Postby rampage » Fri May 19, 2006 10:32 am

Looking good!! :applause: :thumbsup: :thumbsup:
"If you can't be a good example, then you'll just have to be a horrible warning"
User avatar
rampage
Donating Member
 
Posts: 286
Images: 5
Joined: Tue Jan 24, 2006 12:02 pm
Location: Florida

Postby Darren » Fri May 19, 2006 10:37 am

I like it. Keep up the good work and thanks for the photos. :applause:
Image
User avatar
Darren
the camper formerly known as Victor Star
 
Posts: 1356
Images: 161
Joined: Sat Dec 03, 2005 12:09 am
Location: Shawnee, Kansas (KC)
Top

Postby madjack » Fri May 19, 2006 11:04 am

...looks real good there Sunny....just keep in mind that those easily removable pins will vibrate out as well when travelling and make allowances for that...
madjack 8)
...I have come to believe that, conflict resolution, through violence, is never acceptable.....................mj
User avatar
madjack
Site Admin
 
Posts: 15128
Images: 177
Joined: Thu Dec 02, 2004 5:27 pm
Location: Central Louisiana
Top

Postby Miriam C. » Fri May 19, 2006 3:13 pm

madjack wrote:...looks real good there Sunny....just keep in mind that those easily removable pins will vibrate out as well when travelling and make allowances for that...
madjack 8)


Looks good Sunny
Perhaps you can find a pin that is drilled for cotter pins so it won't come undone.

Miriam
“Forgiveness means giving up all hope for a better past.â€
User avatar
Miriam C.
our Aunti M
 
Posts: 19675
Images: 148
Joined: Wed Feb 15, 2006 3:14 pm
Location: Southwest MO
Top

Postby sunny16 » Fri May 19, 2006 4:07 pm

The pins require a good hit with a hammer and screw driver to get them to come out of the hinge so I don't think it will be a problem. But, thanks for the concern. It was something I didn't think about at the time when I decided on the type of hinge to use. I wanted to use the hurrican hinge but the hatch spares are cut at an angle and the hinge is at 90 degrees. So that made me change to what I have used. :)

But the trailer is getting there. I'm already planning where to take it on the maiden camping trip. :thinking:
I cut it three times and it's still too short!!
Perfection is all I ask.......
User avatar
sunny16
The 300 Club
 
Posts: 412
Images: 70
Joined: Fri Oct 14, 2005 10:04 am
Location: Utah, a pretty great state! (West Jordan)
Top

Postby WarPony » Fri May 19, 2006 6:24 pm

I'm with MadJack on the hinge pins. I've seen door hinge pins at home work loose and go "UP"!! I don't know how the hell that happens but that is just crazy!!! I'm afraid yours might rattle loose in time and cause the hatch to fall off. Sure would ruin a camping trip if you were far from home and it was raining, not to mention the guy's day who would be behind you when/if it did fall off. Maybe, if you can't figure out a way to keep the pins securely secured (Whuuuuh?), a couple of safety straps at the corners would do. Wouldn't take too much to do that.
I'm not trying to tell you how to build your camper, just some ideas to think about. I tend to overthink certain situations. I like that side window, though. Good idea!!
ImageImage

Still a million dollars away from being a millionaire!!
User avatar
WarPony
Donating Member
 
Posts: 2089
Images: 289
Joined: Tue Sep 14, 2004 12:10 pm
Location: Kansas, Topeka
Top

hinge pins

Postby waywardson » Fri May 19, 2006 10:42 pm

theres no way the pins will work their way out of the hinges,

it sure looks like you will have a rain water problem though,
i have a similar situation with the fish trailer

george / waywardson
User avatar
waywardson
Silver Donating Member
 
Posts: 104
Joined: Sat Jan 29, 2005 10:19 pm
Location: nashville, tn
Top

Postby sunny16 » Mon May 22, 2006 10:08 am

I think I have the rain problem figured out. I will put a strip of rubber, about the thickness of an innertube, accross the hatch split and hold it down with small strips of aluminum and some kind oif sealer. SOmeone has used this method already. Flexible yet water tight. Isn't that what we all are striving for? :thinking:

Thanks for the comments and concerns. There is so much great information here on this forum.
I cut it three times and it's still too short!!
Perfection is all I ask.......
User avatar
sunny16
The 300 Club
 
Posts: 412
Images: 70
Joined: Fri Oct 14, 2005 10:04 am
Location: Utah, a pretty great state! (West Jordan)
Top

Postby Ira » Mon May 22, 2006 10:31 am

Sunny, it looks great! And with waterproofing that hinge, go REDUNDANT--and test it heavily with the hose.

I was 100% sure my hatch hinge was solid against water--I did everything by the book, including rubber from a bike tire under a piano hinge (not hurricane) and using 3m's 5200 to seal. But lo and behold, I had a leak anyway--a BIG one. What probaby happened was that when I sealed the rubber down, it wasn't a 100% continuous seal.

Know what I mean? All it takes is a tiny gap in sealing that rubber to the wood and you're screwed.

So in my case, I added another piece of vinyl door jam on TOP of the hinge.

Granted, I'm a spastic and did few things right in the first place, but water can flow in from some really strange places and angles.
Here we go again!
User avatar
Ira
Forum Storyteller
 
Posts: 5652
Images: 118
Joined: Tue Nov 29, 2005 2:16 pm
Location: South Florida
Top

Postby sunny16 » Mon May 22, 2006 11:42 am

Thanks, Ira,
I know you had the LEAKING problem so your comments are helpful. I don't want any leaking so when I get to that point, I will do the old water-from-the-hose leak test in the yard. Thanks again, everyone!
I cut it three times and it's still too short!!
Perfection is all I ask.......
User avatar
sunny16
The 300 Club
 
Posts: 412
Images: 70
Joined: Fri Oct 14, 2005 10:04 am
Location: Utah, a pretty great state! (West Jordan)
Top

Postby Todah Tear » Mon May 22, 2006 12:42 pm

Sunny,

I am experimenting with attaching a strip of lawn soaker hose with about 3/8" of it cut out of the top along the section under the gap where the body and the galley meet. I attached it to the wall with staples and liquid nails. I coated the hose with polyurethane then coated with the undercarriage paint. This made a contious seal between the wall and the hose, which now forms a u-channel type trough. The water is directed through the rest of the hose down the inner sides of the galley to the ground. I have place a small RV hose filter at the end of the hose to keep bugs( mainly ants) from crawling in through it. I will try to post pictures of this soon.

The reason that I used a soaker hose instead of a regular water hose is because I didn't think that the undercarriage coating (which not only makes the setup water tight, but also hard) would stick to the slick material that a regular hose is made from . The open pores in the soaker gave the polyurethane and the undercarriage coating a place to fill.

Todah
Last edited by Todah Tear on Mon May 22, 2006 12:53 pm, edited 1 time in total.
"It is not good to have zeal without knowledge, nor to be hasty and miss the way." Proverbs 19:2 Image
User avatar
Todah Tear
Platinum Donating Member
 
Posts: 1723
Images: 282
Joined: Mon Feb 13, 2006 3:30 pm
Location: Texas
Top


Return to Teardrop Construction Tips & Techniques

Who is online

Users browsing this forum: Bing [Bot] and 0 guests