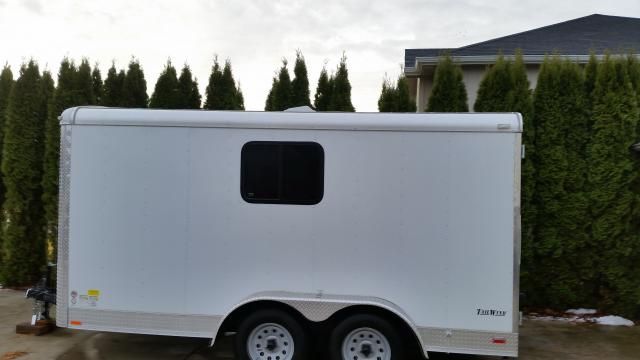
Professors 7x14 Toy Hauler

Converting Cargo Trailers into TTTs

Re: Professors 7x14 Toy Hauler

Postby professorkx » Thu Dec 04, 2014 12:16 pm

Windows arrived and were exactly as described in the ebay ad. I reviewed the window post yesterday and have one followup question. My windows are new, and have a thick piece of foam on the inside of the outside trim piece. It appears that this is intended for a good seal, but in the window post, I see folks are using some type of third party sealant. So, do I need to:

1. peal this foam off and replace with sealing material noted in the widows post
2. leave the foam in place and use additional sealing material
3. just use the foam that is on the windows.

First window installation, so want to do it right the first time.

Thanks
User avatar
professorkx
Teardrop Master
 
Posts: 140
Joined: Wed Nov 12, 2014 4:54 pm

Re: Professors 7x14 Toy Hauler

Postby Prem » Thu Dec 04, 2014 12:46 pm

:thinking: It's black foam rubber, right?

It works. It compresses. But it's open cell foam rubber. It's gonna soak up a little water on the edge, grow green moss or get a little UV damage, so just paint it white (enamel) after it's compressed in place.

The alternative is butyl tape, a ribbon of putty that lasts for 20 years before it gets brittle. Pretty much impervious to UV and nothing grows on it.
Image
RV shops generally use double layers of the butyl tape. You get a good bed for extra protection against water entry and out-of-plane irregularities that way. Some of it squeezes out on the first hot day, so you have to trim the edge of your window with a razor knife to remove the excess. (But wait till the sun goes down, cuz it strings out bad, making a mess, when it's hot and you try to pull it off.) Tighten the screws on the interior trim ring after the first hot day.

Using both gains nothing. You just get the minor downside issues of both. NG.

Your call.
My goal...

_____________________________________________
...is to live in a trailer.
User avatar
Prem
Gold Donating Member
 
Posts: 3222
Images: 144
Joined: Thu Aug 21, 2008 11:25 am
Location: State of Jefferson (Oregon side)

Re: Professors 7x14 Toy Hauler

Postby hankaye » Thu Dec 04, 2014 9:51 pm

professorkx, Howdy;

Should you elect to use the add-on that Prem suggested then I'll follow-up
with this suggestion, prior to using the butyl tape, throw it in the freezer
for an hour or 2, it will allow you to handle it with more ease and less hassles.


hank
Striving for a less complicated life since 1949 ...
Every day I beat my own previous record for number of consecutive days I've stayed alive.
hankaye
2000 Club
2000 Club
 
Posts: 2567
Images: 1
Joined: Thu Dec 06, 2012 5:35 pm
Location: S.W. New Mexico
Top

Re: Professors 7x14 Toy Hauler

Postby professorkx » Fri Dec 05, 2014 2:33 pm

hankaye wrote:professorkx, Howdy;

Should you elect to use the add-on that Prem suggested then I'll follow-up
with this suggestion, prior to using the butyl tape, throw it in the freezer
for an hour or 2, it will allow you to handle it with more ease and less hassles.


hank


Excellent. We live in the Northwest...where it doesn't rain much...so not sure on direction. The cool thing is that the windows are easy to remove, seal and reinstall, so either way, no big deal.

Looking for tape today, which may be the deciding factor, as the windows WILL be in the trailer this weekend....
User avatar
professorkx
Teardrop Master
 
Posts: 140
Joined: Wed Nov 12, 2014 4:54 pm
Top

Re: Professors 7x14 Toy Hauler

Postby professorkx » Sun Dec 07, 2014 7:09 pm

This weekend was dedicated to window installation. First, let me say that windows take a lot longer to install that I thought, so only one window was installed on Saturday. Part of the reason was that I had to modify my installation plan once I started to tape the outside of the trailer, but I will explain more as I post pictures. I should note here that I measured A LOT before I made my first cut, as you only get one chance at cutting the skin.

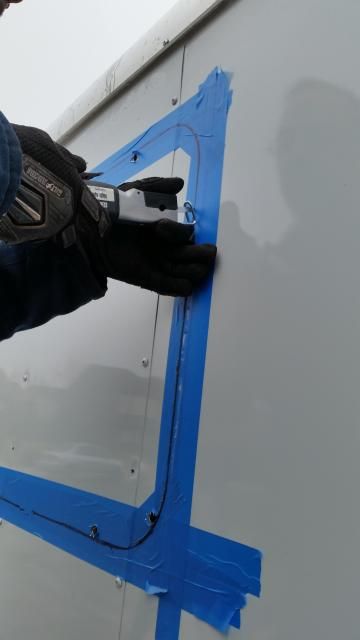
I started by holding my inside ring on the inside and outside of the frame. The problem I noticed was that if I continued with my plan to mount the windows between a first and third wall support, cutting out only one upright in the middle, the outside trim would sit on top of the screw heads on the outside of the trailer, hence my modification. Since that would result in poor water seal, I decided to cut out two wall supports, installing the top and bottom window support between uprights number one and four, while cutting numbers two and three. After I had a new plan, I placed blue tape on the outside of the trailer and drew my line using the inside ring held in place by blue tape.

Image

Step two was to cut the outside skin using an high speed air saw with a 24 tooth blade.

Image

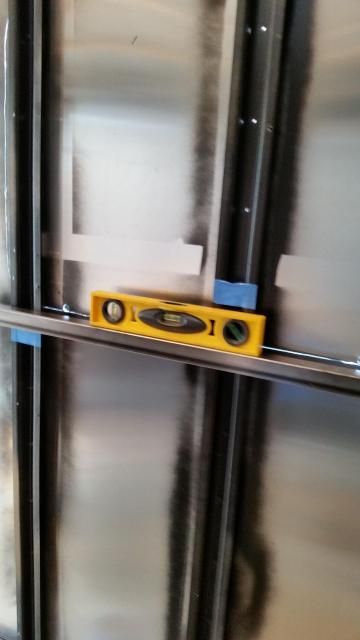
I did not cut the uprights at this time, as I wanted to cut them at the right length the first time so the 1 1/4" square tubing would fit under and over the window. Next step was to put the square tubing in place on the inside of the trailer and mark the cut location. I used two vise grips to hold the tubing in place while leveling and marked the cut location with blue tape.

Image

Image

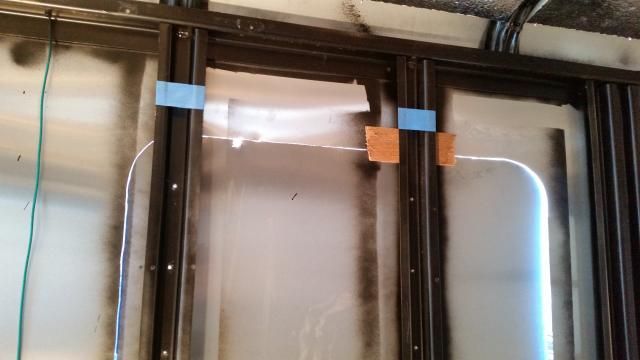
Cutting of the uprights would be done with an abrasive cutoff wheel, so I needed to protect the skin from getting cut when I break through the upright. For this, I used a small piece of Luan, and sandwiched between the skin and upright with the outside screws.

Image

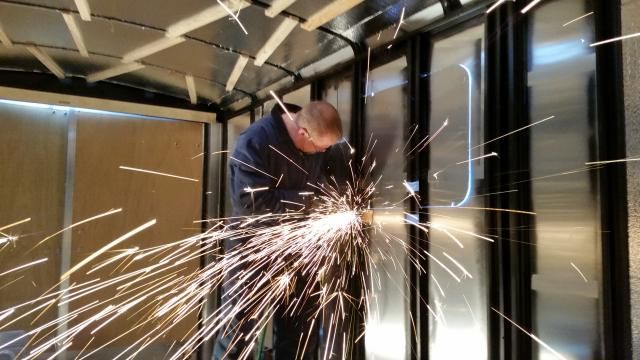
Next up, make 4 cuts and remove the uprights.

Image

Image

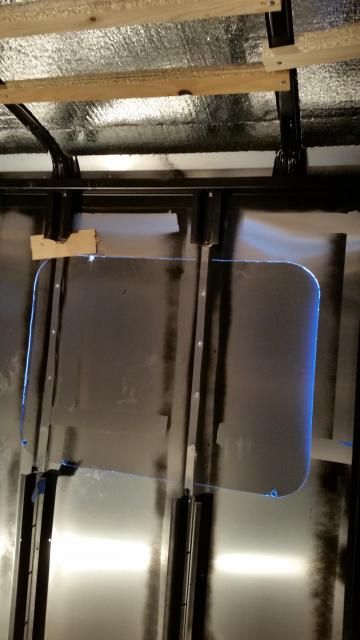
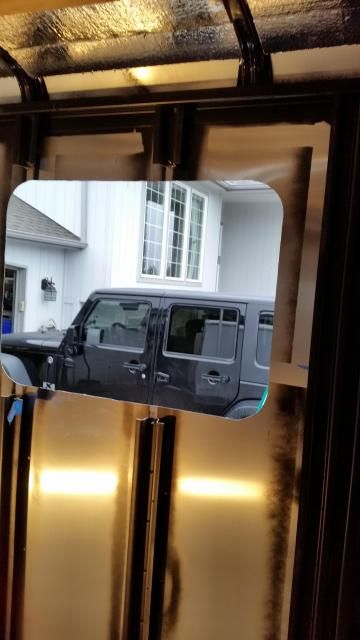
Once the upright were gone, I moved to the outside and finished cutting the skin.

Image

Image

Whew! I sat down and had a little coffee to admire my work and try and calm down. This was very stressful.

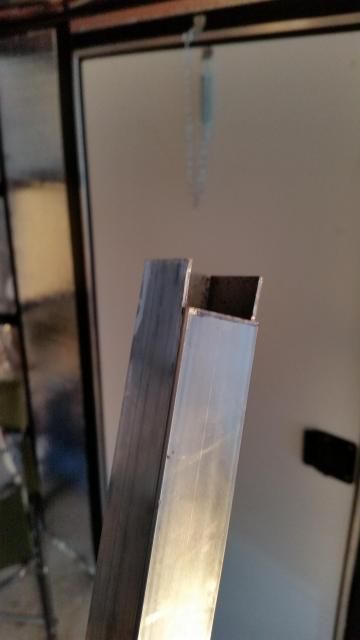
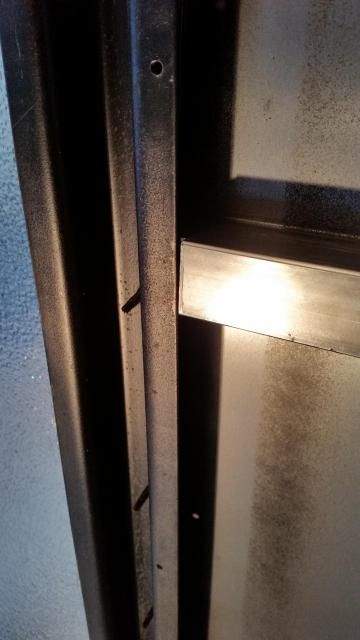
With the new hole in place...and the rain now coming inside through the hole...it was time to cut and install my square tubing. Since my wall support are a hat channel, I notched the end of the square tubing to help lock everything in place.

Image

Image

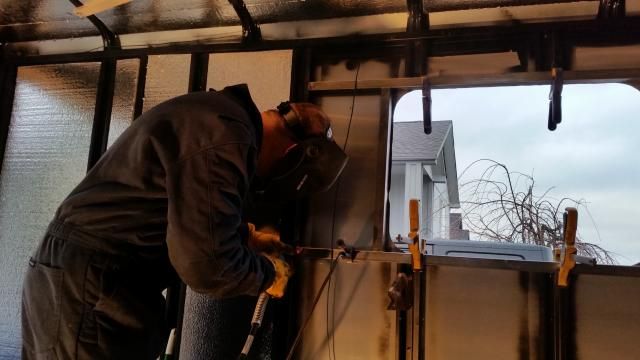
Now to weld everything into place.

Image

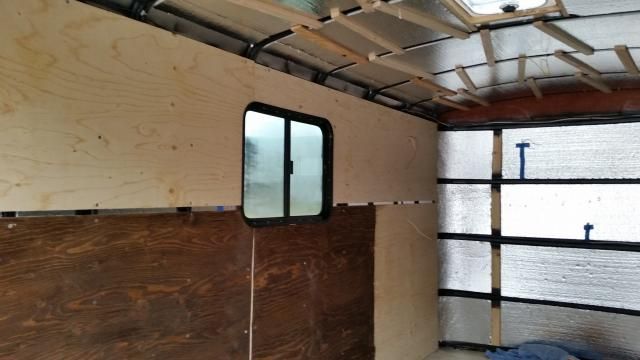
Now that the hard part was over, all that remained was to install the insulation in the window area, install the plywood, mark the holes and cut using the high speed air saw. No pictures of cutting the wood, as this was pretty straight forward. I should note that since my tubing corners are square, I put a small square of 1 1/2" Styrofoam insulation in each corner and trimmed to the shape of the corners using the air saw. This provided support for the outside of the skin when I installed the windows. The finished product looks sweet.

Image

Image

Ignore the stain, as this was just a test. The walls will have carpet.

Next weekend, window two will be installed using this same method. Total installation time...7 hours, but that included a lot of measuring. I used the measure 15 times cut once method. :worship:
Last edited by professorkx on Mon Mar 02, 2015 6:23 pm, edited 2 times in total.
User avatar
professorkx
Teardrop Master
 
Posts: 140
Joined: Wed Nov 12, 2014 4:54 pm
Top

Re: Professors 7x14 Toy Hauler

Postby 2500HHP » Sun Dec 07, 2014 7:39 pm

Very nice. Looks good!
2500HHP
Teardrop Builder
 
Posts: 42
Joined: Tue Nov 18, 2014 4:30 pm
Top

Re: Professors 7x14 Toy Hauler

Postby Rainier70 » Sun Dec 07, 2014 8:51 pm

:) :thumbsup:

Looks good.
User avatar
Rainier70
1000 Club
1000 Club
 
Posts: 1083
Images: 244
Joined: Wed Jan 30, 2013 4:35 am
Location: Southeast Idaho
Top

Re: Professors 7x14 Toy Hauler

Postby Prem » Sun Dec 07, 2014 8:52 pm

8) Yeah. You rock.

I sat down and had a little coffee to admire my work and try and calm down. This was very stressful.


:lol: Dude, you should experience cutting the monster hole for an RV door! :worship: :frightened: :shock:

P.S. I measured and remeasured about 15 times after I drew the line. And still there was that nagging feeling of "what if."
Not to worry. It actually fit like a glove.
My goal...

_____________________________________________
...is to live in a trailer.
User avatar
Prem
Gold Donating Member
 
Posts: 3222
Images: 144
Joined: Thu Aug 21, 2008 11:25 am
Location: State of Jefferson (Oregon side)
Top

Re: Professors 7x14 Toy Hauler

Postby pchast » Sun Dec 07, 2014 9:33 pm

Nice careful job. Stick with the plan you used.
Looks good! :thumbsup:
pchast
Platinum Donating Member
 
Posts: 2065
Images: 97
Joined: Mon Jan 28, 2013 5:47 pm
Location: Athens, NY
Top

Re: Professors 7x14 Toy Hauler

Postby lrrowe » Sun Dec 07, 2014 10:26 pm

What can I say that has not already been mentioned above on your good work?

And nice catch on the window placement and rivets. I will certainly watch out for that. Hopefully I can post pictures this coming week of my window addition. That first cut will be very challenging....on the nerves that is. I may have to go for something stronger then coffee when I sit back to admire my work.
Bob

First Post on Purchase of Trailer: http://www.tnttt.com/viewtopic.php?f=42&t=60722
Hot water infloor and radiator heating project:[url]http://www.tnttt.com/posting.php?mode=reply&f=54&t=62327[/

Image Image
User avatar
lrrowe
Donating Member
 
Posts: 3285
Images: 439
Joined: Sun Feb 10, 2013 5:54 am
Location: SW Virigina
Top

Re: Professors 7x14 Toy Hauler

Postby Prem » Sun Dec 07, 2014 11:46 pm

My goal...

_____________________________________________
...is to live in a trailer.
User avatar
Prem
Gold Donating Member
 
Posts: 3222
Images: 144
Joined: Thu Aug 21, 2008 11:25 am
Location: State of Jefferson (Oregon side)
Top

Re: Professors 7x14 Toy Hauler

Postby lrrowe » Mon Dec 08, 2014 9:47 am

Great advice Prem.

I had thought of that before, but it had escaped my thoughts. Escaped does sound better then forgot.
Bob

First Post on Purchase of Trailer: http://www.tnttt.com/viewtopic.php?f=42&t=60722
Hot water infloor and radiator heating project:[url]http://www.tnttt.com/posting.php?mode=reply&f=54&t=62327[/

Image Image
User avatar
lrrowe
Donating Member
 
Posts: 3285
Images: 439
Joined: Sun Feb 10, 2013 5:54 am
Location: SW Virigina
Top

Re: Professors 7x14 Toy Hauler

Postby professorkx » Tue Dec 09, 2014 2:24 pm

Prem wrote::thinking:
http://www.tnttt.com/viewtopic.php?f=42&t=32504&p=1105492#p1105492


Yup, thought of the problem with using a level, but the issue was that I couldn't measure down on the inside using an outside reference point...namely, the roof edge. However, if you use the jacks to get the roof edge level with the ground on the outside, you can then use the level on the inside with confidence that everything will look right on the outside when using a level from the inside. The issue for me was that I was cutting the skin after I cut the uprights, so had to deal with inside reference points only.

I also found that the inside was not square with the outside, which eliminated measuring down from the inside, so leveling the trailer relative to the roof rail gave me more confidence in the final outcome of using a level for inside cuts. It's all in the setup...
User avatar
professorkx
Teardrop Master
 
Posts: 140
Joined: Wed Nov 12, 2014 4:54 pm
Top

Re: Professors 7x14 Toy Hauler

Postby Prem » Tue Dec 09, 2014 2:56 pm

:thumbsup: Hey prof, yours turned out perfect. Perfectly level visually from the outside. All good! :thumbsup:

:SG For others, just a future reference: Draw the lines for the window cut out on the masking tape on the outside from measurements made from the exterior top trim. Just inside the top, bottom and side lines, drill 8 holes with a 1/8" or smaller drill bit. This will give you two points on each of the four sides to draw the line where the flat meets the radius corners.

Don't drill holes on four square corners outside the radius corners. :duh: :crying2:

My favorite alternative to this is using a long, metal-cutting, Bosch blade in a jigsaw. It cuts all the way through the skin, a rib and the interior insulation and panelling in one pass. The window and the trim ring fit perfectly. This only works IF you, a) are not cutting through more than one vertical rib and don't have to reinforce it with steel cross members, or b) are installing the 12" wide vertical slider RV windows that fit perfectly in between ribs. With this method, you can wire, insulate and panel the interior walls first.

Best wishes for a successful build. :thumbsup:
My goal...

_____________________________________________
...is to live in a trailer.
User avatar
Prem
Gold Donating Member
 
Posts: 3222
Images: 144
Joined: Thu Aug 21, 2008 11:25 am
Location: State of Jefferson (Oregon side)
Top

Re: Professors 7x14 Toy Hauler

Postby professorkx » Fri Dec 12, 2014 5:53 pm

Prem wrote::thumbsup: Hey prof, yours turned out perfect. Perfectly level visually from the outside. All good! :thumbsup:

:SG For others, just a future reference: Draw the lines for the window cut out on the masking tape on the outside from measurements made from the exterior top trim. Just inside the top, bottom and side lines, drill 8 holes with a 1/8" or smaller drill bit. This will give you two points on each of the four sides to draw the line where the flat meets the radius corners.

Don't drill holes on four square corners outside the radius corners. :duh: :crying2:

My favorite alternative to this is using a long, metal-cutting, Bosch blade in a jigsaw. It cuts all the way through the skin, a rib and the interior insulation and panelling in one pass. The window and the trim ring fit perfectly. This only works IF you, a) are not cutting through more than one vertical rib and don't have to reinforce it with steel cross members, or b) are installing the 12" wide vertical slider RV windows that fit perfectly in between ribs. With this method, you can wire, insulate and panel the interior walls first.

Best wishes for a successful build. :thumbsup:


For most folks, I think the window installation causes the most concern, as it's difficult to fix the hole if it's too large or not in the right spot. I've been a fabricator my entire life, both steel and wood, and I have completed some pretty complicated builds, including two ground up custom motorcycles that started with Harley crate motors sitting in my garage for months while I decided on what type of frame I wanted to build, each build requiring about 1000 hours to complete. However, even with everything I have done over the years, cutting holes in the side of a brand new trailer for windows just made me nervous. This forum helped me solve problems before they ever occurred. This is one reason I have been posting so many pictures, trying to give back so others who are sitting on the fence on a conversion can take the plunge.

If you spend as much time thinking about the build as you do actually building the conversion, everything will work out. The first cut is the hardest...
User avatar
professorkx
Teardrop Master
 
Posts: 140
Joined: Wed Nov 12, 2014 4:54 pm
Top

PreviousNext

Return to Cargo Trailer Conversions

Who is online

Users browsing this forum: Bing [Bot] and 3 guests