Professors 7x14 Toy Hauler

Converting Cargo Trailers into TTTs

Re: Professors 7x14 Toy Hauler

Postby professorkx » Wed Dec 31, 2014 11:19 am

Just a couple of more pictures before I start building cabinets. We installed the rubber floor, and since the roll was 14 feet long, I knew I would be a little short in the nose of the trailer. However, this is mostly under cabinets, so a splice won't be noticed, and I could cut the splice piece from the edge that I cut off to match the width of the trailer.. The challenge was cutting the curved nose shape on the splice piece.

First, a template was needed, and I had some scrape white board material that could be used. Second, I needed a marking gauge. I should have taken more pictures of the process, but was focused on finishing since it was snowing, so only have a few pictures.

Here is a picture of the template that was cut and the marking gauge that I made sitting on the bench.

Image

The template started life as a 12 inch by 48 inch piece that I positioned 1 inch from the edge of the floor we had just laid. The marking gauge is just a 1x2 with a point cut in one end and a hole drilled to allow me to insert a black marker so the marking point was just below the bottom surface of the marking gauge.

I marked the center of the template and the center of the the wall so I would have equal distance on each side. I place the point against the wall, keeping the marking gauge as straight as possible, and pushed the pen down so it began to mark the template. I followed the front wall from the center to the edge on both sides and then cut my line.

Using my new template, I marked my splice piece and cut with a utility knife. Since my floor is a diamond plate pattern, I had marked the bottom edge of the template with the pattern so I could match the pattern before I marked/cut my splice piece. Here is a picture of the finished product.

Image

You have to look close to see the splice, so this should work just fine.

Next up, I wanted my wife to approve the kitchen layout, so I cut a counter top from another piece of white board panel and placed it on supports. I also placed the refrigerator where it will be installed in a tall cabinet and placed the portable toilet where it will live.

Image

My wife moved the stove top and sink around on the counter top until she was happy, and we now have a plan for the cabinets. This weekend, I hope to make some progress on building cabinet faces. Oh yes, with the counter template, I was able to test cut my raw length before I cut the end for the rounded nose using the same marking gauge above. This process told me the exact rough length of my counter before I cut for the rounded nose. At $36 for a sheet of 1/2 plywood, I would rather sacrifice a piece of scrap to get my initial measurement. I was actually 3/4 inch too long, so it would have worked out without the counter template, but the concern was being too short.

Moving forward...
User avatar
professorkx
Teardrop Master
 
Posts: 140
Joined: Wed Nov 12, 2014 4:54 pm

Re: Professors 7x14 Toy Hauler

Postby Rainier70 » Wed Dec 31, 2014 12:26 pm

Wife's happy! :thumbsup:
User avatar
Rainier70
1000 Club
1000 Club
 
Posts: 1083
Images: 244
Joined: Wed Jan 30, 2013 4:35 am
Location: Southeast Idaho

Re: Professors 7x14 Toy Hauler

Postby professorkx » Sun Jan 04, 2015 1:01 pm

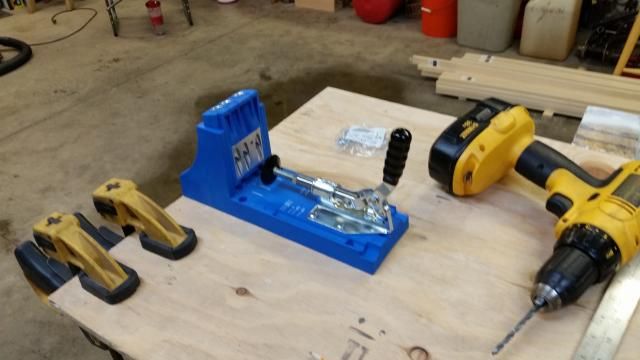
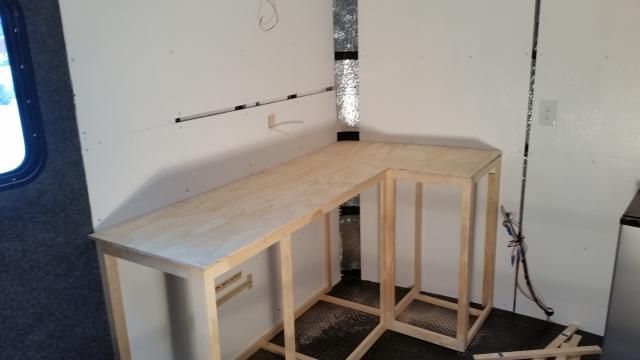
I completed the first cabinet frame and the counter top in the last two days, so thought I would post pictures. I noted earlier, that a Kreg Pocket Jig was the hot ticket for building face frames. It's also helpful to have a flat surface on saw horses on which the face frames can be easily constructed. I used a 2 foot wide piece of plywood, and screwed a 1x2 on edge to the bottom on each side to give the plywood more rigidity. Finally, I screwed the pocket jig to the end of the flat surface, as the jig needs to be held secure while drilling the pockets.

Image

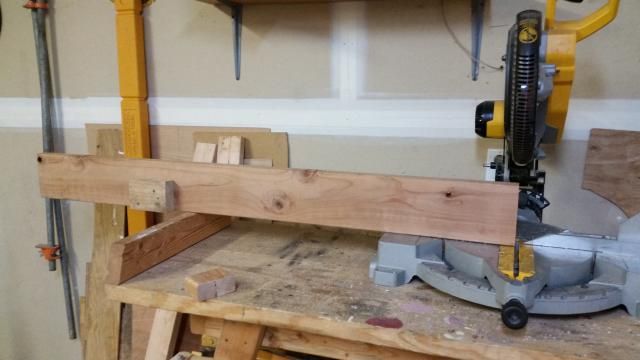
I also used a simple jig to cut all of my vertical pieces, as these need to be exactly the same to ensure the cabinet height is consistent since the face frame will sit on the floor without a kicker. Since I'm not using plywood to build my cabinets, building a kicker would have been a pain, and would have just added weight. Here is the jig for the verticals, and you will notice that it's pretty basic.

Image

The front and side will be the basis for my entire cabinet system, as I will use these for measuring all other points to ensure the cabinets look as straight as possible. Since we all know that CT are not built with the care necessary to ensure everything is square, we have to deal with the trailer as delivered and not worry about being out of square a little. Measuring from a common set point can help make the cabinets appear to be straight, and this corner piece, coupled with the left wall, provide these common measuring points.

Image

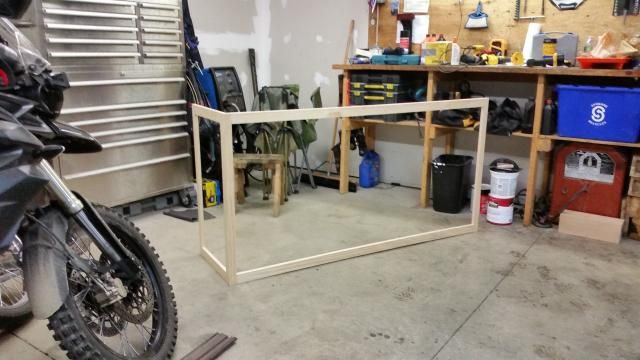
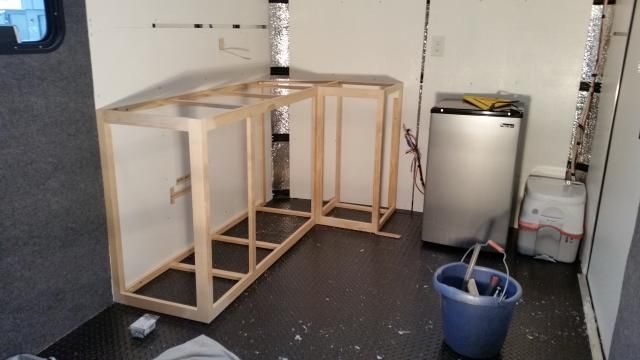
Now for the install of the first cabinet face frame. Since my panels will be very thin, I added bracing on top and bottom to ensure my primary face frame is square with the wall on the left. I should note that it's been snowing for the last week, so all of my pictures are taken with me standing at the rear of the trailer holding the camera at weird angles, so there are lots of shadows mess with the pictures, but you get the general idea.

Image

Once I had this face frame in place, it was time to build the counter. I could have built the counter after all cabinets were installed, but I don't have an offset trimming tool, so I would have been unable to trim the formica next to the wall and tall cabinet. Instead, I used a standard router, but was still unable to fully trim the inside corner when I glued the formica on the face. For this last trimming, I used a high speed air die grinder since it accepts 1/4 inch bits. This final trim was done by hand without a guide, so a steady hand was required.

Installing formica is pretty easy when your counter is sitting in the garage, and there are quite a number of Youtube videos that will show you how to install. I should note that I cut the holes for the sink and stove before I glued down the formica, then just trimmed out the formica.

A couple of tricks. First, I rough cut my counter piece and set on the counter for marking.

Image

I used a length of 1/4" plywood and 3/4 pine to get my edge facing and then just marked on the bottom of the counter. Once back in the shop, I flipped the rough cut piece upside down and cut my lines.

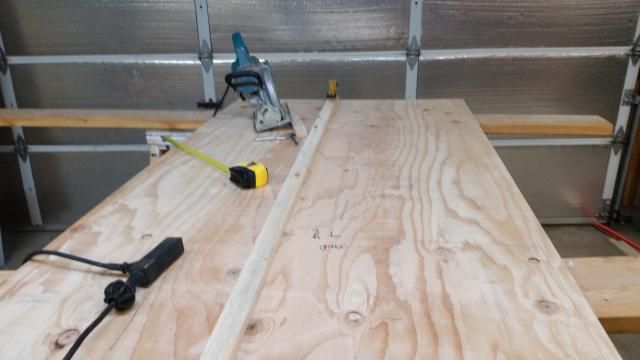
The second trick is to use an edge to guide your saw so your cuts are straight. Here, I used a pretty straight piece of pine, clamped at each end so the board was 3 11/16 inch off my line. I also placed one screw in the middle to eliminate any flex in the edge guide. Setup is everything here, as the actual sawing takes less than a minute.

Image

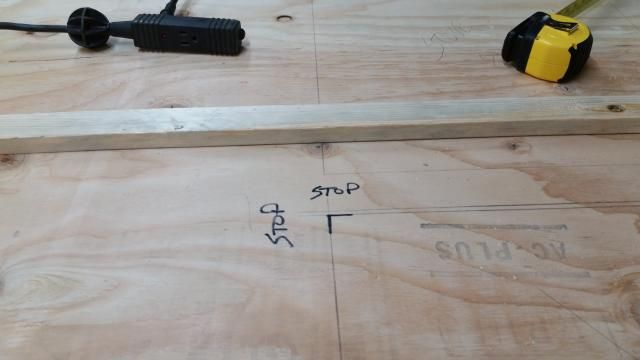
It's important to give yourself visual signals to know when to stop cutting. Here, I am cutting an inside corner, so I actually wrote "Stop" on the plywood as a visual signal to stop at the line.

Image

Image

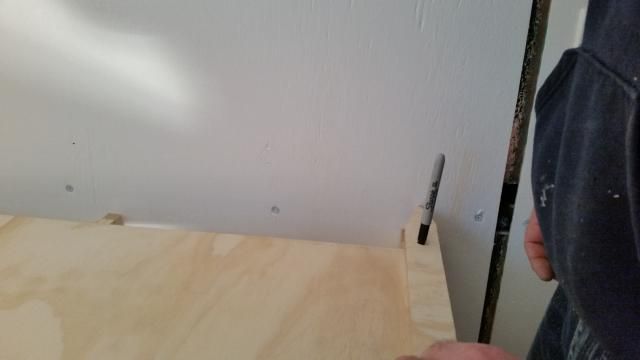
Finally, cutting a piece to fit against an irregular surface is difficult to understand, and while I had previously shown my marking gauge, I didn't have any pictures of the process. Since I will use this gauge many times while building my cabinets, I took the time to take a series of pictures of the process of cutting my counter top to fit against the rounded nose of my trailer.
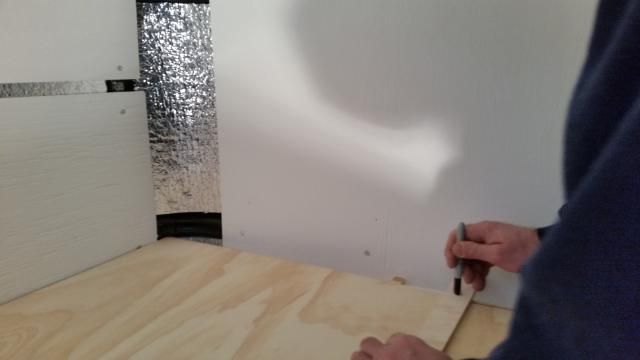
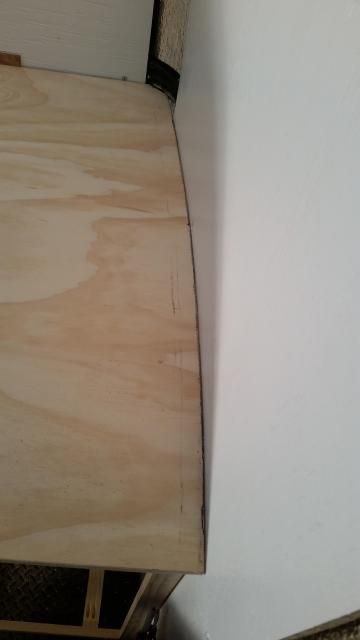
First, I rough cut my plywood for the counter, ensuring I had excess on all sides for trimming. MDF is better for counter tops, but since weight is an issue for me, I used 1/2 inch plywood. I placed my rough cut piece on top of the cabinet frame and positioned away from the rounded nose so my pen in my marking gauge was at the edge of the point furthest from the front of the trailer.

Image

Keeping the marking gauge straight in relation to the edge of my rough cut plywood, I slowly followed the curved edge of the front plywood.

Image

Image

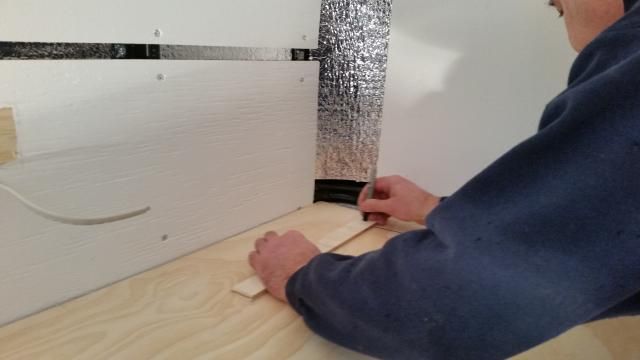
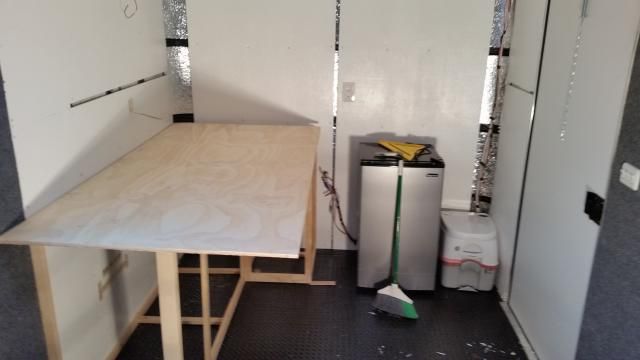
Once marked, I trimmed with a jigsaw, and have a very nice fitting counter.

Image

Once I installed formica on the finished counter top, the cut is so precise that I could actually run the counter in this finished form with a small bead of silicon.

Image

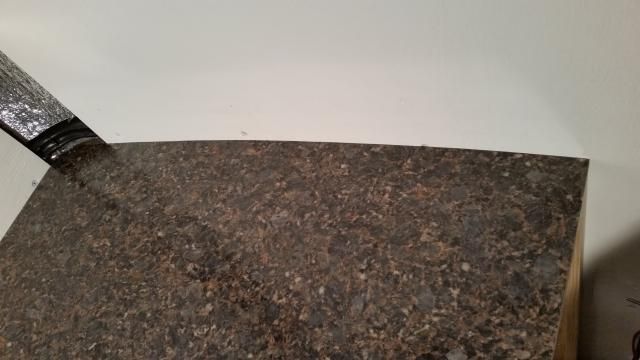
I will be installing a backsplash for aesthetics, but with this cut, it isn't necessary to hide the seam. Here is the counter after final installation.

Image

Next up, the tall cabinet.
User avatar
professorkx
Teardrop Master
 
Posts: 140
Joined: Wed Nov 12, 2014 4:54 pm
Top

Re: Professors 7x14 Toy Hauler

Postby abqlloyd » Sun Jan 04, 2015 1:41 pm

Very nicely done. Saves a bunch of weight, also.
abqlloyd
Teardrop Master
 
Posts: 273
Images: 3
Joined: Mon Aug 08, 2005 11:47 pm
Top

Re: Professors 7x14 Toy Hauler

Postby hankaye » Sun Jan 04, 2015 9:02 pm

professorkx, Howdy;

Just for clarity, when you marked the cuts for the counter top, it
looks like you have the 1/2" ply upside down judging from the knots
and other not so nice finish stuff that are absent from the finished
surface in the next pix before the formica surface is added.
I'd also like to say thanks for the SBS of the build, very easy to follow
and very well documented.

hank
Striving for a less complicated life since 1949 ...
Every day I beat my own previous record for number of consecutive days I've stayed alive.
hankaye
2000 Club
2000 Club
 
Posts: 2567
Images: 1
Joined: Thu Dec 06, 2012 5:35 pm
Location: S.W. New Mexico
Top

Re: Professors 7x14 Toy Hauler

Postby 2500HHP » Mon Jan 05, 2015 10:45 am

Very nice professor. :thumbsup:
2500HHP
Teardrop Builder
 
Posts: 42
Joined: Tue Nov 18, 2014 4:30 pm
Top

Re: Professors 7x14 Toy Hauler

Postby professorkx » Mon Jan 05, 2015 1:22 pm

hankaye wrote:professorkx, Howdy;

Just for clarity, when you marked the cuts for the counter top, it
looks like you have the 1/2" ply upside down judging from the knots
and other not so nice finish stuff that are absent from the finished
surface in the next pix before the formica surface is added.
I'd also like to say thanks for the SBS of the build, very easy to follow
and very well documented.

hank


Hank,

When I marked the plywood for the front of the trailer, the plywood is on the counter as it will be in it's final counter configuration, as this will orient the front cut properly.

However, once I cut for the round nose in the front and the rough cut plywood was pushed into place, I marked the underside of the plywood for the counter edge. Remember, I don't have any confidence that my walls are square, so didn't want to just measure and cut the front of the counter. Also, a counter needs an edge, usually 1 1/2 by 3/4 inches, and needs to be spaced 1/4 off the front of the cabinet face for clearance. So, I used a 1x2 piece of pine spaced out using a 1/4" strip of plywood held against the face frame and marked the underneath side of the plywood with a pencil. The pictures you see of the cutting in the shop (the word "stop" is written on the underside of the counter) shows the underside of the counter, as that's where my cut lines were made in the trailer. No reason to transfer these to the top surface, so I just flipped it upside down and cut.

I should also note that there are two ways to affix the counter edge as follows:

1. If you are using 3/4 plywood or MDF, you can cut the counter 1/4" from the face of the cabinets and just glue a 1x2 to the edge that will eventually have formica glued on. This method will ensure a flat face on which to glue your formica.

2. I was using 1/2 inch plywood for weight, which means I have a thin glue edge for the counter edge. So, I cut my plywood 1" wider than the face frame (1x2 pine plus 1/4 inch spacer I used to mark the lines), then cut a 1x2 pine piece down to 1 inch and glued the pine to the underneath side of the plywood. With this method, I had to add another step and sand the face of the the counter after the 1" pine is glued to the underneath side to ensure I had a flat surface onto which I would glue the formica. If the face edge of your counter is not flat, your formic will not adhere well, so taking a little extra time with a sander will ensure your formica facing will stay in place for years. You can use a hand held belt sander or an orbital. Orbital is a little more difficult to control, but with patience, it's not an problem.

This is a difficult process to explain without pictures, so I can take a few pictures of the underside of the counter edge to show the spacing from the face frame if that helps bring clarity, so just say the word if you would like a picture.

Oh yes, you will see two lines in the picture, spaced 1/4" apart. Because I have carpet on the walls that keeps the rough cut plywood from pushing flat against the wall until I notch for the carpet on the final counter top, I spaced my rough cut plywood 1/4" from the wall so my cuts would be true. That meant I needed TWO pieces of 1/4" plywood while marking the underside of the plywood to get 1/4" spacing from the cabinet face in final form. The first time I marked, I forgot to add the second spacer, so had to mark a second time. Had I not corrected my mistake, I would have just cut my pine down to 1/2" thick before I glued to the underside of the counter, and no one would have ever known. A good fabricator sometimes has to fix errors, but no one should ever be able to spot the "fix" without first being told.

Finally, thanks for the kind words on the SBS process. As you can probably tell, I enjoy this aspect of a project...
User avatar
professorkx
Teardrop Master
 
Posts: 140
Joined: Wed Nov 12, 2014 4:54 pm
Top

Re: Professors 7x14 Toy Hauler

Postby Rainier70 » Mon Jan 05, 2015 2:58 pm

Excellent work and tutorial! :thumbsup:
User avatar
Rainier70
1000 Club
1000 Club
 
Posts: 1083
Images: 244
Joined: Wed Jan 30, 2013 4:35 am
Location: Southeast Idaho
Top

Re: Professors 7x14 Toy Hauler

Postby hankaye » Mon Jan 05, 2015 5:17 pm

professorkx, Howdy;

Sure ... the more pix the better :D .
For me, a see and do type the pix are the "nutz" of
the learning experience. They take the written word and
amplify it better than being at a 'Metal' concert.

Thanks again,

hank
Striving for a less complicated life since 1949 ...
Every day I beat my own previous record for number of consecutive days I've stayed alive.
hankaye
2000 Club
2000 Club
 
Posts: 2567
Images: 1
Joined: Thu Dec 06, 2012 5:35 pm
Location: S.W. New Mexico
Top

Re: Professors 7x14 Toy Hauler

Postby professorkx » Sun Jan 11, 2015 2:28 pm

Another weekend and more progress. This weekend, I built the tall cabinet for the refrigerator, and installed shelves in all of the cabinets that are partially finished, as I don't like to get ahead of myself and have stages partially complete. Only one picture, as this was just normal cabinet making, nothing special. However, my marking gauge is getting a workout on anything that goes against the ceiling or against the front wall.

Image

It's hard to tell from the picture, but the top style on the tall cabinet that goes next to the ceiling follows the curve of the ceiling. To do this, I built the entire facing and both side walls of this cabinet and left the top facing for last. Once everything was installed, I cut my top board, placed it about 4 inches down in the facing, and used my marking gauge to mark the curve. The curve only falls away about 1/2 inch, so I cut this free-hand on my table saw, as this eliminated any cleanup work with a sander that always comes when using a jigsaw. Yes, you really can cut curves with a table saw, as long as the piece being cut off is thin enough to flex as you move the blade along the curve, so the curve must be rather gentle. Cutting free-hand on a table saw IS Not recommended, but...

These cabinets are nicer than necessary for a CT conversion, but since I have the skills, it's winter with snow is on the ground and both motorcycles are sitting in the garage looking all sad, I might as well turn out a nice end product.
User avatar
professorkx
Teardrop Master
 
Posts: 140
Joined: Wed Nov 12, 2014 4:54 pm
Top

Re: Professors 7x14 Toy Hauler

Postby professorkx » Sun Jan 11, 2015 2:33 pm

hankaye wrote:professorkx, Howdy;

Sure ... the more pix the better :D .
For me, a see and do type the pix are the "nutz" of
the learning experience. They take the written word and
amplify it better than being at a 'Metal' concert.

Thanks again,

hank


Two pictures from under the counter top.

Image

This picture shows a piece of 1/4 inch plywood I used for my spacer when I marked the front edge for cutting.

Image

This is the front edge of the counter from underneath. The 1/4 inch spacer gave me wiggle room when gluing the piece of pine under the edge of the counter, as well as making sure that the counter sticks out a little further than the doors for aesthetics.
User avatar
professorkx
Teardrop Master
 
Posts: 140
Joined: Wed Nov 12, 2014 4:54 pm
Top

Re: Professors 7x14 Toy Hauler

Postby hankaye » Sun Jan 11, 2015 5:37 pm

professorkx, Howdy;

Thanks for the extra pix. helps me organize my thoughts...

hank
Striving for a less complicated life since 1949 ...
Every day I beat my own previous record for number of consecutive days I've stayed alive.
hankaye
2000 Club
2000 Club
 
Posts: 2567
Images: 1
Joined: Thu Dec 06, 2012 5:35 pm
Location: S.W. New Mexico
Top

Re: Professors 7x14 Toy Hauler

Postby professorkx » Sun Jan 11, 2015 9:18 pm

We started our upper cabinets today. We began with the face frame for the cabinets above the stove and sink. Here again, I will need to use my marking gauge to fit the bottom of the cabinet to the front of the trailer, which created a dilemma. My first thought was to use the top of the counter as my guide for building the bottom of the top cabinet section. However, as I have indicated several times, my CT is not square, so this create risk. I would have made this work either way, but kept noodling options.

I really needed a way to put the face frame in place so I could just build the bottom in place. This would also help me find the right position for the piece against the ceiling that would screw to the ceiling supports, onto which I can attach the top of the face frame to hold the cabinets in place.

After pondering this during lunch, I decide to build two rectangular frames that I could attach to the back of the face frame and the wall in the rear. This would allow me to hang the face frame in position and build both the bottom and end of my cabinet.

To start the entire process, I taped a piece of masking paper to the top of the counter and started to lay out the face frame. This would allow me to measure style positions for the doors and small cabinet that will go above the right leg of the counter. The last section will have to built in place, but I wanted to build as much as possible (and paint) in the shop. Here are two photos of the face frame mounted in place with my two rectangular supports.

Image
Picture from the rear of the trailer. Since the side of the roof is curved, the back leg of my rectangle support is only 11 inches long, while the front is 14 3/8 inches long. This eliminated interference with the round edge of the roof, allowed me to screw the rectangular support to the back of the face frame, and left room above the front leg to install my ceiling support. As with most building projects, it's all about the layout before you cut one board.

Image
facing the cabinet from the man door.

After I build the bottom and end of this cabinet, all I have to do is remove 4 screws and the cabinet will come off the wall. Since I will have already installed the wall and ceiling supports, reassembly will be easy, as all I need to do is glue/staple the finished cabinet to the wall and ceiling supports. I will post more pictures of the process to help folks visualize.

We actually built two face frames, the first one was 4 inches closer to the counter. However, when we held it in place, it overwhelmed the kitchen area, so I cut it down and took another look. Without the comparison, this one looks a little too small, but it doesn't overwhelm the space. Trial and error is often the only way to finalize a build of this nature.

By the way, all of these face frames are being built with the pocket jig, and are very simple to build. Honestly, anyone can do this, just make a square you don't plan on keeping and you will learn the right and wrong things to do. For example, screw length is important, as too short and the screws don't bite, too long and the screw end will come out of the face of the cabinet. I use 1 1/4 inch screws for my pocket depth.
User avatar
professorkx
Teardrop Master
 
Posts: 140
Joined: Wed Nov 12, 2014 4:54 pm
Top

Re: Professors 7x14 Toy Hauler

Postby Gonefishin » Sun Jan 11, 2015 9:40 pm

Love the custom carpentry and craftsmanship! Way out of my league, but I'm watching and waiting for the finished masterpiece. Lots going on in a 7X14, and you look to be making the most of it.
User avatar
Gonefishin
Donating Member
 
Posts: 528
Images: 119
Joined: Sat Oct 03, 2009 7:38 pm
Location: NE Utah
Top

Re: Professors 7x14 Toy Hauler

Postby hankaye » Mon Jan 12, 2015 11:47 am

professorkx, Howdy;

Interesting with the cabinets. Looking at the framework this morning, yes had a
cup of coffee already, I have a question perhaps more than one. I understand
about the extension on the right (front), to reach the forward wall, but, then
the supports that mount it to the sidewall appear to be on the inside of the face
an again, appear to be at differing widths inside the openings. How is this going to
affect the interior? Also, it appears that you have it designed for 2 doors that raise
up instead of swinging Right and Left???
Am I way off-base or am I close? Thanks for any and all enlightenment.

Constantly curious,

hank
Striving for a less complicated life since 1949 ...
Every day I beat my own previous record for number of consecutive days I've stayed alive.
hankaye
2000 Club
2000 Club
 
Posts: 2567
Images: 1
Joined: Thu Dec 06, 2012 5:35 pm
Location: S.W. New Mexico
Top

PreviousNext

Return to Cargo Trailer Conversions

Who is online

Users browsing this forum: No registered users and 2 guests