Oversized Off-road Teardrop (Military Themed)

...ask your questions in the appropriate forums BUT document your build here...preferably in a single thread...dates for updates, are appreciated....

Oversized Off-road TD (Military Themed) Design Complete

Postby CMC » Sun Feb 08, 2015 5:09 am

Here is the AC unit box. Has connections on the box and on the front of the trailer. I am looking at getting an American flag (3'x5') made with the same colors and put it on a pole attached to the trailer.
Image

Here is the roof rack which is being custom made for the trailer as well as my jeep. It will hold the awning boxes, ammo boxes, solar panels, and spare tire. I have 4 ammo boxes that will be placed on the rack. 1 will hold my water hose, 1 will hold the electrical cable, and the other 2 will hold everything to connect the solar panels. Along with all that I have 4 32" light bars that will be placed on all sides and 1 will be placed on the jeep rack as well. 16 strobe lights will be placed on the rack (4 each side) that are red and white. I have these on for worse case scenario when I am in the middle of no where. I want to be able to be seen if in an emergency. I know its over kill but my families life is worth so much more.
The roof rack on the jeep will have the hilift jack as well as other gear for climbing, repelling, hiking, and fishing.
Image

Here is the awning and side tent for when its just my wife and I camping. Its plenty big to be able to change in. the awning will connect to the trailer with the edge molding that has the awning attachment. Then in the corners I will have a pole with a rope that will tie into a stake to keep it up.
Image
Image

And when we have the kids I have found the perfect sleeping arrangement. It is a bunk bed cot which you can get at Cabela's or online. fits perfectly and when not using to sleep it can be made into a little couch for sitting. I will have one on each side. I also will enclose the awning area for them. It will be just like tent camping for them but more luxurious with a cot. haha.
Image
Image

I also am looking at making a tent that will cover the hatch area and connect to each side of the awning so that I have a complete tent around the sides and back of the trailer. I want to do that just in case of bad weather but I have to figure that one out some more.

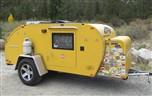
Here is what it looks like completed with the camp sign already in place.
Image

And here is what it looks like with the hatch up and complete awning in place.
Image
Finally the build has started. Oversized Off-road Benroy (Military Themed)
CMC
Teardrop Advisor
 
Posts: 66
Images: 0
Joined: Wed Jun 19, 2013 7:12 pm
Location: Fort Worth, TX

Re: Oversized Off-road Teardrop (Military Themed)

Postby CMC » Sun Feb 08, 2015 1:00 pm

Now after looking around for aluminum I don't know exactly how I will skin the trailer. I have seen 4x8 and 5x10 sheets but I really wanted to be able to do a 1 piece side. So I have looked all around to find a sheet that is long enough with no luck at all. So I guess the next way would be to fiberglass. I have talked to a couple places that fiberglass and the cost is pretty high. So now I guess I have to learn how to do it my self. This will be an interesting process.

Now for an update. I am in the process of leveling out the trailer for the build. I have taken the fenders off and next will be to make stands to go under the frame. I will also be taking off the wheels/tires so that I can place it about 12" off the ground instead of the 18" (I think) that it is now.

If anyone has any ideas on skinning the trailer I am up for comments.

Here is how the trailer sits currently. Sorry for the messy garage. Having to move things around and getting rid of others. You can see how the fenders are off and it is starting to be level. I just want it lower to the ground and a more sturdy platform.

Image

Image
Finally the build has started. Oversized Off-road Benroy (Military Themed)
CMC
Teardrop Advisor
 
Posts: 66
Images: 0
Joined: Wed Jun 19, 2013 7:12 pm
Location: Fort Worth, TX

Re: Oversized Off-road Teardrop (Military Themed)

Postby dales133 » Sun Feb 08, 2015 4:20 pm

Looks good and similar to mine in concept but larger.
Some great design work there I wish I had your talents.
Have you considered canvas over ply and painted?
Would be a good option for you.
User avatar
dales133
4000 Club
4000 Club
 
Posts: 4605
Images: 1
Joined: Mon Oct 13, 2014 5:26 pm
Top

Re: Oversized Off-road Teardrop (Military Themed)

Postby CMC » Mon Feb 09, 2015 4:13 am

dales133 wrote:Looks good and similar to mine in concept but larger.
Some great design work there I wish I had your talents.
Have you considered canvas over ply and painted?
Would be a good option for you.


Thank you for the kind words. I'm not sure about talented. I have been using sketchup for the past 2 years and watched a lot of youtube for tips and tricks. I still have a lot to learn. But again thank you.

I have thought about the canvas but my wife and I are wanting a smooth surface and with all the canvas trailers I have seen they aren't. That is why I am thinking that I might have to just do fiberglass. I would go filon but that is way to expensive. Plus we want something that will hold up to the off pavement travel. I do appreciate the idea though.

Curtis
Finally the build has started. Oversized Off-road Benroy (Military Themed)
CMC
Teardrop Advisor
 
Posts: 66
Images: 0
Joined: Wed Jun 19, 2013 7:12 pm
Location: Fort Worth, TX
Top

Re: Oversized Off-road Teardrop (Military Themed)

Postby dales133 » Mon Feb 09, 2015 5:24 am

It realy depends on the canvas I'd imagine.i got some samples of so expensive super fine we've stuff and I'd recon sanding between coats it would have the faintest texture.id remind your Mrs if it wasn't for canvas there would be no military... anywhere
User avatar
dales133
4000 Club
4000 Club
 
Posts: 4605
Images: 1
Joined: Mon Oct 13, 2014 5:26 pm
Top

Re: Oversized Off-road Teardrop (Military Themed)

Postby KCStudly » Mon Feb 09, 2015 7:54 am

Filling glass weave is as much work and more expensive than using a high build primer and paint on canvas. Not to mention more hazardous. (Well, I guess I mentioned it. ;) )

I like the knife block idea. I wonder if there is a way to fit it without having to hold so much of the shelf back there, like on the spice rack side where it is over/under. :thinking:

Do you plan to have all of these details sorted out and built before you start using it, or will some of them trickle into the build with use? On my build I find the details take a lot of time but I like the idea of doing the work when it makes the most sense, when access is easiest.

Have you thought about just skinning under the frame and eliminating all of the extra complexity and weight that all of that extra 1/2 ply and framing will bring? Seems like an awful lot of wood and complication for an under basement panel, essentially just for insulated storage. :thinking:
KC
My Build: The Poet Creek Express Hybrid Foamie

Poet Creek Or Bust
Engineering the TLAR way - "That Looks About Right"
TnTTT ORIGINAL 200A LANTERN CLUB = "The 200A Gang"
Green Lantern Corpsmen
User avatar
KCStudly
Donating Member
 
Posts: 9640
Images: 8169
Joined: Mon Feb 06, 2012 10:18 pm
Location: Southeastern CT, USA
Top

Re: Oversized Off-road Teardrop (Military Themed)

Postby titanpat57 » Mon Feb 09, 2015 3:51 pm

I like the sheer footprint...I'm big into the "add a tent/canopy" to increase your camping area...especially in foul weather. Does the plan include pitching the roofs for water run-off?

I'm not sure how I feel about 1/2" plywood exposed on the bottom (unless I missed something). I think I would skin it with 1/8" aluminum...sealed against the weather (towing in a driving rain at 65mph can push water in places you can't imagine). I used 1" blue foam then screwed 3/4" over the entire thing. I used an exterior glue plywood, in the event of a leak. Birch looks good no doubt, but I'd be concerned what would happen to it exposed to any moisture. All seals should be rubber bulb type..no foam. I used foam on my hatch, and although it finally kept the water out, it came back to bite me by holding moisture, and rotting out the edges of the birch. I would seal every edge grain with a good sealer to prevent any moisture wicking.

They have the FRP in rolls now. Outside of the shear size of the piece, and the inherent handling of a piece that size, lots of trailers using it. Think "no" seams...more seams mean more leaks, and just allows water to be driven in. https://www.factoryrvsurplus.com/catego ... ory_id=164

If your looking for LED floods, check out the OPT7 over on Amazon...great price point, nice quality, and damn bright. I just put a 30" on the roof rack of the truck and love it. At $160 bucks it was a no brainer.

Don't forget lots of USB and 12v ports inside and outside. The nicest 12v weatherproof ports I found were over at Cycle Gear http://www.cyclegear.com/TRACKSIDE-12-V ... er-Adapter

I really admire the amount of thought and planning that has gone into this design. The attention to detail is exceptional.
titanpat57
Donating Member
 
Posts: 82
Images: 139
Joined: Mon Jan 10, 2011 9:48 pm
Location: Beacon NY
Top

Re: Oversized Off-road Teardrop (Military Themed)

Postby CMC » Mon Feb 09, 2015 7:18 pm

dales133 wrote:It realy depends on the canvas I'd imagine.i got some samples of so expensive super fine we've stuff and I'd recon sanding between coats it would have the faintest texture.id remind your Mrs if it wasn't for canvas there would be no military... anywhere


Well after talking with the wife we are still trying to sort it out. The biggest reason she did not like the canvas is how it looked then others used it. She didn't like all the overhang and wanted it to look smooth. So it is still in the list of skinning options.

Curtis
Finally the build has started. Oversized Off-road Benroy (Military Themed)
CMC
Teardrop Advisor
 
Posts: 66
Images: 0
Joined: Wed Jun 19, 2013 7:12 pm
Location: Fort Worth, TX
Top

Re: Oversized Off-road Teardrop (Military Themed)

Postby CMC » Mon Feb 09, 2015 7:18 pm

KCStudly wrote:Filling glass weave is as much work and more expensive than using a high build primer and paint on canvas. Not to mention more hazardous. (Well, I guess I mentioned it. ;)

I agree glass isn't the best to work with but it does look good. The only worry I have is cracking while off-road.

KCStudly wrote:I like the knife block idea. I wonder if there is a way to fit it without having to hold so much of the shelf back there, like on the spice rack side where it is over/under. :thinking:

With the knife block I tried several ways but a few things made it hard to have it look like the spice rack.
-Due to size of knife and blade they would not fit horizontally.
-Don't want to have the knife slide out and lock us out of that cabinet
-Needed room for the latch that will be on the doors (the pull to open latch)

KCStudly wrote:Do you plan to have all of these details sorted out and built before you start using it, or will some of them trickle into the build with use? On my build I find the details take a lot of time but I like the idea of doing the work when it makes the most sense, when access is easiest.

Now with all the little details I think I will start the build and decide on each detail as it comes to play.

KCStudly wrote:Have you thought about just skinning under the frame and eliminating all of the extra complexity and weight that all of that extra 1/2 ply and framing will bring? Seems like an awful lot of wood and complication for an under basement panel, essentially just for insulated storage. :thinking:

Actually I have thought about just that the past few days. After looking at the trailer and all the welds and parts I am starting to think it will be too much and cause a big headache. I know the trailer is rated for 7000Lbs but I really am looking for ways with weight reduction and that is one of the reductions I really am considering. If I do the floor like I planned, that part of the floor would weigh close to 300Lbs not counting the insulation. Now if I just have the floor with out the addition of the insulation panels my calculations would have the floor roughly 120Lbs. It looks like a no brainier but I also want to make sure that it doesn't get to cold if we decide to camp during the winter months. But thank you for bringing that up. It helps knowing I am not the only one that had that thought.

Now if I delete that part I have to figure another way of securing the floor. I have 3 ways I am looking at doing it.
1. Self tapping screws into the frame. I am not sure how well that would work.
2. drill and thread areas of the frame I want to screw a bolt to attach the floor.
3. Make brackets (like an "L" shape). Drill and thread into the sides of the cross members and secure the bracket to the frame. Then I would use carriage bolts through the floor and bracket.

So now it is time to figure which way would be best. :thinking:

Curtis
Last edited by CMC on Mon Feb 09, 2015 7:53 pm, edited 1 time in total.
Finally the build has started. Oversized Off-road Benroy (Military Themed)
CMC
Teardrop Advisor
 
Posts: 66
Images: 0
Joined: Wed Jun 19, 2013 7:12 pm
Location: Fort Worth, TX
Top

Re: Oversized Off-road Teardrop (Military Themed)

Postby CMC » Mon Feb 09, 2015 7:47 pm

titanpat57 wrote:I like the sheer footprint...I'm big into the "add a tent/canopy" to increase your camping area...especially in foul weather. Does the plan include pitching the roofs for water run-off?
Thank you, I do appreciate it. I wanted to build it so that my wife and I could take it out whenever but also have it to where we would not have to bring tents when we have the kids come. The final product will have pitched roofs, just was giving me problems when designing. I am also looking at making a covering for the rear hatch and both sides of the hatch for bad weather. I am wanting to make that part box each side of the hatch as well as cover the hatch for better protection.

titanpat57 wrote:I'm not sure how I feel about 1/2" plywood exposed on the bottom (unless I missed something). I think I would skin it with 1/8" aluminum...sealed against the weather (towing in a driving rain at 65mph can push water in places you can't imagine). I used 1" blue foam then screwed 3/4" over the entire thing. I used an exterior glue plywood, in the event of a leak. Birch looks good no doubt, but I'd be concerned what would happen to it exposed to any moisture. All seals should be rubber bulb type..no foam. I used foam on my hatch, and although it finally kept the water out, it came back to bite me by holding moisture, and rotting out the edges of the birch. I would seal every edge grain with a good sealer to prevent any moisture wicking.

I know the design shows that the birch is bare but it will not be exposed. I have been looking at ways to completely seal the bottom. I know wood seal would work but I want more than just that. I really don't want to put the tar stuff on it especially with the temps we get here. I have looked around and have several ideas but the top 2 right now are:
-aluminum skin (just like you offered)
-bed liner which I have been looking into Monstaliner (have been told that rhino and line-x will peel off)

What ever I use I will be sealing everything the best ways I find. I was even thinking of adding a silicon sealer between any part the wood touches the frame.


[titanpat57]They have the FRP in rolls now. Outside of the shear size of the piece, and the inherent handling of a piece that size, lots of trailers using it. Think "no" seams...more seams mean more leaks, and just allows water to be driven in. https://www.factoryrvsurplus.com/catego ... ory_id=164

Thank you for the link, I will have to do some more research on FRP. I keep hearing more and more about it so it is a possibility.

[titanpat57]If your looking for LED floods, check out the OPT7 over on Amazon...great price point, nice quality, and damn bright. I just put a 30" on the roof rack of the truck and love it. At $160 bucks it was a no brainer.[/quote]
I have been looking around and haven't decided exactly which ones I will be using. Again I will look into the one you are using. I would love to have Rigid lights but its to expensive for my wallet. I have seen some on amazon that are around $100 made by Eyourlife. Have read about condensation gets inside but a lot of the reviews state that if you seal around the glass and the ends where the screws bracket and electrical connection then the condensation doesn't happen.

[titanpat57]Don't forget lots of USB and 12v ports inside and outside. The nicest 12v weatherproof ports I found were over at Cycle Gear http://www.cyclegear.com/TRACKSIDE-12-V ... er-Adapter[/quote]
I plan on placing as many as possible since 12v will be the primary power source. I believe I have a total of 6 in the design but I have found places that I can place extras. Now just finding a place for a radio and speakers in the galley. Thanks for the link, I like the waterproofing for the galley application. I just would have to clip off the ends to run it how I want instead of straight to the battery.

[titanpat57]I really admire the amount of thought and planning that has gone into this design. The attention to detail is exceptional.[/quote]
Again thank you. I have tried to think of as much as possible before jumping into building. I know if I just jumped into the build I would complete something that I wasn't 100% proud of. At least this way I am not going at it blind and I have thought of utilizing as much space as possible. The road that I have taken to get to this point has been long but so far worth every part. I started the design over 1 1/2 years ago. If you saw the first design to the present, this trailer has transformed in many ways. At first I was going to do a single axle but with the length it would of been difficult. I was not sure of doing a tandem axle with the tear drop style until I saw a picture of one and placed it on my design. Once I did that my wife and I knew that is how it was suppose to be and looked good. Again thank you for all your input.

Curtis
Finally the build has started. Oversized Off-road Benroy (Military Themed)
CMC
Teardrop Advisor
 
Posts: 66
Images: 0
Joined: Wed Jun 19, 2013 7:12 pm
Location: Fort Worth, TX
Top

Re: Oversized Off-road Teardrop (Military Themed)

Postby CMC » Mon Feb 09, 2015 8:03 pm

Thought I would bring up something for discussion since I will be doing it very soon. I need to "stretch" the plywood for the floor. I know many have overcome this but I am trying to figure which way would be best for my case. I will be using 3 birch 1/2" plywood pieces (5'x5') to make the floor. I have seen many methods including splicing, half lap joint , scarf joint, and using biscuits to join the wood together. What do you think would be the best way to "stretch" the plywood. I do have a biscuit cutter and will be getting a router very soon.

On a side note, what router would you recommend to use. I have been looking at the variable speed bosh router with both the plunger and the fixed base. Here is a link to it which I just noticed that it is on sale.
http://www.lowes.com/pd_136633-353-1617 ... facetInfo=

Thanks
Curtis
Finally the build has started. Oversized Off-road Benroy (Military Themed)
CMC
Teardrop Advisor
 
Posts: 66
Images: 0
Joined: Wed Jun 19, 2013 7:12 pm
Location: Fort Worth, TX
Top

Re: Oversized Off-road Teardrop (Military Themed)

Postby titanpat57 » Mon Feb 09, 2015 8:54 pm

CMC wrote:Thought I would bring up something for discussion since I will be doing it very soon. I need to "stretch" the plywood for the floor. I know many have overcome this but I am trying to figure which way would be best for my case. I will be using 3 birch 1/2" plywood pieces (5'x5') to make the floor. I have seen many methods including splicing, half lap joint , scarf joint, and using biscuits to join the wood together. What do you think would be the best way to "stretch" the plywood. I do have a biscuit cutter and will be getting a router very soon.

Think "boat building" joints...I think I'd do a half lap epoxyied together and either fasten with brads or predrilled screws.

On a side note, what router would you recommend to use. I have been looking at the variable speed bosh router with both the plunger and the fixed base. Here is a link to it which I just noticed that it is on sale.
http://www.lowes.com/pd_136633-353-1617 ... facetInfo=

Thanks
Curtis


I have that router for quite awhile now. I rarely use the fixed base because the plunge base is so versitle. The only part that has given me any problem was the collet...keep it away from moisture. The soft start is probably the nicest feature. I had a 2hp Hitachi that you had to have the neighbor come over and hang on to when you started.

Just an FYI on those Opt 7's...I tightend all the screws prior to mounting, and so far so good. I put a pair of 10" on the ARB bumper in the front, and the 30" on the roof. After about 3 months, and about a 90 mile round trip to work everyday, they seem to be ok. The Eyourlife had great reviews as well.
titanpat57
Donating Member
 
Posts: 82
Images: 139
Joined: Mon Jan 10, 2011 9:48 pm
Location: Beacon NY
Top

Re: Oversized Off-road Teardrop (Military Themed)

Postby CMC » Thu Feb 12, 2015 10:23 pm

So I planned on starting the floor today but things did not go my way. I decided not to do the insulation and framing under the floor due to weight and how complex it was. So I had to figure a new plan connecting the floor to the frame. I did not have any mounting tabs or anything to use. So my options were to just drill and tap screws into the wood and crossbeams or find a way to attach mounting points. I really did not want to drill into the crossbeams since I was not sure if the screws would hold the load or how the different metals would act toward each other. So that left me with figuring out the mounting tab idea. I was looking for a type of bracket that would surround 3 sides of the crossbeam and then attach to the floor. Well I wasn't having any luck finding that so I called metal fab shops. They really are happy with the work they do. :shock: I was quoted several hundred dollars to fab the mount but even then I didn't know if it was possible even with that bracket to stop from having side to side movement. So I started to think of other options. :thinking: Then it hit me, I called the shop I had my trailer built and told them what I needed. They told me to bring my trailer and they would fab some mounting tabs and weld them to the frame. :D So instead of getting what I wanted accomplished my trailer is now in the shop to have mounting tabs placed. At least I will have it within a week. The crew at the shop are some great guys and may I mention fast. If anyone builds a TD around here and needs a trailer made, they need to have these guys do it.

So since I couldn't work on the trailer today I made a stand to hold my plywood and lumber to help keep it organized and out of the way. I also had some time to browse other builds on this site. WOW, I have seen some really good work. So good I have made another design change on mine. It isn't much but it will help out a lot. With out rambling on here are some new pictures of the design. The design change was to the rear cabinets.

This is how the old cabinets looked.
Image

And here is the new design. As you can see, the TV is no longer there and I have added more cabinets to the lower portion. All 3 lower cabinets open up into the basement. I also have a 120v outlet in each one and the power center is still in the same place just inside the cabinet now. By doing that it is no longer an eye sore.
Image

Also one change was the rails I added to the driver and passenger wall. Here is why. Now if I take my youngest with my wife and I he can sleep inside with us. I recessed the switches and cb/scanner back so that if I have my youngest he doesn't roll over and start to hit all of them. I wish I could remember what build gave me the idea of placing the bunk so that I could give them credit. I just need to place legs underneath for support. The legs will fold out from the bunk frame so that it will be easier to use.
Image

I still wanted to have the TV but with the bunk I wasn't sure how I would protect it if using the bunk. After a lot of brainstorming I came up with this. its a frame to house the tv.
Image

And when I want to use the TV I just slide it out and now I can watch the TV.
Image

So now its back to work for me and hopefully I can start to place the floor this next week.

Curtis
Finally the build has started. Oversized Off-road Benroy (Military Themed)
CMC
Teardrop Advisor
 
Posts: 66
Images: 0
Joined: Wed Jun 19, 2013 7:12 pm
Location: Fort Worth, TX
Top

Re: Oversized Off-road Teardrop (Military Themed)

Postby kayakdlk » Fri Feb 13, 2015 9:00 am

For floor mounting I used 1/8" thick 2" angle iron. I cut off several a 2" pieces, drilled 1/2" hole and welded on as tab. I use about 8 on my floor. I then used elevator bolts which are flat on top to mount the floor. I buried the heads them slightly into the wood floor for a flush fit and filled the holes with epoxy to seal them.

Dan
User avatar
kayakdlk
Platinum Donating Member
 
Posts: 310
Images: 392
Joined: Wed Jun 27, 2012 9:02 pm
Location: Foothills of Colorado
Top

Re: Oversized Off-road Teardrop (Military Themed)

Postby CMC » Fri Feb 13, 2015 7:10 pm

kayakdlk wrote:For floor mounting I used 1/8" thick 2" angle iron. I cut off several a 2" pieces, drilled 1/2" hole and welded on as tab. I use about 8 on my floor. I then used elevator bolts which are flat on top to mount the floor. I buried the heads them slightly into the wood floor for a flush fit and filled the holes with epoxy to seal them.

Dan


Thanks for the input. The guys that built the trailer are going to use 2"x3" angle for the tabs. After talking with them each tab will be 2-4" long and welded to 3 places on almost all crossbeams. After they weld them on then they will repaint with the 2 part epoxy paint used in the oil field. I have been looking at the elevator bolts as well as carriage bolts. I like the elevator bolts because I can recess them and make a flush fit, better than the carriage bolts. Well after writing this I think I have come to the conclusion that I will be using elevator bolts. I have it set for 5/16 bolts to be used. I believe after talking with the trailer manufacture that the bolt will be plenty big enough to secure the deck to the frame.
Finally the build has started. Oversized Off-road Benroy (Military Themed)
CMC
Teardrop Advisor
 
Posts: 66
Images: 0
Joined: Wed Jun 19, 2013 7:12 pm
Location: Fort Worth, TX
Top

PreviousNext

Return to Build Journals

Who is online

Users browsing this forum: No registered users and 19 guests