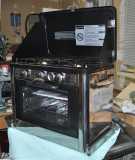
Need to get some more wood, so I took a break & worked on the stove installation today. I got a Camp Chef 2 burner stove top with the bottom oven. Took off the 2 side carry handles & rubber feet it sits on, since they're just a waste of space. I don't want to run the oven with it sitting in the cabinet base, so it's being mounted on full extension drawer guides. I don't mind cooking on the stove (set in the counter), but I'm concerned about heat from the oven in a confined area, so it needs to track out for pizza, bread, sticky buns or cookies to vent properly.
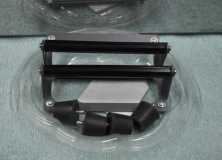
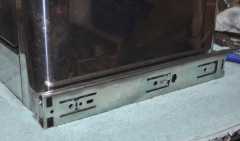
Next made a couple of aluminum angles. These took a bit of work & thinking. I decided to drill out for the existing round-head screws which attach the stove bottom to the sides & avoid using them for a mount since they're so small. Instead I used #8-32 flat head machine screws to fasten up from the bottom and attach the aluminum angle to the stove. There are 4 screws on each angle from the bottom, drilled & tapped holding the angle in place, along with some blue lock-tite since it's just tapped into sheet metal. With the weight of the stove pushing down into the angles, it should work fine and be strong enough.
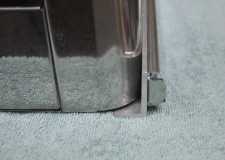
Here's the angle looking at the lower right corner, where it fits against the stove. The aluminum is a bit heavier than necessary, but I'm using up what I have as I go.
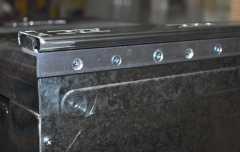
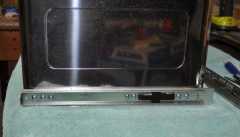
The inner drawer guide is fastened through the aluminum angle & into the stainless steel sheet metal with 7 round head #8-32 machine screws & blue lock-tite per side. Hopefully that's enough to hold the stove in place (total of 14 screws in shear when we're driving down the road or about 2.5# per #8 screw into the sides, 35# stove). Biggest concern is on bumpy roads and lots of rocks & ruts. Will have to see how it holds up over time, but so far so good. It works just fine sitting on the bench. These are 100# guides, since that's all I had access to from a local supplier. I guess I could always make some wood or aluminum shims to set under the stove, to keep it from working loose and hopping up & down from the bumps. Will have to think about that one a bit. (After edit: The stove is still as good as new after 20,000 miles of towing)
Finally, here's the right side guide assembled & attached to the stove. It slides very easily, so I'm happy with the way it's going. The stove is 12" deep from front to back, so it will have a cut-out in the counter to nest in and stow while travelling.
I'll do the same type of thing for the ice chest, only it will be a regular drawer body made from 1/2" baltic birch. It sits under the counter (no cut-out), so I have enough room to prepare meals & work. Once I have both things made & working, I'll think about the small, narrow center section which goes from the floor to the counter & acts as a partition between the stove & cooler to mount the guides. I don't want to do a layout & rely on a tape measure, rather have the assemblies made first, then build the center pull-out section to fit (safer that way). The center drawer will be pretty narrow, but it will hold something, so no wasted space.
Back to work tomorrow, ugh!


 I will be following your build for some ideas as well.