The Poet Creek Express - Foamie Hybrid

Canvas covered foamies (Thrifty Alternatives...)

Moderator: eaglesdare

Re: The Poet Creek Express - Foamie Hybrid

Postby KCStudly » Thu Jun 11, 2015 8:33 am

NO!

The 3M77 will eat foam as it is solvent based. Is that the stuff your RC buddies had trouble with?

The stuff I used is what is shown in the picture, water based 3M 30-NF Green. This stuff is more or less dry when you stick it together.
Last edited by KCStudly on Sat Jun 13, 2015 11:45 pm, edited 1 time in total.
KC
My Build: The Poet Creek Express Hybrid Foamie

Poet Creek Or Bust
Engineering the TLAR way - "That Looks About Right"
TnTTT ORIGINAL 200A LANTERN CLUB = "The 200A Gang"
Green Lantern Corpsmen
User avatar
KCStudly
Donating Member
 
Posts: 9640
Images: 8169
Joined: Mon Feb 06, 2012 10:18 pm
Location: Southeastern CT, USA

Re: The Poet Creek Express - Foamie Hybrid

Postby Wolffarmer » Thu Jun 11, 2015 8:50 am

I think it was Linuxmaxx ( or something like that ) out of Round Rock TX that used that 3M stuff.
"these guys must be afraid of the dark"
User avatar
Wolffarmer
Donating Member
 
Posts: 4612
Images: 309
Joined: Wed May 02, 2007 1:32 pm
Location: Idaho Rupert

Re: The Poet Creek Express - Foamie Hybrid

Postby KCStudly » Thu Jun 11, 2015 8:55 am

Yup. Way back early in the build he suggested it, and I used it for (at least) one of my wall inner skins and the bulkhead.

I might just have enough in the jug to finish the roof off. I will prioritize the curved parts and see if it lasts, otherwise I can still use the PL3 for the small flatter roof fill-ins.
KC
My Build: The Poet Creek Express Hybrid Foamie

Poet Creek Or Bust
Engineering the TLAR way - "That Looks About Right"
TnTTT ORIGINAL 200A LANTERN CLUB = "The 200A Gang"
Green Lantern Corpsmen
User avatar
KCStudly
Donating Member
 
Posts: 9640
Images: 8169
Joined: Mon Feb 06, 2012 10:18 pm
Location: Southeastern CT, USA
Top

Re: The Poet Creek Express - Foamie Hybrid

Postby GPW » Thu Jun 11, 2015 9:31 am

Oh Cool .... sorry to be an alarmist .... just after all that work and all ...don’t want anything to (your word here) Up now eh ? :thinking:
There’s no place like Foam !
User avatar
GPW
Gold Donating Member
 
Posts: 14920
Images: 546
Joined: Thu Feb 09, 2006 7:58 pm
Location: New Orleans
Top

Re: The Poet Creek Express - Foamie Hybrid

Postby Mary C » Thu Jun 11, 2015 10:20 am

wow, you almost gave me a heart attack, don't want you to cause yourself a real problem later, use the proven stuff, glad the guyes clarified the type. it is looking food, I wish I had the patience you have, I had to hurry up and finish mine.

Mary C.
User avatar
Mary C
1000 Club
1000 Club
 
Posts: 1776
Images: 473
Joined: Mon Oct 15, 2012 6:29 pm
Location: Waco, Georgia
Top

Re: The Poet Creek Express - Foamie Hybrid

Postby KCStudly » Thu Jun 11, 2015 10:30 am

I wish I had the patience I have, too. :?

Sometimes it is a struggle and I get a little discouraged, but for me it is as much a journey as it is a destination. Doing something creative with my mind and hands keeps me engaged, almost happy. :D
KC
My Build: The Poet Creek Express Hybrid Foamie

Poet Creek Or Bust
Engineering the TLAR way - "That Looks About Right"
TnTTT ORIGINAL 200A LANTERN CLUB = "The 200A Gang"
Green Lantern Corpsmen
User avatar
KCStudly
Donating Member
 
Posts: 9640
Images: 8169
Joined: Mon Feb 06, 2012 10:18 pm
Location: Southeastern CT, USA
Top

Re: The Poet Creek Express - Foamie Hybrid

Postby Fred Trout » Thu Jun 11, 2015 11:56 am

Doing something creative with my mind and hands keeps me engaged, almost happy. :D


And that's what it's all about and has been for a while:

"that they are endowed by their Creator with certain unalienable rights; that among these are life, liberty, and the pursuit of happiness."
Thomas Jefferson

You notice that you only get the right to pursue, and actually getting it is something else entirely :lol:
User avatar
Fred Trout
The 300 Club
 
Posts: 396
Joined: Fri May 08, 2015 4:30 pm
Location: SW Montana
Top

Re: The Poet Creek Express - Foamie Hybrid

Postby KCStudly » Fri Jun 12, 2015 10:11 pm

I’m not sure, but I may have developed a new technique for working with foam. Chinking, yes chinking like how you would pack the spaces between logs in a log cabin. I guess it isn’t really a new concept; you can buy foam backing rod at any hardware store in the weather stripping aisle, but I was still pretty pleased with myself for finding a solution to my little problem.

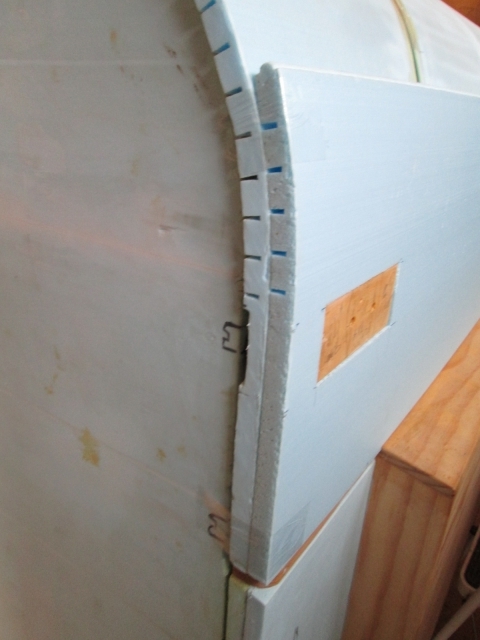
You may recall that when I stuck the first layer of foam on the front roof using the stretcher method it pulled up away from the street side “sparette” (where my rock guards will eventually be attached).
Image

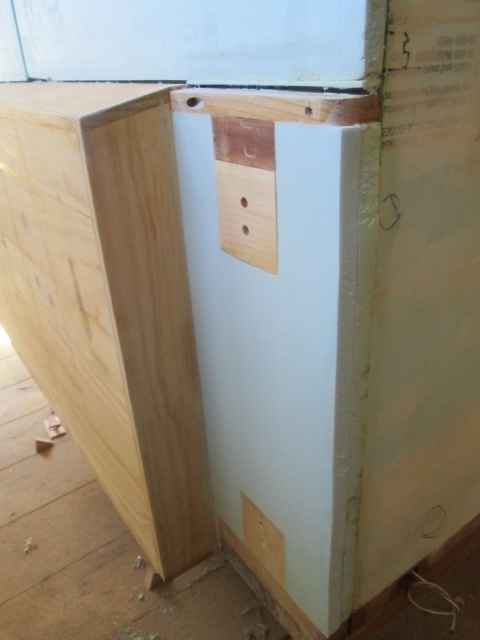
This has been bugging me. My reasoning is that if water were to get in under the canvas it might likely find a way to settle on this ledge. It didn’t make sense to try to carve this back enough to glue a new strip in, and there was some uneven globs of dried PL3 in the gap that would make sliding a sliver in there difficult. Plus the gap was large enough that more PL3 would not bridge it, and it shrinks some as it dries. GS was an option, but I wasn’t confident that I could get it in the narrow areas. I haven't yet mastered its application (be it getting an even application or not making a mess) and it always seems to be hit and miss for me on fairing the stuff back. Either I open up bubble pockets or gouge the surrounding foam when I try to sand it back fair.

Karl had more or less convinced me to just let it be and I had planned to just seal the gap at the side wall end once the next piece of foam went on. So I started dry fitting the next piece here. The locker bump out sits about 3/16 above the sparettes (accounting for the radius on the locker corners) so I had to shave a long thin notch in the bottom of this piece. I did that using the aluminum straight edge and the steak knife, which resulted in a nice thin drop piece of foam. Hmm, maybe I can fit a piece that small in the gap.

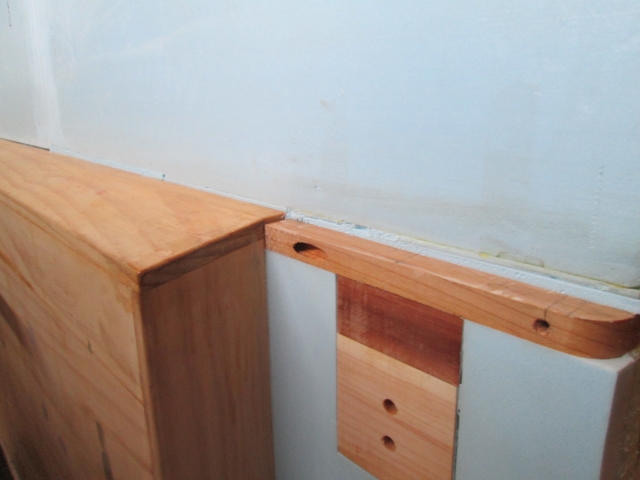
So I switched gears and started shaving little wedge shaped strips, but the dried PL3 hung them up when I tried to slide them in. Hmm, got a little block of wood to spread the load out some and my little mallet. Using the block of wood like a wide punch and tapping with the the mallet, I was able to pack the gap pretty well. Whatever was left out I just trimmed neatly with the steak knife. No glue or adhesive, no mess, and no sanding gouges. Basically I have a sound base so that when I stick the next piece down the adhesive will seal any minute gaps that remain.
Image

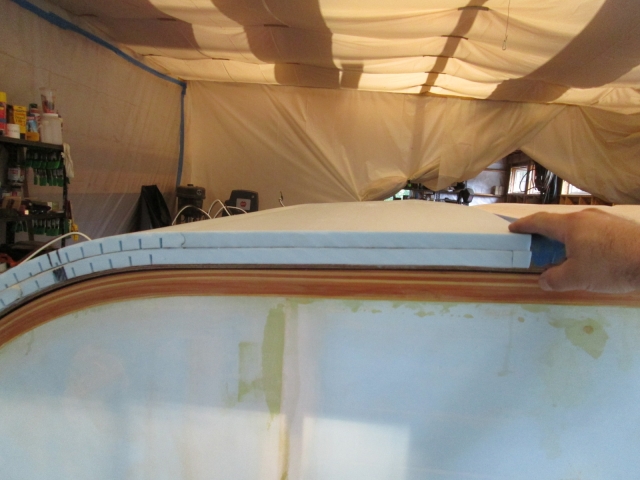
Here is the second layer piece fit over the locker and cut out around the axe head mount blocking.
Image

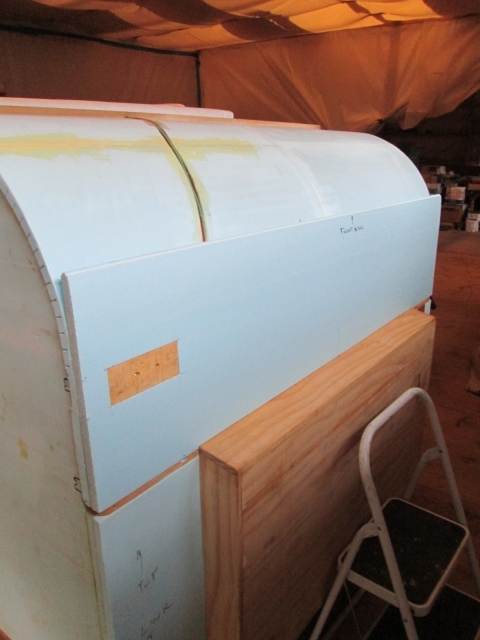
And another shot after kerfing the top portion; still just dry fit with a little packing tape to hold it to the curve.
Image

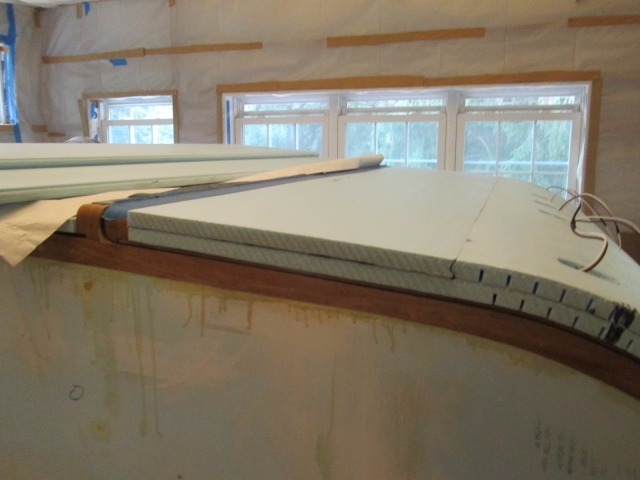
Backing up a little, yesterday I cut the last piece of foam for the top of the hatch. No kerfs needed since it is up on the flatter part of the hatch. It fit just about perfectly on the curb side, but I would have to taper the top edge about 1/8 inch over its length to get it to drop in along the full length of the hinge spar.
Image

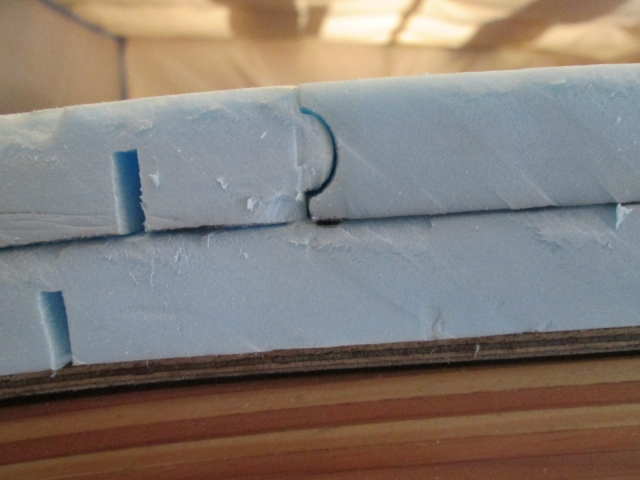
Here’s the factory bead and cove joint along the lower edge of this same panel, still just dry fit.
Image

So tonight I used the same technique with the steak knife and aluminum straight edge to slice a thin wedge. Then just a few strokes with the sanding block, some more test fits, repeat, and she fits like a glove.
Image

Back to yesterday, I ripped the flattened cove edge off of the stock for the 2nd layer at the upper front radius; kerfed it with fewer shallow kerfs near the top and more deeper kerfs over the tighter radius; and dry fit it.
Image

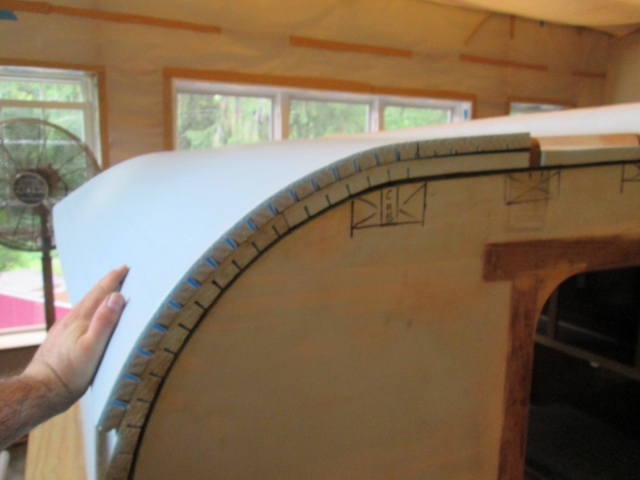
I wanted to start the 2nd layer at the larger top piece to offset the foam seams, figuring that I would cut the lower panel to suit once the top one was stuck down, but then I realized that it would be easier to fit and stick the lower piece first because of the details at the locker and axe mount. So I ripped that lower piece about 1/4 inch wider, figuring that it will give me the margin I need to recut the top edge of this upper piece.

Fortunately the drops off of the lower front and hatch upper panels are just a little wider than a couple of the roof bays, so those will be put to good use, too. In fact it’s looking like I will have several of the 2ft x 64+ inch panels left over.

Not sure how much I will get done tomorrow. Yvette is going to cut my hair and the lawn is up to my knees; need to do spring maintenance on the mower and string trimmer, too.
KC
My Build: The Poet Creek Express Hybrid Foamie

Poet Creek Or Bust
Engineering the TLAR way - "That Looks About Right"
TnTTT ORIGINAL 200A LANTERN CLUB = "The 200A Gang"
Green Lantern Corpsmen
User avatar
KCStudly
Donating Member
 
Posts: 9640
Images: 8169
Joined: Mon Feb 06, 2012 10:18 pm
Location: Southeastern CT, USA
Top

Re: The Poet Creek Express - Foamie Hybrid

Postby GPW » Sat Jun 13, 2015 9:01 am

RE: “Chinking “ .... great idea eh !!!! :thumbsup: :applause:
There’s no place like Foam !
User avatar
GPW
Gold Donating Member
 
Posts: 14920
Images: 546
Joined: Thu Feb 09, 2006 7:58 pm
Location: New Orleans
Top

Re: The Poet Creek Express - Foamie Hybrid

Postby Fred Trout » Sat Jun 13, 2015 12:17 pm

Your basic variant on filling the wiring router slots with foam. Worked for me :applause:
User avatar
Fred Trout
The 300 Club
 
Posts: 396
Joined: Fri May 08, 2015 4:30 pm
Location: SW Montana
Top

Re: The Poet Creek Express - Foamie Hybrid

Postby Fred Trout » Sat Jun 13, 2015 5:29 pm

Edit: Please excuse -- posted my progress in wrong thread, meant to post pic of filling in routed channel & window with foam only.

added finished spackle & fairing shot.
Attachments
Filled & finished routed wiring channel.jpg
Almost disappears when finished
Filled & finished routed wiring channel.jpg (73.65 KiB) Viewed 1314 times
Foam filler inserts.jpg
Foam inserts so that the canvas will cover the window cutout right to the protruding window edge
Foam filler inserts.jpg (115.93 KiB) Viewed 1381 times
Rear roof section inside view.jpg
Filled the wiring channels and edges of roof dado with foam insert after running the wires.
Rear roof section inside view.jpg (77.39 KiB) Viewed 1381 times
Last edited by Fred Trout on Sun Jun 14, 2015 11:37 am, edited 2 times in total.
User avatar
Fred Trout
The 300 Club
 
Posts: 396
Joined: Fri May 08, 2015 4:30 pm
Location: SW Montana
Top

Re: The Poet Creek Express - Foamie Hybrid

Postby KCStudly » Sat Jun 13, 2015 10:32 pm

Great progress today and a mini milestone, of a sort. The hatch foam is all stuck down now, as is the front wall and front roof radius.

At the front, since I had planned to seal the seams in the first layer of foam better when the second layer went down, but had now decided to switch to the 30-NF contact adhesive, I went ahead and “grouted” the seams with the PL300. Just a dab here and there smeared into the cracks with a credit card spreader, then wiped up any excess with a damp paper shop towel.
Image

After sticking the lower front roof foam on and starting to check fit of the upper piece, I suddenly realized that I had cut out the wrong edge on the lower piece leaving them with the factory beads facing each other. It’s a good thing I left that extra 1/4 inch plus the width of one bead. It wasn’t hard to trim the bead off of the piece already attached. I just followed the factory shoulder under the bead slicing it off cleanly with the steak knife.
Image

Used the straight edge on the bench to trim the lower edge of the top piece.
Image

I did have to go back and take another 1/16 inch off, which I did on the table saw.

So with the last hatch piece fit, the top front piece fit, and all of my reference lines for the edges marked, I ran out and got some larger chip brushes to lay down the 30-NF.

Same method, contact adhesive in the field and PL300 along the edges. Here is the top hatch piece stuck.
Image

And the front pieces stuck.
Image

The profile is really starting to take shape.
Image

I laid in the rest of the pieces I’ve already fit, plus the drops that are close but still need to be ripped and that left just one more piece to come out of the full width stock pile.
Image

The train kept a rollin’.
KC
My Build: The Poet Creek Express Hybrid Foamie

Poet Creek Or Bust
Engineering the TLAR way - "That Looks About Right"
TnTTT ORIGINAL 200A LANTERN CLUB = "The 200A Gang"
Green Lantern Corpsmen
User avatar
KCStudly
Donating Member
 
Posts: 9640
Images: 8169
Joined: Mon Feb 06, 2012 10:18 pm
Location: Southeastern CT, USA
Top

Re: The Poet Creek Express - Foamie Hybrid

Postby Fred Trout » Sun Jun 14, 2015 1:27 am

Looking good :thumbsup: That's the first wide shot of your build I have seen in a long time and it's certainly coming along nicely. Are you planning on canvassing as soon as you finish the exterior or wait for major interior work to be completed ?
User avatar
Fred Trout
The 300 Club
 
Posts: 396
Joined: Fri May 08, 2015 4:30 pm
Location: SW Montana
Top

Re: The Poet Creek Express - Foamie Hybrid

Postby GPW » Sun Jun 14, 2015 6:44 am

Looking Good , covering soon ... ;)
There’s no place like Foam !
User avatar
GPW
Gold Donating Member
 
Posts: 14920
Images: 546
Joined: Thu Feb 09, 2006 7:58 pm
Location: New Orleans
Top

Re: The Poet Creek Express - Foamie Hybrid

Postby KCStudly » Sun Jun 14, 2015 10:32 am

Fred Trout wrote:Looking good :thumbsup: That's the first wide shot of your build I have seen in a long time and it's certainly coming along nicely. Are you planning on canvassing as soon as you finish the exterior or wait for major interior work to be completed ?


Thanks Fred. Actually, the interior was all prefinished prior to assembly, including the ceiling panel. Much easier to do on the bench, rather than out of position.
Image
Image

GPW, yeah, it's getting there, slowly but surely. I will have to trim the excess roof foam flush to the sides; do the 3/4 inch round over along the profile; fair it all to the spars, blocking and hatch bumper; router out for the taillight recesses and license plate mount; and there is a lot of prep work to do sealing little gaps, etc., but I'm creeping up on it. Unfortunately, my sinuses have kicked in again (... like someone threw a switch Friday afternoon) and I'm all stuffed up in the head and chest. Might be the honeysuckle in bloom or something I was exposed to at work.
KC
My Build: The Poet Creek Express Hybrid Foamie

Poet Creek Or Bust
Engineering the TLAR way - "That Looks About Right"
TnTTT ORIGINAL 200A LANTERN CLUB = "The 200A Gang"
Green Lantern Corpsmen
User avatar
KCStudly
Donating Member
 
Posts: 9640
Images: 8169
Joined: Mon Feb 06, 2012 10:18 pm
Location: Southeastern CT, USA
Top

PreviousNext

Return to Foamies

Who is online

Users browsing this forum: Google [Bot] and 16 guests

cron