Smiles to go! Updated 8-2 new pics! First trip!
Re: Smiles to go! Ceiling and insulation in!
![]() by jss06 » Mon Jun 22, 2015 9:30 am
by jss06 » Mon Jun 22, 2015 9:30 am
Great progress. Looks like you did get over your building slump.
John
Build Thread: http://www.tnttt.com/viewtopic.php?t=40150
Build Thread: http://www.tnttt.com/viewtopic.php?t=40150
-
jss06 - Palladium Donating Member
- Posts: 663
- Joined: Mon May 12, 2008 7:48 pm
- Location: Carrollton, TX
Re: Smiles to go! Ceiling and insulation in!
![]() by booyah » Mon Jun 22, 2015 1:12 pm
by booyah » Mon Jun 22, 2015 1:12 pm
ok, now with pictures and description
Thursday night
First, let me say I was apprehensive about building the hatch. With nothing to support it, and knowing I had to be precise, I opted for caution.
I borrowed my fathers mitre saw for this part, as so far I've built almost all of this using my little cordless 5.5" Ryobi circular saw. Its tiny and not so precise (in my hands at least) but its quiet enough I can run it at night without bothering the kids.
So for the hatch, I built the ribs from 1/2" 5 ply CDX plywood (same as the floor) with the router. I used the piece of lauan plywood I had previously cut to be the inside of the galley as a template then used the flush trim bit on the router to turn out the first rib.
Then I used three screws to hold that rib in place as I turned out seven more. I tried to clamp initially, but the clamps slipped. Once I had 8 of these 1/2" ribs, I screwed and glued them together, and allowed them to sit for a night or two for the glue to dry.
I also cut eight 18" 1x2 spars and four more at 18.25" (for the center). Plan was one rib on the drivers side, 4-18" spars, rib, 4-18.25" spars rib, 4-18" spars, and the passengers side rib.
Friday night was hatch assembly
Everything went together like clockwork. It all squared up nicely and looks great. Appears to fit perfectly, and follows the curve dead on.
Saturday night I started on the exterior skinning. The tear is 60.75" wide, so I had to combine two pieces of 5x5 birch to get it done. I opted to cut each side at 33" wide so I could trim some off incase things didnt go quite perfectly square. I also plan on fiberglass taping the seam down the middle as well as the edges and epoxying the entire camper.
This is the front two pieces of exterior, trimmed up and the next ones being fitted behind it.
Thursday night
First, let me say I was apprehensive about building the hatch. With nothing to support it, and knowing I had to be precise, I opted for caution.
I borrowed my fathers mitre saw for this part, as so far I've built almost all of this using my little cordless 5.5" Ryobi circular saw. Its tiny and not so precise (in my hands at least) but its quiet enough I can run it at night without bothering the kids.
So for the hatch, I built the ribs from 1/2" 5 ply CDX plywood (same as the floor) with the router. I used the piece of lauan plywood I had previously cut to be the inside of the galley as a template then used the flush trim bit on the router to turn out the first rib.
Then I used three screws to hold that rib in place as I turned out seven more. I tried to clamp initially, but the clamps slipped. Once I had 8 of these 1/2" ribs, I screwed and glued them together, and allowed them to sit for a night or two for the glue to dry.
I also cut eight 18" 1x2 spars and four more at 18.25" (for the center). Plan was one rib on the drivers side, 4-18" spars, rib, 4-18.25" spars rib, 4-18" spars, and the passengers side rib.
Friday night was hatch assembly
Everything went together like clockwork. It all squared up nicely and looks great. Appears to fit perfectly, and follows the curve dead on.
- 20150620_000735.jpg (97.81 KiB) Viewed 3889 times
Saturday night I started on the exterior skinning. The tear is 60.75" wide, so I had to combine two pieces of 5x5 birch to get it done. I opted to cut each side at 33" wide so I could trim some off incase things didnt go quite perfectly square. I also plan on fiberglass taping the seam down the middle as well as the edges and epoxying the entire camper.
This is the front two pieces of exterior, trimmed up and the next ones being fitted behind it.
- 20150622_002559.jpg (57.45 KiB) Viewed 3889 times
Last edited by booyah on Mon Jun 22, 2015 1:48 pm, edited 1 time in total.
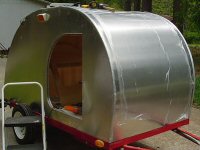
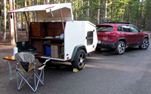
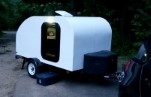
My build, 5x8 modified benroy "Smiles to go". Started April 2nd 2015, first trip August 2nd 2015.
viewtopic.php?f=50&t=63145
viewtopic.php?f=50&t=63145
-
booyah - The 300 Club
- Posts: 424
- Joined: Fri May 16, 2014 5:27 pm
- Location: Lansing MI