My pseudo-teardrop, a work in progress!

...ask your questions in the appropriate forums BUT document your build here...preferably in a single thread...dates for updates, are appreciated....

My pseudo-teardrop, a work in progress!

Postby jmnielsen » Tue Aug 26, 2014 10:43 am

Thought I'd post a "build journal" of my "teardrop" camper build- more of just a small camper thingy since it's not a "teardrop" shape. This will be done on a fairly tight budget, so progress will be slow and while I won't cut corners, I may go cheap on some things. The main goal of this is to get out of a tent off the ground and into something comfortable, everything else is an added bonus!

It all started when I picked up this dirty axle:

Image

I picked it up off craigslist for a whopping $20. The bought it, found out it was too narrow for his use, and it sat in his yard for a year. It was rusty as all get-out but I had it sand blasted for free and then painted it. It's good as new! Bearings were in great shape so I re-packed them and got on with the build!

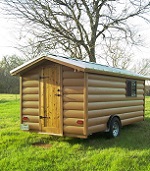
I decided on a 5x8 trailer. 4x8 would have made my life easier, but everything I read said go 5x8 if you'll be camping with another person, which I will be. I drew up my design on AutoCAD for the trailer frame (sorry no pic of that) and then had get to work. I took last summer off of school because I had so much going on, so last May after school got out I built the frame. It's mainly 2"x2" .125" wall square tubing. The cross braces are 2"x1" rectangular tubing that is 14 gauge. The total steel cost was $140, and I got the coupler for free! This trailer is STOUT. It's way overbuilt, but that is fine by me.

Image

Image

Image

Image

This bad boy makes cutting so easy compared to a chop saw!!

Image

With it all welded together and the axle mounted, I flipped it over in the yard and put on a couple coats of rust inhibiting primer and a couple coats of black paint.

Image

Image

I let the paint dry overnight, then I wired the trailer with lights that I bought from Harbor freight $37.99 w/ 20% discount for LED lighting isn't bad!

Image

Once I tested the lighting in the driveway and everything checked out I took her for a spin to make sure it would tow ok. Which it did! It towed great! A little bouncy with a 3500# axle that has like no weight on it though. It was about 3 months between building the frame, and getting it tow ready. So since I had all the measurements I went ahead and build the floor of my teardrop. It is two sheets of 3/4" birch ply cut to fit the 5x8 trailer frame. The framing of the floor is 1x2" stuff (can't remember the wood).

Image

Image

Once the floor was built I bought some roofing tar (asphault emulsion) that is extremely weather resistant, and 3/4" foam insulation. I cut the foam to fit the spaces, then I coated the entire bottom of the floor with the emulsion. I pressed the foam into place, then used 1" screws and fender washers for good measure to hold in the foam insulation. I used 10 screws per piece of foam. (sorry no pictures of that step) Once I got the trailer tow-ready, I bolt the floor to the trailer frame with 4 - 1/2" x 3" carriage bolts. I have gussets welded on the trailer so that I can add 4 more, but this feels VERY sturdy and I don't think it is going anywhere.

I had drawn the profile that I wanted to go with,

Image

so I used an extra piece of OSB that I had to practice the cuts and make sure that is the profile that I wanted to go with! The OSB blended in with the wood on the wall, so I put blue tape around the edge to make it easier to see the profile. The masking tape shows where cabinets, counter, etc will be. I need to mock up door placement and window placement as well.

Image

This is my fancy wall prop

Image

and for those that are interested in height of it, it is right at 6 feet tall. I'm 6'2" so here is a selfy to show you the height.

Image

Lots of stuff to do, but will hopefully get some ply and other stuff to get the walls up soon!

Any advice, ideas are welcome!
jmnielsen
Teardrop Inspector
 
Posts: 13
Joined: Mon Apr 07, 2014 3:22 pm

Re: My pseudo-teardrop, a work in progress!

Postby KCStudly » Tue Aug 26, 2014 1:01 pm

Welcome to the madness. What a great start you have made! Nice shop, too. :thumbsup:

I would consider making the bottom of the rear cabinet the same level as the galley counter, just to simplify things a little and to get rid of the 'outside' corner on the cabin side.

Are you doing barn doors or a lifting hatch at the rear?
KC
My Build: The Poet Creek Express Hybrid Foamie

Poet Creek Or Bust
Engineering the TLAR way - "That Looks About Right"
TnTTT ORIGINAL 200A LANTERN CLUB = "The 200A Gang"
Green Lantern Corpsmen
User avatar
KCStudly
Donating Member
 
Posts: 9640
Images: 8169
Joined: Mon Feb 06, 2012 10:18 pm
Location: Southeastern CT, USA

Re: My pseudo-teardrop, a work in progress!

Postby jmnielsen » Tue Aug 26, 2014 2:25 pm

KCStudly wrote:Welcome to the madness. What a great start you have made! Nice shop, too. :thumbsup:

I would consider making the bottom of the rear cabinet the same level as the galley counter, just to simplify things a little and to get rid of the 'outside' corner on the cabin side.

Are you doing barn doors or a lifting hatch at the rear?


I will probably do what you suggest with the cabinet. Looking at it now it would make much more sense to do it that way. I would prefer a lifting hatch but I'm too tall for that to work if I want to cook in the galley. I would like to do one large door but I'm not sure what I would do for a hinge that would support all the weight without sagging. So what I'm trying to say is I don't know yet!
jmnielsen
Teardrop Inspector
 
Posts: 13
Joined: Mon Apr 07, 2014 3:22 pm
Top

Re: My pseudo-teardrop, a work in progress!

Postby KCStudly » Tue Aug 26, 2014 3:30 pm

The best thing you can do is to read as many build threads and construction techniques as you can. There is a huge wealth of info here.

The hatch does not have to be heavy. You could use 'foamie' style construction for it; just a simple perimeter frame of 1x2 filled with foam board, covered with glued on canvas and paint.

Hurricane hinge, or "better than hurricane" hinges are popular. With this type of hinge be sure to leave a little hanging off each side so that the water running toward it drips away from the side of the camper, rather than wrapping under and coming in.

Barn style doors are popular as well; I would use a piano style hinge for them. One advantage to the barn style door is that you can add canning shelves to the insides of the doors, increasing cupboard space efficiency.

On the flat back profile, consider a short overhang (wicker bill or deck wing style) extending off of the roof above the hatch to give a little added drip edge for the rain. Some people like to build this into the side profile with a little tapered shroud surrounding the rear.

Just some suggestions that may help you get started. :thumbsup:
KC
My Build: The Poet Creek Express Hybrid Foamie

Poet Creek Or Bust
Engineering the TLAR way - "That Looks About Right"
TnTTT ORIGINAL 200A LANTERN CLUB = "The 200A Gang"
Green Lantern Corpsmen
User avatar
KCStudly
Donating Member
 
Posts: 9640
Images: 8169
Joined: Mon Feb 06, 2012 10:18 pm
Location: Southeastern CT, USA
Top

Re: My pseudo-teardrop, a work in progress!

Postby Gunguy05 » Tue Aug 26, 2014 9:49 pm

Looks like you are off to a great start. Being able to weld and just "put things where you want them" is a great help. We started with a boat trailer and adapeted it, but looking back it would have been much simpler to start from scratch.

One thing i would look at (I'm speaking from experience here) is that axle. We had a 3500lb to start off with and we have since replaced it with a 2200. The difference was HUGE. Even with bit of a load on it, it would bounce around a bit. Now with the 2200 torsion, it is much smoother.

Unless you are putting 2k plus on it, then it might be ok.

At any rate, it looks great. Keep up the good work and keep us posted.
Brian


Checkout my buildThe Regal Eagle Bow front for 4
Image
Also my teardrop updates from blog on Dad Rambles
User avatar
Gunguy05
The 300 Club
 
Posts: 385
Images: 6
Joined: Mon Dec 02, 2013 4:45 pm
Location: South GA
Top

Re: My pseudo-teardrop, a work in progress!

Postby jmnielsen » Sun Jun 28, 2015 5:53 pm

Been a while since I updated this so thought I might. This is where I am at now:

Image

I still need to:
Build the hatch
"Poor Mans" fiberglass it
Order and Install window and door
weld on fenders
weld on stabilizer jacks
build tongue box

I've been super busy with school and work, but my goal is to have this in camping shape in just over one month. I'm hoping to take a week long trip or so with the wife in early August, hopefully to Wyoming but we will see!

Been spending a lot of time reading on here. I must admit, without this site I probably would not have built the camper. Love all the information here!
jmnielsen
Teardrop Inspector
 
Posts: 13
Joined: Mon Apr 07, 2014 3:22 pm
Top

Re: My pseudo-teardrop, a work in progress!

Postby jmnielsen » Mon Aug 31, 2015 11:20 am

I know no one is likely following this, but figured I'll give a mini update anyways.

It's finally campable and was used a couple weekends ago. It's definitely not finished but I'm very happy with it and want to thank this site for all of the awesome information!

Image
jmnielsen
Teardrop Inspector
 
Posts: 13
Joined: Mon Apr 07, 2014 3:22 pm
Top

Re: My pseudo-teardrop, a work in progress!

Postby Padilen » Mon Aug 31, 2015 11:30 am

Cool, I'm promising myself I'm going camping trailer ready or not!
Padilen
Donating Member
 
Posts: 1536
Joined: Fri Jan 30, 2015 4:20 pm
Top

Re: My pseudo-teardrop, a work in progress!

Postby M C Toyer » Mon Aug 31, 2015 1:59 pm

Nice job.

You obviously had the talent and the tools and I think I spied your helper / camping companion, so all the motivation you needed to get in on the road.
User avatar
M C Toyer
The 300 Club
 
Posts: 363
Images: 11
Joined: Thu May 31, 2012 8:59 pm
Location: Pilot Point (Denton County) Texas
Top

Re: My pseudo-teardrop, a work in progress!

Postby noseoil » Mon Aug 31, 2015 10:26 pm

Looks good to me. Nice lines & clean build!
Build log: viewtopic.php?f=50&t=60248
The time you spend planning is more important than the time you spend building.........

137905
User avatar
noseoil
1000 Club
1000 Club
 
Posts: 1822
Images: 670
Joined: Sun Apr 27, 2014 8:46 am
Location: Raton, New Mexico, living the good life!
Top

Re: My pseudo-teardrop, a work in progress!

Postby rebapuck » Wed Sep 02, 2015 12:06 am

By camping in it now, you might find you want to make changes before the final finish.
Judy
1966 VW camper
1967 VW singlecab
Image
User avatar
rebapuck
.
 
Posts: 2243
Images: 1
Joined: Thu May 14, 2009 1:55 pm
Location: Chapel Hill NC
Top

Re: My pseudo-teardrop, a work in progress!

Postby felixx » Wed Sep 02, 2015 6:37 am

very tidy
felixx
Donating Member
 
Posts: 644
Images: 22
Joined: Sun Nov 30, 2014 3:01 pm
Location: Christchurch, New Zealand
Top

Re: My pseudo-teardrop, a work in progress!

Postby jmnielsen » Wed Sep 02, 2015 10:22 am

Thanks guys! I have definitely found things I want to do/change now that I have taken it out and used it. The two biggest things are 1) redoing the storage in the galley. I just kinda threw it together quick because I was running out of time. And 2) ventilating the cabin area better.
jmnielsen
Teardrop Inspector
 
Posts: 13
Joined: Mon Apr 07, 2014 3:22 pm
Top

Re: My pseudo-teardrop, a work in progress!

Postby PKCSPT » Wed Sep 02, 2015 8:31 pm

:thumbsup:
121172 116946 159644
PKCSPT
Silver Donating Member
 
Posts: 1515
Images: 61
Joined: Wed Mar 31, 2010 11:27 pm
Location: Minnesota
Top


Return to Build Journals

Who is online

Users browsing this forum: No registered users and 2 guests