I've gotten a bit behind on my posting, so time to catch up.
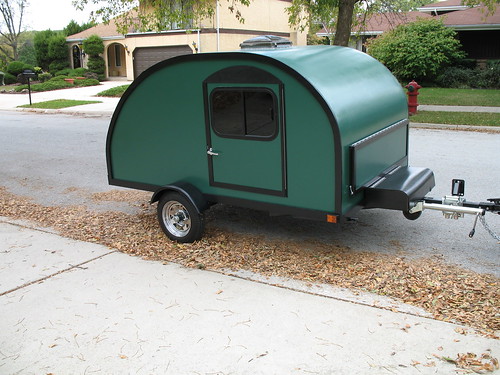
A 3-week trip to Kahleefoornya saw the first off-pavement for the Tear. Charging while towing worked like a charm. All the family and friends went ga-ga over the tear. On the way back, it passed the rain worthiness and mud worthiness tests. Also, a high pucker-factor emergency stop got me off the dime about the trailer brakes. Read all about that here.
I've been using an increasingly ratty piece of nekkid plywood for my galley countertop. This could not be allowed to continue. The faucet barely reached the dog-bowl sink. It wasn't wide(deep) enough. It also didn't go with the decor.
Although granite was briefly mentioned a while back, the price was way out of line. HD and Lowes used to carry full sheets of laminate early in the build, but no more. Besides, I didn't want to buy a whole sheet and store the remainder. So, I fearlessly set forth to see if any cabinet shoppes nearby might have a suitable remnant. My first stop was the shop where I'd gotten a couple of granite drops for free. They don't deal in laminates, but gave me a lead to the local Source for cabinet shops.
Off to central Austin. I explained my need to the nice lady in the showroom, and she directed me to the back of the warehouse, where blems, drops and dents were kept. Long enough story short, I left with about half a sheet of premium laminate freebee. Yes!
Meanwhile, back at capnTelescope World Headquarters, measure twice, cut once. Left side of the galley: 16-1/2"
Right side: 16-7/8"
What? I hadn't noticed that the drawer module wasn't fully into place. Part of the bracing for the water tank was in the way. Hammer and chisel made short work of that: It ain't purty but it doesn't show.
Finally got a measurement. Using contact adhesive left over from the tambours, I got the real countertop ply laminated, trimmed and cut to size.:
Add a notch for wiring:
Next step is to cut out for the sink and faucet. Oh, wait. Next step is to pick up the mess on the CNC table to make room to work.
The desired result: Then made a edge trim piece to match the tambours.
Ta-daa! Still needs trim panels, left/right sides.
By one of the pics, it looks like the CNC table doubles as storage. (Any flat surface in my garage is eligible for stacking - and misplacing - tools and other stuff).
Tom (& Linda) For build info on our former Silver Beatle teardrop: Build Thread
By one of the pics, it looks like the CNC table doubles as storage. (Any flat surface in my garage is eligible for stacking - and misplacing - tools and other stuff).
Thanks, Tom. I'm very pleased!
Any horizontal surface, anywhere. That's why the jeep-style fenders with rubber on top.
KCStudly wrote:I like the figuring in the nosing on the counter. Ties the tambours in nicely.
Thanks, KC. That nose piece came from a odd piece of S3S (Surfaced 3 Sides) oak that has one rough edge that tapers the length of the board. If I'd known it had such nice figuring, I'd have used more of it. It's too skinny to be useful for much of anything else.
Propping up the galley hatch has been THE most vexing part of this whole build. It started with a piece of 2x4.
That was fine during construction, but too ugly to wear in public. Once I started taking the trailer out camping, I substituted a nice piece of 1 x 2 pine.
Better, but it got in my way. What I really wanted was something attached to the Tear that would also prevent the hatch from blowing open and destroying everything. Like gas struts. My galley seems to be an awkward size and shape such that struts insist on opening the hatch when down, or they get interfered with on closing and won't let the hatch shut. Or they don't compress enough or extend enough. Trial and error left several hickeys on the hatch ribs and the old countertop.
The last straw was the new countertop. I managed to put the faucet right where I'd been putting the 2x4/1x2. Now I had to prop off center, which causes the hatch to twist and look like a sorry POS. Not good. Plus, with the prop not being attached, I was dreading someone (me) knocking the prop over and the hatch eating them. Or, worse yet, eating me. Something must be done.
I took some inspiration from seeing JavaJack's Camp-Inn Raindrop. It has a wood prop that runs in a channel and works very nicely. With that in mind, some simple tape measurements sent me down another fork in the road.
Basically, I built a prop that attaches to the center hatch rib and rests near the top of the cabinet faceframe.Here's a quick proof of concept look at hatch prop 3.0.
This worked!
Naturally, it wasn't that easy!
First task was to make something for the prop to rest upon. I made a small korbel for the support. I guess it's a korbel. It's also a Roman Orgee. I think korbels have to have arches. Sconce?
Jigsaw work:
Make a tenon to hold an anchor pin. This is only the second time I've used this jig, which I got off the clearance table at Woodcraft. Glad I didn't pay more.
Korbel 1.0 Stained, glued and screwed: With a little decorative carving, it would look like an obscene gesture.
Then I built up the release version of Hatch Prop 3.0 and installed it,
First problem: The hatch didn't want to shut all the way. Big surprise. I've been there before. Took a picture through the side and found: You can see that the prop is clearly hitting the hinge block.
I trimmed off the offending portion of the hinge block for a second try. "Trimmed off" is putting it politely. It looks like I gnawed it off. Fortunately, it doesn't really show.
Try again. Better, but no cigar. I shortened the prop about an inch, and now the hatch is too low.It's just a couple inches over my head, where it was 6-8 inches over just a minute ago. But it does shut! Hatch Prop 3.1 is a partial success.
OK, I'll raise the korbel and everything should be good. Right? Wrong. Something's hitting, but what?
Lets go to the video:
The prop is hitting the shelf on the korbel. Well, just hack a chunk off? No, That goes thru the screws. Korbel 1.0 is unusable and goes in the kindling box.
Korbel 2.0 is an inch longer, has the chunk taken off, and now the hatch prop 3.2 shuts! Victory! At last.
Once everything was happy, I drilled a hole for a bolt to slip thru and anchor the bottom of the prop (visible above).
I still have to trim the plugs for the screw holes, touch up the stain here and there, and another coat of poly.
If it was easy it wouldn't be called "work". As frustrating as it can be sometimes, when we finally get it right (... or at least close enough) we get a nice happy satisfied feeling and can sit back, crack a beer and enjoy looking at our accomplishments.
Enjoy your success, even if it is the third time around.
KC, you're right. All these "little" frustrations pop up, and when you finally overcome it is very rewarding. I had to share. Multiple beers have already been cracked open in honor.


 HD and Lowes used to carry full sheets of laminate early in the build, but no more. Besides, I didn't want to buy a whole sheet and store the remainder. So, I fearlessly set forth to see if any cabinet shoppes nearby might have a suitable remnant. My first stop was the shop where I'd gotten a couple of granite drops for free. They don't deal in laminates, but gave me a lead to the local Source for cabinet shops.


 Plus, with the prop not being attached, I was dreading someone (me) knocking the prop over and the hatch eating them. Or, worse yet, eating me.
  Something must be done.


