Albuquerque teardrop

...ask your questions in the appropriate forums BUT document your build here...preferably in a single thread...dates for updates, are appreciated....

Re: Albuquerque teardrop - hatch strut brackets installed

Postby ChasCABQ » Tue Jul 14, 2015 3:16 pm

I had to perform some detailed calculations to install the gas strut brackets and braces on the hatch today.

I weighed and measured the hatch. According to online sources, a strut should be about half the length of the hatch. Using statics, I calculated two 20 inch long, 50 to 60 pound struts would be needed. I bought two 20 inch, 60 pound struts and brackets from Albuquerque's Central Trailer Supply.

After observing my Subaru wagon's struts, I used Sketchup Make to check strut layouts and locate best mounting points. The diagram shows how I determined the best mounting points.
Image
My struts were 20" long extended, and 11-3/4" compressed all the way.
Point A was almost 20" from hinge point and three inches inside hatch skin.
With hatch up, I measured an arc with 20" radius from point A.
With hatch down, I measured a second arc from point A with 12-1/4" radius so strut was almost but not fully compressed.
Where the two arcs intersected is where to locate point B, second strut point.

On each side of the hatch, I installed strut brackets and 1x2 poplar braces for extra strength. Next, my wife held up the hatch and I struck the first arc, closed the hatch and struck the second arc. Point B was where the two arcs met. I installed a second set of braces and brackets on the side wall interiors.
Image
I will install gas struts after the hatch hinge is installed.

Next skin the hatch!
Build journal: http://www.tnttt.com/viewtopic.php?t=61303
In 2016, I received a kidney transplant, finished my teardrop, and took it on the road! In 2017 I sold it and am back to car camping.
Thanks to all forum members who provided advice about my build and posted info to help me get started.
User avatar
ChasCABQ
Donating Member
 
Posts: 95
Images: 18
Joined: Sat Sep 27, 2014 3:54 pm
Location: Albuquerque, NM

Re: Albuquerque teardrop - prepping for paint

Postby ChasCABQ » Fri Aug 07, 2015 11:37 am

Quick update
I finished the hatch: installed 1/8" birch plywood skin, drilled holes for tee handle and hinge, etc. Now I'm preparing for paint by patching holes and sanding.
Build journal: http://www.tnttt.com/viewtopic.php?t=61303
In 2016, I received a kidney transplant, finished my teardrop, and took it on the road! In 2017 I sold it and am back to car camping.
Thanks to all forum members who provided advice about my build and posted info to help me get started.
User avatar
ChasCABQ
Donating Member
 
Posts: 95
Images: 18
Joined: Sat Sep 27, 2014 3:54 pm
Location: Albuquerque, NM

Re: Albuquerque teardrop

Postby rebapuck » Sun Aug 09, 2015 1:07 am

How fast does paint dry in NM in August?
Judy
1966 VW camper
1967 VW singlecab
Image
User avatar
rebapuck
.
 
Posts: 2243
Images: 1
Joined: Thu May 14, 2009 1:55 pm
Location: Chapel Hill NC
Top

Re: Albuquerque teardrop - patching and sanding

Postby ChasCABQ » Sun Aug 09, 2015 3:21 pm

"Remember, the goal is not the teardrop. The goal is camping!"
- Captain Bob, USN Retired, local teardrop builder and forum member

With that in mind I've started patching holes and sanding. I tried two patching materials: DAP wood filler and Bondo spot repair. I prefer the wood filler as it is easier to squeeze into larger spaces than Bondo. Also, I don't like the red dust from sanding Bondo. Bondo sure stands out though...
Image
I road-tested the trailer over some nearby speed humps and took it on the highway. Looked it over on return and it looked fine. I began sanding a wall with coarse sandpaper on a belt sander to knock down the roof edge overlap, filler and high spots. I followed up with progressively finer paper on my orbital sander for a smooth, paintable surface. Got one side done today before the heat drove me inside. Answer to rebapuck: quickly.
Build journal: http://www.tnttt.com/viewtopic.php?t=61303
In 2016, I received a kidney transplant, finished my teardrop, and took it on the road! In 2017 I sold it and am back to car camping.
Thanks to all forum members who provided advice about my build and posted info to help me get started.
User avatar
ChasCABQ
Donating Member
 
Posts: 95
Images: 18
Joined: Sat Sep 27, 2014 3:54 pm
Location: Albuquerque, NM
Top

Re: Albuquerque teardrop - primer done, ready for color

Postby ChasCABQ » Sat Aug 22, 2015 2:34 pm

I finished two coats of exterior latex primer. Teardrop is sanded and ready for color now. Then I'll do the interior with zero VOC paint. I keep reminding myself "it's only painted plywood".
Image
Build journal: http://www.tnttt.com/viewtopic.php?t=61303
In 2016, I received a kidney transplant, finished my teardrop, and took it on the road! In 2017 I sold it and am back to car camping.
Thanks to all forum members who provided advice about my build and posted info to help me get started.
User avatar
ChasCABQ
Donating Member
 
Posts: 95
Images: 18
Joined: Sat Sep 27, 2014 3:54 pm
Location: Albuquerque, NM
Top

Re: Albuquerque teardrop

Postby dales133 » Sat Aug 22, 2015 2:55 pm

Looking good chas.final assemblys looking closer
User avatar
dales133
4000 Club
4000 Club
 
Posts: 4605
Images: 1
Joined: Mon Oct 13, 2014 5:26 pm
Top

Re: Albuquerque teardrop

Postby Sheddie » Sat Aug 22, 2015 4:37 pm

Good progress, you will be camping soon :thumbsup:
User avatar
Sheddie
1000 Club
1000 Club
 
Posts: 1499
Images: 1129
Joined: Mon Jul 01, 2013 3:26 pm
Location: Whangarei, New Zealand
Top

Re: Albuquerque teardrop - top coat done

Postby ChasCABQ » Sat Sep 05, 2015 2:28 pm

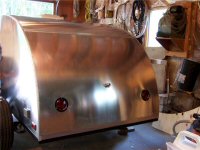
Okay, after some delays I did the top coat (third coat of paint so far). After waiting a bit I went back around and touched up areas as needed. I used high gloss exterior enamel paint applied with a 4" wide mohair roller. Next I'll paint the inside surfaces: galley and hatch will get the exterior paint and the sleeper with interior zero VOC paint. Ignoring the flaws in the marine plywood sides it looks pretty good... at 20 feet ;)
Image
Build journal: http://www.tnttt.com/viewtopic.php?t=61303
In 2016, I received a kidney transplant, finished my teardrop, and took it on the road! In 2017 I sold it and am back to car camping.
Thanks to all forum members who provided advice about my build and posted info to help me get started.
User avatar
ChasCABQ
Donating Member
 
Posts: 95
Images: 18
Joined: Sat Sep 27, 2014 3:54 pm
Location: Albuquerque, NM
Top

Finally finished and ready for camping!

Postby ChasCABQ » Sun Jul 03, 2016 2:45 pm

FINALLY I got her done after many moons of procrastination! Last year I was wondering how I would be able to go camping and perform dialysis in the field. No longer an issue as I received a kidney transplant in January. So I finished up and installed doors, fenders, and put on highway rated wheels. I have some cleanup, screw tightening and touch up paint but those are all minor things.

One thing: my strut calculations were off somehow. The 60# is fine but length or placement is off. I have headroom standing next to galley but far end is low and will be a head knocker I'm afraid. I'll review it and maybe make a change after my first camping trip week of July 11, 2016.

Many thanks to all who've given advice and encouragement along the way! I'll post some camping pics next.
Attachments
Galley view.jpg
Galley view.jpg (77.55 KiB) Viewed 1951 times
Rear view of completed teardrop.jpg
Rear view of completed teardrop.jpg (105.87 KiB) Viewed 1951 times
Side view of completed teardrop.jpg
Side view of completed teardrop.jpg (88.9 KiB) Viewed 1951 times
Last edited by ChasCABQ on Wed Jul 06, 2016 1:45 pm, edited 2 times in total.
Build journal: http://www.tnttt.com/viewtopic.php?t=61303
In 2016, I received a kidney transplant, finished my teardrop, and took it on the road! In 2017 I sold it and am back to car camping.
Thanks to all forum members who provided advice about my build and posted info to help me get started.
User avatar
ChasCABQ
Donating Member
 
Posts: 95
Images: 18
Joined: Sat Sep 27, 2014 3:54 pm
Location: Albuquerque, NM
Top

Re: Albuquerque teardrop

Postby cubbyboy57 » Sun Jul 03, 2016 7:09 pm

Glad to hear you can enjoy your trailer! I am jealous as I am still on the painting and probably won't get to camp until the fall. Post pictures of your camp if you can.

james
cubbyboy57
Lifetime member
 
Posts: 44
Images: 81
Joined: Tue Dec 15, 2015 2:20 pm
Location: DFW Texas
Top

Re: Albuquerque teardrop

Postby S. Heisley » Mon Jul 04, 2016 12:19 pm

Congratulations on your teardrop. It looks very nice. It'll look even better in a camp setting! :D :thumbsup:
User avatar
S. Heisley
Super Lifetime Member
 
Posts: 8813
Images: 495
Joined: Mon Sep 17, 2007 10:02 am
Location: No. California
Top

Re: Albuquerque teardrop

Postby KCStudly » Tue Jul 05, 2016 7:49 am

+1 :thumbsup:
KC
My Build: The Poet Creek Express Hybrid Foamie

Poet Creek Or Bust
Engineering the TLAR way - "That Looks About Right"
TnTTT ORIGINAL 200A LANTERN CLUB = "The 200A Gang"
Green Lantern Corpsmen
User avatar
KCStudly
Donating Member
 
Posts: 9633
Images: 8169
Joined: Mon Feb 06, 2012 10:18 pm
Location: Southeastern CT, USA
Top

Re: Albuquerque teardrop

Postby greygoos » Tue Jul 05, 2016 9:27 am

Congratulations on your teardrop and your transplant. You are an inspiration. Good luck and keep rolling
greygoos
Silver Donating Member
 
Posts: 630
Joined: Sun Sep 27, 2015 6:15 am
Location: Syracuse NY
Top

Re: Albuquerque teardrop

Postby dales133 » Tue Jul 05, 2016 4:00 pm

Well done and congrads on both accounts
User avatar
dales133
4000 Club
4000 Club
 
Posts: 4605
Images: 1
Joined: Mon Oct 13, 2014 5:26 pm
Top

Re: Albuquerque teardrop - wheel issue delays first camping

Postby ChasCABQ » Sat Aug 20, 2016 11:16 am

So I had driven my trailer around town with no issues. A month later I'm readying it for first camping trip, air up the tires, and head down the road. SQUEAK, SQUEAK, SQUEAK! Right wheel's sidewall is rubbing on the frame! I return home, put tent camping gear into my Subaru and head out with my son-in-law. We had a great trip to East Fork Campground in the San Juan Mountains of southern Colorado.

After returning, I check things out. I had put larger, highway rated wheels on the trailer and they have very little clearance. I will check the axle alignment and wheel (it could be out of true) and switch it out with my spare (same size).

I may have to install spacers to move the wheels out 1/4 inch or so. Worst case, buy a new, longer axle.
Build journal: http://www.tnttt.com/viewtopic.php?t=61303
In 2016, I received a kidney transplant, finished my teardrop, and took it on the road! In 2017 I sold it and am back to car camping.
Thanks to all forum members who provided advice about my build and posted info to help me get started.
User avatar
ChasCABQ
Donating Member
 
Posts: 95
Images: 18
Joined: Sat Sep 27, 2014 3:54 pm
Location: Albuquerque, NM
Top

PreviousNext

Return to Build Journals

Who is online

Users browsing this forum: No registered users and 7 guests