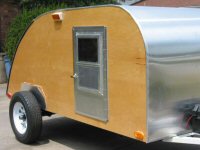
Ok here we go...PMF!

...ask your questions in the appropriate forums BUT document your build here...preferably in a single thread...dates for updates, are appreciated....

Re: Ok here we go...PMF!

Postby Sheddie » Fri Sep 04, 2015 3:52 am

Didn't you say you were going go build another small one?
User avatar
Sheddie
1000 Club
1000 Club
 
Posts: 1499
Images: 1129
Joined: Mon Jul 01, 2013 3:26 pm
Location: Whangarei, New Zealand

Re: Ok here we go...PMF!

Postby dales133 » Fri Sep 04, 2015 3:55 am

Yea but i recon ill use a huricane hinge.
Im building one for someone else starting monday.
Steel frane trailer topper with composte panel cladding
User avatar
dales133
4000 Club
4000 Club
 
Posts: 4605
Images: 1
Joined: Mon Oct 13, 2014 5:26 pm

Re: Ok here we go...PMF!

Postby Sheddie » Fri Sep 04, 2015 3:59 am

Hope it doesn't slow yours down too much.
User avatar
Sheddie
1000 Club
1000 Club
 
Posts: 1499
Images: 1129
Joined: Mon Jul 01, 2013 3:26 pm
Location: Whangarei, New Zealand
Top

Re: Ok here we go...PMF!

Postby dales133 » Fri Sep 04, 2015 4:03 am

My mates welding the frame.
Im just fitting the panel door and windows ect.
Should be able to do that in 3 days.
I need the cash injection.
I have to sort out all the underfloor stuff now and thats several hundered dollars in outsourced work and materials.
Im glad i havnt kept up with a build cost.
I dont want reminding lol
User avatar
dales133
4000 Club
4000 Club
 
Posts: 4605
Images: 1
Joined: Mon Oct 13, 2014 5:26 pm
Top

Re: Ok here we go...PMF!

Postby Sheddie » Fri Sep 04, 2015 4:13 am

Cash injections are always good. ;)
I let the wife worry about the costs.
User avatar
Sheddie
1000 Club
1000 Club
 
Posts: 1499
Images: 1129
Joined: Mon Jul 01, 2013 3:26 pm
Location: Whangarei, New Zealand
Top

Re: Ok here we go...PMF!

Postby dales133 » Fri Sep 04, 2015 4:18 am

Uh huh.
I think that transport supplies joints closed in melborne.
I got no hits on it googling except NZ.
id love some of those door stop thingos.
I almost got my exterior lights yesterday but ive got to much money tied up in this renovation job.
Only 2 places have them and RRP is $176 each.
The others 100 each but had them on sale for 150
User avatar
dales133
4000 Club
4000 Club
 
Posts: 4605
Images: 1
Joined: Mon Oct 13, 2014 5:26 pm
Top

Re: Ok here we go...PMF!

Postby KCStudly » Fri Sep 04, 2015 7:29 am

Your hatch frame is coming out lovely! The button head screws for the cross bracing is a nice touch. Love the wood! :thumbsup:
KC
My Build: The Poet Creek Express Hybrid Foamie

Poet Creek Or Bust
Engineering the TLAR way - "That Looks About Right"
TnTTT ORIGINAL 200A LANTERN CLUB = "The 200A Gang"
Green Lantern Corpsmen
User avatar
KCStudly
Donating Member
 
Posts: 9640
Images: 8169
Joined: Mon Feb 06, 2012 10:18 pm
Location: Southeastern CT, USA
Top

Re: Ok here we go...PMF!

Postby dales133 » Fri Sep 04, 2015 9:57 am

Thanks mate im realy happy with it other than a couple of minor details that will either sand out or annoy me for eternity
Was easier than i thought all beit time consuming
User avatar
dales133
4000 Club
4000 Club
 
Posts: 4605
Images: 1
Joined: Mon Oct 13, 2014 5:26 pm
Top

Re: Ok here we go...PMF!

Postby dales133 » Sat Sep 05, 2015 3:15 am

So i drove to melborne this morning and got the mill finish extrusion to go around the profile on the wall to roof join and another extrusion to go around the galley profile to tidy up the edge and provide a better sealing surface for the seal.
I allso picked up the same roof mold in black powdercoat for this job im doing for someone else.
While i was there i picked up a sheet of .5mm stucco aluminium sheet to line the inside of my galley...ontop of the ribs...a bit of extravigance that i thought would set off the hatch ribs ive lovingly spent weeks making and sanding and assembling.
And as for the hatch frame i went from P80 to 120 to 240 today as well as pluging the kreg jig holes and sanding them back.
Super unhappy that ive been waiting 3 months for maple kregg dowels to come off ebay and ended up using pine ones i had instead.
Its ruined it completly but hes sent them twice and still nothing so reluctantly i moved on.
Gripe over...
I sealed all the timber frame with the same bondall stuff ive used throughout and its ready for a sand and a few coats of poly.
Shame melbornes so far wasted alot of time but on the brightside got alot done too
User avatar
dales133
4000 Club
4000 Club
 
Posts: 4605
Images: 1
Joined: Mon Oct 13, 2014 5:26 pm
Top

Re: Ok here we go...PMF!

Postby dales133 » Sat Sep 05, 2015 6:24 am

Just finished knocking back the sealer and got the first coat of floor urathane on.
Coming up pretty nice.
Mrs isnt to impressed i did it on the kitchen table and stunk the house out with paint fumes but i need to recoat tomorrow as im a busy man
User avatar
dales133
4000 Club
4000 Club
 
Posts: 4605
Images: 1
Joined: Mon Oct 13, 2014 5:26 pm
Top

Re: Ok here we go...PMF!

Postby dales133 » Mon Sep 07, 2015 5:47 am

uploadfromtaptalk1441622730903.jpg
uploadfromtaptalk1441622730903.jpg (28.11 KiB) Viewed 1141 times

uploadfromtaptalk1441622714796.jpg
uploadfromtaptalk1441622714796.jpg (33.61 KiB) Viewed 1141 times

uploadfromtaptalk1441622689875.jpg
uploadfromtaptalk1441622689875.jpg (33.91 KiB) Viewed 1141 times


Coat 5 of floor varnish with plenty of sanding....more than i liked.
I think this might be the last coat
User avatar
dales133
4000 Club
4000 Club
 
Posts: 4605
Images: 1
Joined: Mon Oct 13, 2014 5:26 pm
Top

Re: Ok here we go...PMF!

Postby noseoil » Mon Sep 07, 2015 7:23 am

Really looking nice now, great finish & textures showing up in the grain. Amazing how much time the hatch eats up, isn't it? Glad mine is being skinned instead of the natural finish like you have! Beautiful job!
Build log: viewtopic.php?f=50&t=60248
The time you spend planning is more important than the time you spend building.........

137905
User avatar
noseoil
1000 Club
1000 Club
 
Posts: 1822
Images: 670
Joined: Sun Apr 27, 2014 8:46 am
Location: Raton, New Mexico, living the good life!
Top

Re: Ok here we go...PMF!

Postby dales133 » Mon Sep 07, 2015 9:06 am

Thanks mate,yea i realy couldnt say how many hours its taken but quite alot!
Ive actualy enjoyed it far more than i ever thought i would though...like most people i was dreading the hatch.
One thing that mightnt be much fun is mounting the gas struts though with the 30mm ribs on the outside edge.
I think i may need to fix them under the rib or otherwise id need to block out the lower mounting point.
Just another hurdle in the teardrop manufacturing process ;)
User avatar
dales133
4000 Club
4000 Club
 
Posts: 4605
Images: 1
Joined: Mon Oct 13, 2014 5:26 pm
Top

Re: Ok here we go...PMF!

Postby KCStudly » Mon Sep 07, 2015 10:32 am

Looks great! I think it is worth it to put the time in. Both for your own satisfaction and in a prime area where others will get to see it, too. Keep at it! :thumbsup:
KC
My Build: The Poet Creek Express Hybrid Foamie

Poet Creek Or Bust
Engineering the TLAR way - "That Looks About Right"
TnTTT ORIGINAL 200A LANTERN CLUB = "The 200A Gang"
Green Lantern Corpsmen
User avatar
KCStudly
Donating Member
 
Posts: 9640
Images: 8169
Joined: Mon Feb 06, 2012 10:18 pm
Location: Southeastern CT, USA
Top

Re: Ok here we go...PMF!

Postby Vedette » Mon Sep 07, 2015 11:03 am

Looking pretty Fancy! :thumbsup:
I admire you wood working guys.........so much time spent making your Tears look like fine furniture. Great Talent! :wine:
Keep up the good work.
Good Roads
Brian & Sandi
Good Roads
Brian & Sandi
Here is a link to my Build Journal
viewtopic.php?f=50&t=50912
Image109106109111109110138766
User avatar
Vedette
Silver Donating Member
 
Posts: 5141
Images: 443
Joined: Thu Dec 01, 2011 4:28 am
Location: Westbank B.C.
Top

PreviousNext

Return to Build Journals

Who is online

Users browsing this forum: No registered users and 3 guests