M116A3 Build

...ask your questions in the appropriate forums BUT document your build here...preferably in a single thread...dates for updates, are appreciated....

Re: M116A3 Build

Postby lfhoward » Sat Sep 12, 2015 8:08 pm

dales133 wrote:Tidy work on the lock,they look good in stainless

Thanks Dales133! :D
My off-road camper build on an M116A3 military chassis:
http://www.tnttt.com/viewtopic.php?f=50&t=62581
Tow vehicle: 2008 Jeep Liberty with a 4 inch lift.
User avatar
lfhoward
1000 Club
1000 Club
 
Posts: 1370
Joined: Wed Jan 22, 2014 6:10 pm
Location: Philadelphia, PA

Re: M116A3 Build

Postby lfhoward » Sat Sep 12, 2015 8:08 pm

Here are my prototype clamp rings, version 1.0.

Image

Image

The outer plywood square is the same thickness (1/4 inch) as the inner door/ wall skin, so imagine that it is continuous over the whole surface.

The J-shaped wooden clamp rings hook over a lip on the inside of the aluminum window, and can be sandwiched in between the wall skin and the window, and secured in place with screws. The tightness, or how much it draws the window in, can be adjusted by changing the thickness of the wooden clamp ring, and the screws pull it (and the window) inward.

Image

These two little prototype pieces actually hold the window in place all by themselves, at least here in the workshop. For the final version that will experience the rigors of the road, I will make a longer strip of wood that fits each straight window edge, so it's clamping every surface except the rounded corners. I guess I would make 4 cosmetic wooden corner pieces to hide the aluminum window corners, so it would look consistent from the inside.
Last edited by lfhoward on Sun May 13, 2018 2:54 pm, edited 2 times in total.
My off-road camper build on an M116A3 military chassis:
http://www.tnttt.com/viewtopic.php?f=50&t=62581
Tow vehicle: 2008 Jeep Liberty with a 4 inch lift.
User avatar
lfhoward
1000 Club
1000 Club
 
Posts: 1370
Joined: Wed Jan 22, 2014 6:10 pm
Location: Philadelphia, PA

Re: M116A3 Build

Postby noseoil » Sat Sep 12, 2015 10:29 pm

Looks like you've figured it out & the trim parts should work very well to hold the window firmly. Watch the tension on the wood edge, as it could break across the grain if it's pulled in too tightly, but the locking action seems to be what you need to hold things in place. The wood trim could serve as an accent piece & hold the curtain rods in place as well. A contrasting stain perhaps, just slightly darker than the walls?

What type of bedding compound will you be using for the seal of the window edge to the skin? A butyl rubber tape or sikaflex type of caulk would do the job, grip well & set up firmly. Once the seal is made, the window should be there to stay & the wood trim is just holding against the wall. Really shaping up nicely now.

Good feeling to solve the small stuff in a positive manner, isn't it? Well done! :thumbsup:
Build log: viewtopic.php?f=50&t=60248
The time you spend planning is more important than the time you spend building.........

137905
User avatar
noseoil
1000 Club
1000 Club
 
Posts: 1822
Images: 670
Joined: Sun Apr 27, 2014 8:46 am
Location: Raton, New Mexico, living the good life!
Top

Re: M116A3 Build

Postby lfhoward » Sat Sep 12, 2015 11:39 pm

Thanks, Noseoil! It is good to be able to figure out some of these details like how to install doors and windows, since they have been on my mind. Nothing like a good rainy day in the shop for creative solutions.

Now that I am looking at my post, I'm actually thinking about improvements. I could potentially have a trim ring that goes all the way around (not just the straight edges) if I make it out of several layers of plywood instead of boards. It might look nicer, being continuous. Do you think TB II would hold the plywood layers together well enough (and the window in) over the long haul?

To answer your question, I have been considering the butyl tape to seal the windows and fantastic fan. (And the roof edge moldings too?) I've heard good things about Sikaflex (probably from you, ha ha!) so that sounds like a good option too. I will need a flexible sealer for the seams where the aluminum sheets overlap (4' wide sheets, 5' tall cabin) as well as at the bottom of the body where the aluminum ends as it meets the steel trailer deck. Would Sikaflex do the trick there? Or is PL Premium a good enough sealer for what I need to do?

For windows and roof edge moldings I have also been given the advice to use RV putty instead of butyl tape because it is more easily removed and repaired down the road (without destroying the edge moldings). What are your thoughts about that particular idea? It seems like butyl tape is a more commonly used method.

Have a great evening, and THANKS!
My off-road camper build on an M116A3 military chassis:
http://www.tnttt.com/viewtopic.php?f=50&t=62581
Tow vehicle: 2008 Jeep Liberty with a 4 inch lift.
User avatar
lfhoward
1000 Club
1000 Club
 
Posts: 1370
Joined: Wed Jan 22, 2014 6:10 pm
Location: Philadelphia, PA
Top

Re: M116A3 Build

Postby noseoil » Sun Sep 13, 2015 8:06 am

TB II is fine for a permanent solution on interior woodwork, assemblies, trim or moldings. That's what I've been using for my build & its bonding strength is fine. I will say that here in the (excessive) heat, it tends to discolor & turn dark over time if there's a lot of squeeze-out which is laying on the surface, but not a deal breaker for me & the price is right. I've used nearly a gallon on my small build. Here's a shot showing what I mean about the discoloration. The vertical edge between the backing (1/4" bulkhead) and the cabinet partitions had some squeeze-out which was left in place during assembly. I had to work too fast & by the time I got back to it, the glue was already dry & set. Left it there since it's behind cabinet doors & will be covered up by the stuff in the cabinet anyway, but you get an idea of how it looks if left in place here in the heat. Normally it would be sanded off or removed with a wet rag, not this time.

Image

There are several schools of thought about sealants and their uses. Tony likes the pure silicone approach, while others don't and refuse to use it anywhere on a build (?). It can trap dirt & dust & look bad after a drive down a dusty road. If you ever have to repair the seam, nothing sticks to it. Here's what I'm going to do, but please do some reading so there will be a bit more confusion on the subject before any clarity sets in & you make your decision.

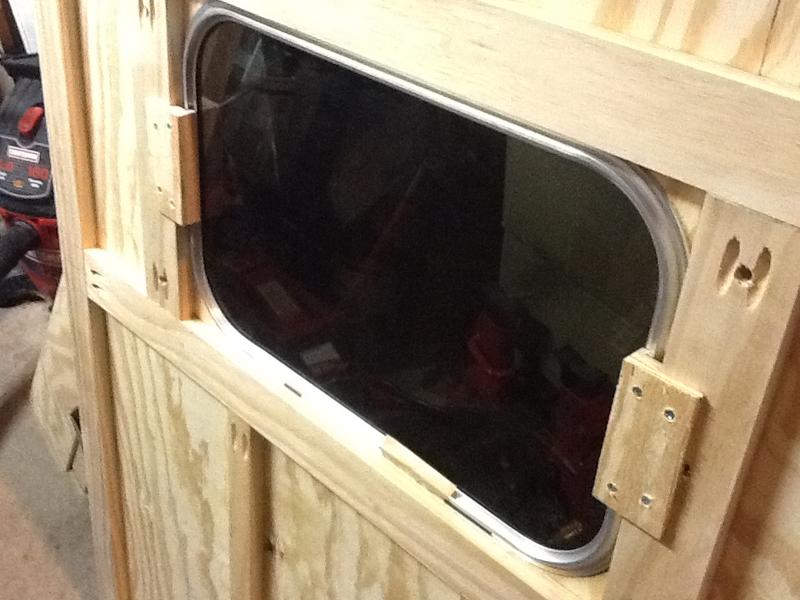
It's butyl rubber tape for all permanent installations for me (ceiling vent, windows, molding edges where applicable). From reading, this tape works well enough, but can have some issues over time. It sticks well & remains flexible but there's some squeeze-out involved with fasteners at the edges, as well as some "creep" at times. From my reading about it, there seems to be a good solution to this problem. A layer of tape can be used to keep it off of the stuff you don't want it sticking to or oozing out of (to look too ugly over time). A utility knife (grind the tip to a blunt edge & run it backwards) can be used to score a 45 degree angle under the edge of the trim or molding, to create a void or "pocket" which goes under the trim edge. A plastic scraper can be used to clean up the edge if necessary. This leaves a 45 degree void at the molding edge, which can then be filled with ProFlex caulk and then cleaned up with soapy water & a finger nail. This makes a nice finished joint, which looks good & won't attract dirt or turn black over time (one issue with the butyl tape). It's all a compromise, of course.

As far as sealing between sheets, a good caulk like Sikaflex will work fine, but you will have made a permanent bond once the fasteners are in place & it sets up. Make sure to degrease the area to be sealed first, so a good bond can be made. You could also look into some 3M bonding tape, but care must be taken to make sure it's in the right place the first time it's located. If not you will have a bad edge which isn't correct & will have to start over. It's really sticky stuff & is permament!

To me, a permanent bond is what I'm after & I don't want issues down the road, which will be a problem & need attention when I have other things to do. I'm spending enough time building this thing that I don't want to have an ongoing issue with repairs & delamination later. If it can be avoided with a bit of time & care during the construction process, I'm all for it!
Build log: viewtopic.php?f=50&t=60248
The time you spend planning is more important than the time you spend building.........

137905
User avatar
noseoil
1000 Club
1000 Club
 
Posts: 1822
Images: 670
Joined: Sun Apr 27, 2014 8:46 am
Location: Raton, New Mexico, living the good life!
Top

Re: M116A3 Build

Postby lfhoward » Sun Sep 13, 2015 11:37 pm

Noseoil, thank you for your detailed response to my questions! I think I will use butyl tape and sikaflex caulk (90% sure at this point, I think). Can the sikaflex be used in screw holes also?

That's very interesting about how PL and butyl tape change color with heat and age. I didn't know that. I have lots of exposed PL down at the junction of the wood sides and metal flat bed. Most will be covered by aluminum, but some won't be able to. Maybe I'll just coat over the top of that seam with more sikaflex caulk. By the way, what color is Sikaflex?

Today's progress included making the two side utility doors and routing out their latch holes, as well as cutting more styrofoam insulation to size and installing it in the doors and walls. I'm maybe halfway done with the insulation now. I just keep chipping away at installing the insulation when I have small snippets of time. I have all of the polygons measured, so it is just a matter of cutting the styrofoam sheets to fit.

As I am building these doors I am aware that the door jambs will need attention next. There needs to be an interior lip that the doors will close against. The wood for the lip around the back door could also help thicken and reinforce the back wall, and make it less likely to stress under the weight of the big door when it's open. If I install the lips on the door jambs next, then I can waterproof them when I do my next coat of spar urethane.

Here's another question: is it best to wait until after the aluminum is on to install door hinges and latches? I would love to get the doors mounted on the trailer and fine-tune them, although I think it would be a challenge to reinstall the screws into the same holes later after skinning with aluminum. Thoughts?
My off-road camper build on an M116A3 military chassis:
http://www.tnttt.com/viewtopic.php?f=50&t=62581
Tow vehicle: 2008 Jeep Liberty with a 4 inch lift.
User avatar
lfhoward
1000 Club
1000 Club
 
Posts: 1370
Joined: Wed Jan 22, 2014 6:10 pm
Location: Philadelphia, PA
Top

Re: M116A3 Build

Postby noseoil » Mon Sep 14, 2015 7:57 am

TB II changes color & turns dark, as in the image I posted.

The sikaflex I looked at (252) is available in black or white, I think. Not sure if there are other colors out there with this "adhesive" as it isn't a caulk but a glue.

For the door hinges, since they will take more loading over time & are somewhat picky about gaps & sealing, I would think about using "T" nuts installed from the back side (inside the wall) if at all possible. If the inner skin isn't installed yet on that wall, take a look at potting inserts in 5 min. epoxy as a permanent fastener solution. That way you will have machine screws threaded into a metal "nut" bedded in the wall. I use a 3/4" speed-bore bit (paddle bit) to set them flush in the backing block (3/4" thick plywood or frame in my case) so the skin doesn't bulge where they're located. If you wait to install the inner skin on that wall, you can just drill through the aluminum from the inside with a smaller bit than the diameter of the screw itself. Then use the correct size bit to drill from the outside for the aluminum. Watch out for screw length!

Image

If the inner skin is already in place & you need to pick up the fastener holes, a cardboard or 1/8" plywood template with the holes in place can be made with a center-line marked on the jamb & template. A block nailed & glued to the back side will index the depth or offset from the edge, then the holes can be located & transferred to the aluminum from the outside.

I buy the "T" nuts & screws from a fastener store here in town, as a store hardware sells them at absurdly high prices. In general, they're much cheaper in bulk or by the "each" at a supply house.

The jam can either have a rabbet joint to act as a seal or have an inner panel applied form the back side to provide a lip. In either case, before you do this joint spend a little time figuring out what type of seal or gasket you will use to make the joint water tight. There needs to be sufficient clearance built into the design to accommodate this gasket before you do all of the work on the door. Doors are picky things...

Build is looking nice!
Build log: viewtopic.php?f=50&t=60248
The time you spend planning is more important than the time you spend building.........

137905
User avatar
noseoil
1000 Club
1000 Club
 
Posts: 1822
Images: 670
Joined: Sun Apr 27, 2014 8:46 am
Location: Raton, New Mexico, living the good life!
Top

Re: M116A3 Build

Postby lfhoward » Mon Sep 14, 2015 9:45 am

Noseoil, these are FANTASTIC ideas! Thank you. I don't have time to write much now, but am excited to get the doors on now. Will write more later. THANK YOU. :thumbsup:
My off-road camper build on an M116A3 military chassis:
http://www.tnttt.com/viewtopic.php?f=50&t=62581
Tow vehicle: 2008 Jeep Liberty with a 4 inch lift.
User avatar
lfhoward
1000 Club
1000 Club
 
Posts: 1370
Joined: Wed Jan 22, 2014 6:10 pm
Location: Philadelphia, PA
Top

Re: M116A3 Build

Postby lfhoward » Thu Sep 17, 2015 4:26 pm

Not much in the way of construction has occurred since my last post, but I've ordered/acquired a good number of parts in preparation for skinning.

- Stainless steel screws
- Butyl tape
- Sikaflex 221
- Rubber inserts for my aluminum RV edge moldings
- Tee Nuts and bolts for door hinges and latches
- Solar panel rack
- Solar panel wiring and fuses
- Lunette lock (so no one can easily tow my trailer away while I'm not home)

I'm waiting for a nice day (24 hours without rain) combined with a little free time. The next step is to put another layer of urethane sealer on the trailer, since it leaked with only two.

With an hour here and there to work on it this week, I cut out and installed a few more pieces of wall insulation.

Looking forward to installing doors, windows, and aluminum skin. Hopefully soon.

Cheers,
Lauren
My off-road camper build on an M116A3 military chassis:
http://www.tnttt.com/viewtopic.php?f=50&t=62581
Tow vehicle: 2008 Jeep Liberty with a 4 inch lift.
User avatar
lfhoward
1000 Club
1000 Club
 
Posts: 1370
Joined: Wed Jan 22, 2014 6:10 pm
Location: Philadelphia, PA
Top

Re: M116A3 Build

Postby lfhoward » Sun Sep 20, 2015 7:25 pm

I used up my gallon of urethane this afternoon... Need to get another one to finish the job! The camper has 3 coats now, and the doors have an incomplete first coat. The camper could probably use a 4th coat anyway... It is still soaking the urethane up like a sponge!
My off-road camper build on an M116A3 military chassis:
http://www.tnttt.com/viewtopic.php?f=50&t=62581
Tow vehicle: 2008 Jeep Liberty with a 4 inch lift.
User avatar
lfhoward
1000 Club
1000 Club
 
Posts: 1370
Joined: Wed Jan 22, 2014 6:10 pm
Location: Philadelphia, PA
Top

Re: M116A3 Build

Postby lfhoward » Mon Sep 21, 2015 8:40 pm

I didn't have a vehicle to go to work or to pick up more urethane today, so I worked from home for part of the day and then did some tinkering around the shop. Today's accomplishments:

- Routed out the space in the back door for the RV latch. Since I practiced on a fake "door" earlier, the process went really smoothly and the RV handle fits really well.
- Routed out the latch holes in the utility doors and installed the door latches. These are the same latches you see on aluminum truck boxes.
- Installed hinges on all three doors using tee-nuts and machine screws. The tee-nuts will be hidden inside the doors, under the interior skin.
- Attached the utility doors to the trailer. The utility doors don't have back-stops yet so they swing too far in, but they look good in place!
- Wedged the back door in place using 1/4 inch shims. I need to beef up the thickness of the door jambs with an extra 1x3 on the inside before drilling for the hinges, but the door looks darn good sitting there where it is supposed to go!

None of the door hardware is permanently on at this point. It all has to come off for aluminum skinning, but it is nice to know it fits! And I can drill perfectly placed holes in the aluminum from the inside-out through the tee-nuts. Thanks for that idea, Noseoil!

I'll try to get pics of the doors on later this week.
My off-road camper build on an M116A3 military chassis:
http://www.tnttt.com/viewtopic.php?f=50&t=62581
Tow vehicle: 2008 Jeep Liberty with a 4 inch lift.
User avatar
lfhoward
1000 Club
1000 Club
 
Posts: 1370
Joined: Wed Jan 22, 2014 6:10 pm
Location: Philadelphia, PA
Top

Re: M116A3 Build

Postby lfhoward » Wed Sep 23, 2015 5:39 pm

Some progress this afternoon!

We have a back door with a latch and hinges!
Image

The hinges are held on with tee-nuts, recessed slightly into the wood. The interior skin will cover these up. Thanks, Noseoil!
Image

Clamp ring update!
Image

I'm making them out of plywood using the same principle in my prototype, but this will look much better. I think it will hold the window much better too, as there is more surface area holding the window on, and no grain in the wrong direction that can snap off.
Image

Here's a close up of the wood pieces that will hold the window by its interior lip.
Image
Last edited by lfhoward on Sun May 13, 2018 2:54 pm, edited 2 times in total.
My off-road camper build on an M116A3 military chassis:
http://www.tnttt.com/viewtopic.php?f=50&t=62581
Tow vehicle: 2008 Jeep Liberty with a 4 inch lift.
User avatar
lfhoward
1000 Club
1000 Club
 
Posts: 1370
Joined: Wed Jan 22, 2014 6:10 pm
Location: Philadelphia, PA
Top

Re: M116A3 Build

Postby lfhoward » Fri Sep 25, 2015 12:12 pm

The trim ring test-fits well. It will be permanently installed after skinning the door with aluminum and backing it with 1/4 inch thick material that matches the interior of the trailer. (We haven't picked out what we want on the inside walls yet.)

There are two trim rings left to build, for the front two windows. Those window frames are different (deeper) than the frame on the back door, so I will need to modify my trim ring design slightly. I will keep you updated!
My off-road camper build on an M116A3 military chassis:
http://www.tnttt.com/viewtopic.php?f=50&t=62581
Tow vehicle: 2008 Jeep Liberty with a 4 inch lift.
User avatar
lfhoward
1000 Club
1000 Club
 
Posts: 1370
Joined: Wed Jan 22, 2014 6:10 pm
Location: Philadelphia, PA
Top

Re: M116A3 Build

Postby lfhoward » Fri Sep 25, 2015 6:19 pm

I picked up another gallon of Helmsman Spar Urethane today, so I can finish waterproofing the trailer and it's doors. I also got a small sheet of acrylic plastic (looks like plexiglass) to make spacers for the hinges. (I have to give credit to the Silver Beatle and Atma Travelear for some fantastic door engineering and the photo documentation to go with it!) Lastly, I got a tube of wood filler, as I made a few slip-ups with the router that need to be patched and smoothed over. Nothing serious or structural, but enough to bug me every time I look out the window and see a gouge on the trim ring!
My off-road camper build on an M116A3 military chassis:
http://www.tnttt.com/viewtopic.php?f=50&t=62581
Tow vehicle: 2008 Jeep Liberty with a 4 inch lift.
User avatar
lfhoward
1000 Club
1000 Club
 
Posts: 1370
Joined: Wed Jan 22, 2014 6:10 pm
Location: Philadelphia, PA
Top

Re: M116A3 Build

Postby lfhoward » Fri Sep 25, 2015 6:40 pm

This door thread is particularly useful!
http://www.tnttt.com/viewtopic.php?f=21&t=62204

Here are a couple of excellent sketches by Aggie79 from the thread:

Image

Image
My off-road camper build on an M116A3 military chassis:
http://www.tnttt.com/viewtopic.php?f=50&t=62581
Tow vehicle: 2008 Jeep Liberty with a 4 inch lift.
User avatar
lfhoward
1000 Club
1000 Club
 
Posts: 1370
Joined: Wed Jan 22, 2014 6:10 pm
Location: Philadelphia, PA
Top

PreviousNext

Return to Build Journals

Who is online

Users browsing this forum: No registered users and 8 guests