Tucson tortoise: Edit for photos

...ask your questions in the appropriate forums BUT document your build here...preferably in a single thread...dates for updates, are appreciated....

Re: Tucson tortoise

Postby noseoil » Sun Sep 20, 2015 7:48 am

That's the best shot of what's happening Frank, but I'll try to explain it better. To everyone else, just skip this one as it will be pretty boring to read about and you probably have better things to do with your time.

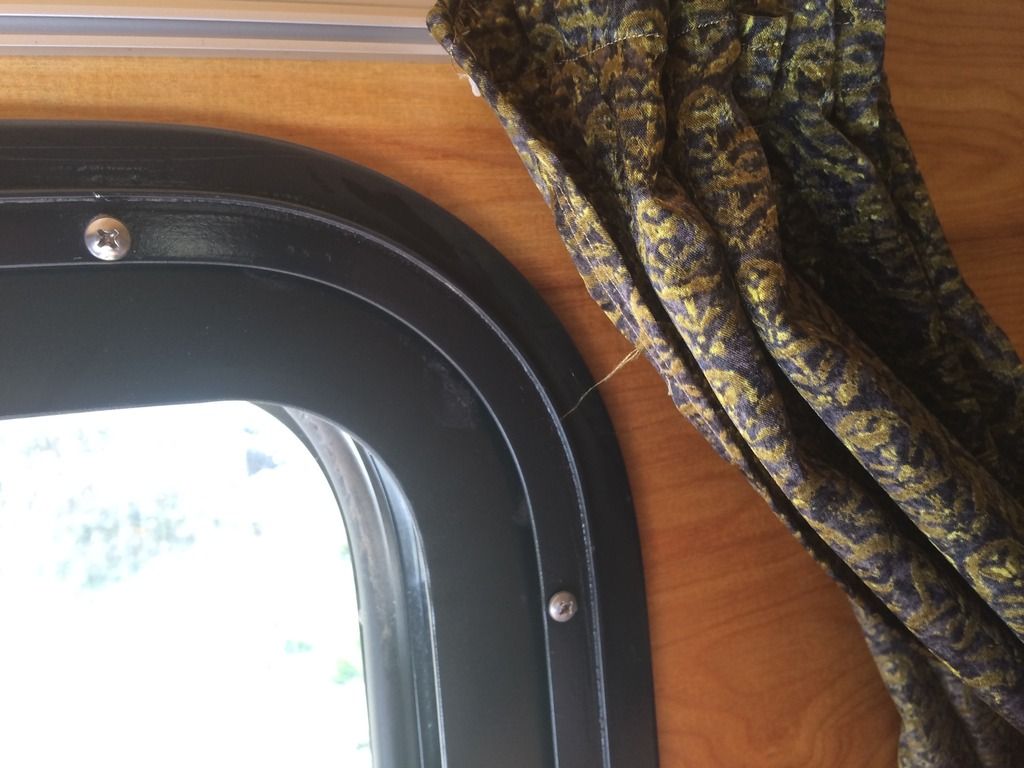
The trim ring, which is fastened from the back (inside the wall), has a rabbeted edge which lips over the inner edge of the door frame. To work properly, it has to go all the way around the edge of the frame. It isn't a flat trim, but has a cross-section which looks like this. In the picture, the top part rests against the wall (on the inside face) & the lower part clamps against the door frame edge with the screws.
160121

The screws go through the back side of the trim ring, then self-tap into a "lip" which is around the edge of the door frame. When it pulls up properly, the trim ring is fastened to the metal door frame itself & acts like a clamp, which pulls the gasket tight against the outside skin by pulling from the inside (back side) of the door frame & wall. The inner side of the wall (or the inside of the cabin wall) is what the trim ring pulls against.

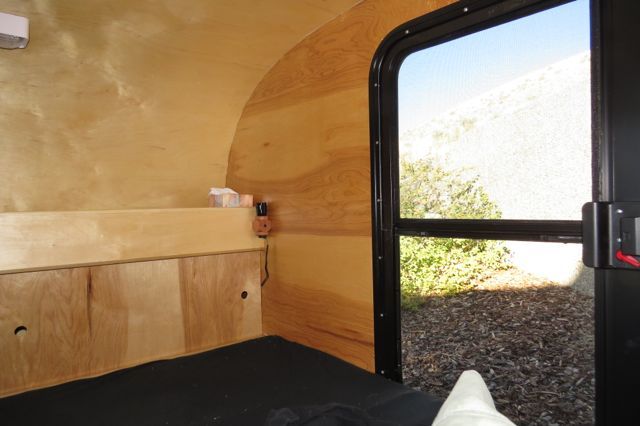
Here's a picture of what it does on the inside of the cabin. The left side is in place where it would go but the right side is "floating" due to the fit.
160122

With the metal clamp piece in place to hold the trim ring together, there was no way to make the trim ring fit around the door frame. It would fit around three corners, but it was too small to fit around the 4th corner, no way to make it fit over the back of the door! That's what the first pictures show in the above images. The trim ring is too small to fit around the door. Hope this makes more sense now! I'm getting confused just trying to write it down again. If I get the #*^^# door installed, I'll take a picture!
Last edited by noseoil on Fri Nov 08, 2019 8:55 am, edited 1 time in total.
Build log: viewtopic.php?f=50&t=60248
The time you spend planning is more important than the time you spend building.........

137905
User avatar
noseoil
1000 Club
1000 Club
 
Posts: 1822
Images: 670
Joined: Sun Apr 27, 2014 8:46 am
Location: Raton, New Mexico, living the good life!

Re: Tucson tortoise

Postby tony.latham » Sun Sep 20, 2015 11:43 am

The trim ring is too small to fit around the door.


What's "Frank" saying?

Tony
User avatar
tony.latham
Gold Donating Member
 
Posts: 7073
Images: 17
Joined: Mon Jul 08, 2013 4:03 pm
Location: Middle of Idaho on the edge of nowhere

Re: Tucson tortoise

Postby noseoil » Sun Sep 20, 2015 3:11 pm

OK, the doors are both installed. It did pull up better, but I'm still not happy about the trim rings. They don't seem to work very well. The driver's side door "bumps" into the jamb when being closed, so I'll take a look at trying to shim or adjust under the trim ring so it closes a little better. The basic problem is slop in the hinge itself. There's enough run-out & play that the door is bumping against the jamb as it swings & pivots around the hinge. Here's a picture from the outside, looks fine this way. The passenger side door is better & closes properly.
160123

Here's what the inside corners look like with the screws pulled up tight & run all the way home. The corners don't seem to want to settle down & pull in flat. Here's the gap as seen from above. Pretty much what they look like with all the screws run in & fully tightened.
160118

You can see where the two screws are at the corners & how they pull in, but the corners still don't want to lay flat & are pooched out a little, showing a gap. Anyone else have this happen to their trim rings & door corners? Certainly not the end of the world, but a bit annoying when I think about what the doors cost with shipping & trim rings. About the only thing I could do now is add an extra screw at each corner, to try to pull them down a bit tighter and flatten things out more.

I'm through for the weekend now & will sit & think about this. Figure not doing anything is better than making a mess with a wrong move at this point.
Last edited by noseoil on Fri Nov 08, 2019 8:57 am, edited 1 time in total.
Build log: viewtopic.php?f=50&t=60248
The time you spend planning is more important than the time you spend building.........

137905
User avatar
noseoil
1000 Club
1000 Club
 
Posts: 1822
Images: 670
Joined: Sun Apr 27, 2014 8:46 am
Location: Raton, New Mexico, living the good life!
Top

Re: Tucson tortoise

Postby tony.latham » Sun Sep 20, 2015 10:33 pm

I think my trim ring is about an inch wide. And I painted it....


Image

Tony
User avatar
tony.latham
Gold Donating Member
 
Posts: 7073
Images: 17
Joined: Mon Jul 08, 2013 4:03 pm
Location: Middle of Idaho on the edge of nowhere
Top

Re: Tucson tortoise

Postby noseoil » Thu Sep 24, 2015 11:02 am

Tony, did your trim ring "pucker" at the corners or did it lay flat?
Build log: viewtopic.php?f=50&t=60248
The time you spend planning is more important than the time you spend building.........

137905
User avatar
noseoil
1000 Club
1000 Club
 
Posts: 1822
Images: 670
Joined: Sun Apr 27, 2014 8:46 am
Location: Raton, New Mexico, living the good life!
Top

Re: Tucson tortoise

Postby tony.latham » Thu Sep 24, 2015 10:35 pm

noseoil wrote:Tony, did your trim ring "pucker" at the corners or did it lay flat?


Nope. They're flat.

Tony

Edit: I just walked over to our 'drop and snapped this.

Image

Now I'm tempted to walk back out there, get in, turn the fan on, and take a nap. You may have made my day. 8) It's a nice Indian Summer day up here.

Tony
User avatar
tony.latham
Gold Donating Member
 
Posts: 7073
Images: 17
Joined: Mon Jul 08, 2013 4:03 pm
Location: Middle of Idaho on the edge of nowhere
Top

Re: Tucson tortoise

Postby noseoil » Sat Sep 26, 2015 3:49 pm

Thanks Tony, I've called Frank and sent a couple of pictures to him to see what he thinks. From what he said, it sounds like the rings were made undersize for the doors & don't fit as they were designed.

A couple more shots of the aluminum from today. Starting on the roof & edge trim pieces. Here's the front panel going in place.
160124

Here's a detail shot of the "snoot" for the battery vent. It came with 4 screws, but didn't pull flat with the butyl rubber tape under it, so I added 4 more. It's a bit much, but should be there for good now & no leaks.
160125

The snoot cover & trim molding for the removable shelf. There's one shelf on each side, a bit more space for the galley when we need it.
160126

Galley wall trim at the hatch opening.
160127
Last edited by noseoil on Fri Nov 08, 2019 9:01 am, edited 1 time in total.
Build log: viewtopic.php?f=50&t=60248
The time you spend planning is more important than the time you spend building.........

137905
User avatar
noseoil
1000 Club
1000 Club
 
Posts: 1822
Images: 670
Joined: Sun Apr 27, 2014 8:46 am
Location: Raton, New Mexico, living the good life!
Top

Re: Tucson tortoise

Postby tony.latham » Sat Sep 26, 2015 3:57 pm

I think your colors are going to make for a classic 'drop. It'll need to get it's butt up into the timber for it's debut camping shot.

:pictures: :thumbsup:

T
User avatar
tony.latham
Gold Donating Member
 
Posts: 7073
Images: 17
Joined: Mon Jul 08, 2013 4:03 pm
Location: Middle of Idaho on the edge of nowhere
Top

Re: Tucson tortoise

Postby dales133 » Sat Sep 26, 2015 4:05 pm

Looking great and I agree the colours look fantastic.
What colours the hatch and roof?
User avatar
dales133
4000 Club
4000 Club
 
Posts: 4605
Images: 1
Joined: Mon Oct 13, 2014 5:26 pm
Top

Re: Tucson tortoise

Postby noseoil » Sat Sep 26, 2015 5:54 pm

I'm just going with mill finished aluminum for the roof & hatch. Didn't want to give it all the same color (looking like a large green cough-drop that way) & wanted something which would be a bit cooler in the summer, so plain aluminum should be about right. I can always paint over it if I need to, but I didn't want a white roof, just too plain. I think a jet-black roof would look good with the green also, but no way I'm doing that in Tucson. You could fry an egg on it in the summer if it was black, literally!

I really like the way the black fenders & frame go with the green. The green is called "Ivy Green" & is used in sign making & is just a pre-finished panel. Almost wish I had black trim for the edges, but not going with that. The trim I got up in Phoenix this week from Rockwell American is a polished aluminum & will have a black insert for the roof & hatch trim, so it should look OK once it's installed.

Thanks for the comments guys, means a lot to get positive feedback. Tony, enjoy your nap, I just woke up from mine!
Build log: viewtopic.php?f=50&t=60248
The time you spend planning is more important than the time you spend building.........

137905
User avatar
noseoil
1000 Club
1000 Club
 
Posts: 1822
Images: 670
Joined: Sun Apr 27, 2014 8:46 am
Location: Raton, New Mexico, living the good life!
Top

Re: Tucson tortoise

Postby dales133 » Sat Sep 26, 2015 6:15 pm

Funny how things work out.
I'm on the otherside of the world with differnt ideas and a slightly differnt build but coincidently will end up with a green benroy with black gaurds and an aluminium roof too!
All be it my aluminium is different and the greens differnt but yea... good combo of colours
User avatar
dales133
4000 Club
4000 Club
 
Posts: 4605
Images: 1
Joined: Mon Oct 13, 2014 5:26 pm
Top

Re: Tucson tortoise

Postby noseoil » Sun Sep 27, 2015 5:17 pm

The roof took longer than I had hoped (8 1/2 hours non-stop from early this morning, I'm pooped!). Appreciate everyone's input on it, as it was bad enough knowing what to do and keeping going today.... The trim is fastened in place now, but not bedded yet. Next weekend I'll finish the roof & start on the hatch skin. Did the two bottom strips at the lower sides (1 1/4" edge bedded & complete), the roof panel, & roof trim edges with holes drilled & everything is located for the next session. I was hoping the heat would back down a bit in honor of fall starting, but noooooo! 99 out there now that I'm done, but at least it isn't as muggy (as usual it's a dry heat).

Here's a shot of the front box with the skin wrapped & in place. I sliced into the sheet & cut an opening for the A/C box, then left a tongue at the top & bent it so the box has a roof which is attached to the big sheet. Could be a better fit at the fold, but it will be good enough & as long as it's weatherproof & doesn't leak, I'll be happy. Still lots to do....
160128
Last edited by noseoil on Fri Nov 08, 2019 9:04 am, edited 1 time in total.
Build log: viewtopic.php?f=50&t=60248
The time you spend planning is more important than the time you spend building.........

137905
User avatar
noseoil
1000 Club
1000 Club
 
Posts: 1822
Images: 670
Joined: Sun Apr 27, 2014 8:46 am
Location: Raton, New Mexico, living the good life!
Top

Re: Tucson tortoise

Postby lfhoward » Sun Sep 27, 2015 9:01 pm

Tim, your trailer looks fantastic in that forest green! Really stunning with the green sides/silver roof. Seeing yours with the aluminum skin on is great encouragement. It's the next big step in my build, and I am not a lttle bit nervous about it.

I also really like your interior. Is that baltic birch on the walls and ceiling? Aesthetically, you've really made some beautiful choices for materials in this build.

Sorry to read of the problems with your door trim rings. Sounds frustrating, especially since everything else in your trailer fits so nicely. I wish you the best in figuring that part out. On the bright side, the big windows in your doors make your trailer bright and airy on the inside. It will be a joy to camp in!
My off-road camper build on an M116A3 military chassis:
http://www.tnttt.com/viewtopic.php?f=50&t=62581
Tow vehicle: 2008 Jeep Liberty with a 4 inch lift.
User avatar
lfhoward
1000 Club
1000 Club
 
Posts: 1370
Joined: Wed Jan 22, 2014 6:10 pm
Location: Philadelphia, PA
Top

Re: Tucson tortoise

Postby noseoil » Sun Sep 27, 2015 10:39 pm

Thanks Lauren. The walls & cabinet boxes are baltic birch with a light golden maple stain, just enough to take the white look out of the birch & tone it down a little. The face frames are just alder with the same stain. The colors are working out pretty well on this thing so far.

The ceiling panel (1/8" baltic birch) is covered in unbleached canvas, so it's not a pure white & has some warm tones which go well with the walls. I did the lay-up with contact cement prior to installation, when it was laying flat on saw horses. It seems to have stuck in place fairly well still, in spite of the heat this summer. I was a little worried about the bonding ability of the glue I used, but so far it's holding well enough. I need to make up a couple of pieces of trim to cover the corners at the walls, since the 60" wide canvas was only about 58" as it came on the roll (go figure on that one). I should have brought a tape measure with me to the fabric store, next time.... There's a gap of about 5/16" along both edges which needs to be covered up with the molding. My build being 60 5/8" has been challenging at times.

The trim rings are "sort of" OK, they're just not working out as I thought they would. I've sent a couple of pictures to Frank at Vintage Technologies & am waiting for his answer about them. Basically, they just weren't made properly to fit the doors. Both have the same problem. I think it's a manufacturing problem coming from his vendor.

Your build is getting closer to being ready for the skins! It's time consuming, but you got a great deal on the aluminum, so it should work out very well. Just take your time, measure twice & cut once!
Build log: viewtopic.php?f=50&t=60248
The time you spend planning is more important than the time you spend building.........

137905
User avatar
noseoil
1000 Club
1000 Club
 
Posts: 1822
Images: 670
Joined: Sun Apr 27, 2014 8:46 am
Location: Raton, New Mexico, living the good life!
Top

Re: Tucson tortoise

Postby McGuffin » Mon Sep 28, 2015 5:46 pm

Hi There,

Great quality on the build. Seems like you did a great job on the roof too. It's amazing how the aluminium trims sets the whole lot off to perfection. You are definitly getting there :thumbsup:

Image

:applause:

Larry
User avatar
McGuffin
Teardrop Advisor
 
Posts: 90
Images: 211
Joined: Sat Jan 04, 2014 6:04 am
Location: Ireland
Top

PreviousNext

Return to Build Journals

Who is online

Users browsing this forum: No registered users and 16 guests