" The White Elephant" formerly know as "KISS" Skin on

...ask your questions in the appropriate forums BUT document your build here...preferably in a single thread...dates for updates, are appreciated....

" The White Elephant" formerly know as "KISS" Skin on

Postby lrrice » Mon Aug 04, 2014 11:09 pm

First, a little background. I've been lurking here for a while stealing everyone,s knowledge. I really like tear drops but have been informed by the other half that tents are for camping, the only reason to pull a trailer is if it has a bathroom in it. So I did a massive rebuild on a 15' bread box several years ago which we have been using as a family. I still want a little trailer for one or two that doesn't tow like a parachute. I also need to pull it with my work truck occasionally so it really doesn't need to look like a camper either. And I need to be able to haul tools, bike, etc. I also want room to sit comfortably off of the floor out of the weather and bugs. Of course it needs a shower and portapot at minimum too. I dont need power or plumbed galley or other nonsense. So if I can figure out how to attach some pictures I will. I have probably spent more time learning sketch up than it will take to build the frame. The results are poor at best.
[img]
frame.jpg
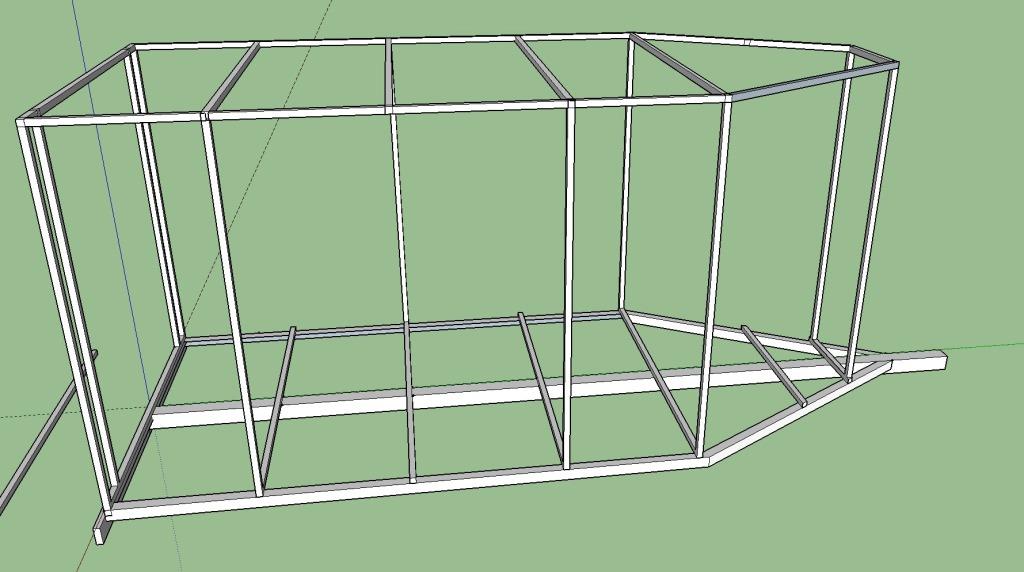
frame.jpg (72.16 KiB) Viewed 2781 times

The frame is based on metal I already have which is the reason for the odd shape. Then I will have to add square tube to make the box
[/img]
I am planning to sandwich 1" foam between 5mm luan to make the walls. The out side will be wrapped with painted muslin for a smooth shiny(ish) shell. The shower will be in the nose with an expandable bench/bed and storage/galley at the rear. The door will hinge up to add some shade and rain protection.

Size is 5x8 for the main box and the 3' nose tapers to 2'wide.

Any concerns, comments, suggestions are appreciated.
Last edited by lrrice on Wed Dec 02, 2015 8:23 pm, edited 3 times in total.
lrrice
Teardrop Builder
 
Posts: 27
Images: 7
Joined: Sat Jul 19, 2014 4:20 am
Location: Southwest NM

Re: KISS drawings

Postby bc toys » Tue Aug 05, 2014 7:03 am

looking forward to following this build
bc toys
2000 Club
2000 Club
 
Posts: 2217
Images: 42
Joined: Sun Jun 28, 2009 2:45 pm
Location: LAS VEGAS NV

Re: KISS drawings

Postby KCStudly » Tue Aug 05, 2014 4:52 pm

Sounds like a reasonable plan. :thumbsup:

I would plan on leaving an inch or two of flat wall in between the tapered front section and the door jamb just to make sure you have a good flat area to make the door seal happen.

Also, take the time now to figure out how your metal frame members are going to come together and get joined; in the sketch up rendering the intersections all seem to collide in a big jumble. You may need to cope, or offset some of the joints so that they can be welded properly.
KC
My Build: The Poet Creek Express Hybrid Foamie

Poet Creek Or Bust
Engineering the TLAR way - "That Looks About Right"
TnTTT ORIGINAL 200A LANTERN CLUB = "The 200A Gang"
Green Lantern Corpsmen
User avatar
KCStudly
Donating Member
 
Posts: 9640
Images: 8169
Joined: Mon Feb 06, 2012 10:18 pm
Location: Southeastern CT, USA
Top

Re: KISS drawings

Postby lrrice » Tue Aug 05, 2014 10:37 pm

All my sketch up is collided and jumbled. Probably because I only have the vaguest idea of how to use it. You should see the back of the box drawing, it looks like the back of vacuum formed plastic. I'm still kicking around how to do the seals with the muslin skin.
lrrice
Teardrop Builder
 
Posts: 27
Images: 7
Joined: Sat Jul 19, 2014 4:20 am
Location: Southwest NM
Top

Re: KISS drawings

Postby lrrice » Sat Oct 10, 2015 12:02 am

Ok so I've been pretty busy but have managed to do a little work on this and finally have time to post some pics. I bought a frame from a pop up that had been scrapped and managed to get and axle, stabilizer and jacks from it.
parts.jpg
parts.jpg (163.94 KiB) Viewed 2385 times

Axle start.jpg
Axle start.jpg (176.08 KiB) Viewed 2385 times

The axle is too narrow so here is a brief tutorial on making it the size I need.
Axle cut.jpg
First, cut it in half
Axle cut.jpg (169 KiB) Viewed 2385 times

Make sure the bearings are good with no slop at all and mount the rims with no tires on the hubs. You will need a jig a little longer than the finished axle. A piece of straight I-beam or large channel iron are best. Two large pieces of pipe clamped together will work. Or you can use your trailer parts like I did. Just as long as it is straight.
lrrice
Teardrop Builder
 
Posts: 27
Images: 7
Joined: Sat Jul 19, 2014 4:20 am
Location: Southwest NM
Top

Re: KISS drawings

Postby lrrice » Sat Oct 10, 2015 12:13 am

Axle Jig.jpg
Here is the axle jig I used.
Axle Jig.jpg (203.2 KiB) Viewed 2385 times

Now you will need a sleeve that fits tightly over the axle. Inside will work too but I like it out side. Drill 5/8 (or larger) holes around the sleeve I used two staggered rows of 3 holes on each end of the sleeve.
axle sleeve.jpg
axle sleeve.jpg (182.2 KiB) Viewed 2385 times

Place your rims in the jig making sure the rims are in good shape and not bent. The jig will hold them parallel. Then slide the axle ends into the sleeve until the desired width is obtained.
axle in sleeve.jpg
Center the sleeve between the hubs.
axle in sleeve.jpg (182.82 KiB) Viewed 2385 times
lrrice
Teardrop Builder
 
Posts: 27
Images: 7
Joined: Sat Jul 19, 2014 4:20 am
Location: Southwest NM
Top

Re: KISS drawings

Postby lrrice » Sat Oct 10, 2015 12:22 am

Double and triple check everything. Are the rims firmly in the jig? Is the sleeve centered? Then level the spring perches
level perches.jpg
make sure both perches are perfectly level.
level perches.jpg (217.03 KiB) Viewed 2383 times

once the perches are level and everything is rechecked, plug weld the holes in the sleeve. Start in the center to make sure you get good penetration of the axle then work the puddle out in a circular motion to weld the sleeve.
plug weld sleeve.jpg
plug weld sleeve.jpg (186.56 KiB) Viewed 2383 times
Now stand back, have a beer and admire your handy work.
lrrice
Teardrop Builder
 
Posts: 27
Images: 7
Joined: Sat Jul 19, 2014 4:20 am
Location: Southwest NM
Top

Re: KISS drawings

Postby lrrice » Sat Oct 10, 2015 12:35 am

finshed axle.jpg
finshed axle.jpg (138.31 KiB) Viewed 2376 times


Now, on to the trailer. First I sweep the floor then pop a chalk line where I want the center of my trailer to be. Then using the 3-4-5 measurements (three units one way, four units the other and a diagonal of 5 units makes your lines perpendicular to each other) I get the ends of the frame marked out on the floor.
3-4-5.jpg
Getting everything nice and square is the key.
3-4-5.jpg (159.83 KiB) Viewed 2376 times
Then I can use those lines to lay out the rest of the trailer.
drawn on floor.jpg
sorry I didn't get a better picture.
drawn on floor.jpg (148.01 KiB) Viewed 2376 times
. Now I can measure diagonals on the drawing and make sure it is nice and square.
Last edited by lrrice on Sat Oct 10, 2015 12:46 am, edited 1 time in total.
lrrice
Teardrop Builder
 
Posts: 27
Images: 7
Joined: Sat Jul 19, 2014 4:20 am
Location: Southwest NM
Top

Re: KISS drawings

Postby lrrice » Sat Oct 10, 2015 12:41 am

You can also transfer the angle from the floor to your saw to cut your material.
transfer angles.jpg
No Math!
transfer angles.jpg (177.15 KiB) Viewed 2375 times

And now materials are cut and layed out on the drawing on the floor so you can make sure nothing moves while your tacking it all together.
Attachments
ready to tack.jpg
All ready to tack and weld up.
ready to tack.jpg (163.64 KiB) Viewed 2375 times
lrrice
Teardrop Builder
 
Posts: 27
Images: 7
Joined: Sat Jul 19, 2014 4:20 am
Location: Southwest NM
Top

Re: KISS drawings Finally got some time to work on it. Pics

Postby Talia62 » Sat Oct 10, 2015 10:55 am

Thank you for showing the axle modification! I passed up a popup last week because the wheelbase was too wide for my tow vehicle, and I can't really afford a brand new axle assembly.. If I had run across this before that, I would have bought it and shortened the axle instead.
Talia62
Teardrop Master
 
Posts: 123
Joined: Thu Sep 17, 2015 5:55 pm
Top

Re: KISS drawings Finally got some time to work on it. Pics

Postby angib » Sat Oct 10, 2015 1:50 pm

That's a good narrowing of an axle, with all strength retained.

But sweeping the floor before starting work, that's just gettin' fancy.....
User avatar
angib
5000 Club
5000 Club
 
Posts: 5783
Images: 231
Joined: Fri Apr 30, 2004 2:04 pm
Location: (Olde) England
Top

Re: KISS drawings Finally got some time to work on it. Pics

Postby lrrice » Sat Oct 10, 2015 2:51 pm

I only sweep when I need the chalk to stick to the floor and not the normal dirt and oil. :D

You can use a similar method to make axles from the front spindles off an older truck with drum brakes. Depending on your welding, its stronger and better than the cheap axles currently available.

Got the axle and shoes on her. Shes a little taller than I expected. Bigger rims raised it quite a bit.
wheels on.jpg
wheels on.jpg (76.58 KiB) Viewed 2290 times
lrrice
Teardrop Builder
 
Posts: 27
Images: 7
Joined: Sat Jul 19, 2014 4:20 am
Location: Southwest NM
Top

Re: KISS drawings Finally got some time to work on it. Pics

Postby KCStudly » Sat Oct 10, 2015 10:41 pm

Maybe put the axle over the springs (if you have enough up travel)?
KC
My Build: The Poet Creek Express Hybrid Foamie

Poet Creek Or Bust
Engineering the TLAR way - "That Looks About Right"
TnTTT ORIGINAL 200A LANTERN CLUB = "The 200A Gang"
Green Lantern Corpsmen
User avatar
KCStudly
Donating Member
 
Posts: 9640
Images: 8169
Joined: Mon Feb 06, 2012 10:18 pm
Location: Southeastern CT, USA
Top

Re: KISS drawings Finally got some time to work on it. Pics

Postby lrrice » Sun Oct 11, 2015 2:42 am

Thanks, that is definitely an option. Should have plenty of travel and the axle didn't have much camber so it should work without welding on new perches (again).
lrrice
Teardrop Builder
 
Posts: 27
Images: 7
Joined: Sat Jul 19, 2014 4:20 am
Location: Southwest NM
Top

Re: KISS drawings Finally got some time to work on it. Pics

Postby lrrice » Fri Oct 16, 2015 11:53 pm

More build pics
Floor cross members tacked in
floor.jpg
floor.jpg (80.24 KiB) Viewed 2113 times

Cut the roof bow partially through at the center.
bow cut.jpg
bow cut.jpg (149.49 KiB) Viewed 2113 times

and bent it.
bow bent.jpg
bow bent.jpg (114.06 KiB) Viewed 2113 times
lrrice
Teardrop Builder
 
Posts: 27
Images: 7
Joined: Sat Jul 19, 2014 4:20 am
Location: Southwest NM
Top

Next

Return to Build Journals

Who is online

Users browsing this forum: jdeleon and 4 guests