notre larme - Modified Gruman 2

...ask your questions in the appropriate forums BUT document your build here...preferably in a single thread...dates for updates, are appreciated....

Re: notre larme - Modified Gruman 2

Postby Strop » Sat Oct 17, 2015 1:43 am

Well it I setting exciting. A bit more work and I will be ready for a dry fit of the walls. I have placed the front cupboards in place, just need to refit doors and lift up flaps.

Back cupboard unit almost finished but want to do a bit more sealing before I lift it into position.

Then - dry fit walls.
ImageUploadedByTapatalk1445064161.857299.jpg
ImageUploadedByTapatalk1445064161.857299.jpg (42.62 KiB) Viewed 1119 times

ImageUploadedByTapatalk1445064144.748538.jpg
ImageUploadedByTapatalk1445064144.748538.jpg (37.98 KiB) Viewed 1119 times

ImageUploadedByTapatalk1445064125.984526.jpg
ImageUploadedByTapatalk1445064125.984526.jpg (44.26 KiB) Viewed 1119 times


I have used so many kreg screws it is not funny. I hope they work.

All he best

Laurie
Strop
Teardrop Master
 
Posts: 148
Images: 10
Joined: Wed May 15, 2013 3:12 pm
Location: Armidale, NSW, Australia

Re: notre larme - Modified Gruman 2

Postby Breytie » Sat Oct 17, 2015 2:39 am

Strop wrote: The price was right compared to custom made tanks, the only downfall being no baffles. I am keeping my fingers crossed on that one.


That should not be a problem provided it is 100% full of either water or air while on the move, never a mix of the two as that is when sloshing happens that causes instability.
Experience is learning from your own mistakes
Here I make mine in public: My build
Breytie
Teardrop Master
 
Posts: 209
Images: 36
Joined: Sun Sep 04, 2011 4:21 pm

Re: notre larme - Modified Gruman 2

Postby dales133 » Sat Oct 17, 2015 3:03 am

Nice work laurie.
Youve realy got off the ground running.
I have exactly the same water tank and im adding a marine fuel tank breather to the top outlet to aid with filling and slosh.
Is your out in the red center just tape it up to stop crap getting in there.
Id love to shoot up and see your build sometime soon and your more than welcome to do the same..
Couple of things i noticed is your using alot of marine ply.
I nearly did but with the right ptecautions standard hardwood ply will surfice.
Give me a call again any time i enjoyed the chat and ive purchassed alot since we last spoke so can probably advise you further.

Im super keen on getting my hands on 2 bar checker plate ,if you could help me there id be a happy man.
Cheers dale
User avatar
dales133
4000 Club
4000 Club
 
Posts: 4605
Images: 1
Joined: Mon Oct 13, 2014 5:26 pm
Top

Re: notre larme - Modified Gruman 2

Postby Strop » Sat Oct 17, 2015 4:19 am

Bertie, I was thinking the same but there is always that cup of tea or coffee on the way home and not many places to get water. Dale, I will have to look up your idea.

Dale, more than welcome to drop up but there are 3 Armidales in Australia. I should have been a bit more specific in my information. You have Armidale down there in Melbourne. Armadale in WA and lastly little old me in Armidale NSW. Half way between Brisbane and Sydney.

I have used a lot of ordinary structural ply in the build. Only used marine ply for the cabinets. I have already used 4 litres of polyurethane so far and more to go.

I used 19mm ply for the floor and I have a raised floor, also 19mm ply for under bed storage inside the tear. The walls are 3 types of ply sandwiched. Middle layer is 15mm ply with as much cut away as I could and filled with styrofoam. I had to join 2 sheets with a lap join. I then put a 7mm outside piece on. This was not joined but just butted up against each other and the trimmed with the router. The 15mm piece sits on the floor and the 7mm piece extends down to cover the trailer frame. I will have to put a little bit of bog in to fill the gaps but much easier than joining etc. last was a 4mm piece to be the interior wall finish.

With the wall I am going to run a bead of adhesive along the bottom edge of the 15mm piece and inside of the 7mm so it should adhere to the floor top, side and trailer side. This will be added to with 2 kreg screws every 150mm. I also have to run a piece of 15mm ply around the edge for the raised bed to sit on. Going to glue this to inside of side wall kreg screws into the floor and a couple of screws from outside into that piece. Should be rock solid.

All the best

Laurie
Strop
Teardrop Master
 
Posts: 148
Images: 10
Joined: Wed May 15, 2013 3:12 pm
Location: Armidale, NSW, Australia
Top

Re: notre larme - Modified Gruman 2

Postby Strop » Sat Oct 17, 2015 4:22 am

Bertie, I was thinking the same but there is always that cup of tea or coffee on the way home and not many places to get water. Dale, I will have to look up your idea.

Dale, more than welcome to drop up but there are 3 Armidales in Australia. I should have been a bit more specific in my information. You have Armidale down there in Melbourne. Armadale in WA and lastly little old me in Armidale NSW. Half way between Brisbane and Sydney.

I have used a lot of ordinary structural ply in the build. Only used marine ply for the cabinets. I have already used 4 litres of polyurethane so far and more to go.

I used 19mm ply for the floor and I have a raised floor, also 19mm ply for under bed storage inside the tear. The walls are 3 types of ply sandwiched. Middle layer is 15mm ply with as much cut away as I could and filled with styrofoam. I had to join 2 sheets with a lap join. I then put a 7mm outside piece on. This was not joined but just butted up against each other and the trimmed with the router. The 15mm piece sits on the floor and the 7mm piece extends down to cover the trailer frame. I will have to put a little bit of bog in to fill the gaps but much easier than joining etc. last was a 4mm piece to be the interior wall finish.

With the wall I am going to run a bead of adhesive along the bottom edge of the 15mm piece and inside of the 7mm so it should adhere to the floor top, side and trailer side. This will be added to with 2 kreg screws every 150mm. I also have to run a piece of 15mm ply around the edge for the raised bed to sit on. Going to glue this to inside of side wall kreg screws into the floor and a couple of screws from outside into that piece. Should be rock solid.

All the best

Laurie
Strop
Teardrop Master
 
Posts: 148
Images: 10
Joined: Wed May 15, 2013 3:12 pm
Location: Armidale, NSW, Australia
Top

Re: notre larme - Modified Gruman 2

Postby Sheddie » Sat Oct 17, 2015 4:38 am

Hi Laurie, good to see you are back in to it and progress is going well. All looking good. :thumbsup: Frame looks nice, it was worth the wait.
User avatar
Sheddie
1000 Club
1000 Club
 
Posts: 1499
Images: 1129
Joined: Mon Jul 01, 2013 3:26 pm
Location: Whangarei, New Zealand
Top

Re: notre larme - Modified Gruman 2

Postby Strop » Tue Oct 20, 2015 1:42 am

Well I hope someone is reading this because I am seeking some options. I just did a dry fit and while I am happy I also have a problem.

The trailer has a bow in it. Didn't check before putting the floor on - so that could be it also - but there is a bow in the middle. A high point. Therefore I see that I have a couple of options.

1. I can pack under the side where the wall sits over the floor
2. I can sand the floor back along the edge so it is flat
3. A combination of both.

The packing will probably be easier. I was going to use pocket screws along the wall to pull it down onto the floor. Also a run of glue along the edge. If I pack it I could then run a bead of glue/adhesive to fill in any remaining gaps.

Any other ideas?

Going to my phone to post some pictures

Laurie
Strop
Teardrop Master
 
Posts: 148
Images: 10
Joined: Wed May 15, 2013 3:12 pm
Location: Armidale, NSW, Australia
Top

Re: notre larme - Modified Gruman 2

Postby Strop » Tue Oct 20, 2015 1:44 am

ImageUploadedByTapatalk1445323466.349810.jpg
ImageUploadedByTapatalk1445323466.349810.jpg (97.01 KiB) Viewed 1078 times


ImageUploadedByTapatalk1445323432.345648.jpg
ImageUploadedByTapatalk1445323432.345648.jpg (253.65 KiB) Viewed 1078 times


ImageUploadedByTapatalk1445323411.691055.jpg
ImageUploadedByTapatalk1445323411.691055.jpg (125.71 KiB) Viewed 1078 times
Strop
Teardrop Master
 
Posts: 148
Images: 10
Joined: Wed May 15, 2013 3:12 pm
Location: Armidale, NSW, Australia
Top

Re: notre larme - Modified Gruman 2

Postby Strop » Tue Oct 20, 2015 1:46 am

ImageUploadedByTapatalk1445323605.078410.jpg
ImageUploadedByTapatalk1445323605.078410.jpg (106.1 KiB) Viewed 1073 times
ImageUploadedByTapatalk1445323582.693553.jpg
ImageUploadedByTapatalk1445323582.693553.jpg (102.03 KiB) Viewed 1073 times
ImageUploadedByTapatalk1445323556.208070.jpg
ImageUploadedByTapatalk1445323556.208070.jpg (98.64 KiB) Viewed 1073 times
Strop
Teardrop Master
 
Posts: 148
Images: 10
Joined: Wed May 15, 2013 3:12 pm
Location: Armidale, NSW, Australia
Top

Re: notre larme - Modified Gruman 2

Postby dales133 » Tue Oct 20, 2015 1:48 am

Ive got a bit of a bow in the side of my trailer i just bolted it up and fixed the wall off.
When i took it off the trailer tbe other week to do some work on the trailer i beltsanded tbe floor wall joint flush.
If it isnt much i wouldnt loose much sleep over it.
Only you can judge if its going to be verry noticeable or problematic.
How much of a bow is it?
User avatar
dales133
4000 Club
4000 Club
 
Posts: 4605
Images: 1
Joined: Mon Oct 13, 2014 5:26 pm
Top

Re: notre larme - Modified Gruman 2

Postby dales133 » Tue Oct 20, 2015 1:50 am

Looking good though
User avatar
dales133
4000 Club
4000 Club
 
Posts: 4605
Images: 1
Joined: Mon Oct 13, 2014 5:26 pm
Top

Re: notre larme - Modified Gruman 2

Postby Strop » Tue Oct 20, 2015 2:06 am

The front left corner is about 10mm down. Rear left about 6mm. Front right about 7mm and rear right 7mm.

I know that it will not be seen once finished - perhaps in galley but once the bed is in it disappears. I just don't know if a bead of sika adhesive that thick would really add any bonding strength. Though that is the easy way to fix it. Little blocks every 100-150mm then adhesive between. Also I only have 32mm kreg screws for that not sure if they will now be long enough. Though again any flat screw would do as you will not see them once bed and all is in.

The bow is the right way in the trailer, if such a thing exists - gives me a high point over the axle area.

Laurie
Strop
Teardrop Master
 
Posts: 148
Images: 10
Joined: Wed May 15, 2013 3:12 pm
Location: Armidale, NSW, Australia
Top

Re: notre larme - Modified Gruman 2

Postby dales133 » Tue Oct 20, 2015 2:21 am

You have several options i can see depending on your wall atachment method.
If your wall sits down on your floor you could scribe the shape of the bow into the wall botton and cut/sand the offending material back so its a closer fit.
If the walls attach to the side of the floor as mine does then attach it flush as you can and sand the offending material back.
Option 3 you could use shims of steel like large square washers to pack it level as you bolt it down or option 4 heat the frame rails to straighten them out.
Id do what is easist but i wouldnt just fill the void with sikaflex,that could have major implications for waterproofing and structual integrity if it was to fail down the track
User avatar
dales133
4000 Club
4000 Club
 
Posts: 4605
Images: 1
Joined: Mon Oct 13, 2014 5:26 pm
Top

Re: notre larme - Modified Gruman 2

Postby noseoil » Tue Oct 20, 2015 7:42 am

I think the "best" option would be to fit the assembly of the cabin with everything straight & tight, then do as was suggested & shim to the frame. You wouldn't need steel wedges (too complicated & difficult for tooling setups) but some hardwood wedges would work if they're fastened with a good bedding adhesive to the bottom of the deck & treated for water (epoxy, roof coat, asphalt emulsion?).

My build has a bit of the same thing, so I just ran the aluminum sides down a small amount past the walls & trimmed them out. Used the factory edge as a straight line & it's all good.

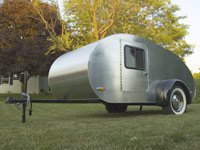
Here's a shot of the side with the edge molding set in place. It only hangs down about 3mm past the bottom of the deck, but it's enough to make the edge look good & true. It looks like it's hanging down more, but that's only the 2x4 sleeper the box is sitting on & angle of the shot.

Image

Once it's dropped onto the frame, who cares & who knows....
Build log: viewtopic.php?f=50&t=60248
The time you spend planning is more important than the time you spend building.........

137905
User avatar
noseoil
1000 Club
1000 Club
 
Posts: 1822
Images: 670
Joined: Sun Apr 27, 2014 8:46 am
Location: Raton, New Mexico, living the good life!
Top

Re: notre larme - Modified Gruman 2

Postby KCStudly » Tue Oct 20, 2015 1:31 pm

Lost my post.

I was going to say the same thing as noseoil, except use the rigid cabin assembly to pull the trailer frame straight to it, like Aggie79/Tom did on his Silver Beatle build. Somewhere in his build (IIRC) he shows how rigid the box becomes and used pipe clamps to draw the chassis to the box. Even though it is steel, the trailer frame is relatively flat and therefore is relatively flexible, especially a bolt together.
KC
My Build: The Poet Creek Express Hybrid Foamie

Poet Creek Or Bust
Engineering the TLAR way - "That Looks About Right"
TnTTT ORIGINAL 200A LANTERN CLUB = "The 200A Gang"
Green Lantern Corpsmen
User avatar
KCStudly
Donating Member
 
Posts: 9640
Images: 8169
Joined: Mon Feb 06, 2012 10:18 pm
Location: Southeastern CT, USA
Top

PreviousNext

Return to Build Journals

Who is online

Users browsing this forum: jdeleon and 4 guests