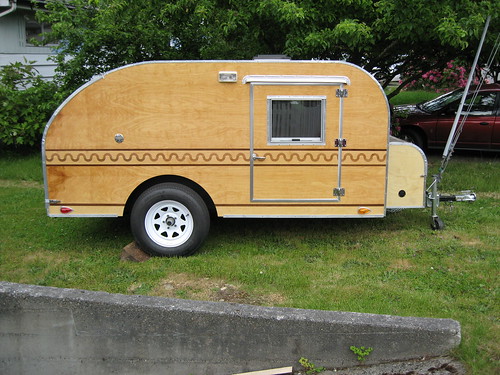
Tucson tortoise: Edit for photos

...ask your questions in the appropriate forums BUT document your build here...preferably in a single thread...dates for updates, are appreciated....

Re: Tucson tortoise

Postby noseoil » Sun Oct 18, 2015 5:00 pm

Laminating the sides. Scuffed up the aluminum panels with a coarse grit 2" disc, contact cement & applied them in the box.
160156

With the top edge setting up. I need to make a few more pieces, but the box is working out OK so far. Facing strips, angles & trim will be next time.
160157

License plate light & bracket attached. Just wanted to see how it looks with everything in place. I'll use a green trim piece under the hatch to cover the bottom edge which is white now. Should help tie things together & look better.
160158

Getting closer to bolting it down on the frame, then I can do the wiring and start hooking things up. Moving along slowly.....
Last edited by noseoil on Sun Nov 10, 2019 9:46 am, edited 1 time in total.
Build log: viewtopic.php?f=50&t=60248
The time you spend planning is more important than the time you spend building.........

137905
User avatar
noseoil
1000 Club
1000 Club
 
Posts: 1822
Images: 670
Joined: Sun Apr 27, 2014 8:46 am
Location: Raton, New Mexico, living the good life!

Re: Tucson tortoise

Postby Atomic77 » Sun Oct 18, 2015 9:30 pm

I've gotten way behind on your build and I see you're really getting there! I really like your solar set up... That's something I wish I knew more about...
Michael

"The Strength is in the Sum of the Parts..."

The Astroliner

Follow The Astroliner Blog Here!

Check out our YouTube video
User avatar
Atomic77
1000 Club
1000 Club
 
Posts: 1463
Images: 309
Joined: Tue Oct 08, 2013 5:29 pm
Location: Fort Wayne Indiana

Re: Tucson tortoise

Postby noseoil » Sat Oct 24, 2015 7:06 pm

I finally lowered the box onto the frame & bolted it down today! I'll add a few pictures to the thread tomorrow (didn't take any today, too busy I guess). Had to figure out how to make it drop after taking out the 2X4's I had been using for the skinning & the air conditioning box up front. I've been pushing it around on the frame all summer. For anyone doing a build with a tongue box, add the box last or it's a royal PITA to work around in general!

Basically, I made a cleat for the back & used 2 jack stands to support the rear end, then used the tongue screw jack to put the weight on the jack stands. Once the butt was lifted off the 2X4's, I used a hydraulic jack in the middle under the front headboard partition & lifted the body enough to slide out the 2X4's. Checked alignment & gradually lowered it down onto the frame. There are elevator bolts set in the deck & the frame was pre-drilled, so it was just a case of letting things drop in the right place & then tightening it up afterwards. I used 5/16" bolts with nylock nuts to keep them from loosening on the road. It pulled up really well & should be there to stay now. The white roof coat makes it easy to see under there when working on things.

I used some sill seal foam strip we had at work when I dropped it on the frame. It's the stuff used when you're framing walls & setting them on the concrete. Figured it would give a bit of cushion & some waterproofing at the bolts. The stuff I used was 1/4" x 3 1/2" wide & it comes in rolls. It squished down to almost nothing once the bolts were tightened up.

Did some of the diamond plate at the front corners & tongue box & made two pieces to protect the sides from rocks in the wheel wells. The fenders are open on the inside on the trailer I found. It should help protect the .040" skin from dings & pock marks on gravel roads. Still a long way to go to finish things up, but it's moving forward so that's what matters.
Build log: viewtopic.php?f=50&t=60248
The time you spend planning is more important than the time you spend building.........

137905
User avatar
noseoil
1000 Club
1000 Club
 
Posts: 1822
Images: 670
Joined: Sun Apr 27, 2014 8:46 am
Location: Raton, New Mexico, living the good life!
Top

Re: Tucson tortoise

Postby Atomic77 » Sat Oct 24, 2015 7:09 pm

Sounds like lots of progress going on! That's great! Very anxious to see some photos.
Michael

"The Strength is in the Sum of the Parts..."

The Astroliner

Follow The Astroliner Blog Here!

Check out our YouTube video
User avatar
Atomic77
1000 Club
1000 Club
 
Posts: 1463
Images: 309
Joined: Tue Oct 08, 2013 5:29 pm
Location: Fort Wayne Indiana
Top

Re: Tucson tortoise

Postby dales133 » Sat Oct 24, 2015 8:15 pm

Sounds good!
I was debating building the tounge box prior to final assembly and figured it might make life alot harder.
Looking forward to the pictures
User avatar
dales133
4000 Club
4000 Club
 
Posts: 4605
Images: 1
Joined: Mon Oct 13, 2014 5:26 pm
Top

Re: Tucson tortoise

Postby felixx » Sun Oct 25, 2015 2:31 am

I love seeing progress
felixx
Donating Member
 
Posts: 644
Images: 22
Joined: Sun Nov 30, 2014 3:01 pm
Location: Christchurch, New Zealand
Top

Re: Tucson tortoise

Postby Sheddie » Sun Oct 25, 2015 5:07 am

:thumbsup: Mile stone :thumbsup:
All looking awesome Tim, you are really making a nice job and progressing well. :applause:
User avatar
Sheddie
1000 Club
1000 Club
 
Posts: 1499
Images: 1129
Joined: Mon Jul 01, 2013 3:26 pm
Location: Whangarei, New Zealand
Top

Re: Tucson tortoise

Postby noseoil » Sun Oct 25, 2015 3:10 pm

OK guys, here are some pictures, thanks as always for the comments.

The sill seal foam used between the frame & cabin. It compresses to almost nothing.
160159

Front with the box in place, notice the amount of "room" between the tongue box & front of the cabin, about an inch. There's just enough room for the lid of the box to open & not hit on the edge, barely.
160160

Back corner
160161

Diamond plate set to go
160162

Fastened in place
160163

That's it for the weekend, time for a nap!
Last edited by noseoil on Sun Nov 10, 2019 9:53 am, edited 3 times in total.
Build log: viewtopic.php?f=50&t=60248
The time you spend planning is more important than the time you spend building.........

137905
User avatar
noseoil
1000 Club
1000 Club
 
Posts: 1822
Images: 670
Joined: Sun Apr 27, 2014 8:46 am
Location: Raton, New Mexico, living the good life!
Top

Re: Tucson tortoise

Postby tony.latham » Sun Oct 25, 2015 4:15 pm

That's it for the weekend, time for a nap!


You need to get the mattress in that little fella.

T
User avatar
tony.latham
Gold Donating Member
 
Posts: 7073
Images: 17
Joined: Mon Jul 08, 2013 4:03 pm
Location: Middle of Idaho on the edge of nowhere
Top

Re: Tucson tortoise

Postby Atomic77 » Sun Oct 25, 2015 5:12 pm

Wow that looks great! Looks done! I'm jealous.
Michael

"The Strength is in the Sum of the Parts..."

The Astroliner

Follow The Astroliner Blog Here!

Check out our YouTube video
User avatar
Atomic77
1000 Club
1000 Club
 
Posts: 1463
Images: 309
Joined: Tue Oct 08, 2013 5:29 pm
Location: Fort Wayne Indiana
Top

Re: Tucson tortoise

Postby noseoil » Mon Oct 26, 2015 7:46 am

Michael, thanks but nowhere near finished yet, not even close. I still have a bunch of wiring to complete (little things like marker lights, brake lights & turn signals), the stereo to install, entertainment system, alarm hookup, PD4045, propane & stove, doors & drawer heads to make, etc. etc. etc.

While I can't say I'm not getting there, I can say I'm not "there" yet. At least I'll be able to go camping someday soon & Tony, you're right! I'll have to get a mattress inside now. Looking forward to taking my first nap in it some afternoon this fall. That should be a major milestone!

Extra bonus pictures! Here's a new knife from Michael Morris. It's a friction folder made from an old file (when Detroit saw better days). Has a nice bottle opener on one end & I really like seeing the file marks he left on the blade. They're made from W1 or W2 high carbon steel, at about a 58 in the Rockwell hardness department. The blade's cutting edge is only 2 1/4" long, so it's a nice size for pocket carry. I used it this weekend to slice the foam & do other odds & ends on the build. He's running about 9 months out on orders at this point & also does fixed blades. Motto is "Deez aint no sissy knives."
160183

160184

160185
Last edited by noseoil on Mon Nov 11, 2019 9:59 am, edited 2 times in total.
Build log: viewtopic.php?f=50&t=60248
The time you spend planning is more important than the time you spend building.........

137905
User avatar
noseoil
1000 Club
1000 Club
 
Posts: 1822
Images: 670
Joined: Sun Apr 27, 2014 8:46 am
Location: Raton, New Mexico, living the good life!
Top

Re: Tucson tortoise

Postby Funluvin001 » Mon Oct 26, 2015 5:32 pm

noseoil wrote:OK guys, here are some pictures, thanks as always for the comments.

The sill seal foam used between the frame & cabin. It compresses to almost nothing.

Image

Front with the box in place, notice the amount of "room" there is between the tongue box & the front of the cabin.

Image

Back corner

Image

Diamond plate set to go

Image

Fastened in place

Image

That's it for the weekend, time for a nap!


Love the use of the diamond plate as trim.. she's lookin' sharp!
Funluvin001
Teardrop Advisor
 
Posts: 55
Images: 145
Joined: Sun Aug 16, 2015 6:40 pm
Location: P.E.I. Canada
Top

Re: Tucson tortoise

Postby lfhoward » Mon Oct 26, 2015 7:13 pm

Looking really nice, Tim! :thumbsup:
My off-road camper build on an M116A3 military chassis:
http://www.tnttt.com/viewtopic.php?f=50&t=62581
Tow vehicle: 2008 Jeep Liberty with a 4 inch lift.
User avatar
lfhoward
1000 Club
1000 Club
 
Posts: 1370
Joined: Wed Jan 22, 2014 6:10 pm
Location: Philadelphia, PA
Top

Re: Tucson tortoise

Postby KCStudly » Tue Oct 27, 2015 2:14 pm

Camper is turning out very nice. I like the way you did the rock guards behind the fenders.

That knife sure is a thing of beauty! I probably wouldn't have guessed that it started out as a file (although am aware that they are a common starting point for home made knives); it just looks so good that it seems intentional... and I suppose it is. Nice piece. :thumbsup:

I picked up a nice camp knife from a craftsman in the Adirondacks a year ago or so; http://www.chaxknives.com/. I'll have to post a pic or two up sometime.
KC
My Build: The Poet Creek Express Hybrid Foamie

Poet Creek Or Bust
Engineering the TLAR way - "That Looks About Right"
TnTTT ORIGINAL 200A LANTERN CLUB = "The 200A Gang"
Green Lantern Corpsmen
User avatar
KCStudly
Donating Member
 
Posts: 9640
Images: 8169
Joined: Mon Feb 06, 2012 10:18 pm
Location: Southeastern CT, USA
Top

Re: Tucson tortoise

Postby noseoil » Tue Oct 27, 2015 8:23 pm

Thanks KC, appreciate the feedback. Normally the fenders are closed on the inside in most cases, but as you can see here they aren't. I was a bit concerned with rocks, mud & other stuff bouncing around & screwing up the sides in that area. Here's another view of the same area, while it's being worked on & before the fasteners go in place.
160186

You can see how big the area for damage is, so a plate inside will help things stay in good shape. Hopefully they're big enough to keep most of the bad stuff from chewing up the thin sheet metal and destroying the paint over time.

Would enjoy seeing a shot or two of your knife. I must be entering my second childhood, as I collected some hardware store knives when I was young & find I'm doing a bit of it now again. Ah well, I guess I could be doing worse things. I find putting a nice edge on good steel is soothing after work when it's stressful & it's too hot to work outside. As always, nice hearing from you.

P.S. Marker lights went in after work this afternoon. PITA but they work.
Last edited by noseoil on Mon Nov 11, 2019 10:02 am, edited 1 time in total.
Build log: viewtopic.php?f=50&t=60248
The time you spend planning is more important than the time you spend building.........

137905
User avatar
noseoil
1000 Club
1000 Club
 
Posts: 1822
Images: 670
Joined: Sun Apr 27, 2014 8:46 am
Location: Raton, New Mexico, living the good life!
Top

PreviousNext

Return to Build Journals

Who is online

Users browsing this forum: No registered users and 11 guests