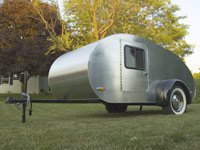
The Astroliner

...ask your questions in the appropriate forums BUT document your build here...preferably in a single thread...dates for updates, are appreciated....

Re: The Astroliner

Postby KCStudly » Sun Nov 01, 2015 8:38 pm

Blisters? Phew, I don't feel so bad now. But seriously, that looks sharp! :thumbsup:
KC
My Build: The Poet Creek Express Hybrid Foamie

Poet Creek Or Bust
Engineering the TLAR way - "That Looks About Right"
TnTTT ORIGINAL 200A LANTERN CLUB = "The 200A Gang"
Green Lantern Corpsmen
User avatar
KCStudly
Donating Member
 
Posts: 9640
Images: 8169
Joined: Mon Feb 06, 2012 10:18 pm
Location: Southeastern CT, USA

Re: The Astroliner

Postby Atomic77 » Sun Nov 01, 2015 8:41 pm

Thanks KC... On the boat we always vacuum bag... We don't dare risk a void at 200mph. But here, no worries... Just fill the void with thick and wet out a new piece. Problem solved.
Last edited by Atomic77 on Sun Nov 01, 2015 10:18 pm, edited 1 time in total.
Michael

"The Strength is in the Sum of the Parts..."

The Astroliner

Follow The Astroliner Blog Here!

Check out our YouTube video
User avatar
Atomic77
1000 Club
1000 Club
 
Posts: 1463
Images: 309
Joined: Tue Oct 08, 2013 5:29 pm
Location: Fort Wayne Indiana

Re: The Astroliner

Postby KCStudly » Sun Nov 01, 2015 8:52 pm

:thumbsup: Yup, I'm learning. As always, thanks for the tips.
KC
My Build: The Poet Creek Express Hybrid Foamie

Poet Creek Or Bust
Engineering the TLAR way - "That Looks About Right"
TnTTT ORIGINAL 200A LANTERN CLUB = "The 200A Gang"
Green Lantern Corpsmen
User avatar
KCStudly
Donating Member
 
Posts: 9640
Images: 8169
Joined: Mon Feb 06, 2012 10:18 pm
Location: Southeastern CT, USA
Top

Carbon Fiber is complete...

Postby Atomic77 » Sun Nov 01, 2015 9:46 pm

Thanks noseoil... And yes I've got the paint figured out. All I can tell you is, it's space age and includes atomic boomerangs with lots of old school flake!
:thumbsup:

Laying carbon on corners is always a challenge... Add in a big radius and the level of difficulty goes up even more. Then all the sanding! Whew! But it's over now and I'm pleased. I also got the first coat of filler on, (3M Platinum) and maybe a third of it sanded. Thankfully it looks like one coat will get most of it, a second should get the remaining low spots. I had several moments through the process where I almost regretted all the extra work it took to glass and mould the seams. But now at this stage I just keep thinking how pleased I am that I made the decision. The outer shell is literally all one piece! It's the lightest tank I've ever built.
;)
I apologize that all my pictures look the same... Major progress yet difficult to convey. Part of the reason is the scale of the thing. Take a look at the last picture to get a feel for the size next to my brothers fifth wheel...
136980136982136983136981136984
Michael

"The Strength is in the Sum of the Parts..."

The Astroliner

Follow The Astroliner Blog Here!

Check out our YouTube video
User avatar
Atomic77
1000 Club
1000 Club
 
Posts: 1463
Images: 309
Joined: Tue Oct 08, 2013 5:29 pm
Location: Fort Wayne Indiana
Top

Re: The Astroliner

Postby OP827 » Sun Nov 01, 2015 10:33 pm

Nice looking work, how much light filler did you put down today, close to a gallon?
User avatar
OP827
Donating Member
 
Posts: 1596
Images: 414
Joined: Fri Apr 25, 2014 7:27 pm
Location: Bruce County Ontario
Top

Re: The Astroliner

Postby KCStudly » Sun Nov 01, 2015 10:34 pm

I love seeing this stage of a build when the color starts to get uniform and you can really get a sense of the finished look. You can really see all of the effort you have put in. :thumbsup:
KC
My Build: The Poet Creek Express Hybrid Foamie

Poet Creek Or Bust
Engineering the TLAR way - "That Looks About Right"
TnTTT ORIGINAL 200A LANTERN CLUB = "The 200A Gang"
Green Lantern Corpsmen
User avatar
KCStudly
Donating Member
 
Posts: 9640
Images: 8169
Joined: Mon Feb 06, 2012 10:18 pm
Location: Southeastern CT, USA
Top

Re: The Astroliner

Postby Atomic77 » Sun Nov 01, 2015 10:39 pm

Thanks OP... I used a gallon and a half. I can get most bodywork done in one pass, sometimes two. I've seen people put it on and sand it off almost endlessly... The trick is to get enough on the first time. ;)
Michael

"The Strength is in the Sum of the Parts..."

The Astroliner

Follow The Astroliner Blog Here!

Check out our YouTube video
User avatar
Atomic77
1000 Club
1000 Club
 
Posts: 1463
Images: 309
Joined: Tue Oct 08, 2013 5:29 pm
Location: Fort Wayne Indiana
Top

Re: The Astroliner

Postby Atomic77 » Sun Nov 01, 2015 10:41 pm

Thanks KC... It's actually the best I've felt about it in a while! Closer to paint...
Michael

"The Strength is in the Sum of the Parts..."

The Astroliner

Follow The Astroliner Blog Here!

Check out our YouTube video
User avatar
Atomic77
1000 Club
1000 Club
 
Posts: 1463
Images: 309
Joined: Tue Oct 08, 2013 5:29 pm
Location: Fort Wayne Indiana
Top

Re: The Astroliner

Postby OP827 » Sun Nov 01, 2015 10:43 pm

Atomic77 wrote:Thanks OP... I used a gallon and a half. I can get most bodywork done in one pass, sometimes two. I've seen people put it on and sand it off almost endlessly... The trick is to get enough on the first time. ;)

That is a lot of mix batches and work in my book for sure, great progress and thanks for the tip, Michael!
User avatar
OP827
Donating Member
 
Posts: 1596
Images: 414
Joined: Fri Apr 25, 2014 7:27 pm
Location: Bruce County Ontario
Top

Re: The Astroliner

Postby Atomic77 » Thu Nov 05, 2015 8:23 am

Thanks OP...
Michael

"The Strength is in the Sum of the Parts..."

The Astroliner

Follow The Astroliner Blog Here!

Check out our YouTube video
User avatar
Atomic77
1000 Club
1000 Club
 
Posts: 1463
Images: 309
Joined: Tue Oct 08, 2013 5:29 pm
Location: Fort Wayne Indiana
Top

Re: The Astroliner

Postby Vedette » Thu Nov 05, 2015 9:41 am

I sure hope you have a "Bondo "Buster" :R
Brian
Good Roads
Brian & Sandi
Here is a link to my Build Journal
viewtopic.php?f=50&t=50912
Image109106109111109110138766
User avatar
Vedette
Silver Donating Member
 
Posts: 5141
Images: 443
Joined: Thu Dec 01, 2011 4:28 am
Location: Westbank B.C.
Top

Re: The Astroliner

Postby Atomic77 » Thu Nov 05, 2015 10:50 am

Of course! I think my brother's comment was something like, you couldn't pay me enough to mold all that in. Or something like that. Anyway, truth is I've got about 50% of it knocked out already. That 3M filler is so nice. Hit it with the bondo buster on the first pass with 80, come back on the second pass with 180 on a board. A few tweaks here and there and it's ready for the polyester primer.
Michael

"The Strength is in the Sum of the Parts..."

The Astroliner

Follow The Astroliner Blog Here!

Check out our YouTube video
User avatar
Atomic77
1000 Club
1000 Club
 
Posts: 1463
Images: 309
Joined: Tue Oct 08, 2013 5:29 pm
Location: Fort Wayne Indiana
Top

Re: The Astroliner

Postby Bruce Schneider » Sat Nov 07, 2015 5:46 pm

Standing here in awe. (actually sitting).

Just for us oldtimers is a 'bondo buster' the same as a 'cheese grater'?
"My rear end is louder than yours"
User avatar
Bruce Schneider
Teardrop Inspector
 
Posts: 7
Joined: Mon Oct 19, 2015 3:12 pm
Location: Davisburg, MI
Top

Re: The Astroliner

Postby Atomic77 » Sat Nov 07, 2015 10:57 pm

Thank you Bruce... Actually I haven't used a cheese grater since the 80's. The filler now is so much better and easier to sand that I don't have a need anymore for one. A Bondo Buster is similar to a DA sander, with a slightly different pattern and an 8"pad.
uploadfromtaptalk1446955044762.jpg
uploadfromtaptalk1446955044762.jpg (95.39 KiB) Viewed 1580 times
Michael

"The Strength is in the Sum of the Parts..."

The Astroliner

Follow The Astroliner Blog Here!

Check out our YouTube video
User avatar
Atomic77
1000 Club
1000 Club
 
Posts: 1463
Images: 309
Joined: Tue Oct 08, 2013 5:29 pm
Location: Fort Wayne Indiana
Top

Re: The Astroliner

Postby Atomic77 » Sun Nov 08, 2015 8:59 pm

Another great weekend making loads of dust! As brother Matt said, you're only about a five gallon bucket of dust away from paint! Actually, most of the heavy sanding is almost finished. I got the first coat of filler on last weekend. I put guide coat on the filler so I could find the low spots and imperfections in the carbon fiber.
137171
Then a lot of sanding and the second coat of filler applied.
137172
Notice the squares where I built the taillights in are now gone.
137173
Two coats pretty much got it, but I did come back with a little here and there to perfect out the edge.
137174
Which I'm pretty happy with...Its sharp and straight and way better than a moulding! Starting to look pretty custom...
137175
Michael

"The Strength is in the Sum of the Parts..."

The Astroliner

Follow The Astroliner Blog Here!

Check out our YouTube video
User avatar
Atomic77
1000 Club
1000 Club
 
Posts: 1463
Images: 309
Joined: Tue Oct 08, 2013 5:29 pm
Location: Fort Wayne Indiana
Top

PreviousNext

Return to Build Journals

Who is online

Users browsing this forum: No registered users and 4 guests