The Poet Creek Express - Foamie Hybrid

Canvas covered foamies (Thrifty Alternatives...)

Moderator: eaglesdare

Re: The Poet Creek Express - Foamie Hybrid

Postby Sheddie » Sat Dec 05, 2015 2:28 pm

Hi KC, I haven't had a lot of time to get on the site over the past few weeks, so have just finished a big catch up on your build journal. You have been going well with the fibreglassing and although you started with all the little bits to practice on, they are the mor time consuming bits and you will find that the main body will be a breeze. :thumbsup: It is all looking awesome, keep it up.
Also, as Felixx said, it is nice to see a bit of Kauri on your Mothers dinner table. The timber I used for the cabinets, doors and drawers in our Tear Drop are all Kauri. In the late 1940s and early 50s, my father was a bulldozing contractor and amongst the work he did was pulling Kauri logs out of the forrest to be trucked off to the mills.
User avatar
Sheddie
1000 Club
1000 Club
 
Posts: 1499
Images: 1129
Joined: Mon Jul 01, 2013 3:26 pm
Location: Whangarei, New Zealand

Re: The Poet Creek Express - Foamie Hybrid

Postby KCStudly » Sun Dec 06, 2015 1:20 am

Thanks Sheddie. I sure do appreciate the kind words and support; and I always love hearing about your stories from N Zed. :thumbsup:
KC
My Build: The Poet Creek Express Hybrid Foamie

Poet Creek Or Bust
Engineering the TLAR way - "That Looks About Right"
TnTTT ORIGINAL 200A LANTERN CLUB = "The 200A Gang"
Green Lantern Corpsmen
User avatar
KCStudly
Donating Member
 
Posts: 9640
Images: 8169
Joined: Mon Feb 06, 2012 10:18 pm
Location: Southeastern CT, USA

Re: The Poet Creek Express - Foamie Hybrid

Postby KCStudly » Sun Dec 06, 2015 2:13 am

Had one of those “didn’t get as much done today as I had hoped” days, but progress is progress.

I started by trimming and sanding the hatch edge test piece. I’m very happy with the result, a nice corner with just a slightly rounded over edge; enough that you won’t split your head open on it but not so rounded over (like what would be needed to get the fiberglass cloth to wrap around) that there would be a gaping canyon between the hatch and galley wall.
Image
Image

Next I wanted to deal with those sharp corners on the front side edges of the hatch bumper. The plan is to wrap the glass along the inside lower edge of the hatch under the bottom of the bumper and up onto the lower back side of the hatch where it can be overlapped by the main layup on the outside of the hatch to come later. This will leave a channel, or taco shaped wrap of cloth running off the ends of the bumper. The plan is to trim the front plies flush to this sharp edge, and then wrap the other two flaps (bottom angle and back) back around the larger radii on the bottom outside edge and rear vertical edge of the bumper; essentially sealing up the ends of the bumper all in one layup with no opportunity to back gouge for flox. However, since the bumper is made of solid wood I can chamfer the sharp edge and build the corner up with flox, and still have hard reference surfaces to sand back true to (unlike the delicate foam).

Anyway, to get a nice consistent chamfer I wanted to use the chamfering bearing bit on the trim router (because the small router is easier to handle free hand while guiding sideways on a small surface such as the edge of the hatch); but the thru holes in the baseplates (round and square) that came with the router were just a little undersized for the bit. So I used a scrap of the 5mm ply to make another baseplate. Used the factory baseplate to template the hole locations; drilled for the mounting screws; chiseled out a couple of plies so the heads of the screws would be below the base surface; and used an existing hole as a starter for the scroll saw to cut out the center hole (and there was an extra “bonus” hole in the scrap that would come along for the ride).
Image

I find myself using the direction of rotation arrow on the factory baseplate frequently as a reference to feed the router in the correct direction, so I marked the direction on both sides, top and bottom.

Took longer to make the baseplate than it did to do the cuts, but the results were well worth the effort. In the first pic of the curb side I have sanded just enough to remove the frizzy edges of the cut. In the second pic, of the street side, I have removed fuzzies and scuffed the burn marks off with a bit of 36 grit, putting some tooth into the milled edge.
Image
Image

I probably could have just packed some thickened epoxy on by hand and been ready to sand it back, but I thought I could get a little closer and have less sanding to do if I made a temporary dam. I matched two of the screw holes from the draw latch tab (which I had removed for now) so that I could use the existing holes to hold the dam to the side of the hatch. Then I screwed the blank dam up and traced the inside face of the hatch onto the blank. Once removed again this would show me where to band saw off the excess part of the dam blank so that I could make it fair and squeegee across the seal face and edge of the dam at the same time; using the “top” edge of the dam as a screed rail.
Image

After refitting the dam and shaving it even to the seal face with the matchbox plane, I took it back off again and carefully covered it with packing tape so as to avoid creases and wrinkles in the tape. The smooth face of the tape would act as a release agent for the dam.
Image

I still had hopes of getting to the bumper and edge seal layups today, so I used a 5 minute epoxy with some of the 403 filler so that it could be ready to sand in short order.
Image

Not sure why the street side looks so sloppy in this pic but it came out nicer in person.
Image

Curb side looks more like it in this pic.
Image

In just a few minutes the epoxy had set up enough that the dams could be popped off quite easily. Just a little flash and some minor high spots to be sanded back to fair.
Image

Here it is sanded back close to final.
Image

And the curb side after removing the dam.
Image

And the curb side after sanding.
Image

Apparently I didn’t pack the top end of the router cut (left divot in pic) as well as I should have. The filler wasn’t adhered well there so I trimmed it back a little and will deal with that in a minute.
Image

Backing up a little, that little 0.30oz of filler I made up last night was still gummy when I arrived midday today. The thermometer recorded a low of 49 deg F, so that shouldn’t have been an issue for the fast hardener. I may not have mixed the wet for very long before adding the filler, but with such a small batch there really shouldn’t have been an issue getting it mixed up well in short order. The most likely culprit was attempting such a small batch. The digital scale only registers in 0.05 increments, so if my 0.25 resin measurement was about to tip to 0.30, and my 0.05 hardener addition was at the low/roundup end of the 0.05oz spectrum I suppose I could have been out of range on my mix ration.

I kept checking the dregs in the pot and filled areas, and it did seem to be firming up very slowly. It wasn’t in my way for the bumper edges, so I didn’t worry about it at first. Karl suggested that maybe such a small batch never built enough heat to feed its own thermal reaction, so I decided to hit it with the hair dryer to see if it would continue to kick, but instead it got softer. So I scraped it back off, sanded some and wiped with a paper shop towel damped in acetone.

This time I used the 5 minute epoxy and some of the fairing filler (tan colored). The 5-minute epoxy is a 2-part gel out of aluminum tubes that mixes at a 1:1 ratio, so it is a lot more forgiving in small batches than the 5:1 liquid. The curb side needed a little more with that router divot, so I took the time to mask that with blue tape, while the street side just needed a small amount so I went without masking.
Image
Image

Tomorrow I will just need to sand those areas back and check the filler at the hinge spar to see if it ever set up, then I can get into the cloth layups.

Rather than rushing thru that today, and needing to get cleaned up early for Yvette’s formal B-Day dinner, I called that a good stopping point.

We went out with Chris and Karl to that Red 36 restaurant again. We started by sharing a Thia peanut calamari dish with drizzles of sweet chili and wasabi sauces, cilantro, shaved scallion and a few spouts. I had the artichoke saffron soup; the arugula, Burrata (soft mild cheese), BLT (crispy pancetta) salad on garlic bread raft; and the NY strip steak with “cracked” pan fried fingerling potatoes, and haricot vert with a delicate whiskey barbecue sauce on the plate. We finished by sharing a NY style cheesecake (with chocolate syrup) and a chocolate mousse crème brulee. Here’s some customer service for you; Karl had quite a bit of his steak and potatoes leftover and after the waiter had taken it back to wrap, their bus staff threw it out by mistake; so they gave him his choice of a whole ‘nuther plate to take out or a free dessert. No fools, he took the $28 comp steak dinner and we paid for dessert. No worries, they wanted to make sure we were happy; it wasn’t even a question.
KC
My Build: The Poet Creek Express Hybrid Foamie

Poet Creek Or Bust
Engineering the TLAR way - "That Looks About Right"
TnTTT ORIGINAL 200A LANTERN CLUB = "The 200A Gang"
Green Lantern Corpsmen
User avatar
KCStudly
Donating Member
 
Posts: 9640
Images: 8169
Joined: Mon Feb 06, 2012 10:18 pm
Location: Southeastern CT, USA
Top

Re: The Poet Creek Express - Foamie Hybrid

Postby dales133 » Sun Dec 06, 2015 2:59 pm

Ahhh the dreaded router divit.... i fixed a couple of them myself
Annoying little blughters, never ceases to amaze me how a bearing seems to sink into something thats barely even there and leave a big ole divot.
That fillers odd stuff to isnt it...think karls on the money with the thermal mass thing as ive had it happen before several times with no explainable reason.
Making good headway mate .
Ps... dinner sounds delish
User avatar
dales133
4000 Club
4000 Club
 
Posts: 4605
Images: 1
Joined: Mon Oct 13, 2014 5:26 pm
Top

Re: The Poet Creek Express - Foamie Hybrid

Postby KCStudly » Sun Dec 06, 2015 7:04 pm

Thanks Dale. Actually, that wasn't an errant divot, it was just where I had stopped the router for the bumper edge chamfer, and I didn't get the flox corner filler stuffed in there properly on the first try. It's mo' better now. :thumbsup:

Stand by for an update on getting the hatch seal lip all laid up. 8)
KC
My Build: The Poet Creek Express Hybrid Foamie

Poet Creek Or Bust
Engineering the TLAR way - "That Looks About Right"
TnTTT ORIGINAL 200A LANTERN CLUB = "The 200A Gang"
Green Lantern Corpsmen
User avatar
KCStudly
Donating Member
 
Posts: 9640
Images: 8169
Joined: Mon Feb 06, 2012 10:18 pm
Location: Southeastern CT, USA
Top

Re: The Poet Creek Express - Foamie Hybrid

Postby KCStudly » Sun Dec 06, 2015 11:22 pm

It’s funny sometimes how when you reach a medium milestone it feels like you got more done in less time. Today was a decent sized layup, with about 5 hrs total time in the shop, but it felt like I got over the hump and onto the next phase of the build. I guess that is what happens when you work on all of the little things in preparation that lead up to a milestone, and then everything goes well when you take that step.

Anyway, started today by sanding the redo of the filler at the transition between the hatch edge sealing lips and the bumper; street side first then curb side.
Image
Image

BTW, I have been meaning to apologize for the lighting in some of these recent pics. The floor lamp really helps me to see what I am doing, but it tends to cast shadows or glare when I’m taking pictures. I’ll try to be better about shading and/or moving the lamp.

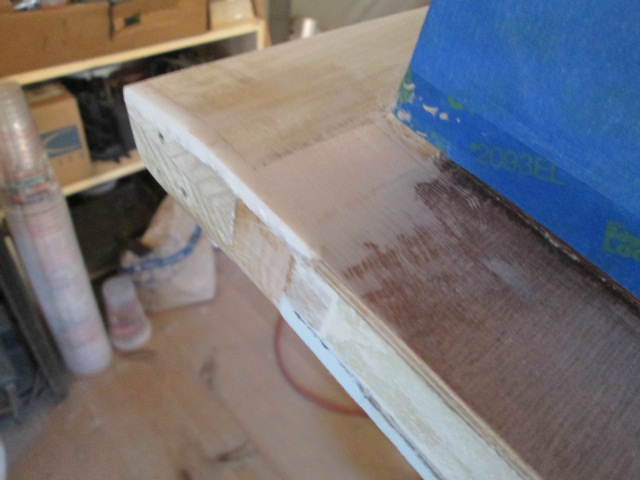
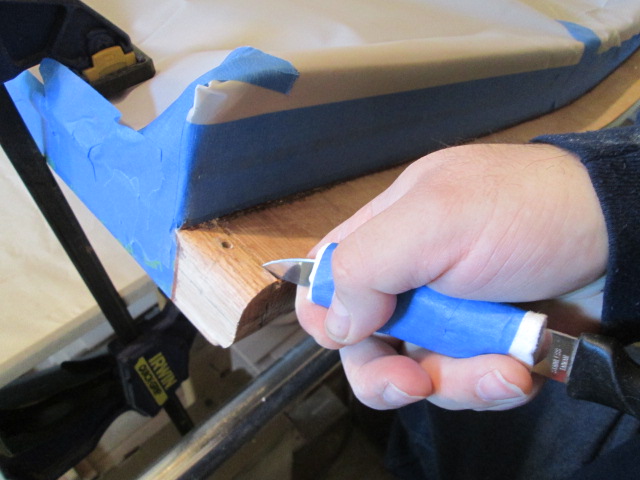
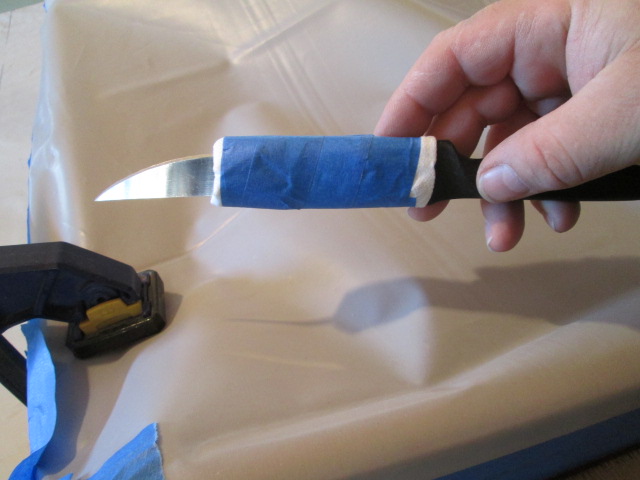
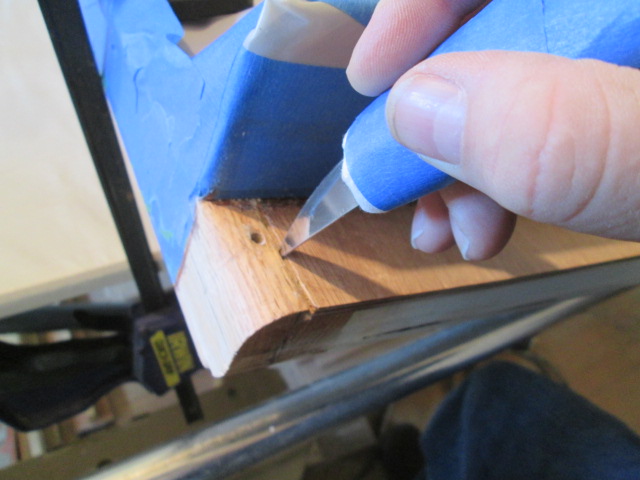
The dregs in the pot from the failed filler episode were a little firmer today, but were still quite pliable compared to what they should have been. The stuff in the gap at the hinge spar to hatch inner skin rabbet joint seemed even firmer, but was still softer than what would have made me happy. Not wanting to take any risks, I drilled out the screw holes and used the cheap steak knife to dig out the gap. Flipping the knife up and using the tip to chisel and pry the gum up worked okay but was subject to slipping, so I wrapped the blade to protect myself.
Image
Image

Once plowed out, dragging the tip of the blade back got down into the corners nicely.
Image

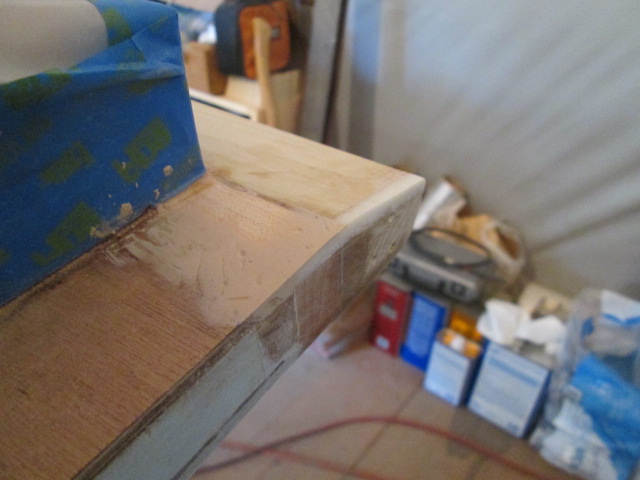
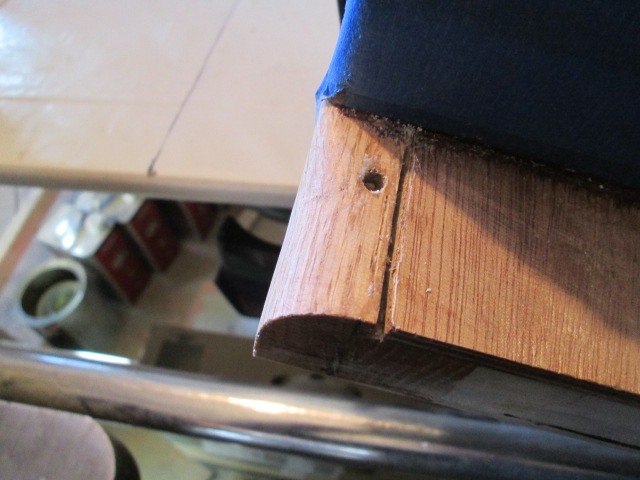
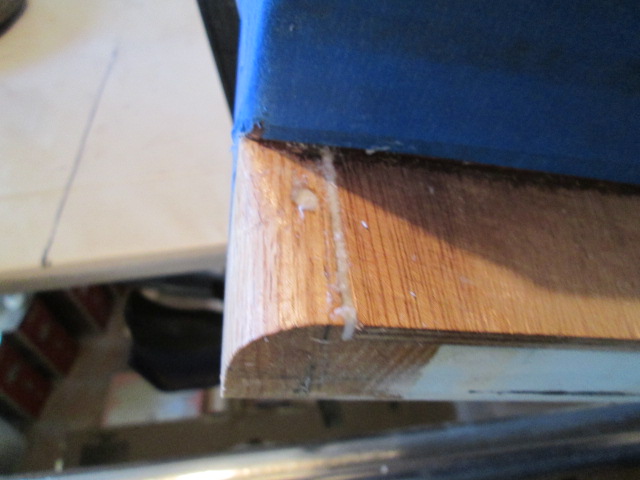
Here they are ready to try again; curb side first, then street side.
Image
Image

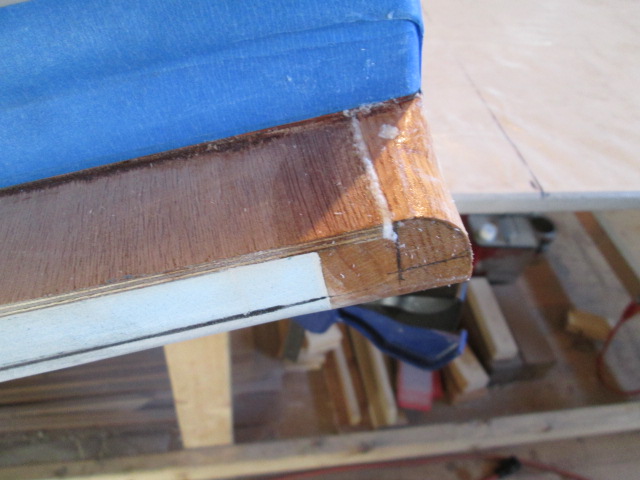
Again, wanting to keep things moving, I used about inch long squirts of the 5-minute epoxy and a dash of the 403 filler to fill this back in again successfully.
Image
Image

I’ll apologize again for not documenting the bigger layups better, but it’s hard enough to stay focused and work at a consistent pace without having to stop for photo op’s. The clock is ticking once the hardener hits the resin.

I’ll try to walk you thru it. First I pushed the hatch as far to the left of the bench as I could, even turning it slightly to get a long enough stretch along the front of the bench to string out the PMPP setups for the sealing lips and bumper. I had originally thought that I would wet out both then interweave the plies where they met at the ends of the bumper; but that meant that I would have to wet out both setups all at the same time and get them all cut out before any of them could be applied. So instead I decided to do the sides first, and then lap the bumper section over them. It just simplified things to where I felt a lot less rushed.

After taping the bottom sheets of plastic to the bench and laying the glass pieces out in position, I didn’t think and wet the three plies for the side lips all at once. With just two plies this has not been a problem, but with the third ply I had to work a lot harder in some areas. If it comes to this again I think I might do the two first plies together then lay the third on top. Not that it ended up being a problem, I just think it would have gone quicker and easier.

Wet out was with a credit card squeegee and cut down 2 inch chip brush. Then the top piece of plastic was put down and the medium Bondo spreader was used to press that down. Out came the scissors, cutting around the perimeter, then a clean cut down the middle to get the two strips, one for each side.

Set those aside for a minute and mixed up a one pump batch to wet the surface on the hatch, painting it on thinly with the chip brush and making sure to get it into the corners between the tape and hatch ribs.

Backing up a minute, when I started mixing the first batch of epoxy today I paid particular attention to the pumps and check weighed everything. What I found was that the hardener pump wasn’t coming up all the way by itself, so I made sure to pull it up the last bit by hand on each stroke, and checked all batches on the scale. (This could not have been the cause of the problem with that little filler batch, though, because that was a weighed batch and wasn’t even a full pump stroke anyway.) I’m getting toward the end of this first gallon, so I will be watching this closely lest I run out and not get a full stroke. That will also be a convenient time to clean the pumps and make sure they are both running freely (… if not before).

Okay, then I peeled one layer of the plastic off. Starting at the bottom of the hatch while holding the tag end up like a snake, I placed the end of the strip just above the lower radius of the bumper and started pressing it down. When I realized it was sticking to my glove, I noticed that I had started putting the plastic side down. DOH! No harm, no foul. Peeled it right back up no problem, flipped it around and started again all the way to the top. With the top plastic still on it was pretty easy to position and shove the edge of the glass right up neatly to the rib. At the top I wrapped straight around the front of the hinge spar and trimmed most of the excess off. I had to be careful peeling the plastic. First, with the multiple strips required for the length, when I got to one of the butt seams the next piece would want to come with the plastic. It is better to go slowly and catch that right away, peeling the lifting ply off of the plastic and laying it back down before too much comes away; it stays neater that way. Second, sometimes there are little scissor jags along the edge of the plastic and if these catch a string of glass along the edge it can try to pull a thread and lift the edge of the glass. If you go slow and steady and pull the plastic as straight back on itself as you can, you can catch these small things and keep the wet cloth down were you want it to be.

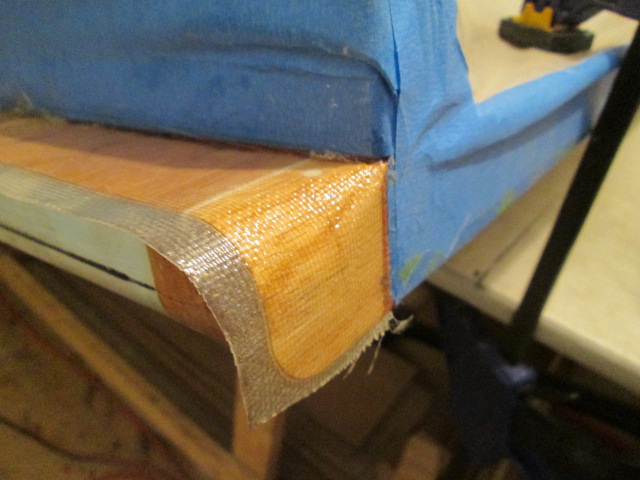
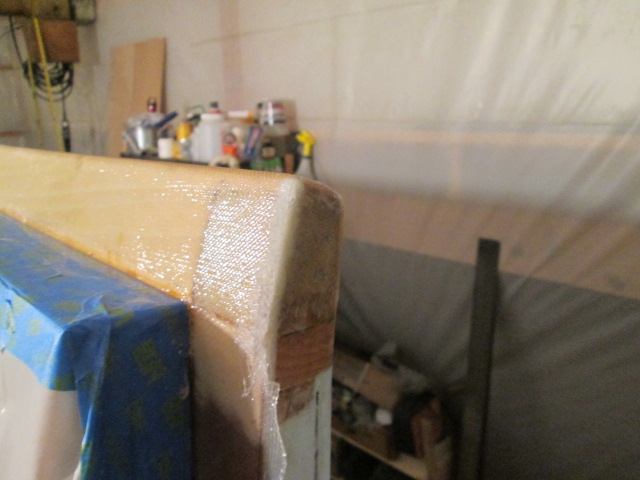
Here is the street side of the hinge spar with the glass lying down very nicely over that transition area I spent so much time blending. Nice!
Image

The second side was a repeat of the first.

Once I had the bumper PMPP wet and cut out, but before peeling any plastic, I could fold it up and make room to position the hatch so that I could walk around the bumper end again. Another one pump batch of wet painted on the bumper and it was time to peel the first layer of plastic. I started at one end and laid it according to my reference marks pushing the edge up to the maple sill. The credit card squeegee was used to press against the outer plastic ply to bed it down into the wet on the front and underside of the bumper. At this point I repositioned the hatch again, rolling it up on the upper part of the radius and away from the end of the bench enough that I had a place to stand. I didn’t really clamp it down hard because I was concerned about damaging the foam, but rather just hooked the clamps under the edge of the bench and over the spar, letting gravity and rocker do the rest. (I had already seen some signs of the creases in the sheet I had placed underneath as a cushion causing dent marks.)

Then I used the step stool to climb up on the end of the bench and wrap the rest of the layup onto the back of the bumper. Once it was all squeegeed down I peeled the top plastic ply off. In this ‘C’-shape, some areas pulled up a little, but it was easy enough to tamp them back down with the brush. I used the scissors to trim the outside edge of the front plies flush to the flox corner, made a triangular dart cut to fold the side end down (“up”), then wrapped the remainder forward from the back radius to the flox corner again. I’m pretty happy with how that worked out. There will be some final trimming and a little sanding after the cure, but I think it worked out very well.
Image

Here’s the front of the street side. You can see were the bumper plies (top) overlap the side strip (on left). In hindsight I probably should have trimmed back a few plies, or just butted the side strip down at the bumper line, so as to keep things more level; but I doubt it will matter much in the end. If needed I can sand and fair a bit with some of the 410.
Image

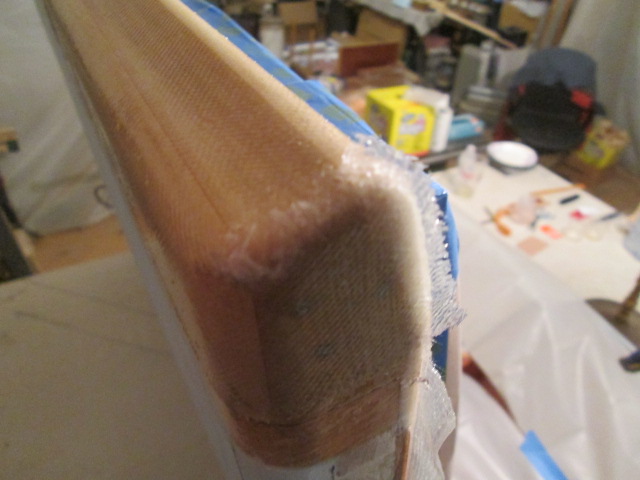
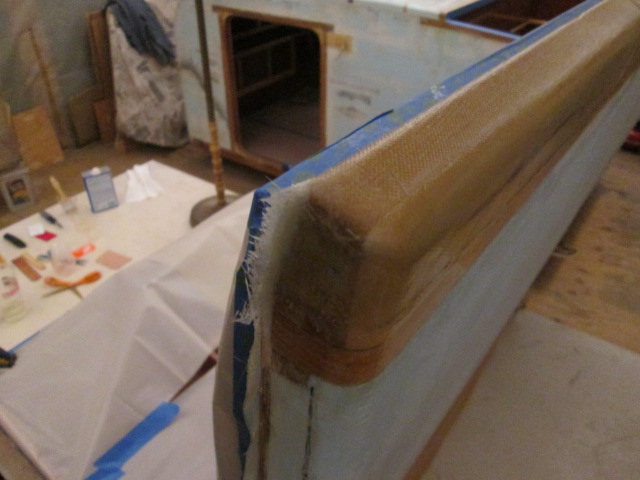
Here’s another look at the edge of the bumper showing the flap that will need to be trimmed later.
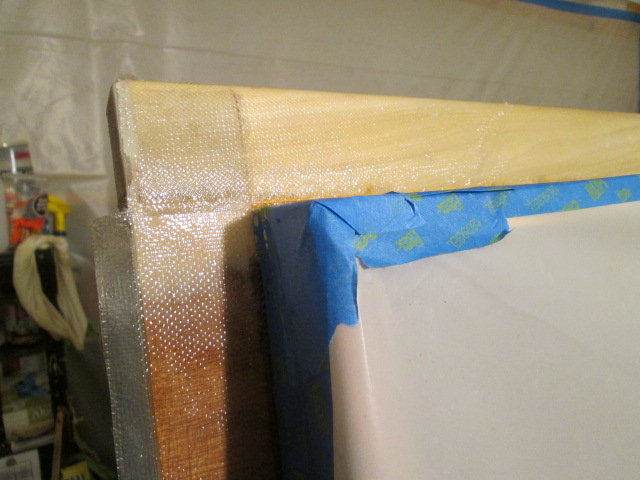
Image

And the curb side.
Image
Image

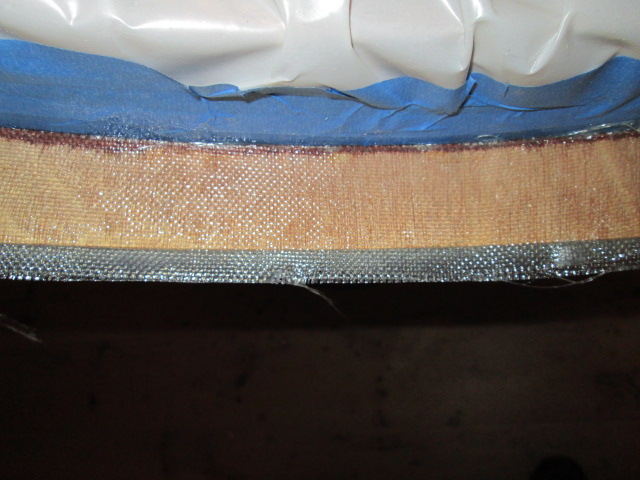
A close-up of the 3 plies on the street side edge.
Image

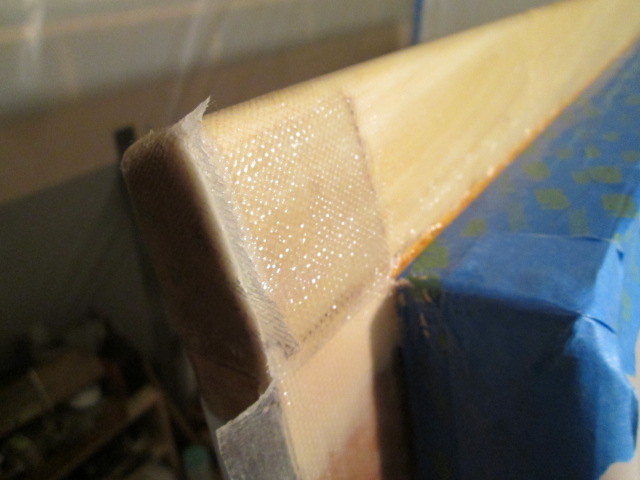
And an overall shot from the curb side for perspective, with the hinge spar on the left and the bumper in the air.
Image

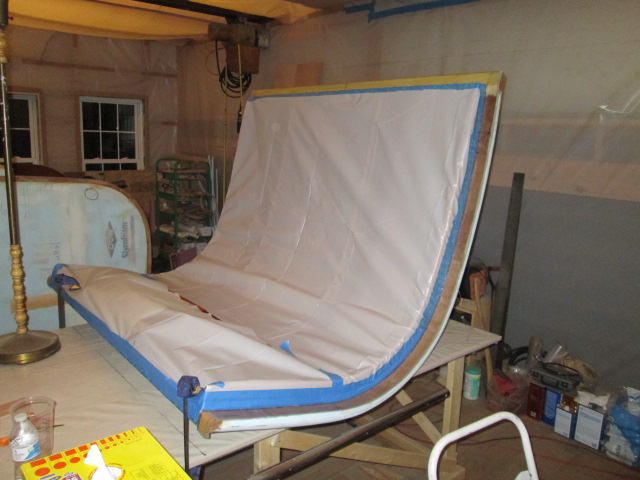
One thing I might have done differently would have been to try and stagger the bumper plies where they wrap up onto the back of the hatch. That way I could have butted the main outer hatch plies in a stagger and still have had some overlap. Now I will have to fair along the edge of this layup to allow the main layup to overlap; but in the end this might work out better because it might be easier to work to the edge of the bumper bottom radius.

I’m pleased with the outcome and it was a good productive day in the shop. :R
KC
My Build: The Poet Creek Express Hybrid Foamie

Poet Creek Or Bust
Engineering the TLAR way - "That Looks About Right"
TnTTT ORIGINAL 200A LANTERN CLUB = "The 200A Gang"
Green Lantern Corpsmen
User avatar
KCStudly
Donating Member
 
Posts: 9640
Images: 8169
Joined: Mon Feb 06, 2012 10:18 pm
Location: Southeastern CT, USA
Top

Re: The Poet Creek Express - Foamie Hybrid

Postby KCStudly » Mon Dec 07, 2015 9:59 pm

I made a step by step list of all of the things that need to happen to get the hatch reinstalled and be ready for the large glassing stages of cabin sides, roof and hatch proper. About 30 something steps. Then I knocked about three things off the list tonight.

The three plies of glass along the hatch sides were a bit harder to trim off using the steak knife than just two plies. Had to use a much heavier sawing motion and be careful not to nick the foam (which I did on a couple of occasions). I tried to get as close as I dared, but the knife likes to follow between the weave, so occasionally it would wander away. When it did I would steer it back again and pop through the next bundle of fibers to follow along that line, etc.

Then I hit it with a chunk of 36 grit sanding belt wrapped around a small block to quickly knock the rest back to the edge of the plywood being careful to use my off hand as a guide so that the block didn’t drop down into the foam (which it did on occasion making some gouges).
Image

A little light detail sanding around the ends of the bumper spiffed them up pretty nicely (the white areas are sandpaper scuffs, not dry layup).
Image
Image

The other end did have two small spots where the first cloth layers did not adhere to the flox corner. I think these lifted when I was trimming with the scissors and probably needed a little more wet to stick back down. The white flox probably threw me off; sure looked good when wet, but showed up when I sanded the excess at the edge. I chased those back to feather out the edges. They ended up being about half a pinky fingernail in size each afterward which I will touch up with filler sometime in the future (no pic).

Here’s the end of the hinge spar all cleaned up.
Image

I had a few strands that climbed up on to the rib masking on the street side that I had to score, scrape and pick at; and there was one small blister in just the outer ply right up against the rib that I just sanded away; but other than that it all looked pretty good.

As I was wrapping things up for the evening Karl came up to check progress and I got his help to stand the hatch up on edge for Wednesday. I think things will be more stable and accessible to do one flox corner at a time in this position.
Image
KC
My Build: The Poet Creek Express Hybrid Foamie

Poet Creek Or Bust
Engineering the TLAR way - "That Looks About Right"
TnTTT ORIGINAL 200A LANTERN CLUB = "The 200A Gang"
Green Lantern Corpsmen
User avatar
KCStudly
Donating Member
 
Posts: 9640
Images: 8169
Joined: Mon Feb 06, 2012 10:18 pm
Location: Southeastern CT, USA
Top

Re: The Poet Creek Express - Foamie Hybrid

Postby KCStudly » Fri Dec 11, 2015 1:37 am

The day job took a lot out of me on Wednesday, so I came home and took it easy; nap time and to bed early. That, and a less demanding day today… plus an afternoon cup of Joe had me ready to make some progress tonight.

I spent a little time sanding the seams where the sections of glass on the bumper butted (or didn’t butt so well). I think I got that to where a little fairing filler or high build primer will do the trick.

Then I got the Dremel going and gouged out the street side of the inner ply skin. Same technique as the test piece; used the rotary cutter to plow out the 2nd wood ply; angle bevel the 3rd and 4th plies leaving most of the last, 5th ply; and then the cutting discs to sand the 1st ply clean off of the underside of the glass lip. The most difficult part, aside from the rotary cutter getting smoking hot and having to stop to cool it off, was not sanding away too much of the glass. There were a couple of spots where it got thin, and a couple where I busted thru a little, but in the end it worked out fine.

Here is the gouge all ready for flox. In this pic the hatch is still standing on the curb side edge with the street side sticking up, and it is viewed from the bumper end looking “up” along the street side. On the right you can see the rounded over edge of the top/outside 3/4 inch foam (light blue); the black sharpie line that helped guide the round over; the bottom layer of 3/4 foam that looks kind of tan (pic may have been taken before cleaning up saw dust from the Dremel); the darker brown/tan line that is the gouge; the thin fiberglass lip; and then the hatch rib covered in blue tape below the hatch seal area.
Image

This one is looking from the hinge spar back along the top section of the street side. You can also see how I gouged out around the end of the spar, and the rash that it caused to the glass lip there.
Image

The red oak took a little more care and I had to use the smaller diameter rotary cutter, instead of the cutting discs, to clean the inside radius behind the glass.
Image

Here’s a closer look.
Image

After folding up a small swatch of 100 grit and doing a little hand sanding to remove the blackening from the cutter and a few spots where there were still a few wood fibers stuck to the glass, it was time to add the filled epoxy. At first I mixed the filler a little on the wet side and went along the gouge stuffing it in. Actually the technique was more like putting a little filler on the stir stick then dragging the stick across the glass lip to scrape the filler into the slot; then using the stick as a squeegee to level it to the foam.
Image
Image

Then I added some more of the 403 to stiffen the mix up enough for the vertical section along the hinge spar. Even with a stiff mix when I came back around inspecting I noticed this area starting to sag, so I stuck a piece of packing tape on there backwards, sticky side out, as a release ply. Seemed to do the trick.
Image

There was a bit of filler left in the pot so I figured I could use it to fair the edge of the glass where it was wrapped up onto the bumper, but it started to get really tacky at that point so I stopped there.

Now it should take just a little bit of sanding and I can flip the hatch over and do the other side.
KC
My Build: The Poet Creek Express Hybrid Foamie

Poet Creek Or Bust
Engineering the TLAR way - "That Looks About Right"
TnTTT ORIGINAL 200A LANTERN CLUB = "The 200A Gang"
Green Lantern Corpsmen
User avatar
KCStudly
Donating Member
 
Posts: 9640
Images: 8169
Joined: Mon Feb 06, 2012 10:18 pm
Location: Southeastern CT, USA
Top

Re: The Poet Creek Express - Foamie Hybrid

Postby ghcoe » Fri Dec 11, 2015 10:12 pm

KC,
I was surfing youtube for some info and stumbled across this video https://www.youtube.com/watch?v=4VgEhrbd24Y .
George.

Gorrilla Glue, Great Stuff and Gripper. The three G's of foamie construction.

My build viewtopic.php?t=54099
Working with flashing for foamie construction viewtopic.php?f=55&t=60303
Making a hot wire http://tnttt.com/viewtopic.php?f=55&t=55323
User avatar
ghcoe
1000 Club
1000 Club
 
Posts: 1982
Joined: Fri Dec 11, 2009 11:20 pm
Location: SW Idaho
Top

Re: The Poet Creek Express - Foamie Hybrid

Postby KCStudly » Fri Dec 11, 2015 10:47 pm

ghcoe wrote:KC,
I was surfing youtube for some info and stumbled across this video https://www.youtube.com/watch?v=4VgEhrbd24Y .

Thanks for digging that one back up, George. Poet Creek sure is a nice out of the way place and I love seeing that footage again!

Build Update: Tonight I cleaned up the freshly cured flox corner using sandpaper to knock down a few little nubbies, then hit it, the bumper and the street side seal lip again with water and a greenie to remove any amine blush.

The flox had some pock holes, a couple of divots, and some very minor low spots on the spar corner where I could have done a better job filling (Atomic’s advice to overfill everything to make sure that you have plenty to sand back ringing in my head). It’s not anything that photographs very well, so not that big of a deal and no pics.

I took a small wad of sandpaper and roughed the low spots as best I could without resorting to gouging out too much material. Then I mixed up a couple of 1 inch “squirt” batches of 5 min epoxy with about an equal volume of the 403 filler. This made a decent spot filler like putty to go back over the flox and smooth it out level. Again, for really small tasks, the 5 min epoxy seems to be the way to go. After a few minutes helping Karl lug a big piece of square tube onto the saw downstairs, and discussing one of his jobs, the epoxy was firm enough to knock off the little nubbies.

Next time I’m ready to flip the hatch over and do the other side.
Last edited by KCStudly on Fri Aug 14, 2020 10:52 pm, edited 1 time in total.
KC
My Build: The Poet Creek Express Hybrid Foamie

Poet Creek Or Bust
Engineering the TLAR way - "That Looks About Right"
TnTTT ORIGINAL 200A LANTERN CLUB = "The 200A Gang"
Green Lantern Corpsmen
User avatar
KCStudly
Donating Member
 
Posts: 9640
Images: 8169
Joined: Mon Feb 06, 2012 10:18 pm
Location: Southeastern CT, USA
Top

Re: The Poet Creek Express - Foamie Hybrid

Postby Wolffarmer » Sat Dec 12, 2015 1:29 am

I just found this one.

https://www.youtube.com/watch?v=cAfwsHG62O8

They hit Poet Creek and the Magruder Trial. And a mess of Idaho.
"these guys must be afraid of the dark"
User avatar
Wolffarmer
Donating Member
 
Posts: 4612
Images: 309
Joined: Wed May 02, 2007 1:32 pm
Location: Idaho Rupert
Top

Re: The Poet Creek Express - Foamie Hybrid

Postby Sheddie » Sat Dec 12, 2015 3:03 am

ghcoe wrote:KC,
I was surfing youtube for some info and stumbled across this video https://www.youtube.com/watch?v=4VgEhrbd24Y .

Wolffarmer wrote:I just found this one.

https://www.youtube.com/watch?v=cAfwsHG62O8

They hit Poet Creek and the Magruder Trial. And a mess of Idaho.

Thanks for sharing those clips, it is nice to see where KC is planning to go. :applause:
User avatar
Sheddie
1000 Club
1000 Club
 
Posts: 1499
Images: 1129
Joined: Mon Jul 01, 2013 3:26 pm
Location: Whangarei, New Zealand
Top

Re: The Poet Creek Express - Foamie Hybrid

Postby KCStudly » Sat Dec 12, 2015 2:52 pm

Yes, thanks for posting! I had not seen the motorcycle trip that Wolffarmer linked to. That was well produced and I enjoyed watching it very much.

Not sure if I will make it out to the shop today. We ran some errands and got a x-mas tree, and I did a few chores around the house. You have to do those every once in a while, despite dedicating a large number of hours to the build. :roll:
Last edited by KCStudly on Fri Aug 14, 2020 10:55 pm, edited 1 time in total.
KC
My Build: The Poet Creek Express Hybrid Foamie

Poet Creek Or Bust
Engineering the TLAR way - "That Looks About Right"
TnTTT ORIGINAL 200A LANTERN CLUB = "The 200A Gang"
Green Lantern Corpsmen
User avatar
KCStudly
Donating Member
 
Posts: 9640
Images: 8169
Joined: Mon Feb 06, 2012 10:18 pm
Location: Southeastern CT, USA
Top

Re: The Poet Creek Express - Foamie Hybrid

Postby Wolffarmer » Sat Dec 12, 2015 10:36 pm

Something different. A true ballad from Idaho's recent history. I remember these events well.
Dallas in the Owyhees

Thats Claude Dallas.


Edit. Just found out that my oldest Sister lived next door to Jim Stevens ( the friend of Dallas who was at the shooting ) for about a year in the late 60's. If I knew that before it slipped my mind but that explains why they was so spooked when ever Dallas was on the loose. He also escaped from prison once.
"these guys must be afraid of the dark"
User avatar
Wolffarmer
Donating Member
 
Posts: 4612
Images: 309
Joined: Wed May 02, 2007 1:32 pm
Location: Idaho Rupert
Top

Re: The Poet Creek Express - Foamie Hybrid

Postby tony.latham » Sun Dec 13, 2015 10:06 pm

Wolffarmer wrote:Something different. A true ballad from Idaho's recent history. I remember these events well.
Dallas in the Owyhees

Thats Claude Dallas.


Edit. Just found out that my oldest Sister lived next door to Jim Stevens ( the friend of Dallas who was at the shooting ) for about a year in the late 60's. If I knew that before it slipped my mind but that explains why they was so spooked when ever Dallas was on the loose. He also escaped from prison once.


Tony
User avatar
tony.latham
Gold Donating Member
 
Posts: 7073
Images: 17
Joined: Mon Jul 08, 2013 4:03 pm
Location: Middle of Idaho on the edge of nowhere
Top

PreviousNext

Return to Foamies

Who is online

Users browsing this forum: No registered users and 12 guests