The Poet Creek Express - Foamie Hybrid

Canvas covered foamies (Thrifty Alternatives...)

Moderator: eaglesdare

Re: The Poet Creek Express - Foamie Hybrid

Postby GPW » Tue Jan 12, 2016 6:47 pm

Hang in there KC !!! We’re not going anywhere ... yet ... :thumbsup:
There’s no place like Foam !
User avatar
GPW
Gold Donating Member
 
Posts: 14920
Images: 546
Joined: Thu Feb 09, 2006 7:58 pm
Location: New Orleans

Re: The Poet Creek Express - Foamie Hybrid

Postby KCStudly » Tue Jan 12, 2016 7:59 pm

Thanks GPW. When I go, you all will come with me, virtually. :D
KC
My Build: The Poet Creek Express Hybrid Foamie

Poet Creek Or Bust
Engineering the TLAR way - "That Looks About Right"
TnTTT ORIGINAL 200A LANTERN CLUB = "The 200A Gang"
Green Lantern Corpsmen
User avatar
KCStudly
Donating Member
 
Posts: 9640
Images: 8169
Joined: Mon Feb 06, 2012 10:18 pm
Location: Southeastern CT, USA

Re: The Poet Creek Express - Foamie Hybrid

Postby GPW » Wed Jan 13, 2016 7:59 am

And we will enjoy it !!! :thumbsup: 8) :applause: :beer:
There’s no place like Foam !
User avatar
GPW
Gold Donating Member
 
Posts: 14920
Images: 546
Joined: Thu Feb 09, 2006 7:58 pm
Location: New Orleans
Top

Re: The Poet Creek Express - Foamie Hybrid

Postby KCStudly » Sat Jan 16, 2016 12:38 am

It finally warmed up a bit today. I suppose I have been slack and could have found something other than epoxy work to do on the build over the last several cold days (Sunday thru Thursday), but I have also been on the fence about what to do with the lower edge of the floor.

So tonight I keeled the cabin over on the curb side, raising the street side, to take a closer look and see if I can make a decision.

The 1/8 thk box tubes on the sides of the trailer have a radius of 3/16 inch, while the 3/16 thk front xmbr has a radius of 1/4 inch. The locker bump out takes up most of the front wall and the rock guards will cover the rest, so whatever I do there isn’t really an appearance factor. From my work on the TB I know that I am much more comfortable wrapping zero bias cloth over a 1/4 inch radius than a 3/16 inch one (although Michael's suggestion to use a light mist of spray tack to hold the cloth snug might help).

The countersunk screws under the floor securing the walls ended up being far enough in from the edge that the bearing on the 3/16 round over bit wouldn’t fall into them by about half the width of the bearing. I decided that I could run that bit around and if I decided I didn’t like how it looked, I could either step up to the 1/4 inch bit or switch to the chamfer bit and commit to the flox edge.

It seems like a really small detail, but I really don’t like the idea of having a bigger radius on the cabin than there is on the trailer; a lopsided “butt crack”.

Anyway, I removed the draw latch to get it out of the way and ran the 3/16 inch bit, and then hand sanded the area where the router shoe wouldn’t let the bit get close to the locker. While contemplating I used the medium sized sanding block with 80 grit and roughed up the outside edge of the floor to take the TB2 glaze off.

The 3/16 radius just doesn’t look like it is enough for me to reliably get the cloth to wrap under, especially with the somewhat unknown factor of worker more or less overhead under the floor.

The flox corner option means that the strip that would go under would be applied as a separate operation. Not having the cloth draping down from above and having to stick it up from below sounds a bit harder. The only way I would try that is with the PMPP process and it still could be trickier than just wrapping the side cloth under as one big operation.

Tomorrow is supposed to stay warmer (mid 40’s), but rainy and wet. I think I will take the TB out to the trailer and do a mock up with the 1/4 inch radius against the side rails and see if I can’t get over my hang up on the butt crack appearance. Stepping up to the 1/4 inch round over and wrapping the side layup under in one operation seems like the easiest solution.
KC
My Build: The Poet Creek Express Hybrid Foamie

Poet Creek Or Bust
Engineering the TLAR way - "That Looks About Right"
TnTTT ORIGINAL 200A LANTERN CLUB = "The 200A Gang"
Green Lantern Corpsmen
User avatar
KCStudly
Donating Member
 
Posts: 9640
Images: 8169
Joined: Mon Feb 06, 2012 10:18 pm
Location: Southeastern CT, USA
Top

Re: The Poet Creek Express - Foamie Hybrid

Postby wagondude » Sat Jan 16, 2016 8:30 pm

Either way you decide to go, It would probably just be less work to wrap the corner first. Then if you don't like the way it looks, build the flox edge on top of the glass.
Bill

TnTTT ORIGIONAL 200A LANTERN CLUB
101137
User avatar
wagondude
1000 Club
1000 Club
 
Posts: 1535
Images: 35
Joined: Sun Jan 16, 2011 7:41 pm
Location: Land of the Jayhawks
Top

Re: The Poet Creek Express - Foamie Hybrid

Postby KCStudly » Sun Jan 17, 2016 12:19 am

Thanks Bill. My concern about that is I don’t want to clip too many bits and pieces off of the big roll of cloth before I get the larger pieces sorted out and make sure that I don't run myself short. I know I have enough to cover it all based on the width and length of cloth that I bought, but if I take from the end of the roll instead of along the selvage edge, I could short myself. Plus that would give me some long seams to have to fair. On the other hand, I do not look forward to wetting out overhead, so doing a strip along the bottom with PMPP and wrapping that up onto the side a bit does have a lot of appeal.

Rather than handling the cloth a bunch now to work that out, I suppose I could buy a yard and a half more cloth and pre-skin these areas. Either that or I wish I had a huge cutting table, or a nice clean, smooth floor to lay cloth out on. I suppose I could lay out some of the big plastic sheet I have left and work off of that to pre-cut the cloth.

Back shortly with today's update.
KC
My Build: The Poet Creek Express Hybrid Foamie

Poet Creek Or Bust
Engineering the TLAR way - "That Looks About Right"
TnTTT ORIGINAL 200A LANTERN CLUB = "The 200A Gang"
Green Lantern Corpsmen
User avatar
KCStudly
Donating Member
 
Posts: 9640
Images: 8169
Joined: Mon Feb 06, 2012 10:18 pm
Location: Southeastern CT, USA
Top

Re: The Poet Creek Express - Foamie Hybrid

Postby KCStudly » Sun Jan 17, 2016 12:31 am

It was hard at first to get going in the shop today. Despite the slightly warmer temps, it was overcast and damp today, so the loft temperature was slow to come up.

But once I got going things went well and I felt like I got a good deal done. I didn’t want to take the TB out in the rain to do that mockup with the trailer frame radius, so instead I just took a scrap of the cabinet face frame stock that also had the 1/4 inch radius on it. Sorry, didn’t think to bring the camera down. Anyway, the butt crack actually looked better with the 1/4 inch radius than it did with a sharper edge on the cabin. Maybe the promise of less work influenced my opinion, but I’m okay with that.

So I ran the 1/4 round over bit along the street side, and while it was still up in the air, used the medium block with the 80 grit belt to scrub up the underside within about 8 inches of the edge of the floor, and along the side and sill of the wall. There is some slight lack of fairness between the bottom of the wall and the top of the floor here and there that I hadn’t noticed before, so I might have to give that a smear of filler at some point. I had meant to pick up some 80 grit sheet sandpaper to use in the palm sander, but I forgot. Doing the full length of the floor, even just near the side edge was enough work and steamed up my glasses, so when I switched and jacked up the curb side I decided to use the palm sander with the 100 grit paper that I had on hand. Here’s a shot looking down the curb side from the rear. Just forward of the draw latch tab on the hatch you can see the 3/16 inch radius (I’ll increase this later when the cabin is down and I can lift the hatch out of the way). Ahead of that you can see the 1/4 inch radius running to the front. Also, up on the sill and side edge of the floor you can see the start of the scuffing work, but it needs more still.
Image

In this slightly different angle you can see how the underside is scuffed and the countersunk deck screw heads that need filling where they run up into the bottom of the wall.
Image

While I had the router setup I ran it around the bottom and side edges of the front locker bump out to increase those from the 1/8 inch radius I had done previously. The top side edges had to be done by hand because the router base wouldn’t fit there, as well as the front top edge due to the shed angle.
Image

Here you can see the front underside of the floor scuffed, the fresh radius on the underside of the locker bump out, and the pocket screw holes that need to be filled. Also, the rear edge of the locker is slightly lower than the floor, so that needs to be faired with some filler.
Image
Image

I cut a faux credit card to match the angle between the top of the locker and the front wall then rounded it over to a 1/4 inch radius. I also rounded one of the 90 deg corners of the card to 1/4 inch, as well. Once I had the thickened epoxy mixed and in the piping bag I filled the inside corners around the locker and used the card to form inside radius fillets.
Image
Image

Used the same batch to fill the pocket screw holes and fair the underside of the locker to the floor.
Image

Then filled all of the screw holes along the sides. (The larger unfilled hole you see a little further in from the edge is one of the bolt holes for attaching the cabin to the trailer.)
Image

Still had some thick left so I used it to touch up the flox corner on the curb side door frame and to fill the screw holes left from the temporary dam there.
Image

Still a little leftover, so I smeared it along the front edge of the hinge glass where the plastic peel ply had not performed as well as I would have liked.
Image

Tomorrow I’ll get some 80 grit for the palm sander and rough the floor up some more while I clean up the filler.

Seems like good progress to me.
KC
My Build: The Poet Creek Express Hybrid Foamie

Poet Creek Or Bust
Engineering the TLAR way - "That Looks About Right"
TnTTT ORIGINAL 200A LANTERN CLUB = "The 200A Gang"
Green Lantern Corpsmen
User avatar
KCStudly
Donating Member
 
Posts: 9640
Images: 8169
Joined: Mon Feb 06, 2012 10:18 pm
Location: Southeastern CT, USA
Top

Re: The Poet Creek Express - Foamie Hybrid

Postby GPW » Sun Jan 17, 2016 7:03 am

Looking Good , so many little bits to attend to ... :o
There’s no place like Foam !
User avatar
GPW
Gold Donating Member
 
Posts: 14920
Images: 546
Joined: Thu Feb 09, 2006 7:58 pm
Location: New Orleans
Top

Re: The Poet Creek Express - Foamie Hybrid

Postby KCStudly » Sun Jan 17, 2016 9:54 am

Yes, but we are getting there. After cleaning up this effort, finishing those little bits of radius at the rear I'll be pretty close to covering.

I'll probably also round over the bottom rear edge of the floor. I had never intended to skin the back edge of the floor. The plan had always been to just seal it well, so I will probably just wet that with neat epoxy and paint it. (Recall that I have already set the aluminum hard edge 'L' trim into the upper rear edge of the floor.)

I still might smear some filler along the wall sill to floor joint just to even that up some. Then there are some incidental dents and dings in the foam especially on the hatch, that will need a final prep.

The list is getting shorter?
KC
My Build: The Poet Creek Express Hybrid Foamie

Poet Creek Or Bust
Engineering the TLAR way - "That Looks About Right"
TnTTT ORIGINAL 200A LANTERN CLUB = "The 200A Gang"
Green Lantern Corpsmen
User avatar
KCStudly
Donating Member
 
Posts: 9640
Images: 8169
Joined: Mon Feb 06, 2012 10:18 pm
Location: Southeastern CT, USA
Top

Re: The Poet Creek Express - Foamie Hybrid

Postby KCStudly » Sun Jan 17, 2016 11:05 pm

Yesterday was about 5-1/2 hrs of work. Today was about 4 hrs; a little earlier in and a little earlier out.

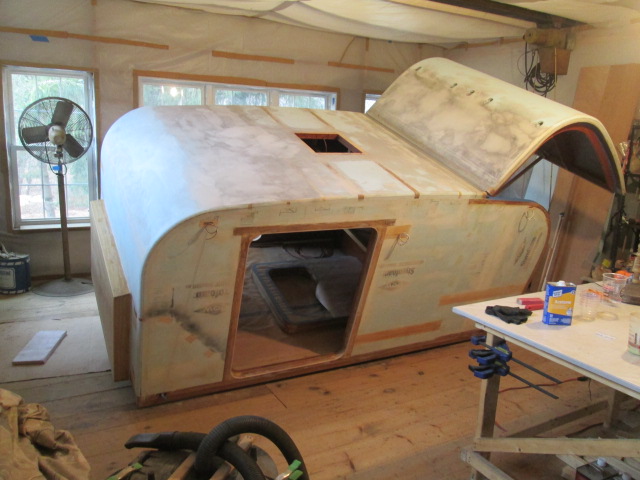
I remembered to take a couple of pictures of the mock up for the now infamous “butt crack”.
Image
Image

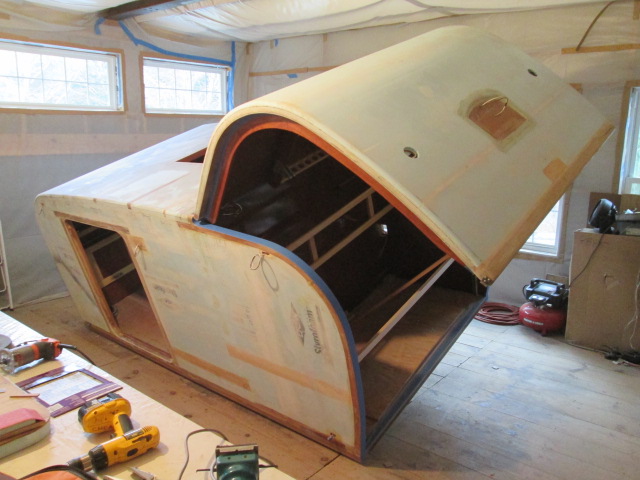
I hadn’t intended to keel the cabin over with the hatch propped up, but must have spaced out because it happened. Doesn’t seem to have caused any issues, so I worked on; but it did make for a couple of interesting shots. Spoiler up; hard bank to port.
Image
Image

That got me access to scrub amine from the street side roof at the cabin hinge glass; along the underside of the front and curb side; as well as the curb side door frame. Then 60 grit with the small hand block to knock the small high spots down; then 60 grit on the soft back of the palm sander along the side of the sill and floor edge, and the underside adjacent to the edge (to give it great tooth for the glass cloth wrap). Not much of the TB2 left in these areas and plenty of raw wood for the epoxy to grab.

The filler in the pocket screw holes under the front locker sucked up more than I would have liked, so I had to rough them… well, the half or so that I could reach comfortably from this side… out by hand with a small scrap of 36 grit so that I can top them off with another round of filler. Also, I had second thoughts about the filler I added between the back of the locker and the front of the floor. My concern was that this build up would act as a shim along the front xmbr of the trailer, but given that I plan to use some sort of welting or sealer, I don’t think there is much reason to knock it back all the way; though I did hit it with the 60 grit on the small hand block. (no pics)

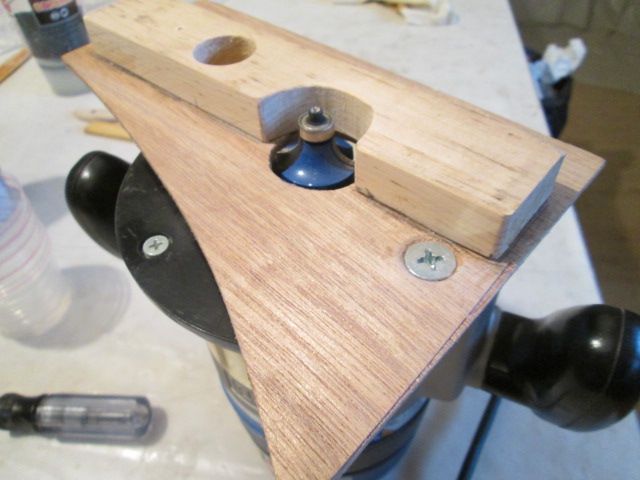
For the fillet around the locker bump out the straight 403 chop filler had some bramble and the shaped credit card squeegee didn’t work as consistently as I would have liked. My solution was to make a radius sanding block to let me block sand the fillets. Here you can see the block (with a strip of coarse grit red sandpaper already glued on the edge) located by a makeshift ‘L’ shaped dog clamp (a cabinet frame mock up test piece and small spacer) to keep the small chunk of 2x3 block from flying off or sliding under the router.
Image
Image

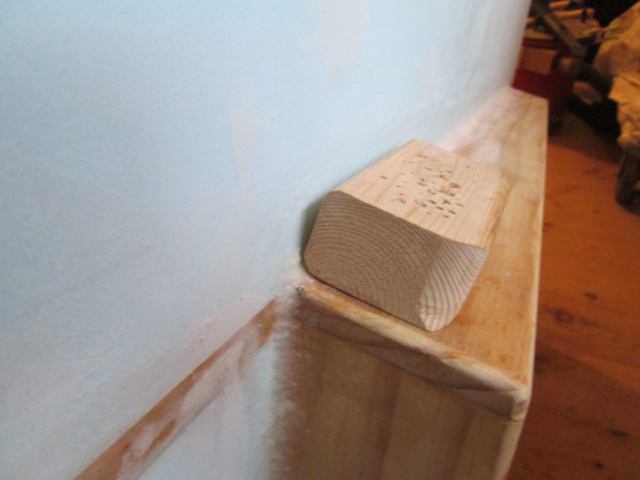
The sanding block worked very well to knock the high spots down and even up the fillet. On the top of the locker I ran it both ways, guiding off of the locker top for a few passes, then guiding off of the wall for a few. The hard crust of filler that spilled over onto the foam, though very thin from being squeegeed off, provided enough armor to keep the sanding block from damaging the foam.
Image

On the curb side of the locker, in the 90 deg corner, the block worked equally well. This shot, looking down from the top, is a bit skewed due to the cabin being tilted up on the street side.
Image

There were still a couple low spots that you might just be able to make out in this pic; so maybe a little pickup filler, or some of the 410 fairing compound will be needed here.
Image

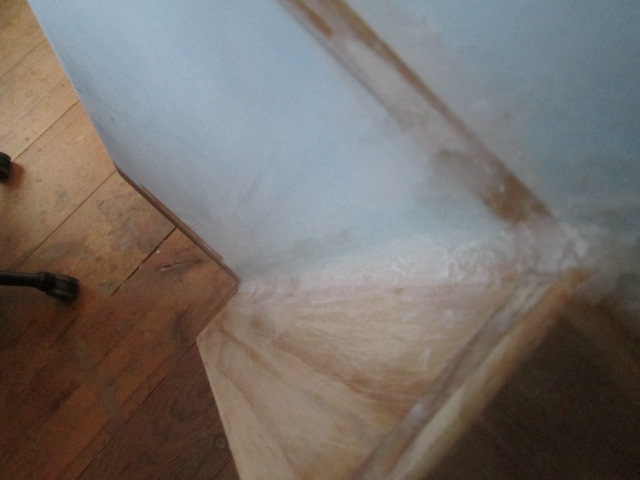
Here is the underside of the floor rear edge looking from the street side, mostly just a reminder for me of what I did. You can see that I rounded it over, but left about 1-1/2 inches unrounded (the width of the galley walls) near and far. I have an idea of how the seal rabbet will transition from the rear edges of the walls to the back edge of the floor and I thought it would be better to leave this for now until I’m sure how the rabbeting bit wants to be guided at this transition.
Image

Tomorrow I’ll keel the cabin back the other way and finish these operations on the areas that I didn’t get to today.

This evening we celebrated Karl’s B-day (early) by treating them to a nice dinner out at Olio. We shared the Shrimp and pork spring roll special ap (more like a wrapped and fried sausage, than a veggie filled thing); the hanger steak, mushroom, gorgonzola demi-glazed topped bruschetta ap; Yvette had a mixed green salad; I had the special arugula salad that came on top of a chicken parard (essentially a pounded chicken breast that had been breaded and sautéed… really more than an appetizer… I joked that I had been “over served”) with a caper/olive oil dressing and shaved parmesan. Chris and Karl both had the special grilled hanger steak over asparagus white wine risotto; while Yvette and I both had the grilled salmon served with an asparagus herb bread pudding (toasted like a muffin sized popover), a few asparagus spears, some haricot vert, a citrus crème sauce and topped with an arugula and red onion salad. For dessert Karl had the sea salted crème Brule; Chris had a triple chocolate ice cream cup; Yvette had a slab of 7 layer carrot cake; and I had banana and chocolate stuffed “ravioli” (more like stuffed beignets, or donut puffs) with a scoop of malted milk ball ice cream, and chocolate and caramel sauces drizzled on the plate. Suffice to say, it was all good, and we had leftovers.

(Burp.)
KC
My Build: The Poet Creek Express Hybrid Foamie

Poet Creek Or Bust
Engineering the TLAR way - "That Looks About Right"
TnTTT ORIGINAL 200A LANTERN CLUB = "The 200A Gang"
Green Lantern Corpsmen
User avatar
KCStudly
Donating Member
 
Posts: 9640
Images: 8169
Joined: Mon Feb 06, 2012 10:18 pm
Location: Southeastern CT, USA
Top

Re: The Poet Creek Express - Foamie Hybrid

Postby sincere01 » Mon Jan 18, 2016 7:26 pm

It's been so long since I've been able to be online. You've gotten a ton of work done. It's looking great!!!
Cheers,
Scott

My build thread: http://tnttt.com/viewtopic.php?f=50&t=63853
User avatar
sincere01
Teardrop Advisor
 
Posts: 64
Joined: Mon Jul 20, 2015 5:03 pm
Top

Re: The Poet Creek Express - Foamie Hybrid

Postby KCStudly » Mon Jan 18, 2016 8:04 pm

Thank you for that.

I mean it. :)

And here just when I was thinking that I have been slacking off a little more than usual, what with the cold weather setting in. Sub freezing again today, we had our first "real" little bit of snow last night, and I just couldn't put off waterproofing my new work boots any longer (they've been sitting in their box in the closet for a couple of months waiting for me to warm them up and spread the bee's wax based waterproofing treatment on them before I start wearing them). My "dogs were barking" today in my old boots, so I came straight home tonight and didn't even try to make it out to Mecca.

:oops:

... so your kind words mean a lot. Thanks.

p.s. I hate breaking in new boots. :roll:
KC
My Build: The Poet Creek Express Hybrid Foamie

Poet Creek Or Bust
Engineering the TLAR way - "That Looks About Right"
TnTTT ORIGINAL 200A LANTERN CLUB = "The 200A Gang"
Green Lantern Corpsmen
User avatar
KCStudly
Donating Member
 
Posts: 9640
Images: 8169
Joined: Mon Feb 06, 2012 10:18 pm
Location: Southeastern CT, USA
Top

Re: The Poet Creek Express - Foamie Hybrid

Postby linuxmanxxx » Mon Jan 18, 2016 9:14 pm

KCStudly wrote:Thank you for that.

I mean it. :)

p.s. I hate breaking in new boots. :roll:


The army had us shower in our new black leather combat boots and wear them the next day to dry and form to our feet and soften the leather. I'll never forget a bunch of naked men in boots in the shower and we were all strangers. Funny indeed lol. Head to the shower KC
User avatar
linuxmanxxx
500 Club
 
Posts: 802
Images: 10
Joined: Fri Sep 10, 2010 1:50 am
Location: Abilene TX
Top

Re: The Poet Creek Express - Foamie Hybrid

Postby Wolffarmer » Mon Jan 18, 2016 10:24 pm

Last backing trip I made was hurriedly set up and I did not have time to properly break in my new boots. I walked out of Yellowstone 14 miles on blistered feet. I was also solo. Stop every few miles and rest my feet and stick on more mole skin. When I got home a friend who normally backpacked with me came over as I was taking off my boots and mole skin. He got a great laugh at all the mole skin stuck to my feet. At least they did not have to send in a helicopter to fly me out.

Randy
"these guys must be afraid of the dark"
User avatar
Wolffarmer
Donating Member
 
Posts: 4612
Images: 309
Joined: Wed May 02, 2007 1:32 pm
Location: Idaho Rupert
Top

Re: The Poet Creek Express - Foamie Hybrid

Postby Mary C » Tue Jan 19, 2016 12:20 am

KC , I am appreciative of all your hard work and I do know you are making progress....and doing it fantastically

Your dinner sounds great please pass on Happy Birthday wishes to Karl from all of us. :D

I think all of us should get together and meet up at Poet Creek when you finally get the Express on the Road. if not then make a trip to see you!!

Mary C.
User avatar
Mary C
1000 Club
1000 Club
 
Posts: 1776
Images: 473
Joined: Mon Oct 15, 2012 6:29 pm
Location: Waco, Georgia
Top

PreviousNext

Return to Foamies

Who is online

Users browsing this forum: No registered users and 16 guests

cron