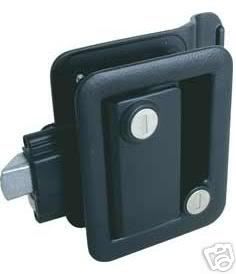
Door Latches

Anything to do with mechanical, construction etc

Door Latches

Postby Bandit » Mon Jun 12, 2006 11:02 am

I purchased a set of flush mounted latches on Ebay and it seems they are going to be difficult to install.

Image

Does anyone have experience in installing the about latches.
If not, how simple are the Lil Bear Latches to install?
Does anyone have photo's and instructions?
Thanks for any help!

:thinking: :thinking:
First Metal Cut 02/11/06
Complete! (Almost) 08/22/06
Looking for a trip in the SPRING!!!!
Not Up to Testing the Heater!!!
Thanks for all the HELP!!!!
User avatar
Bandit
Donating Member
 
Posts: 207
Joined: Tue Dec 06, 2005 12:25 pm
Location: McMinnville, TN

Postby madjack » Mon Jun 12, 2006 11:07 am

...those are very similar to the ones we used...figure your placement and install, the only problem will be(probably) the striker...you will probably haveta make your own...a piece of Al angle can be used for this...........
madjack 8)
...I have come to believe that, conflict resolution, through violence, is never acceptable.....................mj
User avatar
madjack
Site Admin
 
Posts: 15128
Images: 177
Joined: Thu Dec 02, 2004 5:27 pm
Location: Central Louisiana

Postby Bandit » Mon Jun 12, 2006 11:11 am

MadJack,
How did you frame this into the door? It seems that you have to cut out a section of the door to flush mount the outer portion of the latch?
Do you have some closeup photos of the latch and how it is installed?
Thanks!
First Metal Cut 02/11/06
Complete! (Almost) 08/22/06
Looking for a trip in the SPRING!!!!
Not Up to Testing the Heater!!!
Thanks for all the HELP!!!!
User avatar
Bandit
Donating Member
 
Posts: 207
Joined: Tue Dec 06, 2005 12:25 pm
Location: McMinnville, TN
Top

Postby madjack » Mon Jun 12, 2006 12:26 pm

...hard to tell from the pics but...it looks like it is meant for a 3/4" door (as was ours)...you cut a hole the size and shape of the inner portion of the latch and then it clamps onto the door...the outer ring sits on top of the door material...it is not completely "flush"...I have a number of pics of the latch in my WWW album but nothing specific to installation
madjack 8)
p.s. there are additional pics here
...I have come to believe that, conflict resolution, through violence, is never acceptable.....................mj
User avatar
madjack
Site Admin
 
Posts: 15128
Images: 177
Joined: Thu Dec 02, 2004 5:27 pm
Location: Central Louisiana
Top

Postby Bandit » Mon Jun 12, 2006 9:59 pm

MadJack,
I wish it was that simple. The only part of the latch that is surface mount is the inside portion. The outside portion will have some pretty intricate router work to make it fit. I'll post some more detail pictures of the latch tomorrow.
:thinking: :thinking:
First Metal Cut 02/11/06
Complete! (Almost) 08/22/06
Looking for a trip in the SPRING!!!!
Not Up to Testing the Heater!!!
Thanks for all the HELP!!!!
User avatar
Bandit
Donating Member
 
Posts: 207
Joined: Tue Dec 06, 2005 12:25 pm
Location: McMinnville, TN
Top

Postby Chris C » Tue Jun 13, 2006 6:18 am

Madjack,

Those are the same entry latches I bought. They are for door thickness' of 1 1/4" to 1 1/2".

Bandit, I worked for 3 hours yesterday to try and figure out how to mortise out a mockup to accept those. Believe me, I understand what a bugger-bear it is! I'm going to an RV store today to see if they'll let me take one off a used trailer to see how it's mortised. The drawing available on the site where I bought mine gives mortise dimensions, but they are way too small. :roll: I'll let you know what I find out, if your interested.
Chris :D

The tension between what is good enough and what is beyond that creates the space for character to become our work.

Teardrop Trailer Build Pictures: http://tinyurl.com/px5cd
Chris C
.
 
Posts: 3302
Joined: Sun May 15, 2005 7:24 pm
Location: Norman, Oklahoma
Top

Postby Bandit » Tue Jun 13, 2006 3:46 pm

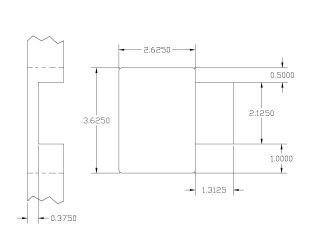
I've come up with the following mortise drawing to install this latch.
The left diagram is the end view with the left side being the outside of the door. The right diagram shows the full mortise to install the main body of the latch and the right portion is the partial mortise to seat the bolt.

What do you think?

Image

:thinking:
:thumbsup:
First Metal Cut 02/11/06
Complete! (Almost) 08/22/06
Looking for a trip in the SPRING!!!!
Not Up to Testing the Heater!!!
Thanks for all the HELP!!!!
User avatar
Bandit
Donating Member
 
Posts: 207
Joined: Tue Dec 06, 2005 12:25 pm
Location: McMinnville, TN
Top

Postby Chris C » Tue Jun 13, 2006 4:00 pm

Bandit,

I'm not positive, but I think it will go into that mortise if you (as I think you've shown) you are completely exposed on the inside of the door. But if you are mortising the latching portion like a residence door, it's too small. (even the manufacturer's drawing says 2.750" x 3.750", and that's too small!!!) I've got a call into the manufacturer and their "tech" man is going to call me tomorrow. I'll let you know what we work out.
Chris :D

The tension between what is good enough and what is beyond that creates the space for character to become our work.

Teardrop Trailer Build Pictures: http://tinyurl.com/px5cd
Chris C
.
 
Posts: 3302
Joined: Sun May 15, 2005 7:24 pm
Location: Norman, Oklahoma
Top

Postby Ken A Hood » Tue Jun 13, 2006 4:03 pm

I picked these ones up, since it like a standard door set.

Image
Disclaimer: I in no way resemble the avatar shown. Furthermore, I in no way have any affiliation to the Trailer Park Boys and more specifically Bubbles!
User avatar
Ken A Hood
500 Club
 
Posts: 841
Images: 42
Joined: Sun Apr 18, 2004 8:15 pm
Location: ON CANADA
Top

Postby Bandit » Tue Jun 13, 2006 4:10 pm

Chris C.
It is completely opened to the inside, so I can make the dimensions a little tighter. I'm allowing 1/8" oversize for the opening and the inside of the latch serves as a cover plate for the complete opening.
www.fastecindustrial.com is sending me their cutout diagram as we speak. I hope to have it before I leave today.
:thumbsup: :thumbsup:
First Metal Cut 02/11/06
Complete! (Almost) 08/22/06
Looking for a trip in the SPRING!!!!
Not Up to Testing the Heater!!!
Thanks for all the HELP!!!!
User avatar
Bandit
Donating Member
 
Posts: 207
Joined: Tue Dec 06, 2005 12:25 pm
Location: McMinnville, TN
Top

Postby Chris C » Tue Jun 13, 2006 4:28 pm

Bandit,

I have the drawing and it is the same dimensions I gave you previously. They don't work! That's why I've been in touch with them and I'll be talking with the tech man tomorrow. My doors will be 1 1/4" thick, so I don't want the latch mortise to be open on the inside of the trailer.
Chris :D

The tension between what is good enough and what is beyond that creates the space for character to become our work.

Teardrop Trailer Build Pictures: http://tinyurl.com/px5cd
Chris C
.
 
Posts: 3302
Joined: Sun May 15, 2005 7:24 pm
Location: Norman, Oklahoma
Top

Postby Woodbutcher » Tue Jun 13, 2006 9:59 pm

Ken A Hood wrote:I picked these ones up, since it like a standard door set.

Image


Do you have a link to where you bought that lockset. I like the looks of it. Thanks, Steve
User avatar
Woodbutcher
Platinum Donating Member
 
Posts: 4189
Images: 45
Joined: Fri Mar 10, 2006 10:01 pm
Location: Chicago Suburbs
Top

Postby Bandit » Tue Jun 13, 2006 10:09 pm

Chris C.
I just completed mounting the first latch. I used the dimensions that I show on my drawing. As I do not have the inner skin on my door, the mortise is just deep enough for the inside of the latch to be flush and the inner skin will cover the mortise.
The key to get the latch into the tight dimensions that I discribed is to step the mortise for the bolt, deeper toward the latch, and then remove the silver backing plate and the pin for the dead bolt and it slips right in.
I just completed it so I will disassemble it tomorrow to put on my inner skin and mortise out the door frame for the striker plate and I will get some pictures.
It looks real nice and has a good finished look to it.
:thumbsup: :applause: :thumbsup: :applause: :thumbsup:
First Metal Cut 02/11/06
Complete! (Almost) 08/22/06
Looking for a trip in the SPRING!!!!
Not Up to Testing the Heater!!!
Thanks for all the HELP!!!!
User avatar
Bandit
Donating Member
 
Posts: 207
Joined: Tue Dec 06, 2005 12:25 pm
Location: McMinnville, TN
Top

Postby Chris C » Wed Jun 14, 2006 8:38 am

Great! You are correct that it'll fit without the inner 1/4" wall thickness. Glad it worked for you. :applause:
Chris :D

The tension between what is good enough and what is beyond that creates the space for character to become our work.

Teardrop Trailer Build Pictures: http://tinyurl.com/px5cd
Chris C
.
 
Posts: 3302
Joined: Sun May 15, 2005 7:24 pm
Location: Norman, Oklahoma
Top

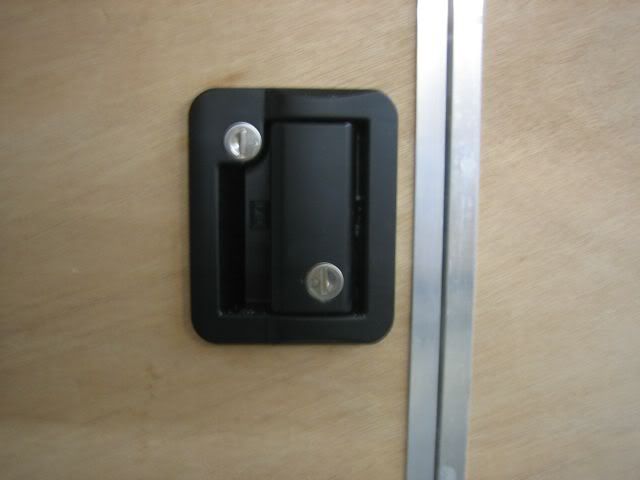
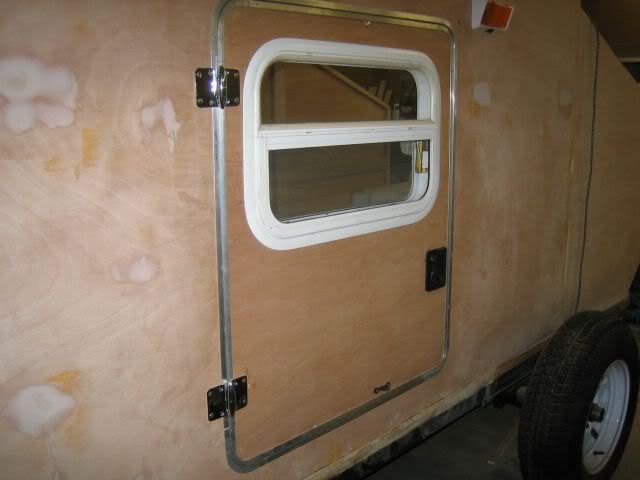
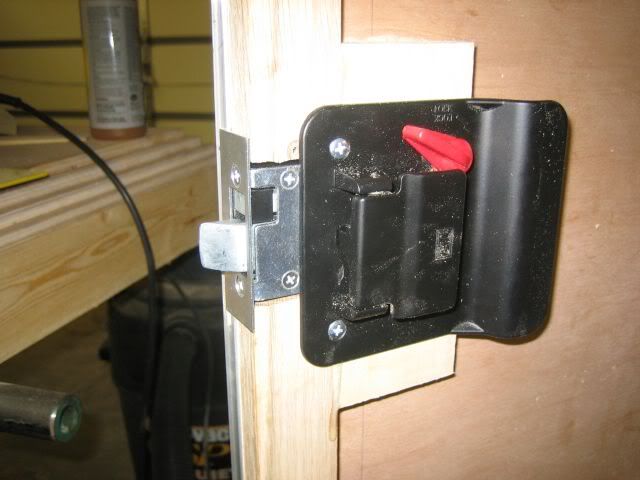
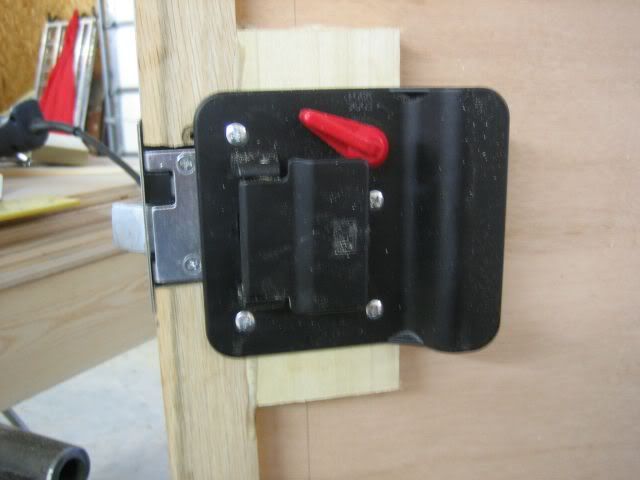
Postby Bandit » Wed Jun 14, 2006 12:06 pm

Here are some photos of the latch installed:

Image

Image

Image

Image

I seem to work in halves. I just about got the road side of the Weekender complete, so now I have to reverse and replicate everything for the curb side.

The front storage/AC location, Fantastic Fan and Galley are not left and right so I guess I can start front to back!
:thinking: :thumbsup:
First Metal Cut 02/11/06
Complete! (Almost) 08/22/06
Looking for a trip in the SPRING!!!!
Not Up to Testing the Heater!!!
Thanks for all the HELP!!!!
User avatar
Bandit
Donating Member
 
Posts: 207
Joined: Tue Dec 06, 2005 12:25 pm
Location: McMinnville, TN
Top

Next

Return to Teardrop Construction Tips & Techniques

Who is online

Users browsing this forum: No registered users and 9 guests