Looking good mate i to have been keeping up with it and youd have to be pretty happy with how the fg is turning out.
I saw on the news this morning actualy about the record high temps youve been getting.
Keep up the good work
The Poet Creek Express - Foamie Hybrid
Moderator: eaglesdare
Re: The Poet Creek Express - Foamie Hybrid
![]() by dales133 » Thu Mar 10, 2016 3:10 pm
by dales133 » Thu Mar 10, 2016 3:10 pm
-

dales133 - 4000 Club

- Posts: 4605
- Images: 1
- Joined: Mon Oct 13, 2014 5:26 pm
Re: The Poet Creek Express - Foamie Hybrid
![]() by KCStudly » Thu Mar 10, 2016 3:44 pm
by KCStudly » Thu Mar 10, 2016 3:44 pm
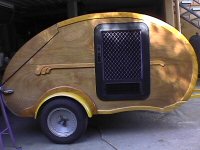
Thanks Dale.  Yeah I am happy about how the glass is coming. It's probably not for everyone, but if I can do it as well as it would appear things are going, with minimal prior experience, then perhaps it might help others decide if it is something they might want to consider. Not an easy choice for a novice.
I had a pretty strenuous day at work today and was just teetering on whether to bail out tonight... plus there is rain coming... , but with your encouragement I think I'll go push on. Stay tuned later this evening for an update on glassing the street side door header that I laid up last night, and perhaps more.
Yeah I am happy about how the glass is coming. It's probably not for everyone, but if I can do it as well as it would appear things are going, with minimal prior experience, then perhaps it might help others decide if it is something they might want to consider. Not an easy choice for a novice.I had a pretty strenuous day at work today and was just teetering on whether to bail out tonight... plus there is rain coming... , but with your encouragement I think I'll go push on. Stay tuned later this evening for an update on glassing the street side door header that I laid up last night, and perhaps more.
KC
My Build: The Poet Creek Express Hybrid Foamie
Poet Creek Or Bust
Engineering the TLAR way - "That Looks About Right"
TnTTT ORIGINAL 200A LANTERN CLUB = "The 200A Gang"
Green Lantern Corpsmen
My Build: The Poet Creek Express Hybrid Foamie
Poet Creek Or Bust
Engineering the TLAR way - "That Looks About Right"
TnTTT ORIGINAL 200A LANTERN CLUB = "The 200A Gang"
Green Lantern Corpsmen
-

KCStudly - Donating Member
- Posts: 9640
- Images: 8169
- Joined: Mon Feb 06, 2012 10:18 pm
- Location: Southeastern CT, USA


 and best don’t tell him about the paint process ...
  You going to shoot a “filler” ?


 And why not ??? Deserves a Cool paint job ... It really does !!!
  Ever since you said you weren’t in a rush , we’re OK with that ...


