Teardrops n Tiny Travel Trailersor t n ttt for short (tnttt.com) |
#1
Moderator: eaglesdare
Re: #1
![]() by ghcoe » Fri Oct 09, 2015 10:24 pm
by ghcoe » Fri Oct 09, 2015 10:24 pm
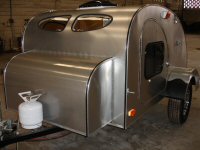
Thanks Mary.
George.
Gorrilla Glue, Great Stuff and Gripper. The three G's of foamie construction.
My build viewtopic.php?t=54099
Working with flashing for foamie construction viewtopic.php?f=55&t=60303
Making a hot wire http://tnttt.com/viewtopic.php?f=55&t=55323
Gorrilla Glue, Great Stuff and Gripper. The three G's of foamie construction.
My build viewtopic.php?t=54099
Working with flashing for foamie construction viewtopic.php?f=55&t=60303
Making a hot wire http://tnttt.com/viewtopic.php?f=55&t=55323
-

ghcoe - 1000 Club

- Posts: 1982
- Joined: Fri Dec 11, 2009 11:20 pm
- Location: SW Idaho
Re: #1
![]() by tpstorey » Sat Oct 17, 2015 7:10 pm
by tpstorey » Sat Oct 17, 2015 7:10 pm
George, fantastic work. This will be my goto build when I start mine.
How do you get the seam flaps to lay down so nicely? It seems you have let the glue dry so isn't it stiff and hard to form as needed as you fold it down...especially on curves?
How do you get the seam flaps to lay down so nicely? It seems you have let the glue dry so isn't it stiff and hard to form as needed as you fold it down...especially on curves?
********
TP (Tim)
TP (Tim)
-

tpstorey - Teardrop Inspector
- Posts: 23
- Images: 2
- Joined: Tue Sep 29, 2015 4:36 am
- Location: Saint Louis, MO
 (root beer)


