Maiden VoyageLast weekend we got the trailer frame registered and lighted up (sort of), the car's electrical done (by pros--I'm willing to futz with the electricity in a funny little homemade rolling box of my own devising, but when it comes to cutting wires in my car--someone else can do that, thanks) and took it on its maiden drive. My wee little Insight pulled the (mostly empty) trailer like a champ.
Trailer Lights - WTH?Today we devoted to chasing down the trailer light problem. The problem was: the tail lights didn't work, and when I used the brake lights, the radio display in my car went dark.
We undid and redid all the wires including the ground, switched which wires connected to which, but couldn't figure it out. Finally, we decided that the light kit that came with the trailer must have been defective (um... sure--that's the ticket) and bought a new LED light kit and started over. That one gave us trouble too (how is this possible??? It's 4 stinking wires, for crying out loud, and they're color coded! A chimpanzee could figure this out), so we finally decided that instead of connecting the light fixture grounds to the mounting bolts as per the instructions, we would drill an extra little hole into the trailer and screw the ground in there.
God knows why, but this worked. Huzzah! Plus, the new lights are sexier than the old lights, and they're submersible. You know--for if we decide to make the Little Ferdie into the world's first amphibious teardrop houseboat.
I still don't get why this was hard, let alone why it was hard
twice, but everything works beautifully now, so I'm focusing on that.
Gratefully, I turned my attention away from the mysteries of electricity and back to wood for the rest of the day.
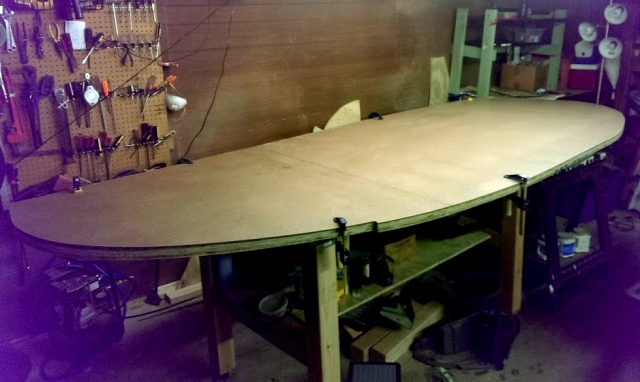
2 Walls & a TemplateI used a top-bearing trim bit on my router to copy my first wall onto the new plywood, and the lovely bit ate plywood like Pacman eats those little white pellets. Actually, faster. It's a half-inch bit, which I thought was too big but was all my small-town hardware store had. But it worked a treat. Rough cutting with a jigsaw was a misery (OMG, my jigsaw is slow! Are they all like this?) but the router was like a racehorse--a real pleasure.
Then I plopped the masonite on top of the whole thing and used a bottom-bearing trim bit to create the template, which I'll use when I need to cut out interior walls and the hatch.
Interestingly, I had a smaller ~3/8" bottom-bearing bit, so I used it instead of the a bigger size since...I don't know...why not? But it kept trying to invent fire. The wood didn't feel particularly hot, but the bit was smoking (a lot) and had char marks on it. I also have a 1/2" bottom-bearing bit, so I swapped them out and again, the router went to town. No smoke, no charring, just zipping cleanly along a beautiful curve.
The moral of the story--use a big honking flush trim bit if you can. I'm not sure what the little ones are for, but they have pyromaniac tendencies.
Polished everything up with my good old orbital sander, so I now have 2 exterior walls and a template. W00t! We're getting closer to an actual box!
Next week = the floor. I'll be taking my newly even-more-legal trailer into Austin to visit the specialty lumber places for supplies. My wallet winces in anticipation.