Grumman 2 on Harbor Freight 4x8' Folding Utility Trailer

This is the place where you can introduce yourself, and include a photo if so desired.

Grumman 2 on Harbor Freight 4x8' Folding Utility Trailer

Postby Lemon Drop » Thu Apr 07, 2016 10:17 am

I started this build two weeks ago (bought the trailer kit at Harbor Freight two weeks ago) and have gotten through the majority of my exterior build. I thought I would share with this group and fish for comments/suggestions from our members. ALL comments welcome! I am in Maryland near Rockville. I am going to pull this trailer behind my 1992 Jeep Wrangler YJ. It has a 4 cylinder engine and a maximum 2,000# tow weight.

My goal is to keep the trailer build under 1,000# and the cost under $1,000. I have very little experience welding, and I would say "Intermediate" skills in woodworking. But can follow a plan!

It took most of 8 hours to fully assemble the trailer from the kit. Here is a shot of the rear of my Jeep and the assembled trailer.
JUST A NOTE about the Harbor Freight Trailer: Where the acquisition price was under $250, I found I also had to by a folding jack that attaches to the hitch area ($40), longer safety chains ($12), apply for a title (in MD it is a flat $100 fee) and get temp tags and pay sales tax ($56), then get it inspected ($40) and then get permanent tags ($51). Added roughly $300 to my $239 trailer kit. Grand total is $540. Now I question the wisdom of NOT buying the used Craig's list trailer for $350....

http://s49.photobucket.com/user/James_J ... sort=3&o=2

Nice part about assembling the trailer in advance is that I used it to haul most of the flat sheet materials I was going to need

http://s49.photobucket.com/user/James_J ... sort=3&o=4

I cut out the left and right sides at the same time using a Jigsaw

http://s49.photobucket.com/user/James_J ... ort=3&o=16

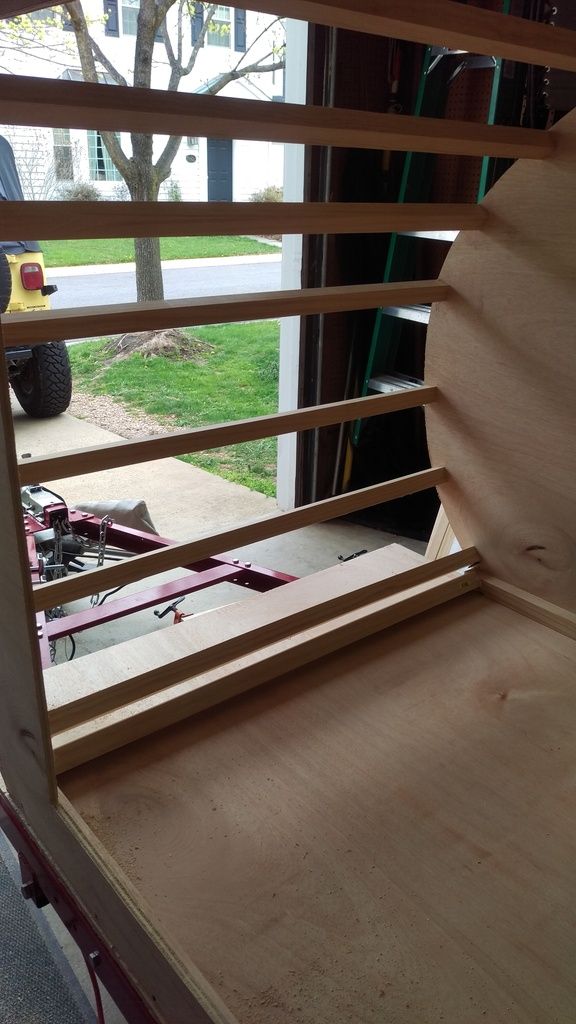
Next step is to assemble the sides on the plywood bed and install the spars for structural support and to hold the headliner interior and the Styrofoam insulation and for a secure mounting base for the exterior nose wrap

http://s49.photobucket.com/user/James_J ... ort=3&o=32

Now the insulation in the nose, cut the door rough opening in the driver side, and install the headliner into the interior of the nose and the ceiling.

http://s49.photobucket.com/user/James_J ... ort=3&o=26

http://s49.photobucket.com/user/James_J ... ort=3&o=28

http://s49.photobucket.com/user/James_J ... ort=3&o=33

http://s49.photobucket.com/user/James_J ... ort=3&o=24

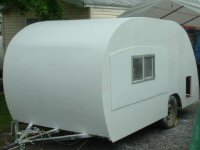
What really shows progress is the addition of the 5mm Luan Mahogany plywood with that beautiful, rich grain as the nose and partial top exterior wrap.

http://s49.photobucket.com/user/James_J ... ort=3&o=25

http://s49.photobucket.com/user/James_J ... ort=3&o=16

This weekend I am laying out the rear galley, the interior side wall supports with passages for both 110v and 12v wiring, and the rough opening for the passenger side 20x30 window. I will keep posting!

Again, I am looking for as many comments and suggestions as I can have to help me in my build! Thanks in advance!
Lemon Drop
Teardrop Inspector
 
Posts: 6
Joined: Sun Apr 03, 2016 5:15 am

Re: Grumman 2 on Harbor Freight 4x8' Folding Utility Trailer

Postby Graniterich » Thu Apr 07, 2016 10:31 pm

Pictures aren't showing for me. Would like to see
User avatar
Graniterich
Donating Member
 
Posts: 508
Joined: Tue Sep 16, 2014 3:39 pm

Re: Grumman 2 on Harbor Freight 4x8' Folding Utility Trailer

Postby AZ_Desert_Rat » Fri Apr 08, 2016 12:44 pm

Hi Lemon Drop,
I can see most of the pics, but my computer is older and Photo Bucket loads very slow for me. In reviewing though, it looks like your off and running ... Good luck and keep us posted... :applause: :applause: :thumbsup: :thumbsup:
Happy Camping & Building,
John (JC)


Image

Image
The Arizona Desert Rat 6x10' Cargo Conversion

Image
The FunFinder a 19' Toy Hauler

An AZ Desert Transplant
Gallery: gallery/album.php?album_id=3168
User avatar
AZ_Desert_Rat
500 Club
 
Posts: 553
Images: 55
Joined: Sun May 12, 2013 12:17 pm
Location: Zimmerman, Minnesota
Top

Re: Grumman 2 on Harbor Freight 4x8' Folding Utility Trailer

Postby daveesl77 » Fri Apr 08, 2016 4:39 pm

First, nice looking design and build!
I assume that in looking at the photo show, the image that shows the cabin sitting back from the front of the floor, is just done to get the exterior ply to form and you'll then move the cabin forward to cover the floor. Is that correct?

Keep up the great work, it's something you can be proud of!

dave
*******
Dave and Regina - Enjoying old age, a LOT!

Build Journal - http://www.tnttt.com/viewtopic.php?f=50&t=62386
User avatar
daveesl77
Donating Member
 
Posts: 871
Images: 273
Joined: Tue Jan 27, 2015 4:33 pm
Location: Pocahontas County, West Virginia
Top

Re: Grumman 2 on Harbor Freight 4x8' Folding Utility Trailer

Postby Lemon Drop » Sat Apr 09, 2016 12:13 pm

Actually, that is where the cabin does sit. About 10" back from the base piece. That area is to be used for my battery and other items.
Lemon Drop
Teardrop Inspector
 
Posts: 6
Joined: Sun Apr 03, 2016 5:15 am
Top

Re: Grumman 2 on Harbor Freight 4x8' Folding Utility Trailer

Postby Lemon Drop » Sat Apr 09, 2016 12:14 pm

Graniterich wrote:Pictures aren't showing for me. Would like to see


Im not sure why you cannot see them. Sorry! Others seem to be able to view them
Lemon Drop
Teardrop Inspector
 
Posts: 6
Joined: Sun Apr 03, 2016 5:15 am
Top

Re: Grumman 2 on Harbor Freight 4x8' Folding Utility Trailer

Postby Lemon Drop » Sat Apr 09, 2016 12:16 pm

AZ_Desert_Rat wrote:Hi Lemon Drop,
I can see most of the pics, but my computer is older and Photo Bucket loads very slow for me. In reviewing though, it looks like your off and running ... Good luck and keep us posted... :applause: :applause: :thumbsup: :thumbsup:


Thanks. Finishing the interior framing this weekend, then a good start on the wiring. Bought a 25amp/110v/12v panel this weekend and am routing wires now.
Lemon Drop
Teardrop Inspector
 
Posts: 6
Joined: Sun Apr 03, 2016 5:15 am
Top

Re: Grumman 2 on Harbor Freight 4x8' Folding Utility Trailer

Postby Lemon Drop » Sat Apr 09, 2016 12:16 pm

Graniterich wrote:Pictures aren't showing for me. Would like to see


Did you click on the links?
Lemon Drop
Teardrop Inspector
 
Posts: 6
Joined: Sun Apr 03, 2016 5:15 am
Top

Re: Grumman 2 on Harbor Freight 4x8' Folding Utility Trailer

Postby Lemon Drop » Sat Apr 09, 2016 12:24 pm

Insulated the floor and am ready to put the final floor surface down.

http://s49.photobucket.com/user/James_J ... sort=3&o=0

Interior framing. Ready for side wall Styrofoam panels and wiring for the 12V LED reading lights, cabin lights and the rear storage lights.

http://s49.photobucket.com/user/James_J ... sort=3&o=1

I bought a 110V/12V converter panel and will be running both 12V wiring for the interior lights, and 110V wiring for 1 power receptacle in the interior aft cabinets, as well as 110V in the galley for electric cooler, blender, electric heater, and small microwave.... The panel added $155 to my costs, and the 30 amp connection cord (25') is another $88 and the 30amp to 110V standard adapter is another $15. The power service exterior hatch was $10. The 25' line will store under the floor and can be withdrawn as needed through the hatch. Pics to come after installation.
Lemon Drop
Teardrop Inspector
 
Posts: 6
Joined: Sun Apr 03, 2016 5:15 am
Top

Re: Grumman 2 on Harbor Freight 4x8' Folding Utility Trailer

Postby Brushy_Bill » Mon Apr 11, 2016 9:43 am

Looks great! I was wondering if you knew you can insert your photos
to your post just as easy as inserting the photobucket links.

Use the Img button instead of the URL button at the top of the text box.
Image

Instead of the URL you have been using, copy the "Direct Link" from the photo you
want to show.
Image

When you click the Img button, this text will appear in your text box.
Image

Simply paste the "Direct LInk" you copied between the brackets. (your cursor will automatically be there)
I just use Ctrl V to paste.

You can use the Preview button at the bottom to check your progress.

Here is how it looks when doing this.

Image

I am looking forward to seeing more of your build. Thanks for taking the time to share it with us.
User avatar
Brushy_Bill
Teardrop Advisor
 
Posts: 55
Joined: Tue Jul 21, 2015 3:14 pm
Top


Return to Newbies, Introduce yourselves

Who is online

Users browsing this forum: No registered users and 1 guest