Teardrops n Tiny Travel Trailersor t n ttt for short (tnttt.com) |
Tucson tortoise: Edit for photos
Re: Tucson tortoise
![]() by lfhoward » Sat May 28, 2016 9:26 pm
by lfhoward » Sat May 28, 2016 9:26 pm
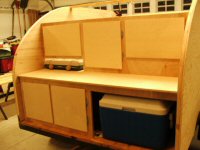
The wood working and the attention to detail in this trailer are amazing. It is a functional piece of art. Very very nice!
My off-road camper build on an M116A3 military chassis:
http://www.tnttt.com/viewtopic.php?f=50&t=62581
Tow vehicle: 2008 Jeep Liberty with a 4 inch lift.
http://www.tnttt.com/viewtopic.php?f=50&t=62581
Tow vehicle: 2008 Jeep Liberty with a 4 inch lift.
-

lfhoward - 1000 Club

- Posts: 1370
- Joined: Wed Jan 22, 2014 6:10 pm
- Location: Philadelphia, PA
Re: Tucson tortoise
![]() by noseoil » Sun May 29, 2016 5:40 pm
by noseoil » Sun May 29, 2016 5:40 pm
OK, making progress on the A/C installation. Here's what we have so far. A view from outside looking at the panel. Rivets from the front side which go into the backing pieces.
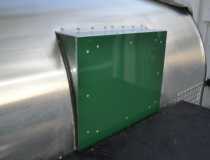
Here's a partial insert shot. Still some more stuff to go inside the box to locate the A/C unit in it.

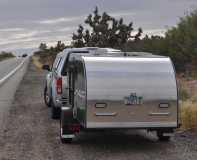
Set the unit in place & turned it on. Temp went from 86 inside this morning, down to 64 in about 20 minutes, so it's getting plenty of air flow on the back end. More to follow tomorrow.
Here's a partial insert shot. Still some more stuff to go inside the box to locate the A/C unit in it.
Set the unit in place & turned it on. Temp went from 86 inside this morning, down to 64 in about 20 minutes, so it's getting plenty of air flow on the back end. More to follow tomorrow.
Last edited by noseoil on Sat Nov 16, 2019 9:14 am, edited 1 time in total.
Build log: viewtopic.php?f=50&t=60248
The time you spend planning is more important than the time you spend building.........
The time you spend planning is more important than the time you spend building.........
-

noseoil - 1000 Club
- Posts: 1822
- Images: 670
- Joined: Sun Apr 27, 2014 8:46 am
- Location: Raton, New Mexico, living the good life!


 , but good that you had a nice thorough test session.